Tuesday, July 31, 2018

Tu-Na Quilts: Hive 4 Tutorial for August

My name is Karen but I'm also known as Tu-Na or Tu-Na Quilts. I started my blog, Tu-Na Quilts, Travels, and Eats, to journal what I do and make and see. I'm often asked about my name. If you're curious you'll just have to click here to read my first post to find out how I came to be known by that and who started it. You can read more about me here and here. If you're liking what you're reading and would like to become part of my family of readers, please subscribe using one of the three ways: Wordpress, Bloglovin, or email, found in my sidebar on my blog.

I'm busily preparing for a couple of trips so I'll be writing this and setting it to schedule. Hopefully, all will go well and it will publish when it's supposed to.

Help!! Last year I was part of a different bee and had requested the Wanta Fanta block. However, I only received blocks from three other members. So I decided I needed to ask for them this year from my Stash Bee Hive members but I also decided to simplify it so you could finish it within the time limits.


This block consists of two snowball units and two X units. I thought I'd simplify this block and ask that you just make the units and not sew the units together as pictured above. Just trim each unit and mail. That will require less of your time and allow me to scatter your units around to create that really scrappy look. I also have alternative ideas listed towards the end of this post for those of you who would rather not do paper piecing and those with limited orange fabrics.

Pattern Location: The free Wanta Fanta pattern can be found here on Blossom Heart Quilts and more info about it here.
Colors needed:

Background: Please use either a solid white or white on white for the background.
Fabrics A, B, C, and D should all be a different orange fabric—any shade or tone except for peach.  I am going for a very scrappy orange look so anything goes such as solids and prints and batiks as long as orange is the main color. 

To make the snowball units and bonus Half Square Triangles:
Cut two 6.5" squares from solid white or white on white.

Cut eight 2.5" squares from orange fabric as listed above.
Directions:

Draw a diagonal line on the back of each of the orange squares and another one 1/2" away. Place each orange square with RST on the corners of each white square.


Sew just a hair's width on the outside of the line towards the corner. 
Trim seam by cutting between the two stitching lines.


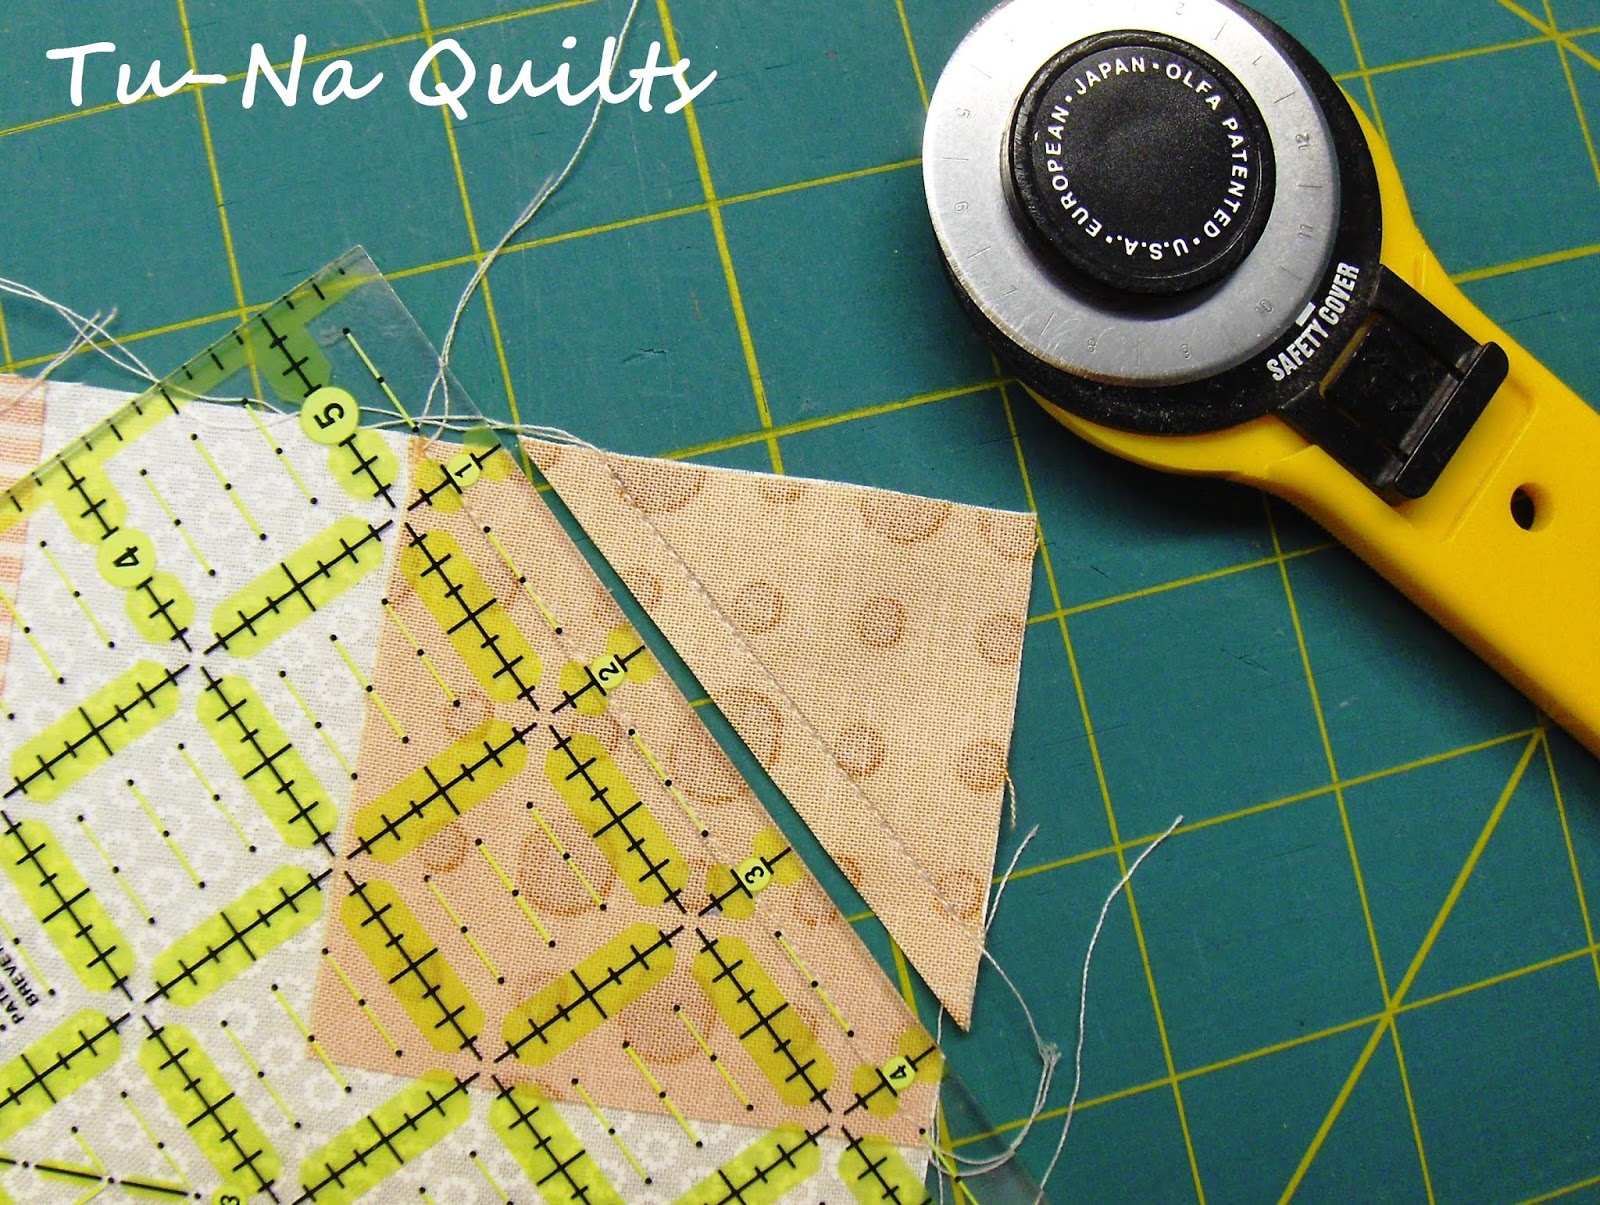
Press seam towards corner. Trim block to 6.5" Please make two snowball units.


Here are 4 of those cute, little, bonus HSTs. Please include all 8 of them in the mailing. You don't need to press seams or trim them

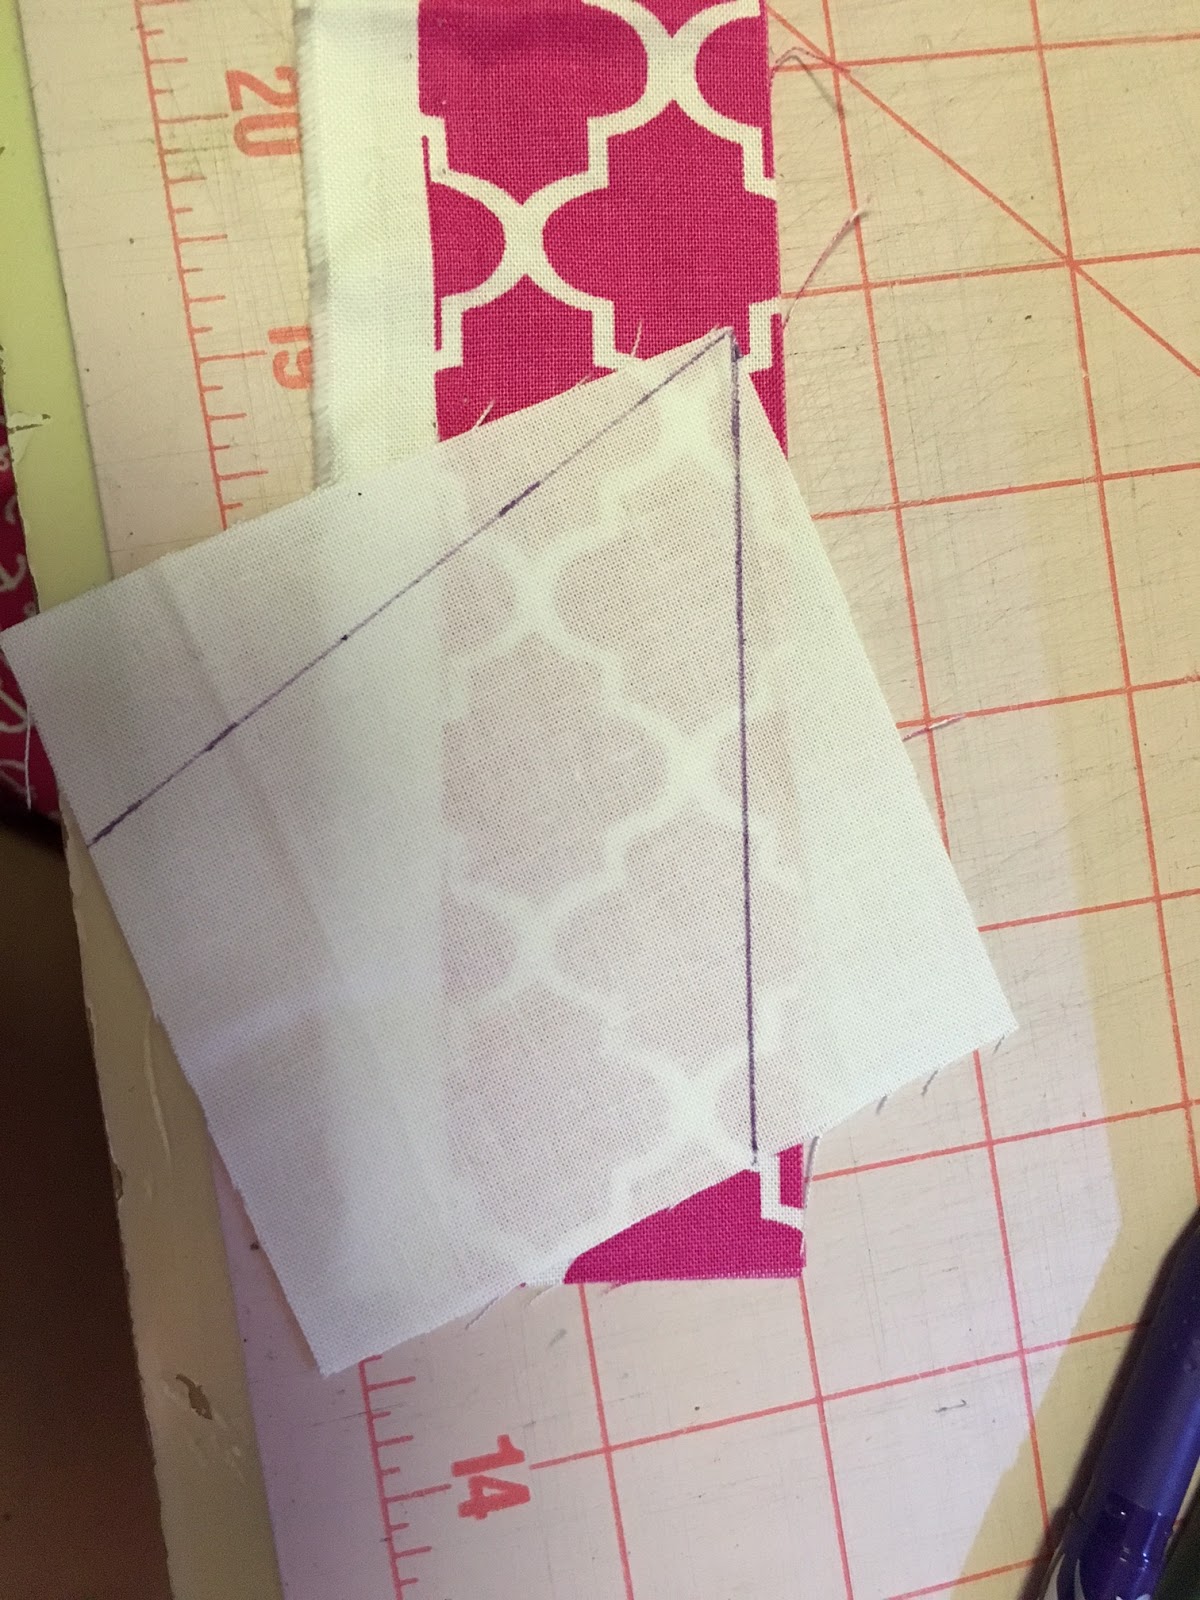
To make the X Units: Make sure your printer will be printing at 100%. Print out two pages of the paper-pieced pattern included in the pattern link above. Measure the test box to make sure it is 1" square.


The pattern gives approximate fabric requirements but you could use scraps.

Lay paper on top of wrong side of orange fabric (printing should be showing on top) with fabric covering area #1 completely with about 1/2" around it. Pin.


Place this section on top of white or white on white fabric again making sure you have plenty of fabric that will cover #2 area with about 1/2" around it.


Reduce stitch length to 1.5. Sew on the line between #1 and 2 starting and stopping well into the seam allowance. I even sew right off the paper.
I should have continued this sewing line off the paper. This helps keep the seam from unraveling.
 Fold paper back and trim seam allowance to 1/4".


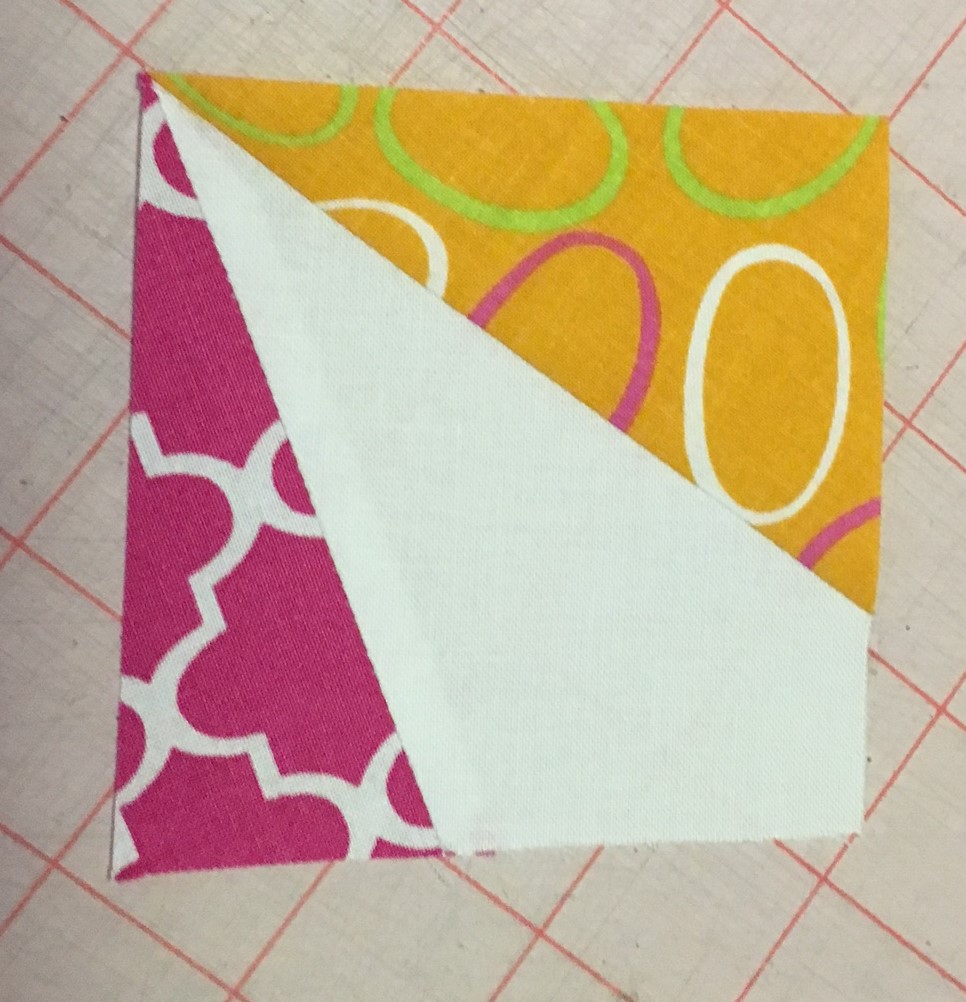
Press on the right side of the fabric (not on the side with the paper to prevent the ink from bleeding). Now lay this section on top of the same white fabric making sure you have plenty of fabric. Sew on the line starting and stopping well into the seam allowance. Even better, start and stop off the paper.


Trim seam. Press. Trim block to 3.5" square.


Please leave papers on. Make 8.
No need to sew them together from here as I can spread them around to add to the scrappiness. Plus this is about all that you can get done in 1.5 hours or so.

Alternative for non-paper piecers: If paper piecing is not your thing (or your cup of tea), please make 2 additional snowball units and forget the X units.
Alternative for those with limited orange fabrics: Hopefully, you have one orange fabric on hand. Just make 16 X units with the same orange fabric or as many as your time allows. But don't sew the units together into a set.
What I Learned Today:
  1. I do not know how to write up a post quickly.
  2. There's a lot to do to get ready for a vacation.
  3. I'm exhausted from all the preparations and definitely need a vacation.
  4. I usually come back from a vacation being tired.

Question: Where's your dream vacation? We'll be heading to see our new granddaughter in Michigan and then we'll hop around Minnesota on the Shop Hop for a bit. By the time you read this, I should have already visited about 30 shops. But our big vacation comes later in the year when we go to Germany and Italy.

I'll be watching for the mail, as soon as I get back from my trip. Thank you very much for helping me add to my Wanta Fanta blocks so I can finish this quilt with lots of orange scrappiness!
Karen, Tu-Na Quilts


Hive 4 Block for July

This is such a cute block - and perfect for summer!
Sorry, it's a terrible picture, I am having technical difficulties with my camera, so I had to use my phone.


It's in the mail this morning. Thanks!

Saturday, July 28, 2018

Hive 4 block for Kathy


This is a lovely block from Meredith. She was unable to post earlier so I am trying to do it for her. It is already mailed for you Kathy.  Your garden is going to be special. 

Monday, July 23, 2018

July blocks for Kimberly

Kimberly asked for these cute blocks as her time as Queen Bee.  They are so cute and so easy to do.  They will be in the mail today!

Sunday, July 22, 2018

July Queen Bee Sweet Polaroids

These sweet little Polaroid pictures sew up fast once you spend the time on the fussy cut.  I ended up with a nice variety of 2.5” squares for another project.  My birthday is in July, so receiving all of these precious blocks has been like a month of birthdays.  Thank you Stashbee mates for making this month so special.  It seems so fitting to make a baby blanket after losing my mother in May-gentle reminders of the cycles of life.  

Saturday, July 21, 2018

Friday, July 20, 2018

flowers for Kathy - Hive 4

These were a nice break in my summer sewing frenzy....  and the pattern was super simple so I made Two...


It will be fun to see your "garden" grow.


Thursday, July 19, 2018

Hive 4 Buttercup for Kathy

Hi all. Here is my buttercup block for Kathy. Such a fun fast sew. Can't wait to see all our colorful blocks together. It's already in the mail and should be there soon.


Wednesday, July 18, 2018

Tu-Na Quilts: A Buttercup for Kathy in Hive 4


Miracles do happen!! I am living proof since I've completed my bee block before the end of the month.


Oh, why does my picture load on it's side? And how do I turn it?

I sewed this cute block for Kathy a few days ago. You can find her initial post here. The free pattern can be found here. Just click on the picture of the pattern in that link to download the pdf.

The pattern offers three sizes. Kathy asked us to make the 12" size. It was fun to make because we were able to choose what ever color we wanted for the flower and leaves. I love teal!

This should be a fun quilt. Thanks, Kathy, for letting me be a part of your fantastic quilt.

This Buttercup should be in the mail by Friday.

What I Learned Today:
  1. July is flying fast.
  2. I feel good finishing Kathy's block early so I can prepare my "queen" post for next month.
  3. There are only 9 days until the Quilt Minnesota Shop Hop. I can hardly wait.
  4. I need to have my post for #2 scheduled to post before I leave for it. I better get busy!!
Question: Do you plant flowers, or enjoy picking up a bunch at the store, or receiving a bouquet from someone special? Tu-Na Helper plants flowers in the garden and several flower beds and once in a while he will buy me a bouquet. My favorite ones are the wildflowers that I see in the fields and ditches while we travel. But, shhh, don't tell him!

If you'd like to read more about me or read about my adventures and misadventures in quilting, traveling, and cooking, please visit my blog, Tu-Na Quilts, Travels, and Eats. You're welcome to join my reading family by subscribing to follow me using one of the three ways found on my sidebar (if viewing on a mobile phone, just keep on scrolling down): Wordpress, Bloglovin, and email.

Thanks for stopping by and do come again.
Karen, Tu-Na Quilts


Crashing Hive 1 July for Kim

I had these fabrics so had to make some Polaroids with kitties. Very quick little blocks.


Monday, July 16, 2018

Hive 1 May (for Liz), June (Sherry) & July (Kim)

Well the last few months haven't gone quite to plan here in VERY sunny England....

I simple change of sofa, turned into a full redecoration, new carpets, new sofa and new every other bit of furniture possible in my living room.....

Combine that with the hottest temperatures on record and a lot of work travel.....   a 4 week project ended up closer to 10 weeks!!

During which my sewing machine was buried under the living room clutter!!!

Fast forward and I now have a superb living room....  and 3 blocks caught up!!

Firstly May for Liz,  I struggle with pale, so hope these are ok.  I also don't like half square triangles - but love how this block came together!!

Colours are looking strange on my screen -


June for Sherry - this was a fun block!


July for Kim - I love polaroid iSpy blocks.  These have a UK tourist theme  :)


 All caught up and ready for August!

Sunday, July 15, 2018

Hive 4 top finished

Hive 4 Stars.  Thank you so much to all my hive mates in Hive 4.  Here are all your stars shining brightly. It is still a top clinging to the flannel sheet on the wall but I hope to get it quilted this summer.  I love how it turned out. 

Poloroids for Kim - Hive 1 in July

Kim,
I have plenty of I Spy fabric that a friend gifted me, so I have plenty to make Poloroids for you.  I ended up with 12.  Enjoy,
Kathie L
Allentown, PA

Saturday, July 14, 2018

Hive 1 Polaroids for Kim


I've had these made and waiting ... it was fun to try to find "pictures" in my stash.  Can't wait to see all these together!

Friday, July 13, 2018

Hive 1 Photos Ready to Go!


Oh these blocks were fun. . . . .but what a mess I ended up with after searching for fabrics with small enough pictures to frame!


The scary thing is that I remember winning a Polaroid One Step camera at a Halloween party at a roller rink that I used to frequent.  Yes, I know, I have really, really dated myself!  LOL


These will be in the mail tomorrow.


Thank you for a fun block!


Sherry V.

Monday, July 9, 2018

Hive 4 Buttercup block for Kathy


Quick, easy, and cute as can be!  Loved making this block and can’t wait to see the finished quilt!  
-Katy 

Sunday, July 8, 2018

Buttercup block for Kathy


I quickly made this buttercup block for Kathy.  It will be fun to see all the colors she gets.
I love the site she referred to for the pattern.  It had several awesome layouts.

This went together very easily. I picked purple instead of the usual flower colors.   ( I had not seen Paulette's blocks.)

It will go in the mail Monday.


July Cuties

Weren't these fun! Quilts for babies and toddlers are my favorite thing to make but I have never made an I-Spy quilt. I can see where looking for the centers might become addicting, I just couldn't stop at four.


Saturday, July 7, 2018

Hive 4 buttercups for Kathy


After making this cute flower the other day I decided to make another. I will mail these on Monday.

July block for Hive 4

Hello (again today!)!

I decided that, due to my tardiness, I was going to take the time I had today to sew the July blocks.  So (sew) cute!!


My enthusiasm to sew today could also be attributed to my new purchase (as of 2 pm today).


This is my dream and forever machine.  It is SOOOO nice compared to the beginner machine I was using.  I see lots of hours of making ahead!  I hope you enjoy my blocks!

Super late June post for Hive 4

(hanging my head in shame)

So sorry for the tardiness of this post!  June was a busy month for me (I'm sure for everybody), but I have finally gotten things under control!


What an easy yet fun block!  I love practicing my piecing with 4 patch blocks.  BTW, I made the conceited mistake of not marking the white blocks for the star points.  That didn't go well, so I had to redo those (let my mistake be a lesson to you all).

These will be going out in the mail this morning.

Friday, July 6, 2018

Kathy's buttercup block

Such a cute block! I am sure it will make a bright and colorful quilt. It went together easily.
I will put it in the mail Monday.
Debbie Huber

Smile for the Camera!

Kim
These were so quick and fun to make! My favorite part was going through my fabric and picking what to use. You see 4 here, but there's 4 more hiding underneath, and they'll be a surprise!
All of your polaroids will make a fun and colorful quilt!

They went out in the mail to you yesterday.
Stay cool!
Liz

Hive 4 Buttercup for Kathy

What a lovely and easy to piece block.  Your quilt is going to be super cute. 

Thursday, July 5, 2018

Hive 4 July Block Tutorial

I apologize for getting this in late, but just had an incredible vacation at home (California) for the last 2 1/2 weeks.  Well Happy July to all my wonderful sewing friends.  This is my third year being in Stash Bee and I have loved every second.  This year has been tough because all year "life happens" has happened.  But here we are in July and all is well. 


Just a little bit about me.  California will always be home, but have lived in Cedar Rapids Iowa close to twenty years.   I work as a diagnostic assistant in Radiology for St. Lukes Hospital.  Have three grown children in California and two grandchildren.   Really enjoy sewing, but still consider myself a Confident Beginner.  The best part of Stash Bee, is that it introduces me to many different patterns and I learn new metods.


This month I am asking you all to make a block called BUTTERCUP.   I made this block for another online bee and really liked it.   I am wanting a lot of variety so my friends, it is up to you what color the Buttercup and little flower bud will be.   I would like the background to be white or white on white and the leaves can be any color of green that you may have.  Am thinking the scrappiness of this will make the quilt interesting.  So let us begin.   This block is from a really good website called Patchwork Square.   Here is the link https://www.patchworksquare.com/index.php?function=DisplaySheet&sheet=buttercup-quilt-block&links=1&id=   I would like you to use the directions for the 12 inch block:


Background (white or white on white) you will need the following:


Cut 3 squares 4 1/2"
Cut 2 squares 4 7/8" and bisect on one diagonal
Cut 1 square 2 1/2"
Cut 1 rectangle 4 1/2" x 2 1/2"


"Flower" This is up to what you would like


Cut 1 square 4 1/2"
Cut 1 square 4 7/8" and bisect on one diagonal


"Flower Bud"  Again, up to what you would like


Cut 1 square 2 1/2"


Leaf  Any shade of green you would like


Cut 1 square 4 7/8" and bisect on one diagonal


Again, so sorry that I am late with this tutorial.    Please please get in touch with me if you have any questions.  I am at kbertie1379@gmail.com.   Hoping you enjoy the easy way this block goes together.


Hive 1 Block for Kim


I love these little Polaroid pictures. I hope you like them . I had to include the sock monkey and of course a tractor.
 Enjoy Rose

Hive 1 Polaroids for Kim

Wow, these came together so fast and are so tiny! I can see why they would make great little i-spy blocks for a child's quilt. I tried to pick something out that would work for a boy quilt but a lot of what I had seemed too girly. I figured I could get away with the ants, mushroom, and bird, but I'm hoping the pink cat would be okay.


I hope you like them Kim! They'll be in the mail tomorrow.

~ Diana @ Red Delicious Life

Tuesday, July 3, 2018

Heather’s Hive 6 block tutorial for July

Hello Hive Mates,
After a very long winter, Summer has finally arrived in CT
I am looking forward to some warm weather, so I have decided to go with a bright summery colored block for my month


This block is the Scrappy Cross Roads block from Lori at Bee In My Bonnet.
She has a great tutorial in the link above in case you need extra help.

For this block I chose bright colors, with a low volume white fabric as the background print.
This block will measure at 16.5 inches unfinished.


Here is what you will need-
48 different 2  1/2" squares (bright colors)
8 each 4  1/2" squares of background (low volume)

Please avoid brown, black, burgundy and navy and keep greens on the lighter side.
A few lighter grays in the mix are OK.

Choose 16 of the 2 1/2" squares and draw a diagonal line from corner to corner on the back.
Sew two on opposite corners of each background square (sewing on the line you drew).
Trim the excess and press the seams toward the corner fabrics.


These should still measure at 4 1/2".

Now arrange the remaining squares and these newly made pieces into the block layout.

I took the 2 1/2" squares and sewed them together into pairs, then sewed those pairs into 4 patch blocks. You will end up with 8 four patch blocks and 8 triangle corner blocks.

 Arrange them as above and sew the units in rows. Sew the rows all together and then you are done.

I pressed my seams to the sides. not in any particular order, I just prefer nested seams instead of them being pressed open.

Thank you in advance for you creativity.

Heather


When I made this block, I had to cut a lot of the 48 squares because I did not already have enough in my stash basket. It was quite time consuming for the cutting part, but the sewing if pretty quick.
If you do not have 48 different prints or you feel that this block is too time consuming, please feel free to make the alternative block shown below!

Alternative choice - Wonky Pinwheel Block!
I found the block from here.Greenleafgoods Wonky Pinwheel

Here is my tutorial - 
Main Fabric-
I really love bright colors, geometric patterns, and low volume fabrics.
This is a little inspiration fabric.
Please be creative. 
I ask that you avoid dark colors like black, brown, gray, navy and maroon. No batiks!
A little novelty is OK, especially if it is sewing related, just not too child like.
You should be able to use all scrap strips for this block.
The largest piece I used was 3 inch by 5.5 inches.
Background Fabrics-
I used Kona Snow for my background in my tutorial, but would love for you to mix it up with low volume fabrics. The fabrics do not have to match, and can be white or off white with small print or low volume designs, like these. There can be some colored print, but try not to use colored fabrics.
Photo courtesy of Pink Castle Fabrics

Start by cutting 16 squares, each 3.5 inches,  out of your background fabrics.

On the back of each square, draw two lines coming from one corner. This should be wonky, so try not to draw the lines in the same place on both edges. Remember that these pieces you will make will eventually be sewn together, so do not make the lines too close to the edge, as that fabric will be lost in the seam when the whole quilt is assembled. (For example: on this square on the lower left side, the upper line is too close to the edge)


For the next two seams, try to keep the images close as you are working, so that you line up the fabrics under the background correctly. I did not, and I ended up doing a lot of seam ripping while doing this block.
First -
Place a main fabric face up, and lay your neutral fabric on top with your lines facing up, and the point that you drew facing away from you. 
You will be sewing on the line you marked, so give yourself approx. 1/4' overhang for the seam.


Sew on the line. ( I did the first seam on each of my 16 pieces, one right after the other, (chain pieced) so as to save some time)
Press to the dark. Do not trim yet. (I prefer a dry iron press over finger pressing)


NEXT -
Lay your second fabric face up on your work table. Place your second line with the point facing toward you. (The new fabric is face up, and the one you already stitched on is face down)

Sew on the line (for all 16 pieces) Press to the dark.

At this point, I used the exposed background fabric corner, to line up my ruler and trim the excess fabric off to get back to the original 3.5 inch square. I did not remove the background fabric because it helps to control the number of seams on the back of the block.


You will have 16 of these finished pieces.
We are ready to assemble.

Taking 4 pieces at a time, you are going to place the upper left and lower right pieces with their points facing to the center. The upper right and lower left will have their points facing to the outside corners.
This creates the Wonky appearance of the pinwheel.

Arrange the other 12 pieces in the same manner to create a block of 4 sets of 4.
(Please use a scant 1/4" when piecing these together)
You will assemble in rows.
Press the seams of the first and third row to the right, and the second and 4th row to the left.
Nest the seams, and sew the rows together and press those horizontal seams open.

 Your block is complete. 
Your block should finish off at 12.5 inches. 
Please do not trim the block if it comes out larger, just send it as is.

Thank you so much! Please email me with any questions.
 I cannot wait to see all the beautiful blocks that will arrive!


 Just for reference, I wanted to show the NOT correct way to line up the 4 patch. You can see how this is beautiful together, but does not make a Wonky appearance.

Heather!