Tuesday, July 30, 2019

Hive 2 June Block

Hello Hive 2. Here is the block that I made for Lynda last month. She already has it, I just never got around to posting it. It was an interesting block to make, but not one that I would do a whole quilt with. It always is fun to try something new. Hope you liked it Lynda. Rose


Hive 2 July block for Kristi

Hi Kristi, Here are your blocks, they are on their way. I hope you like them. Enjoy the rest of the summer.  Rose


Tuesday, July 23, 2019

July blocks for Hive 2

Kristi may have already received these blocks as they were mailed while we were on vacation.


But, not having internet access I was not able to post the picture, so here goes:


I hope the colors fit into your plan. . . . it was a nice easy block to make.


It will be fun to see how you end up putting the blocks together.


Sherry V.

Sunday, July 21, 2019

July Hive 2 Block

These were nice and easy to put together.  Plenty of wiggle room for trimming at the end too.


-Jennifer

Thursday, July 18, 2019

Stash Bee Hive 2 July Block

Granny's Choice Block for Kristi S...
July, 2019 Hive 2


Not much fabric to spare with this one!
Hard to get a good picture that shows the tone-on-tones, but hope this one plays well with the others you have...two years now...you should have a great quilt!
Will mail soon!
Valorie

Wednesday, July 17, 2019

Hive 2 for Kristi

Oops, seems I forgot to take a picture, but I mailed 2 blocks on July 9.  In the process of moving, so please forgive my “senior moment”. Joan

Tuesday, July 16, 2019

Hive 3 July Tutorial

Hi all, I’m Carolyn and I live on the Jersey Shore in NJ. Martha and I switched months to help her out. Sorry the tutorial is a little late. I decided to make it easy this month, I hope you think it is. We are going to low volume with colorful circles.

This is my vision for this quilt.  As you can see there are blocks with circles and some without.


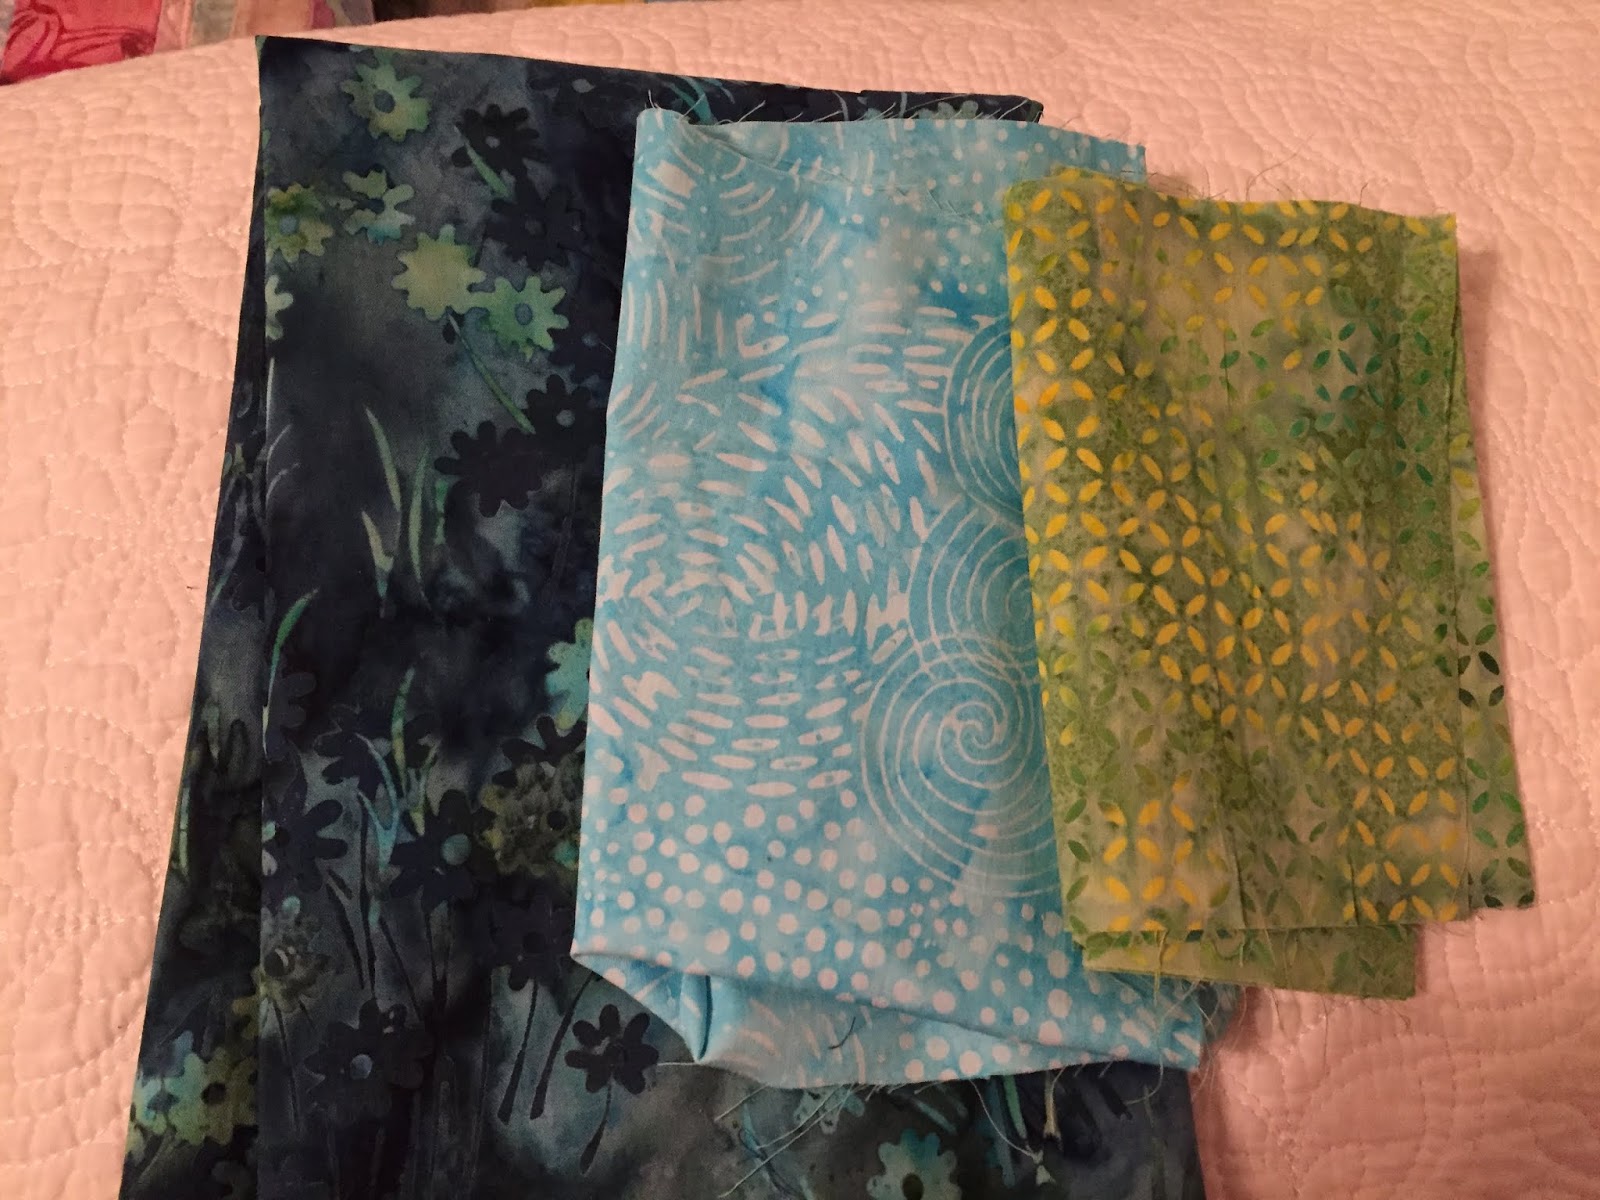
For the low volume I would prefer more white based than cream.


For the circles I would like teal, aqua, light green,... colors like in this selection


To make this block you will need 
2 different - 6.5” x 12.5” low volume rectangles 
Small pieces for circles. (I’m showing reverse appliqué, but you can do your favorite method) 


Using freezer paper, cut circles in the sizes wanted.


Iron the freezer paper, shiny side down, to the back of the the low volume fabric.  (Make sure to leave enough room on the sides for seam allowance so we don't cut the circle when the blocks are sewn together.) 


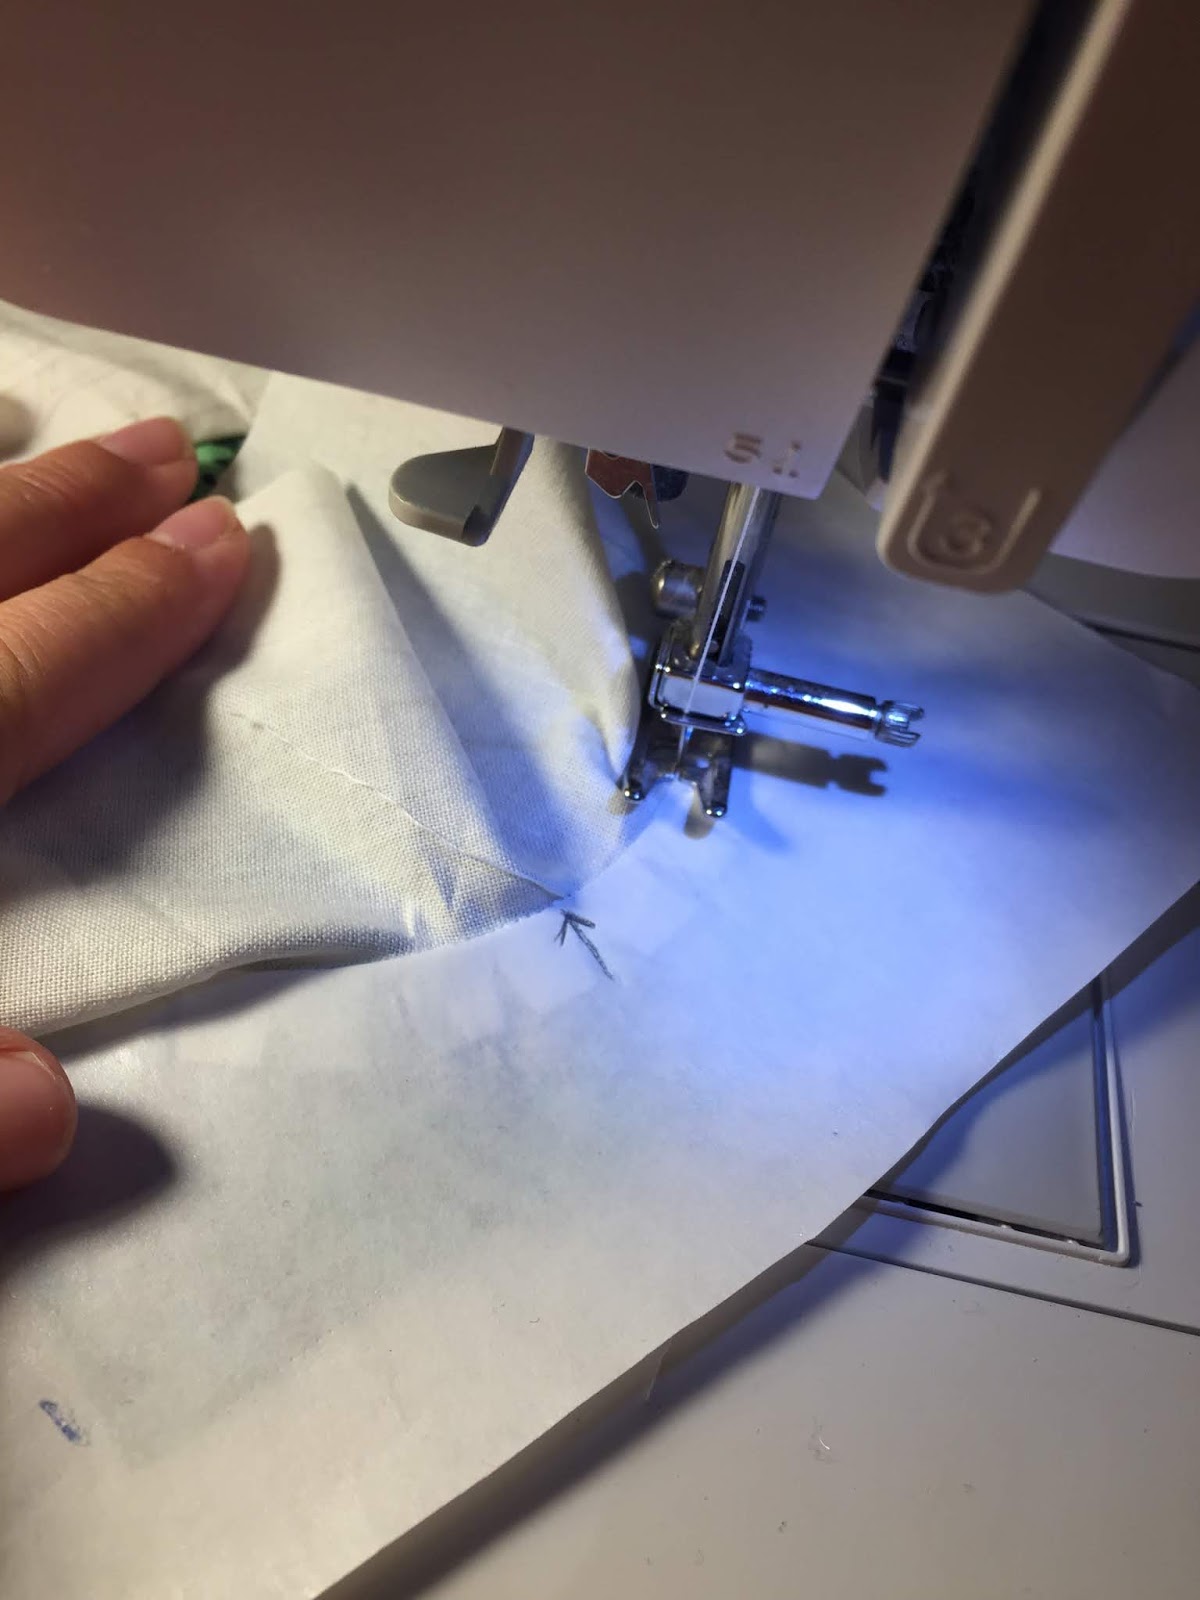
Cut a hole in the middle of the freezer paper in the low volume fabric leaving a half inch border.  Snip the fabric almost to the edge of the freezer paper.


Glue back the tabs of the low volume to the freezer paper.  Then, glue the circle fabric to the tabs. 


Flip the low volume over and pull up the fabric. You will be stitching in the folded edge between the front low volume and the tabs, your presser foot will be on the freezer paper.  


Trim the circle fabric to match the half inch of the tabs and remove the freezer paper.


Give the fabric a good press and you have your circle block.  


You can do as many circles as you would like on the fabrics.  Two on one side, one on the other or one and one, or three and none.  I will leave it up to you.  


At this point you can sew the two pieces of low volume together or you can leave them separate for me to mix into the quilt.

I'm excited to see all the circle blocks you all come up with.

Interfacing method for circle applique 
Raw edge applique method


Saturday, July 6, 2019

Hive 2 blocks for Kristi

What a dynamic block Kristi.  I treated myself to two new reds as most of my current ones were not tone on tones. I am looking forward to seeing them all sewed together.  Happy summer.

Friday, July 5, 2019

Hive 1 March Queen Finished Quilt

Finished just in time for Independence Day.  Here is my Picnic Block Quilt.


I had a few extra blocks from Hive Crashers.  May do a small wall quilt or some placemats.  Thanks to each of you for your help in putting together this quilt.

Monday, July 1, 2019

Hive 2 July block for Kristi

It was a good day to spend some time in my sewing room, so I made this my first project of the month.  I know I've made this block before, but can't remember when.  Glad to help Kristi with her project.
Kathie L in Allentown

Hive 2 - July Tutorial: Granny's Choice Block


IMG_2276.jpegMonday July 1, 2019

Hive 2 Tutorial: Granny's Choice Block


Hi everyone!

Happy Canada Day! And early 4th of July for those of you in the states :) 

After some internal debate, I’ve decided to ask for the same block I did last year. I haven’t had time to make the additional blocks needed to finish the quilt myself, and this way I get a better variety of fabric. I am asking for a Granny's Choice block. I love the contrast, the geometric design, and the secondary patterns that come out in the whole quilt.

I am asking for the block to be done in white, black and ruby red tone on tone blender prints.  Please try to make the red a medium value so it contrasts nicely with the white and the black. True reds please, nothing too orange or too pink/purple.


Cutting List

Black Fabric (Dark Value)
·       1 – 11″ square cut on the diagonal twice – this will make 4 triangles –  you will need 2 of these triangles to make one block
·       2 – 2 ¼″ x 8″  rectangles
·       2 – 2 ¼″ squares

Red Fabric (Medium Value)
·       2 – 2 ¼″ x 8″  rectangles
·       2 – 2 ¼″ squares

White Fabric (Light Value)
·       1 – 11″ square cut on the diagonal twice – this will make 4 triangles –  you will need 2 of these triangles to make one block


The tutorial is found at:


I've made the block from the tutorial, it's pretty easy to follow. Just watch out for all the bias edges on the triangles. 
Please let me know if you have any questions or problems.

 Thanks everyone!

Hive 4 - July Tutorial

IMG_2276.jpegHi!  I'm Amanda from West Michigan.  This month's block is actually one that was designed by a fellow Stash-Bee-er a few years ago.  I've changed the instructions a bit to match with some of the new rules, but the idea is still the same.


Choose 9 fabrics of assorted hues in the orange, yellow, or green colorways.  (Note: if you don't have nine fabrics of the same color that's fine.  You should have at least six and will have slightly different cutting directions later.  If you don't have six, please let me know and we can figure something out.)  Also choose a dark blue.


Cut one strip from each of nine colors of 2.25" by at least 16".  If they're a bit longer that's fine; things will be trimmed up later.  (If you have less than nine strips figure out how wide to cut the strips using the following: width = 15.75 / number of fabrics + 0.5).  If you need to sew two pieces together to get the desired length that's fine.  Also cut two strips of 1.25"x 16.25" (or longer) of the dark blue.

Sort the strips from approximately lightest to darkest.  I know it can be hard to figure out exactly the best order; just try your best.  Sometime taking a picture of them and switching it to grey scale can help.  Sew them together.  Press towards the darker side.


Square up the right side.  (The darkest strip should be on the bottom before squaring up.)  Then cut a 3" strip from the right side and then a 4" strip.

Insert the dark blue strips in between, turning the 4" strip upside down.  Square up to 16.25".

Hive 1- July Tutorial - Beachy Block

Hi! I’m Lindsey and it’s my first year in stash bee! In fact, I only started my first quilt last July (finished it in December)! So this is my first time doing something like this and I’m really enjoying it. 

Fingers crossed it’s finally about to be summer here in Seattle and we have a lot of camping trips planned - by bike! And never fear, I always pack a quilt or two. 


**Sorry for the delay! We had a great time camping - but it took me a minute to get back to my computer and fix the photos!**

In keeping with that summer theme I’m feeling a beach vibe. For July I’ve decided on an imperfect beach themed log cabin. 


There should be a center block that is summery/beach-y/ocean-y. I’m open to your interpretation here! 

Then there should be 4-5 complementary fabrics. 

Each block will stand alone - so don’t worry about matching my colors. 

Here’s an example of three different blocks I put together:


Cutting Instructions:

The center should be at least 3x3”, but no more than 5x5”

The strips should range from 1.5-3” in width. I used scraps or cut WOF (planning to save the extra length for binding). 

Block construction:

Start with your center block and just start sewing! 

I usually mock up each row around the outside to make sure I don’t end up with Y seams or weird issues with length (especially scraps)


After each strip, press and trim to size. 


Keep going until you get a block that’s 16.5”. The “center” block doesn’t need to stay at the center.

Here are more examples:


You might notice I had to piece some strips to make them long enough - totally do that if you want!

Extra square:
If you’d be so kind - I’d love to have a 3x3” of a light color from your block. If you could sign it & add where you’re from (1/4” in from all sides) that would be great! You can use a sharpie. I’m hoping to piece them together for the back as a reminder of the project!

Hive 5 - July Tutorial


Happy Canada Day!
IMG_2276.jpeg
My name is Tanya (like lasagna) and I'm so glad to be part of Stash Bee 2019 -  I live in Ontario, Canada, and love to travel, kayak, and buy fabric. A few years ago, my sister-in-law gave me a rotary cutter and a quilt book for my birthday, and I've been obsessed with fabric and quilting ever since! My obsession has resulted in quite the fabric hoard - I constantly reassure my husband that I have a plan for every single fat quarter 😆

This month, I am being completely selfish and asking for blocks for a quilt for myself. I appreciate your help in creating some bright, colourful blocks! I love bold colours, (my favourite colours are orange and bright green) and rich, saturated tones. I've chosen a block that I'm hoping will come together fairly quickly and that will allow everyone to use a little improv (if they wish!) to make each of their blocks unique.

I am asking for square-in-a-square blocks - with an improv twist. I'm looking for blocks that have a variety of squares and rectangles within the block itself. If the improv makes you nervous, feel free to make all of your cuts at 2 or 2.5 inches in order to keep things simple!

Allison of Cluck Cluck Sew has a fabulous tutorial for creating these improv square blocks (the first section of her tutorial shows traditional blocks, improv blocks are farther along): 

http://cluckclucksew.com/2018/04/easy-stack-cut-and-sew-blocks-tutorial.html

In the tutorial, Allison uses prints with white fabric. I would like my quilt to be bright prints (jewel-tones) paired with low volume contrasts - preferably in grey or black & white. Please avoid large florals, solids, and pastels. Tone on tone fabrics work well, or prints with very few colours - for example, a green background with a yellow or a green or a blue pattern, but not all those colours at the same time. 

I'm asking that you make me four blocks with two different colours. Feel free to create blocks with any sized rectangle / square in the middle - they can be all the same, or a variety. I love the random spirit of these squares! 

Designers like Libs Elliot, Allison Glass, and Rebecca Bryan tend to use the types of tones and colours I am hoping for:


Some Tula fabrics work, too, although I find that most of her prints are too busy for these blocks. Please don't worry about having to use these designers in your blocks - I just seem to have a lot of their prints in my stash!


I hesitated about the mice on the green and orange prints, but since they are simply grey on a bright colour, I think they would be a lot of fun! 


I pulled these fabrics from my general stash (I don't know what line they are from, or who designed them). They are not quite jewel tones, and they are a little washed out in the picture, but they are still bright and cheerful!


Here are some of my low-volume pulls. I would prefer monochromatic (grey, black & white) prints, but trust you to chose low-volumes that work with your colour choices. Text fabrics are fabulous, too!


You will need four 8.5 inch blocks to start - 2 low volume (these can be the same for all the blocks if you wish), and 2 different colour prints. Your blocks should finish at 7.5 inches (7 inches once I sew them together).


Making the blocks:

1. Stack one 8.5 colour block and one 8.5 low volume block on top of each other, right sides up.


2. Make two horizontal cuts through both squares at least 1 1/5 inches from the outside edge. Please don't cut closer than this, as I'd like to have a minimum of a one inch border around each centre print.

I made these first two blocks but making each cut 2.5 inches from the edge for a symmetrical block. I used a variety of measurements for my next blocks!


3. Make two vertical cuts in the middle piece only, again at least 1 1/5 inches from the edge. The top and bottom pieces should not be cut again in this step. Somehow, I forgot to take a picture of this step - sorry!

4. You should now have four strips and one centre square / rectangle for two blocks. Rearrange the pieces so that one square has a colour centre with low volume frame, and the other has a low volume centre with a colour frame.


5. Sew the blocks together. Trim to 7.5 inches


6. Repeat for two more blocks.


Once again, here is the link to a very clear tutorial by Allison at Cluck Cluck Sew:


http://cluckclucksew.com/2018/04/easy-stack-cut-and-sew-blocks-tutorial.html

It took me about an hour to finish six blocks - I hope you find them as fun to make as I did! 

If you have any questions, please send me a message through Instagram @sewgeekcanada

I'd like to make the throw sized quilt, so I'll need 80 blocks in total - with your help I'll be more than half-way there! Thank you so much for contributing to my quilt 😀

Tanya.