Monday, April 30, 2018

Tutorial: Garden Fence block for Hive 4


Garden fence
Debbie Huber

I am excited to be the Queen for a month. I am a former teacher turned learning assistant at a middle/high school. So I still get to enjoy interactions and keep my math and reading skills sharp without all the lesson planning and grading. I live in Wisconsin and am ssoooooo done with April. We had 10 inches of snow.  Bring on spring!. It is finally warm this week and we are due for some rain!

It was hard to decide what to pick as a block and what I wanted to do.  So I found this easy block, but decided to change the colorway. 


 Link here:

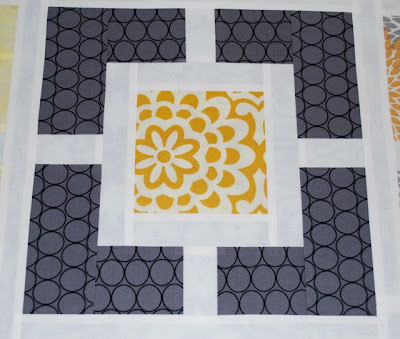
Here is the block I am choosing: it is called Garden Fence and I got the idea and part of the tutorial from Hyacinth Quilt Designs.  Link here.

My color pallet is medium to light grays,
White solid or tone-on-tone white
Bright crayon colors: reds, oranges, yellows, greens, blues, and purples.  I would like tone-on-tone fabrics that read as a solid. 


Choose one color for your block along with a white and gray.
Your color placement can be with the gray in the middle or the gray on the outside.

Here are the cutting dimensions for one block that finishes at 10" (10 1/2" unfinished):
Center square: 4 1/2" x 4 1/2". Again pick one or the other.

\
Outer rectangles: 4 - 2 1/2" x 3" and 4 - 2 1/2" x 5"  ( Both colorations are shown.)


White: 2 - 1 1/2" x 6 1/2"; 2 - 1 1/2" x 4 1/2"; and 4 - 1 1/2" x 2 1/2" rectangles.


Block diagram: 

To piece the block:
  • Sew the white 4 1/2" and 6 1/2" rectangles to opposite sides of the center square.

  • Sew the white 2 1/2" rectangles between 2 outer rectangles; add these to the center pieced square. 

I pressed all seams away from the white to either the color or the gray. 


. Easy! Easy!  I was able to cut and assemble all four blocks in 2 and a half hours.  You only have to make one!  Finished size is 10 and a half inches.

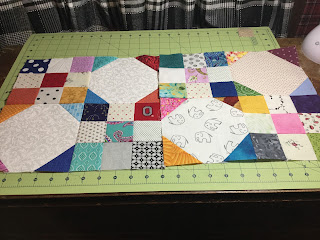
Here is an example of what it looks like with 4; squares:  I am going to add white sashing in between.


This quilt will be for my grandson:    Thanks so much for helping to make it.  I hope you enjoy this easy block. 

  ( He is in front of his grandpa, his favorite person, and he has just graduated to a twin bed. )

Saturday, April 28, 2018

Hive 4 April for Amanda


Happy April!

Although the month started with snow (multiple times), we've had two weekends of lovely weather and I am enjoying playing in my yard!

What a fun block this was to make!  I loved having the opportunity to perfect my ¼" seams.  Can't wait to see the finished quilt!  It went in the mail today.

Thursday, April 26, 2018

April Block for Amanda in Hive 4

This block will be in the mail tomorrow and on it's way to Amanda.

You can find Amanda's pattern directions here.

I've only made three traditional log cabin blocks before so this was a fun one to do. It was also very quick and easy.

Thanks Amanda for letting me be a part of your beautiful modern quilt.

What I Learned Today:
  1. I'd like to make more of these blocks.
  2. I see another quilt added to my "must make" list.
  3. Being in a Bee group is supposed to help quench my thirst for making new blocks and reduce my need to make new quilts with every pattern I see.
  4. Obviously #3 is not working.

Question: Have you made a log cabin block?

If you enjoyed reading this and would like to read more, you may find me over on my blog Tu-Na Quilts, Travels, and Eats.

Thanks for stopping by and do come again.

Karen, Tu-Na Quilts

April Block for Amanda

Here's the finished block - it went together easy, even though I had to double check my orientation a couple times :)


Sorry, the picture's a little dark. It's in the mail first thing on tomorrow morning

Monday, April 23, 2018

April Block for Heather

I had a lot of fun working on this block. . . . my biggest problem was picking what colors to use!


I can just imagine how fun and colorful this quilt will be when it is finished!


Thank you, Heather, for the opportunity to make this block for you.  It is in the mail today so you should be seeing it shortly.


In peace & pieces,


Sherry V.

Saturday, April 21, 2018

April Scraps for Heather

This block seemed to get easier and easier as I went along. Loved the choice of all scraps. They are in the mail already.


Tuesday, April 17, 2018

Hive 1 Block for Heather

Hi Heather!
I had your block finished and ready to mail in the first week of April, but it was fun and I wanted to use more scraps, so I made you a second one! I'm going to keep that one a surprise!
I should get them in the mail to you this week.
I hope you like them!
Liz

Sunday, April 15, 2018

Quarter Log Cabin blocks for Amanda

I've got this fun happy block all made, and it has arrived safely at its destination. Thanks for a fun set, Amanda.


Meredith

Friday, April 13, 2018

Thursday, April 12, 2018

Hive 1 Block for Heather

Greetings from Florida! I hope everyone is doing well. Here is my block for April. Heather asked for a fun scrappy block - I think this will fit the bill. I always struggle when it comes to putting together scrappy blocks because my OCD mind just wants some sort of pattern and structure in the chaos but I just love the look of a finished scrappy quilt. I'm looking forward to seeing her finished quilt.


~ Diana

Tuesday, April 10, 2018

Tu-Na Quilts: A Block for Meredith in Hive 4

I spent a good long time picking out the fabric for this quick and easy block but I think it turned out lovely. I hope Meredith thinks so too. You can find the pattern here.

Meredith asked for medium grays, dark blues, coral, teal, yellow, and lime green.
I didn't have all the fabrics I needed in my stash, so I shopped at three stores. I found what I needed as well as several more pieces I didn't.

This block is on it's way to Meredith in Albuquerque a little late but it will get there soon.

What I Learned Today:
  1. No matter how carefully I pick out the fabric for a block or quilt, I usually change my mind at least once about one or more fabrics.
  2. Be open to using more color combinations in my quilts. I would never have chosen these colors for one quilt but I think it will turn out lovely.
  3. Albuquerque is very difficult to spell.

Karen, Tu-Na Quilts, Travels, and Eats

Sunday, April 8, 2018

April for Amanda -Hive 4

I'm always amazed at all the different blocks people choose each year.  This is a new one for me.  The finished quilt should be fun.


Love you gifts to my aunt and uncle today. 2017 Hive 4 Finished Quilt

Thank you to my talented Hive 4 bee-mates  This was such a fun quilt to make.  I found the perfect backing fabric because my uncle is a crazy fan of old westerns.  It’s a vintage fabric I found on e-bay.  What a lovely adventure.  I quilted it trying to replicate lassos, and it is not perfect but I think he gets the picture.  They were so happy, they cried.  Surely, for me the best part of Quilting is working with bee mates who love to sew and then gifting the final product.  Than you again!


Hive 4 March Block

Well I finally can say I am caught up with blocks for Hive 4.  So embarrassed, but here is your block Meredith.

Saturday, April 7, 2018

April block from Hive 1

Here’s 2 blocks for our Queen.  This was a very easy block to do while watching the snow accumulate here in southern Ohio.  Will spring ever get here?
These will be in the mail the first of the week.  Hope they work for the quilt you are planning.

Wednesday, April 4, 2018

April block for Amanda

The April geometric blocks for Hive 4 for Amanda.
I like the design and had fun with colors, but seem to have repeated them somewhat.  Your chart was easy to follow.  I used numbers 1 and 2.


I hope to get it the mail this week.

Tuesday, April 3, 2018


I am so sorry for the lateness of this post. I actually finished and mailed the block way back on the 23rd, but completely forgot to post. It may have even been received already! :) 

Anyway - this was a lot of fun to make. I hope the teal is green enough, and not too blue. 


Monday, April 2, 2018

April block for Hive 6: Bow Ties

Queen Marie originally posted her tutorial on the Hive 6 Facebook page and has been having trouble getting logged into the blog while traveling.  Rest assured, she posted on time!  ~Emily

Good Morning fellow bee mates and Happy Easter/Passover/Spring to you all

Here in Maine it finally feels like warmer weather might actually arrive, but definitely not here yet. I'm envious of those of you looking at daffodils.

So, for my Queen Bee Month I've chosen a simple block that I hope will be easy and quick. The picture below is of the quilt I'm putting together for my brother. I've blacked/whited it so you can see the values needed rather than the colors. You can choose whether you make a block from the outer light background with mediums or the inner medium background and darks. The colors are mostly browns and grays and can be anything you think a male in your family might like.


No automatic alt text available.

Its a simple bow tie block. For 4 blocks you'll need:
(8) 3" squares from a background color (I used 4 different fabrics, cutting 2 from each)
(8) 3" squares from browns/grays
(8) 2" squares in matching browns/grays

The second picture is of the fabrics I pulled together. The back row across is the background fabric and the front rows are the bow tie fabrics.
No automatic alt text available.


To make the block, take 2 matching 2"squares and place them, right sides together, in one corner of the 3" background squares. Draw a diagonal line on the wrong side of the 2" square. (picture 3).

No automatic alt text available.

Stitch on marked line. Trim outer corner, leaving a 1/4" seam allowance. Press toward dark fabric. Make 2. Take the 2 matching 3" squares and stitch to the corner units as shown in picture 4. The block will be 5 1/2". Make 4 of these units but please do not sew them together. This is a scrappy quilt and I'm going to arrange them once I get them all together.
If you have any questions at all, feel free to ask away. Thank you so much for helping with this! I think my brother is going to love it!
❤️❤️❤️
No automatic alt text available.


April - from Kathie to Heather in Hive 1

Heather,
You can't go wrong with a 9-patch block, especially if it is scrappy like your choice.  It was easy to go through  my box of 2-1/2 inch strip scraps to find fabric to use.  Here are two blocks for you.  I am also an including a picture of a recent finish of mine that used 3-1/2 inch scrappy 9-patches.  As my leader and ender project last year, I made the little blocks with scraps.  Before you know it, you have a quilt.  This year I'm making little windmill blocks.  Have fun with your blocks.
Kathie L from Allentown


Tutorial Hive 5 April. Lauren

Hi everyone,  Happy Easter, Passover and April Fools Day,

   I love paper piecing and have always loved the look of a colorful Union Jack Quilt.  A great tutorial and pattern can be found on Https://grannymaudsgirl.wordpress.com. It is from February 2015. She gives a wonderful tutorial.
   The biggest hints are 1.  Make sure you have your printer correct. Use fill page as is on my printer. Others say other things. NEVER USE FIT TO PAGE.  At the end when printed make sure your 1” square measures correctly.  2.  This pattern has angles. Because of this you need to be careful that your fabric covers through the angle.  3.  Mark the color on pattern for each piece.
   The colors will be brights.  I want a rainbow of color.  If you use your favorite I will receive different colors.  Pick one color, one dark and one light. Such as dark blue and light blue.  Also use white on white for the white.  Per the tutorial dark color will be Color X. This is pieces A1,A8 and B 1. The center strip between each half is also dark.   The lighter color will be Color Z.  This is pieces A4, A5, B 4 and B 5. The A and B4 are large triangles and A and B5 are the small triangles.  The white on white pieces  are A2, A3,A6 and A7.  Also pieces B2,B3,B6 and B7. This will all make sense when you read through the tutorial.   See pictures below.
                                                     

This is a picture of fabric pull.  Each of the two colors read as dark and lighter as compared to the other.

Above is the pattern marked with all the colors for the area.

This is half of flag. Each piece will be the same one this way and the other flipped.  Sew with 2x8 center piece.


Completed flag will look like this.

Any questions please send to my Email.  Will gladly answer.  The tutorial will provide great information. Lauren


Hive 4 block for Amanda


No April Fool.   I actually did get this sewn today.  I used option 2 and 4.  You are going to have a fun quilt. I hope my fabrics are bright enough for you. Amanda's choice was a rectangle instead of a square.  Nice choice and the chart worked great.  In the mail to you this week.  Thanks for the pattern.  
More snow here today.  Isn't it spring yet?   

Sunday, April 1, 2018

Hive 4 for March - Happy Easter

Hi all!

As a church musician, holy week is bonkers for me.  I'm so sorry I didn't get this posted until now.


This was a wonderful block.  Very easy instructions, easy seams, relaxing block.  Block was mailed out on Friday, so it should be getting to you tomorrow.  Yay!

Hive 1 Blocks for Karen

Finished blocks already???  It's no April Fool's joke.  :-)


I love 9-patches.  Pairing them with snowball blocks will make a lovely pattern.  Looking forward to seeing the happy, colourful quilt!  Getting these in the mail in the morning.

~Kathy

Hive 3 April 2018 Tutorial


Modified String Quilt


This is my 3rd year in the Bee, and I really enjoy these mini projects every month.  My family has a lake house in Massachusetts and I'm looking for a bright cheerful string quilt to use at the lake.  

I would like bright light colors, I love purple, blue, yellow, green, aqua, pink, anything bright really. Some of the blocks I have are leaning on the dark side, so I'd really like some lighter blocks to balance it out.
Picture a bright cheerful quilt on a chilly evening at the lake in front the fire.

Here is what I have so far:


I want to highlight the borders around the block by using black and white strips like this quilt pictured by @imquilternity:


Below is a link to the tutorial I started with. In order to get the big black/white borders, you will need to modify the tutorial a bit.  In the middle, use two strips of different black/white fabrics.  Also, my tutorial uses a fabric base in place of paper piecing.  This is because I wanted 10" blocks, and my paper piecing papers weren't big enough.
For the colored strips, I varied the size of my strips from 1-2 inches. 
 

I've provided a complete tutorial below:
You can use the steps below in place of the tutorial above, but I find it nice to have another view of the same process just in case its new to you and confusing.
You will start with a 10" piece white fabric.  You can use any white, it won't show.  In a pinch, you could use any light colored fabric. 
Here are my pictures as I went along:

1. Cut a bunch of 3/4"-2" colorful strips 2-15" in length:

2. Cut two 1" black/white strips.  These should be mostly white. Silver/grey are OK, but please, no brown:


3. Sew the two black/white strips together to form a 1 3/4" strip.  It should be at least 16".

4. Place sewn strips diagonally face up on the white fabric. The tutorial uses a glue stick to hold it down.


5. Start sewing colorful strips alongside each of the black/white strips to cover the fabric.  Instead of the glue stick, I pinned the first colorful strip thru all three layers to hold it down:

6. Open it up and iron. I like to iron as I go, but I like to iron :)   The ironing step is important because it makes the fabric taut so there won't be a bubble or crease.  These bubbles and creases cannot be removed.


7. Continue sewing strips, pressing as you go:


I found it easier to sew both sides together:


8. The finished block will be scrappy and colorful.  You can send to me untrimmed, or trim to 10".


Thank you so much!

Jennifer
@jennquilts