Monday, April 26, 2021

Hive 1 for Carolyn


Would you believe I've had these done for 3 weeks but am only getting around to posting now? April has been a crazy month! It was fun to look through the dark section of my stash for these. In the mail ASAP!

Julia

Thursday, April 22, 2021

Hive 1 April block


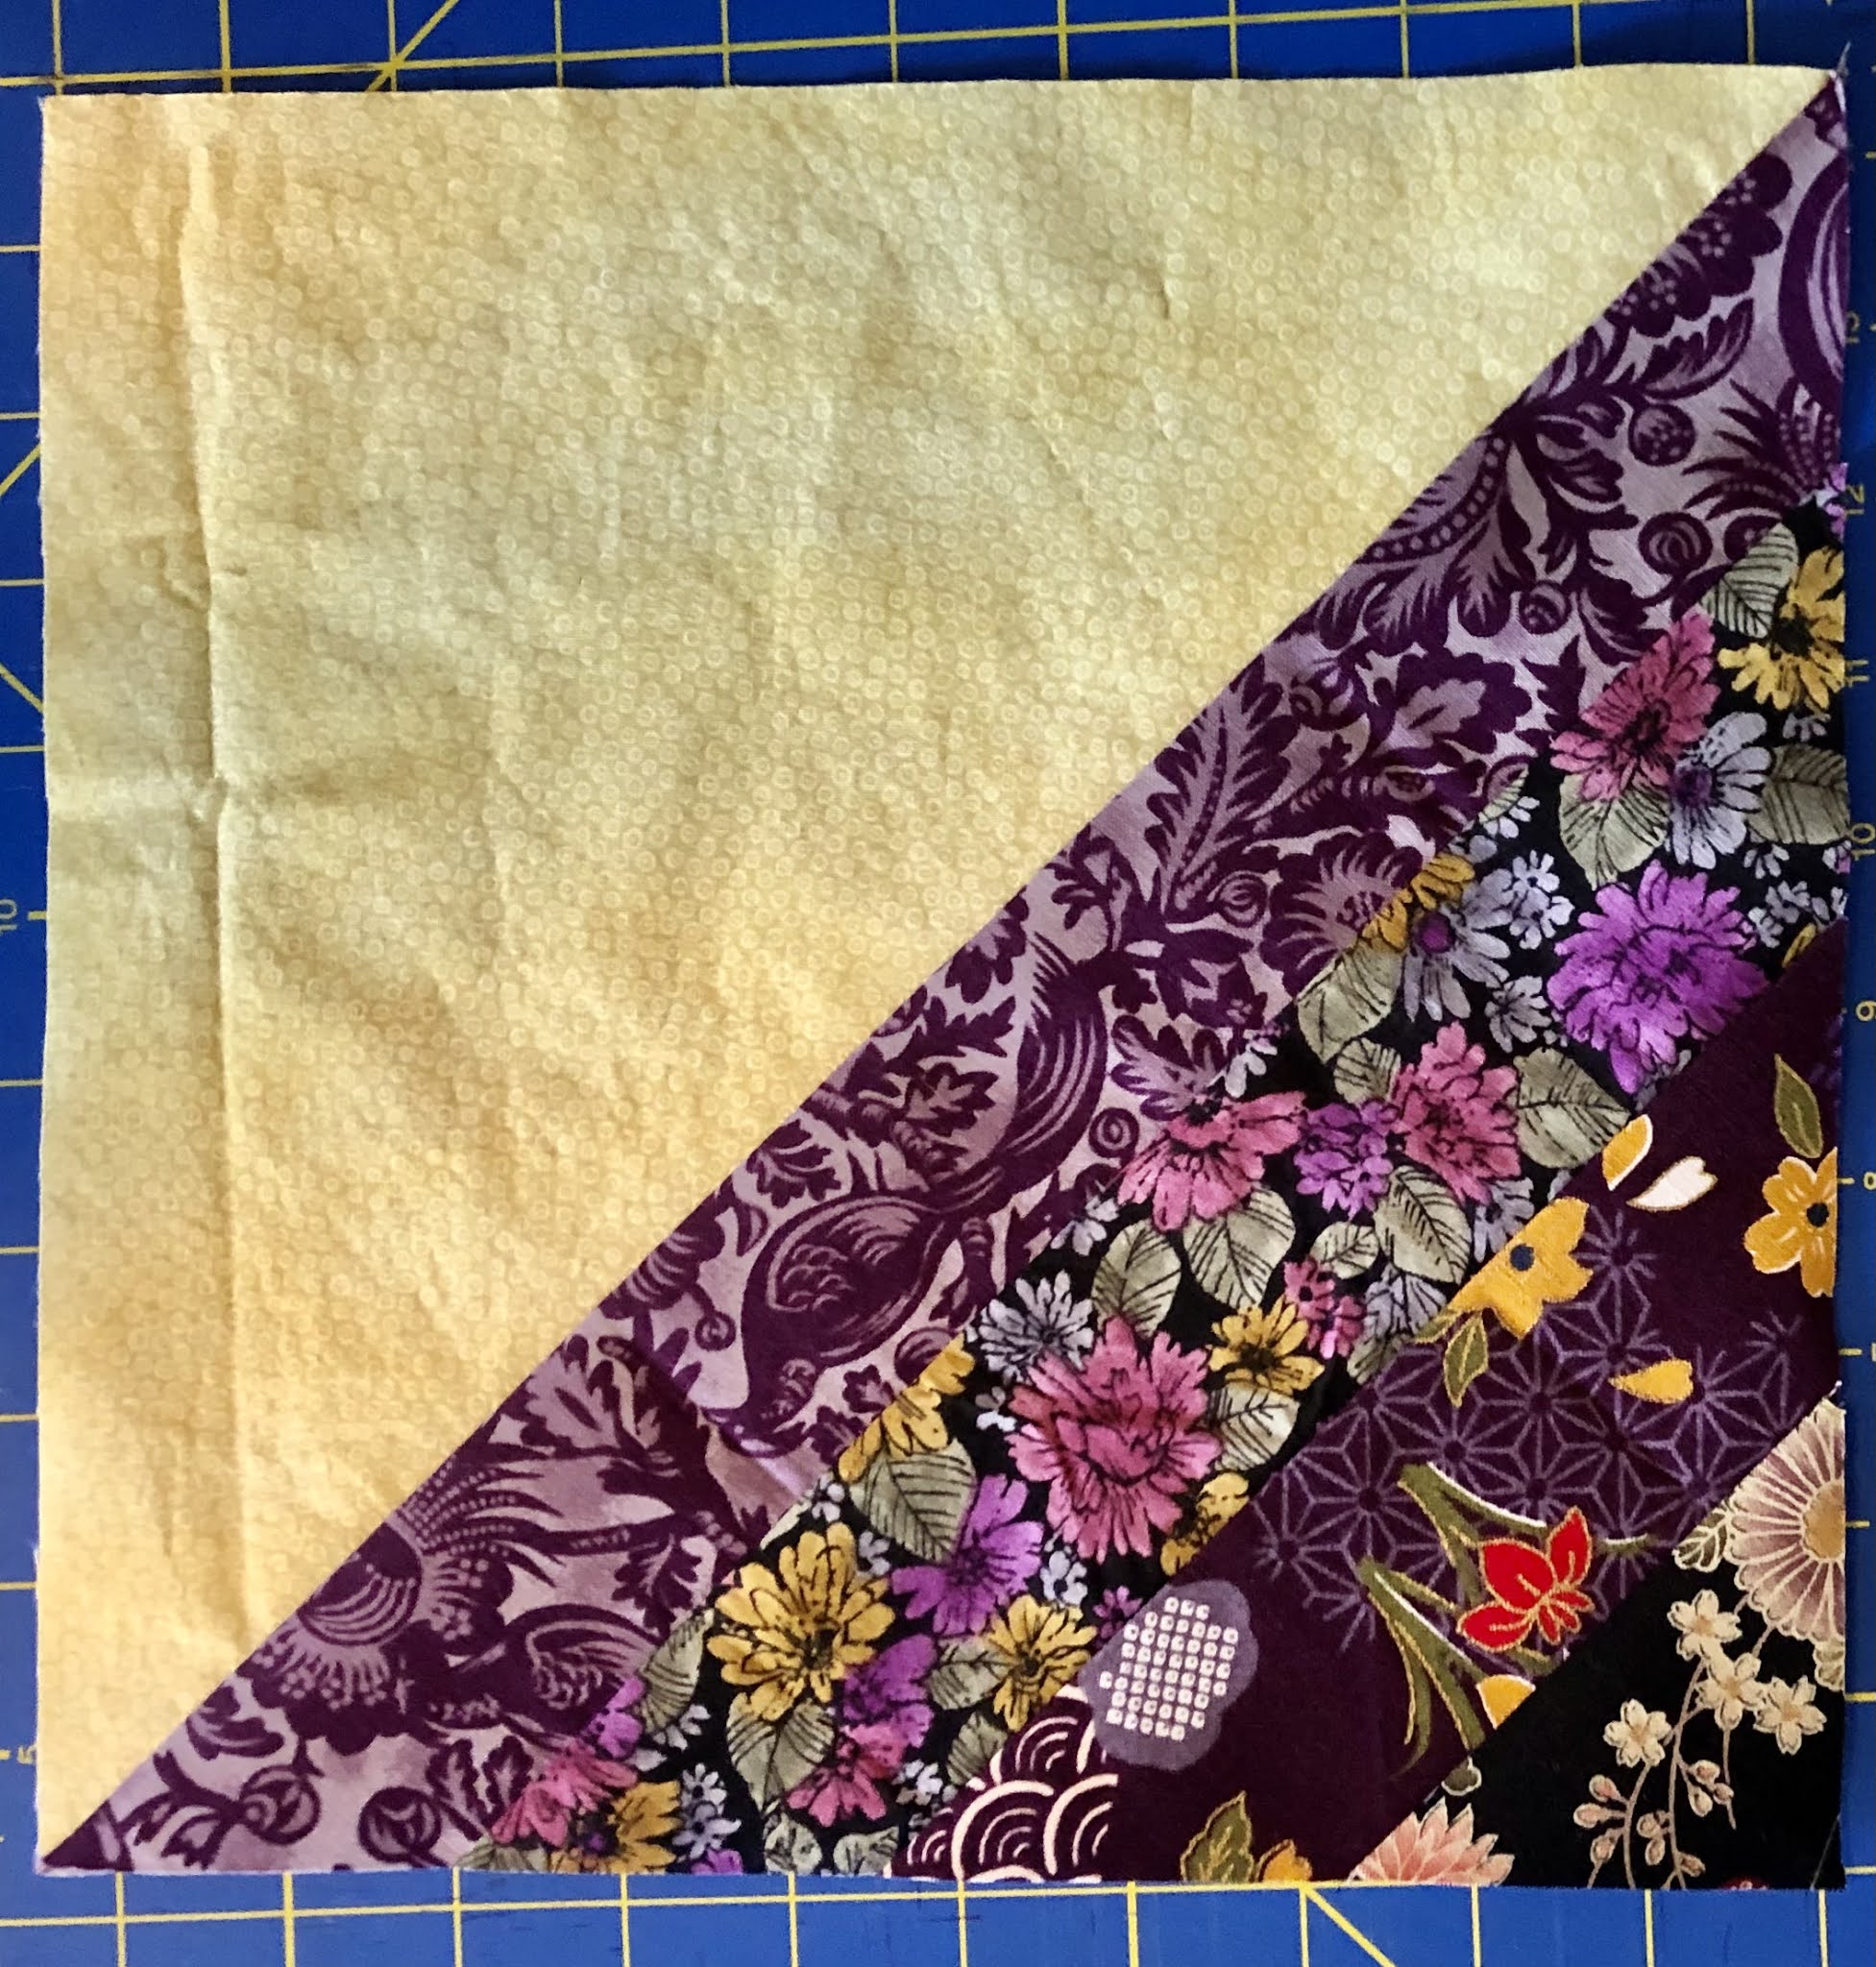
Here’s my April block! I wasn’t sure which end to square the triangle template with when I trimmed the shadow side, so I hope I did it correctly! I can make a new one if needed! 

Monday, April 19, 2021

April blocks for Carolyn

 These were fun to make. Can't wait to see what you do with them!


Wednesday, April 14, 2021

Hive 1 April blocks for Carolyn

 I see that you seem to like Asian prints, so that's what I used for my 2 blocks for you.  This will be a dramatic quilt.

Kathie L in Allentown


Tuesday, April 13, 2021

HIVE 1 April Sunshine & Shadow Blocks for Carolyn


 Carolyn, this was a fun block to make and I just had a pile of purples out for another project so it was easy to pull them together.  This will make a very pretty quilt that will bring sunshine and smiles (shadows).  I can't wait to see the finished quilt.   Jayne

Wednesday, April 7, 2021

Hive 1 April Sunshine & Shadow Blocks for Carolyn

 Looking for stars in my stash was as much fun as making these blocks.  They are going in the mail today.  Thanks for the fun & striking pattern.   Karen


Hive 1 April Block for Carolyn


Hi Carolyn,

This block came together quickly!

Hope to be sending some sunshine your way with it.

The blocks are going in the post this evening.

Take care,

Rita.

Monday, April 5, 2021

Hive 3 April Tutorial: Letter-Size Paper-Pieced Strippy Block


This past year has made me recommit to spending my limited creative/making time on things I truly enjoy.  Stashbee is one of those things!  This is my fifth year in Stashbee.  I've loved making blocks for my hivemates, and the quilts I've made from my own bee blocks are some of my favorites.  When deciding on the block for my turn as April Queen Bee, I decided to go back to the simple style of the blocks I made as a beginner quilter over twenty years ago.  I still have the first strippy quilts I made, and I still love them. 

To make this block a bit different, I decided to make the block rectangular using letter-size (8-1/2" x 11") paper as the foundation, start with a white or whitish center diagonal strip, and use a mostly blue palette for the rest of the strips.  

FABRICS:

You'll need one white or whitish solid or print strip (I used a Moda Grunge print with a white base for my sample blocks) at least 15" long, and a variety of blue or mostly blue strips of various lengths.  Cut all strips about 1" to 2" wide.  The edges of the strips should be straight, but they don't have to be parallel.    


HOW TO PIECE THE BLOCK:

Start with a regular piece of letter-size paper.  I used printer paper, but any paper cut to 8-1/2" x 11" will do.


Pin your white strip roughly diagonally (either left- or right-leaning orientation is fine) right side up onto the paper.


Take a blue strip that's long enough to overlap on each end by a bit, and pin it right side down onto the white strip, pinning through the paper and matching the right side edges.  Place your pins at least 1/2" from the edge so you won't run over them when sewing.

Use a piece of cardstock to fold a sharp crease in the paper along the edges of the fabric strips.  I found a brochure about sewing machine needles that worked for this. Junk mail is also a good resource for this type of cardstock.  


To sew, adjust your stitch length to no longer than 1.5mm.  This will make it possible to tear away the paper easily later.  Don't worry, you don't need to remove the paper, I'll do that.  Backstitch at the beginning and end of the paper.  (This makes sure the stitches won't split apart when the blocks are trimmed and the paper is removed.)  

Sew the strips together with the paper side up and the fabrics against the feed dogs. Use the crease in the paper as a guide for the right edge of your presser foot (you can use a 1/4" or a standard foot for this), and sew.  


Flip the blue strip away from the white strip, and press with a dry iron.

Pin your next blue strip down, lining up the edges with the prior strip, create a new crease in the paper, sew, flip, and press.  Repeat with additional blue strips.


When you've covered the entire piece of paper with strips, it will look pretty shaggy.


You can send me the block as-is, and I'll trim it down.  If you want to trim it to see how great it looks all neatened up, use a ruler and rotary cutter to trim even with the paper edges.


These are easy and fun, and I hope you enjoy making them.  Happy sewing Stashbee friends.
Pam 

Saturday, April 3, 2021

April Block for Carolyn

Dear Carolyn,

Your block was a pleasure to sew! I went ahead with dark blues, as I did not have any purple/lavender that were deep enough to be worthy of the "shadow" side. I knew right away my starry fabric was for you:) 

I will mail this on Monday!
 

Hive 1 Block for Carolyn

Carolyn, this is going to make such a lovely quilt! I LOVE the colors you've chosen for your sunshine and shadow! Can't wait to see everything together. Wishing you all the best!


-Julia D.

Friday, April 2, 2021

Hive 4 - April Tutorial - A Christmassy’ish Block


Hello All, 

This is my first bee and I am so excited to be here!

I would love some Present Blocks for this month. I don’t have a plan yet for the quilt, but I have always wanted a Christmas quilt and thought this would be a good place to get my creative juices going and I will use the present blocks mixed in with other blocks to make a big family Christmas quilt.

FABRIC PARAMETERS: Please make your blocks in a mix of red, green and white.  I am open to you using solids or pattern fabrics.

For patterns I prefer a more modern fabric; nothing too traditional please.  They can be christmassy or not. I trust you, if you think that the fabric could live in a modern christmassy’ish quilt, then go ahead. The only ask is that if it’s a pattern, it sticks to the colours; red, green or white or any combo of those. No other colours, please. 

For this block there will be a “ribbon” fabric, a “gift wrap” fabric and a background fabric.   Please feel free to make the ribbon and the gift wrap fabric either red or green, but the background fabric needs to be white.

Reds: I like more richer reds like a cherry, cardinal, crimson or scarlet red rather than something more on the coral or light red side.

Greens: I am more flexible in my green preferences, anything from a minty green to a forest great would be great.

Whites: For the whites I would prefer a true white, not cream or beige. If you are going to use a pattern for the white, can I ask that it please be white on white?

These are some of the fabrics that I feel fit the look that I had in my stash.  None of them are “Christmassy” but they could all be used as Christmas wrapping paper and look cool under a tree.


Cutting:

“Ribbon” Fabric:

     2 - 3" squares

     2 - 2" x 4.25" strips

     1 - 2" x 7" strip

“Gift Wrap” Fabric:

     4 - 3” x 4.25"

        If you are using a directional fabric, the piece is 4.25” wide, 3” tall

Background Fabric - White:

     2 - 2.5" x 3" strips

     1 - 5.5" x 3" strip

     2 - 2.5" x 9 strip (border)*

     2 - 2.5 x 12.5 strip (border)*

        *For these four pieces I have .25” for wiggle room.

Step 1: Cut out all your pieces

Step 2: Sew together the one of the 3” x 4.25" gift wrap pieces to either side of one of the long sides of the 2" x 4.25" ribbon pieces.  See image below.  Repeat with the remaining three pieces of ribbon and gift wrapping pieces.


 Step 3: Next sew the two completed sides of the gift to either side of the 2” x 7” ribbon fabric strip.


Step 4: Next we make the bow.  Take the 3" x 5.5" background strip, place one of the 3” x 3” ribbon fabric, right sides together, along the right edge of the background fabric.  Mark a diagonal line from top right corner to bottom left corner of the wrong side of the ribbon fabric square. Sew on that line.  Trim off a 1/4" from the seam, and iron open.

 **I know the fabrics are different, I made a few trial blocks**


Step 5:
Take the other 3” x 3” ribbon fabric square and place it on the left side of the background fabric and mark a line from the top left corner to the bottom right corner. Sew down that line.  Trim off excess a 1/4" from the seam, and iron open.  This creates the bow of the gift 


 Step 6: Sew the two 2.5" x 3" strips of the background fabrics onto each side of the bow.


Step 7
: Next sew your bow pieces to the top of the gift piece to make your present. 

**Everytime I made this block, the bow piece was either too long or two short. I have given you extra fabric allowance so you can line up the middle of the bow with the centre of the ribbon stripe and sew together; then once you have a finished bow piece, trim it down to 9” wide.


The block should now be 9” wide and 9.5” tall.


Step 8: Next add the 2.25" x 9” border pieces to the top and bottom of the block. Then add the 2.5” x 12.5” strip border pieces to the left and right sides of the block.


The block should be 12.5” x 12.5”

Thank you so much!!

- Laura

I want to give credit for this block to Moda Bake Shop (it's a free block on their site) for this block. I edited their sizes but I used their ideas. 

Thursday, April 1, 2021

Hive 6 April Tutorial- Converging corners block

It is Kelly here from Hive 6. This is my 3rd year though I did take a break for a bit. When joining, I had always planned to use a tutorial I'd used in the past because I still need more blocks. ;)

I was originally inspired by this quilt found on From Martha With Love. Everything about it is just so pretty. And scrappy!


The block is based on the Converging Corners tutorial by Film In The Fridge. 

For my color palette, I pulled a mix of floral and geometric prints in tones like mint, coral, blush with some pops of gray, navy, gold, lime, orange etc. Think sherbets with a bit of pop. Please DO NOT use baby pastels or other really deep, primary colors like red as the dominant color. For reference, the majority of the fabrics I used in the initial pull were either Art Gallery's Arizona or Basic Grey's Fresh Cut lines. I also threw some Maude Asbury's Geofabulous and Brambleberry Ridge in there for kicks. A few of the prints even have some metallic gold in them! Obviously, those are old lines, but something similar. Basically, I love all Art Gallery stuff, Tula Pinks is fun. Anything with these similar colors. 

A mix of 8-10 fabrics will work well. No novelty prints, please. I know it is a bit of an eclectic mix but I like it. 


You will also need some neutral background fabric. Personally, I do not like bright whites and prefer ivory tones instead. I chose 4 fabrics to work with. One is a solid Kona in Bone and the rest are very low-volume prints. Just mix them up into the block. Please only use very low volume or solids in ivory, creams or off-white tones if possible. 


The tutorial by Film in the Fridge is probably best to follow. Her final block is only 12.5". Please add on to make these 16.5" by can either adding extra strips or make them slightly wider than she describes. I'll walk you through a few of the steps here anyway.


I am making two blocks for samples. The block is built much like a log cabin block. You'll need to pick a feature fabric for the center. I suggest making it any size between 3 - 6" square. Next you'll use the background fabric to build out your block to be around 8-10" or so. Please press your seams open as you go.


The next step is to continue building your block's corners by adding strips of fabric. I start in the bottom right then do the top left corner. The length of the first colored strip should be around 2.5-3.5" long with the remainder of the strip being the background color. Each ring of strips should get progressively longer. Vary of the widths of the fabric strips between 1-3" or so. Skinnier strips will require more to complete the block. Aim for 3-5 strips for each corner.


Keep working back and forth from bottom right to top left corner until your block is 16.5". Don't worry about trimming them down or squaring them up. Try to keep the center square roughly in the center but it doesn't have to be precise. Variety will make the quilt interesting.

When finished you should have a block that looks something like this:


Hopefully, this will be a fun block for you. Let me know if you have any questions or concerns.


Hive 1 April tutorial Sunshine and Shadow Block


 The April block that I have chosen is my take on the Amish design, Sunshine and Shadow.   Some call it Sunlight and Shadow.  This quilt block is comprised of an 11” square, cut on the diagonal.  One half is one piece of fabric and the other half is strips of fabric.  Very simple and easy to make.  It will be Sunshine in the large triangle half, and Shadow in the striped half.  

This quilt will be for me.  I made this quilt before for my daughter but it was Shadow on the large half and Sunlight on the striped half.  I am coming out of a dark time in my life.  I want this quilt to be coming out of darkness into the light.  My life recently has been topsy turvy, culminating in a divorce after 25 years of marriage.  I joined this quilting bee to keep busy and inspired.  A new block every month for friends I have never met sounded perfect to give me something to look forward to.  And it’s going to be exciting to see what you send my way.  

Please pick out:

1) four different darker fabrics for the “shadow” striped dark side. No solids preferred.

And

2) one sunshiney fun (no neon brights) subtle-patterned  fabric for the “sunshine” light side. No solids please, tone on tone is fine though.  (I used a buttery yellow tone on tone for some of mine already.)

PALLET:

For the dark Shadow side: purple, gold, burgundy, rust, lavender, navy, blue, brown, black.  Something with stars is good on the dark side, but it’s not necessary.  Any dark patterns in those colors.  The dark fabric can be fun and colorful with a little bit of light accents just so long as it reads dark. 

I’m

And for the light Sunshine side:  buttery yellows, cream, light tan, cream and a little accent color will be fine so long as it’s not neon bright.  It’s ok to use a printed fabric with a bit of dark on it just so long as it reads light.  No neon brights please!  a little softer colors here.


Tutorial- 

1) cut a Manila envelope (or parchment paper or some stiff paper you have) into an 11” square, draw a line on the diagonal and cut it in half diagonally.


2) For the light fabric lay the triangle on the light fabric and cut with your ruler and rotary cutter, or draw around the pattern with a pen and cut with scissors.


3)  For the dark fabric pick 4 fabrics.  

Cut strips in 4 different lengths:

16 1/4” long x 2 1/2” wide

12 1/2” long x 2 1/2” wide

9” long x 2 1/2” wide

5 1/2” long x 2 1/2” wide

the longest 16 1/4” strip will be at the wide base of the triangle, and the shortest 5 1/2” strip will be at the point of the triangle. 


4) Lay the 16 1/4” strip on your ruled mat.  Take your 12 1/2” strip and line it up and center it to the longer strip.   I use a ruled mat to lay this out so that you can easily find the middle as you are joining the pieces.  Once you have found that your strips are meeting in the middle, turn it over so that right sides are together and sew on the top so that when you open it you have them stacked up so as to start creating the triangle.  Then do the same with the 9” strip and the 5 1/2” strip.  Iron towards the large edge.  You will end up with a triangular piece that steps up on the sides


5) Lay your paper triangle pattern on top of the strips.  Cut along the pattern with either a ruler and rotary cutter, or draw around pattern with pen and cut with scissors.


Join the 2 triangle pieces together, iron towards the light triangle.  

Finished block 10.5” square.  Do not trim, no need for that,  I’ll do that if it needs it.  Thanks.


You are done.  Thank you for your quilty goodness coming my way. 

Carolyn