Sunday, March 31, 2024

Hive 1, April Tutorial: Stacked Improv Curves for Rita


Hi Lovely Bees,

I’m Rita and this is my fifth year with StashBee. 
I was thinking hard to come up with a block for this year.

Initially, I wanted to make a block, based on one of the pretty cards I received with my blocks last year. I tried it out (and it is a finished quilt by now), but decided, that would be too tricky.
So, I looked for something along that line on the web and
found this tutorial by ‘elm street quilts’: 

Stacked Improv Curves Tutorial | Elm Street Quilts

I am intending to incorporate these blocks into an improv quilt for my BFF, for her upcoming round Birthday (I'm not telling you which one it is... suffice to say, the number before the zero sounds way too big...). 

The finished curve pieced sections should end up (very wonky, very roughly) approximately 7” x 7” (incl. seam allowance). Do not worry about the size, nor the wonkiness of your blocks! This is improv! They'll fit somewhere, trust me 😋.

Deviating from the linked Tutorial:

  • Please do not sew the four curved sections together.
  • Please do not trim the four curved sections.

I want to shuffle them round for a scrappier look. Thank you.

Fabric Colour Choices:

  • Slightly muted colours please, 
  • in the colour families of yellow, through orange, to red.
  • Please use either solids or blenders that read the colour.
  • Think cozy hearth fire.

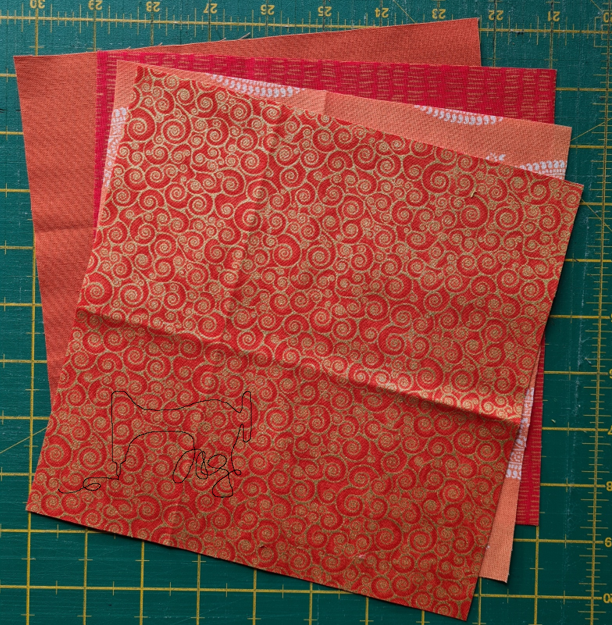
Here is my fabric pull:


Cutting Instructions:

4 different fabrics (either matching colour in different values or a mix between the spectrum – up to you!)

From each an 8” x 8” square.


Sewing Instructions Overview:

  • Please follow the tutorial up to the point, where the second set of cuts are sewn together on the four pieces.
  • Please do not trim the four pieces
  • Please do not sew the four pieces together.
    I want to shuffle them. Thanks.

Here is the overview:

Step 1:

Stack the four Fabric pieces, Right Sides up, lining up the edges, on your cutting mat.

Cut an improv curve – similar to a drunkard’s path block, but free-hand. Just make sure you have plenty of seam allowance on the edges of the fabric pieces. (Keep in mind, that there will be a second cut made later.)

If you are very uncomfortable cutting freehand, you can mark the curves freehand with chalk before cutting. (Remember: this is improv - so: wonky is good!)


Step 2:

Match each outer piece with a different coloured inside piece.


Find the center of the outside and inside pieces by folding them in half diagonally and finger pressing a small crease.

Align the respective outside and inside pieces along the cut line, Right Sides together, pin at least in a few places, working from the creased middle outward, with the convex piece on the bottom.

Step 3:

Sew with a smaller stitch length (I used 1.5 on my machine), with a 1/4” seam allowance.

Press the resulting piece. I pressed my seam allowances to the concave side, which seems the easiest way.

Step 4:

Repeat for all 4 pieces.

Step 5:

Then stack those four pieces, right sides up, lining up the corner of the convex sections.

Make a second freehand curved cut. You decide, where you have more space to do so, either inside or outside the previous seam. Just ensure, you have enough seam allowance to work with.


Step 6:

With these cut pieces repeat Steps 2 to 4.


And that’s a finish!


Thank you so much for sewing for me!

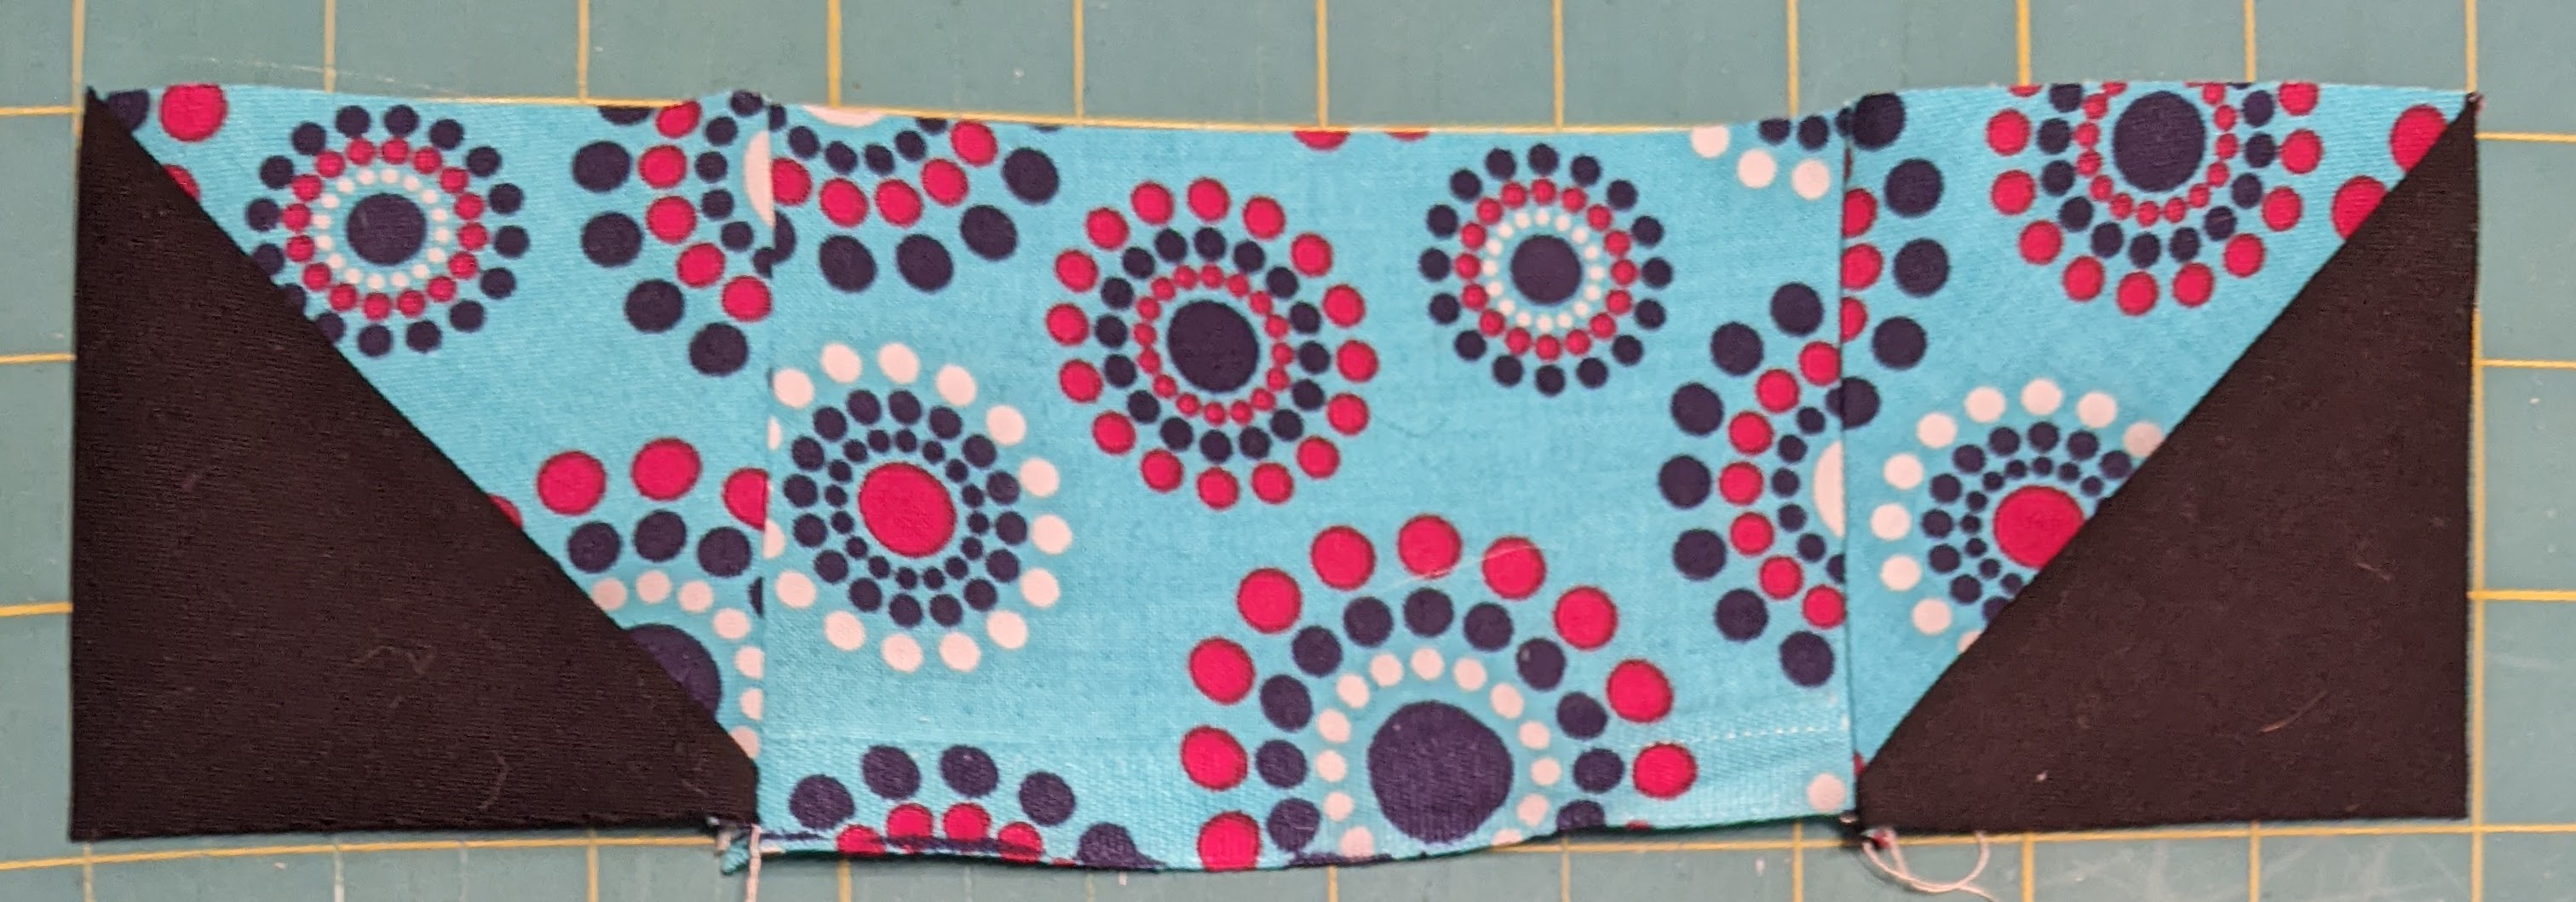
See below a picture of my finished test blocks.

Happy sewing,

Rita


Friday, March 29, 2024

Hive Crash for March

 Crashing Hive 5 for Nicole - Chicken Block

Looked like a fun block to try, so had to make one for Nicole.


Gayle - Hive 2

Disappearing Nine Patch for Marie


Hi Marie! This block came together so quickly and was so fun to make! I love the color palette hoping to get it mailed out tomorrow.

Thursday, March 28, 2024

Hive 1 - Disappearing Nine Patch for Marie

This is the first time I’ve made this block. It was both fun and easy - thanks for choosing it!

I’ll be dropping it in the mail today or Saturday. 

Chris


Wednesday, March 27, 2024

Block for Marie in Hive 1

I love blocks that seem more complicated than they really are and a disappearing 9-patch definitely fits the bill. Marie, you chose such a great color palette that I'm sure this quilt is going to look stunning when it's finished. I hope my block plays well with all the others that you are receiving.


~ Diana 

Sunday, March 24, 2024

Hive 1: Disappearing 9-patch for Marie! 🎃

Marie, I had actually never done one of these before, so I'm happy to have finally had a chance! Very straightforward and satisfying!!

(The first pic looks kinda funny...but the colors ARE kind of subdued, particularly compared to the second one.)


Saturday, March 23, 2024

Hive 1 Disappearing Nine Patch for Marie


 This was a fun one! Thanks, Marie. I can’t wait to see how these all go together. 

Friday, March 22, 2024

Hive 1 Disappearing Nine Patch for Marie

 Thanks, Marie. This block has been on my to try list. I have a feeling I'm going to be making a lot of these.


Thursday, March 21, 2024

Hive 1 March Disappearing Nine Patch for Marie

 I love this color palette, Marie!


Finished 2023 Quilt!

 "Excel-ing" in Stashbee 2023 - Hive 4 Finished Quilt!  

Thank you to all of my hive mates and crashers for helping me make this beautiful quilt that I gifted to a dear friend.  She loves it : ) and said "I can't even put into words how much I love it . . . and the fact that your friends from all over the world contributed . . . it ties into so many themes for why I love red, white, and blue . . . the melting pot that is our country, shared effort for the greater good, so much represented in this quilt."  Thank you, quilty friends! 💙💓


Saturday, March 16, 2024

Hive Crash, Hive5, March Chicken for Nicole


Hi Nicole,

I'm sending those chubby chicken to you this coming week.

Happy St. Patrick's Day 🍀🍀🍀,

Rita

Thursday, March 7, 2024

Hive 1 February folded patchwork for Chris

 I think I finally got this, how to post on stash bee!  All I had to know was that I was posting on my site rather than stash bee!  Thank you Diana Mattoni!  These are my squares and I am already starting on the next.


Saturday, March 2, 2024

March, Disappearing Nine Patch for Marie


 Hi Marie,

This was fun and quick!

I actually found a print with brown, in my stash 🤣.

They go on their way to you on Tuesday.

Happy sewing,

Rita x

Friday, March 1, 2024

Hive 1- March Tutorial - Disappearing Nine-Patch for Marie

Dear Friend Bees,

I turn to you this month to help me prepare a quick and easy quilt, that I need "pronto" for a friend. I want a quilt that looks great and has a touch of complexity. I think the Disappearing Nine-Patch offers just that.

Fabric:

I am not too picky for the type of fabric: solids, prints, batiks...

Colors:

...but I am super picky for the colors! I know my friend's color palette, and I'd like to focus on this. Notably, I know blues and violets don't exit in her world i.e. her house😁

Therefore I am presenting different palettes for you to use, or at least get inspired by. I am aiming for:


And yes, brown is fine! 

For those of you who work better with the color wheel, here are the colors I include in the "yes please" and the "no thanks" categories. Please don't introduce blue, turquoise, or violet. I will refer to these colors in the placement of the squares a little further down in the tutorial.


Note on the colors for the center square:

Out of the nine squares you will start with, one will be positioned right in the middle.  I am asking that this center piece not be white. Instead, you may use off-white, cream, or any high value of any of the colors presented in the palette. The idea is to have the center as contrasting to the other fabric used in the composition, while keeping a touch of warmth in the center (I feel pure white is too "cold").

Tutorial

The Disappearing Nine-Patch is a classic quilt pattern, loved by beginner quilters. I am sure you have done at least one already in your quilting career. Of course the pattern has been presented many times in  Stash Bees. You may use this tutorial available on the blog. The tutorial dates back to July 2012 in Hive 3!

Step 1:

Gather nine 5"x5" piece of fabric. Use four (different or same) fabrics in the greens, yellow greens and yellows of the color wheel and four (different or same) fabrics from the oranges, reds and pinks of the color wheel. One block, to be used as the center square,  should be high value and contrasting compared to the eight (8) other squares.


Step 2:

Place your nine blocks in a square of three squares by three squares. The squares with the fabric in the greens, yellow greens and yellows of the color wheel, along with the center square, should form a plus sign. The squares with the fabric from the oranges, reds and pinks of the color wheel should be in each corner. The center square should be the lightest colored fabric. 

Sew your squares in three rows and then sew the three rows together.


Cut the block in half top to bottom and side to side.


Flip the top right square and bottom left square half way so the center of the block is now the light color fabric next to the fabric from the oranges, reds and pinks of the color wheel. Sew all four squares together. The final block should measure 13.25".


Thank you so much for your help!

Marie

Hive 5 - March tutorial - Funky Chickens for Nicole

Hello there, quilty friends!

I am so happy to be back for my second year with Stashbee and to be sewing with everyone. I'm growing a bit tired of the gray weather we've been having here in Southern California, so I'm hoping to bring some bright and cheerful sewing to your space! This month we are going to be doing the Chubby chicken block by Oh, Kaye Quilting. I crashed a hive last year that did this pattern and loved it so much, I decided I needed chickens of my own. I've basically copied Emily's wonderful instructions from January of last year.

We'll be using the same pattern, just a different color palette.


Unfinished block size: 12.5”

Fabric Style: The chicken body and wing accent is a bright, cheerful combination of any 2 fabrics you have in your stash. I'm looking for saturated ROYGBIV colors in the wildest patterns imaginable. Think it's too wild? It's probably PERFECT! The beak and comb are orange; feel free to use two different oranges, any hue you'd like. The background is solid or tone-on-tone DARK, one fabric. I'm not picky about what color you choose for the background as long as it reads dark (black, blue, gray, green, and purple are all fine!) and provides a good contrast to your other color choices. The only prints not welcome are batik, branded, or cartoon character prints. To give you an idea of what I'm looking for, here's a pull from my stash:

Cutting Instructions: There are lots of moving parts, so each piece has a letter label. Keep a close eye on your half-square triangle (HST) orientations! I’ve included a labeled diagram from Oh, Kaye Quilting as well as pictures from my own assembly.


Background (one fabric, solid or tone on tone DARK)

A: 5” Square 

F: 5.5” x 3” 

G: 3” square

H: 2.5” x 1” 

I: 3” x 2” 

J: 2.5” Square 

K: 8.5” x 2” 

L: 10” x 1.5”

M: 12.5” x 1.5”

Main Body (scrappy or single fabric, one color and hue, quilter’s choice)

A: 5” Square

B: 6.5” x 3”

C: 5.5” Square 

D: (2) 5” x 3” 

E: 7.5” x 2”

Wing Accent (contrasting color to Main Body, quilter’s choice)

C: 5.5“ Square

Beak & Comb (scrappy or single fabric, orange)

G: 3”x 3”

J: 2.5” x 2.5”


Block Construction: Press your seams as you please. I'm not picky about that either. :)

1. Place 5” squares A from Background and Main Body right sides together. Sew ¼” seam around the edges, then cut diagonally to make 4 HSTs. Trim to 3”. You will have one extra.


2. Place 2.5” squares J from Background and Beak & Comb right sides together. Mark a line down the diagonal and sew ¼” seam on either side, the cut down the middle to make 2 HSTs. Trim to 2”. You will have one extra.


3. Place 3” squares G from Background and Beak & Comb right sides together. Mark a line down the diagonal and sew ¼” seam on either side, then cut down the middle to make 2 HSTs. Trim to 2.5”. You will have one extra.

  1. Place 5.5” squares C from Main Body and Wing Accent together. Mark a line down the diagonal and sew ¼” seam on either side, then cut down the middle to make 2 HSTs. Trim to 5”. You will have one extra.


5. Sew together in a row: A HST from Step 1, then D, then another A HST together. This is the bottom of the chicken. Double-check your HST orientation.


  1. Sew C HST from Step 4 to D. Then sew E on top to make the chicken body. Double-check your HST orientation.


  1. Sew the chicken body CDE from Step 6 to B.


  1. Sew the chicken bottom ADA from Step 5 to the chicken body BCDE from Step 7.


  1. Sew Beak & Comb G from Step 2 to Background H. Double-check your HST orientation.


  1. Sew together in a row: A HST from Step 1, then Background F, then Beak & Comb GH unit from Step 9. Double-check your HST orientation.


  1. Connect the row AFGH from Step 10 to the chicken bottom/body unit made in Step 8.


  1. Sew Background strip L to the chicken bottom.


  1. Sew Background strip M to the left/tail side.


  1. Sew together in one column: Background I, then Beak & Comb J from Step 2, then Background K. Double-check your HST orientation.


  1. Connect the column IJK from Step 14 to the right/front of the chicken AND VOILA!


Trim your finished chicken to 12.5" and you're done. Thanks for sewing with me. I can't wait to see your wild and funky chickens.

~~:>  Nicole