Thursday, October 31, 2019

Hive 5 November Tutorial - It's all about scraps!


Happy November Hive 5

It’s the final month in our 2019 Stash Bee.  And for my month, I am asking the hive to curate the content of my Stash Been 2019 quilt.  

I have fallen in love with scraps.  I love what they represent (finished projects/dreams).  And I love the challenge of creating something interesting from scraps.  And then there's the joy of feeling thrifty.  Oddly enough, I quickly finish projects made with others' scraps while ignoring my own projects.  Hmmmm.     

This last year, I exchanged scraps with a modern quilter in Florida.  Using three of her scraps, I’ve generated four pillows and one small quilt top.  Of course, I forgot to take a picture before I used each of them . . . so use your imagination . . . 

From this, 


I created three pillows.  I added a solid tan that came from a pair of my son’s outgrown pants and some tea dyed white from old Halloween curtains.  I used scrap decorator fabrics for the backs.  
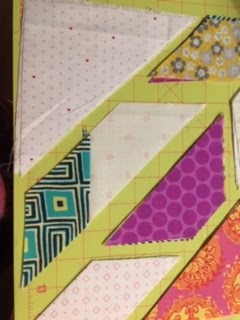

From this,


I created one pillow.  I added the solid bars on the top and bottom to create a square.  Really enjoyed the relaxing hand quilting.  


And from this scrap,


I created a 38” x 35” quilt top.  I added the framing solids/prints around each set of single color x’s and the terra cotta for the background.


My Florida quilting friend now calls me the "scrap whisperer."  

Since scraps challenge, excite and energize me, I’d love to receive some scraps from your stash.  

Choose a scrap or two that reads modern (solids and/or prints).  I can use scraps as large as 16” square or as small as 2.5” strips.  Unusual sized scraps are fun also.  They can be something from one of your completed projects or a bit of something you’ve never been able to use because of its small size.  

I will challenge myself to use them all in one or maybe two projects with a few additions from my stash.  I took Sherri Lynn Wood’s Improv Mashup workshop this summer and might use some of her techniques to experiment and disrupt symmetry.  

For those who would like to send scraps based on what others are sending, you can check #stashbeehive5 prior to pulling.  You can select something that might build on what others have chosen or toss in something that might take the project in a different direction.  Whoever posts first might just set the tone.  

I hope this is a relaxing and fun way to end our 2019.  And this time, I'll have "before" pictures from everyone's Instagram posts!  

I’ve really enjoyed this year with each of you.   Thank you for being such a great hive.  

Cathleen
aka Kitch Kouture


Wednesday, October 30, 2019

cupcake block for october

Once again, I have left it for the last minute. But it is done and i really like how it turned out. I was a bit nervous to try it. But it was much easier than i thought it would be. I hope you like it and that it fits into your design.


Sunday, October 27, 2019

Hive 2 cupcake for Joanne

A chocolate cupcake for Joanne.  With sprinkles too.  Enjoy.

Paulette

Hive 2 October cake


Valorie was unable to post this so I am trying to get it done for her.  So far so good.  I love these little cakes.  They look yummy.  Joanne is going to have quite a variety. 
Paulette

Friday, October 25, 2019

Hive 2 cupcake for October


This was only the second time I've done applique (my first year in Stashbee was the other!). I hope this works well with the others!

Jennifer

Wednesday, October 23, 2019

Hive 2 block for Jo

Hi Jo,

Applique is not my friend. . . .but after several attempts here is what I came up with:


Don't ask me how the picture came out upside down. . . .it is just "par for the course" with my attempts to get this block done.  LOL

I did not do any stitching on this one. . . .my other attempts were so bad that I thought it was just easier to send it unstitched.  I am good with my straight stitching but my old machine just does not do wiggles and squiggles well.

I hope it plays well with the rest of the blocks that you have gotten.  Your quilt should be a fun one.

Happy quilting,

Sherry V.

Monday, October 21, 2019

Hive 2 Cupcake

This was really fun! I like appliqué and who doesn’t love cupcakes! It’s in the mail in the morning :)


Friday, October 11, 2019

Thursday, October 10, 2019

More cupcakes for the party

I  easily found a drawing of a cupcake that I could use for my block.  I hope you like the sprinkles on top.  Kathie L in Allentown

Cup Cakes for Jo

Look what I did!!!Thanks so much Jo for doing applique again. I was afraid to try it before. 
I decided to say , what can I lose, go for it!
It really was fun. I hope you like these. I do. 
I will try to get these in the mail by next week. 
I am looking forward to seeing this all together.
Happy Sewing, Rose

Sunday, October 6, 2019

Hive 4 October Tutorial- Scrappy Hunter’s Star

Hello Hive 4,
Welcome to October.

A quilt made from the Hunter's Star block popped into my news feed on Instagram recently, and I fell in love with the possibilities of arrangement of the pattern.
I found an amazing tutorial  From the Hopeful Homemaker online and used her quilt as my inspiration.

I decided on a slightly different style than her totally Scrappy version to make cutting easier.


Supplies:
You will use 4 light background fabrics, and 4 color (print) fabrics
Backgrounds should be white, white on white or low volume that reads white (not cream or tan).

For the prints, I like bright vibrant happy colors. No grey, Black or Brown.
They can contain more than one color, Novelty is OK if it is sewing related.
Here are a few pics of my colored fabrics that I pulled to give you an idea of what types I like.
My completed picture above in kind of dark because the weather has been gloomy here.
These pictures below are a better example for colors.
Please use any variety and combo of colors, do not choose the same ones I used in my sample block.
 

We will be working with many biased edges, so a little starching of the fabrics may help to keep them from getting distorted.
I used a dry iron and a little bit of  Unscented Mary Ellen's Best Press.

For each print and background, you will need one 90 degree triangle with the two shorter sides measuring 10”.
I started with a 10” square and cut it into two triangles to get the piece I needed!
 

Cutting:
Step 1 -
For each triangle, (background and prints)
place your ruler on the long side of the triangle, and cut 2.5 inches from the edge. This will leave you with one triangle and one trapezoid shape.

Step 2 -
From the end of the trapezoid shape you just cut, measure in 2.5 inches and cut to form a diamond.

   
From the cut you just made, measure in 2.5 inches and cut to make a second diamond.


You will have two diamonds, one trapezoid and one triangle of each color.

Cut each print and each background in this same way! 
You should now have 16 diamonds, 8 trapezoids and 8 triangles.


Arrangement:

This block is made up of four quadrants.
Please Arrange the fabrics so that each quadrant has 4 background and 4 print fabrics.
Please try to be sure that each background and each print has only one piece in each quadrant.

Assembly:
Starting with one quadrant. You will sew the diamonds onto the trapezoid first.

Turn a printed diamond onto the background trapezoid. 
Carefully line up so the little triangle points extend 1/4' past the other fabric.
To make this easier for myself, I marked the 1/4' sewing line on the white fabrics, then you line this up with the edge of the print, and you have the perfect amount of points sticking out.

This will allow the edges of the fabric to fall into a perfect line once sewn and pressed.
Sew with a 1/4' seam allowance. Press to the dark print.


Repeat with the other printed diamond.
For this entire block, please Press the seams to the print to allow for nesting.

You should now have a strip of fabric for the center of that quadrant


 Repeat the process, this time sewing the background diamonds onto the print trapezoid.
Press toward the print.
Next, Sew each triangle corner piece onto their corresponding strip that you just made.
The white background triangle should be sewn to the strip with the white background trapezoid..
The print triangle should be sewn to the strip with the print trapezoid.
On this step, the points that stick out will likely be larger than 1/4".
To center, I folded the triangle and the strip in half and marked the centers of each piece, then lined up the centers before sewing for accurate alignment. 
Press to the print.


Sew the two larger halves of this quadrant together.
This is the most important part of the assembly, nest the seams between the diamonds and trapezoids together. See where I have pinned in the photos below.


Repeat for the remaining 3 quadrants.

 Do not trim! 
Each quadrant should measure approx 8.5". All of my quadrants were off a little on measurement, so I put the 45 degree ruler line on the center seam of the block and trimmed to 8.5".
YOU DO NOT NEED TO TRIM!  

As many of you have done this year, I am going to ask that you keep the 4 quadrants seperate.
This will give me more layout options, if I can mix and mingle all of them with the other hive mates colors if I decide to once they all arrive. 


(When assembling the whole block, I chain pieced the diamonds onto the trapezoids and again chain pieced the triangles onto the strips to save time.)

If you are running out of time, and cannot finish all 4 quadrants, please do as many as you can.
Thank you, and I look forward to seeing all your beauties.

Thank you for your patience in this posting. I was having problems getting pictures to post via ipad and iphone, and I had to meet up with my son at college to use the laptop to the tutorial.

Message me with any questions.

Heather

Tuesday, October 1, 2019

Hive 1 October Tutorial - Shoofly Block

Hi Hive 1!

I'm requesting Shoofly blocks this month.  Hope they are relatively quick, easy, and fun for you!  Follow this tutorial by Annemarie Chany:

Click here:
shoofly block

I'd like version B.  It uses four different fabrics - three colored and one low volume.  Follow the directions for the 12 inch block (12.5 inches unfinished).


For fabrics A, B, and C in the pattern, I'd love modern brights.  I love Cotton + Steel and Ruby Star Society!  Examples of other modern brights I like include fabrics by Anna Maria Horner, Alison Glass, Carolyn Friedlander, Denyse Schmidt, Giucy Giuce, Latifah Saafir, Lizzy House, and Libs Elliot.

Part A is a half square triangle block.  I'd like it to be made of one colored fabric (pointing into the block) and one modern low volume (the corners of the block).  The low volume can have color or gray or black and the background can be white, cream, light gray, etc.

For colors, I'd like blues, greens, gold/mustard, oranges, deep purple, burgundy or deep raspberry.  Please do not include browns or bright Christmas red.


Happy sewing!!  Thanks for making for me!

Kerry

Hive 2 September block

I woke up on October 1 and realized that although I posted my September blocks on instagram, I never posted them here.  Sorry! 

These were fun, easy blocks!


Hive 3 October Tutorial- Sunflower Block

Hello everyone!!
My name is Liz Horgan and I live in northern New Jersey. I believe this is my 5th year doing the stashbee.
I had a tough time deciding what I wanted to ask you to do and finally settled on one of my favorite flowers--sunflowers!! They found a very special place in my heart when my mother passed away in 1989. One of my sister's friends sent a bouquet of sunflowers to my parents house. At a time of such sadness, it was the one thing that made me smile. Sunflowers always make me think of my mother, and bring a smile to my face and heart!
So, I follow Diane Knott of Butterfly Thread Quilting. She did a mystery quilt in 2014 which was a sunflower quilt. She gave me permission to use her tutorial for my blog.
Here's the link to her tutorial -  https://drive.google.com/file/d/0B6pQm-ISUMSUU3Q3ZW14UDlhOXM/view
And here's a picture of her finished quilt - isn't it beautiful! She does the steps of the tutorial in different order than I'm giving. She also uses an option of using tri recs ruler for the large triangle of the petal, but I'm giving instructions for a 4 1/4" square and cutting on diagonal once.

Diane's tutorial is for the full quilt and she did strip sets for the 4 and 9 patches, but since I'm asking you to make a sunflower block, I'm going to give instructions to use 2" squares. If you feel ambitious and want to make and send along a 9 patch for the cornerstones and/or cream/low volume for the sashing strip sets, I would be happy to have them!
Here's a picture of my finished block-

I used different yellows, but would like you to use all same fabric for your petals--mine is too busy! I'd like the your 4 patches to be scrappy though.
Here's some of the fabrics I picked from my stash-
For the block, you'll need the following:
Light cream/white background - 8 - 2" scrappy squares and 1 - 4 1/2" square.
Yellow/gold - 1 - 4 1/2" square and 2 - 4 1/4" square.
Medium/dark greens - 8 - 2" scrappy squares.
If you want to make: 
       9 patch cornerstones - 5 - 2" scrappy green and 4 - 2" scrappy light cream/white.
       strips set for sashing - 3 -  2 x 9 1/2" scrappy background strips sewn to make a 5 x 9" rectangle.
I'd like the yellows to be bright yellow/gold--any yellow that makes you smile!(I wasn't thrilled with my sunflower print)  Greens to be medium to dark, brown center to be medium, and the background to be white or light cream--I'd like the yellow/gold to stand out against the background.

First make scrappy four 4 patches with 2" green and cream squares. They should measure 3.5", If you want to make 9 patches for cornerstones, these use 2" squares also.

Next cut yellow fabric to make the petals by cutting the 4 1/2" yellow and background on the diagonal twice. Sew a yellow and background triangle together with the 90 degree angles against each other at the bottom. Please put the yellow triangle on the left as shown below. Press to the yellow Make 4.
Now cut the two 4 1/4 on the diagonal once and you'll have 4 additional triangles. I finger pressed the long side of these triangles and lined the crease up with the seam of the previous triangles and sew together. It's hard to see the crease in this picture. Make 4 and press to the larger triangle.
Trim these to 3 1/2" square. I lined up the 1 3/4" intersection on the diagonal line of my ruler where the 3 triangles meet, trimmed 2 sides, then turned the block around, lined up again and trimmed.

Make four petals.
Now use the 4 patches, petals and 3 1/2" brown square to make a 9 patch block. Just be careful with the placement of the 4 patches that the green is in the outer corners.
And sew together!
I hope this was clear and not too complicated. Thank you so much for helping me make a quilt that will make me smile, think of my mother, and think of you!! Please email me if you have any questions - eahorgan@gmail.com