Saturday, July 31, 2021

Hive 1 July block for Julia


Sorry for my tardiness to the party Julia! My toddler got a really bad case of RSV and was very sick (and therefore home from daycare….) for a week! Who gets RSV in July? Apparently there’s a really bad outbreak in the Southeast! 


Anyway, this will go in the mail ASAP, but it won’t arrive by the first! Sorry! 

Wednesday, July 28, 2021

Thursday, July 22, 2021

Hive 1 - Jacob's Ladder Block for Julia

 I had this 90% complete by the 3rd of the month and haven't been in my sewing room until today to finish it. Summer is always so busy in our house, I'd be lying if I said I wish the kids didn't have to go back to school. Just 3 more weeks and I can't wait! 

I hope this block works well with the others that you already have.


~ Diana @ Red Delicious Life

Tuesday, July 20, 2021

Hive 1 Block for Julia

What a great block! I had way more autumn colors in my stash than I realized, I had trouble narrowing it down. Can't wait to see how they all look together!

Enjoy!

- Julia D.

Saturday, July 17, 2021

Wednesday, July 7, 2021

Hive 1 July Jacob’s Ladder for Julia

Hi Julia,

Here are a couple of autumn blocks for you.  I love your idea to set them on point. I couldn’t get a good picture of them that way but they looked good that way on my wall!  This is a really versatile block.  Heads up, you’ll see a variation of it next month!   Karen 


Tuesday, July 6, 2021

Hive 1 Jacob's Ladder for Julia C.

Hi Julia,

Thank you for this great tutorial! The nine 4.5" blocks fitted nicely together...which is good because I was obsessed to make the corners meet:) I love the ladder. You will have a fantastic quilt! Take care, Marie


Monday, July 5, 2021

Hive 1 July block for Julia

 This is a block I've often made because I love the diagonal design it creates.  Have fun with your blocks.


Kathie Laposata

Saturday, July 3, 2021

Hive 1, July Block for Julia


Hi Julia,

You've pushed me out of my comfort zone with this ;) .

I haven't made many traditional bocks yet...

Great training for my accuracy, though.

Hope you like the fabrics. I made only one, but put the left over HSTs in the envelope, too.

Went into the post box yesterday.

Lots of love from Ireland,

Rita

Friday, July 2, 2021

Hive 1 July Jacob's Ladder for Julia C.


 Hi Julia, this was a familiar block because our guild just made these.  I wanted your block to be scrappy so I made 4 different half square triangles. I usually make 3 blocks each month for everyone and I got carried away. You said you would like the leftovers so I decided to just sew them instead. I ended up with 4. I hope the colors work for you. If they don't I understand.  This will be a very autumnal quilt. I can't wait to see it completed.  Jayne

Thursday, July 1, 2021

Hive 1 July Tutorial - Jacob's Ladder Block

I'm looking ahead to autumn with my quilt block pattern. My block for the month is Jacob's Ladder. Apparently it goes by a variety of names, but this is how I've seen it referred to most often. There's also a similar block that's done in a four patch rather than a nine patch style I've seen called the same name (that block is used in the popular "Jewel Box" quilt). I'll be setting this quilt on point, so the grid of light color squares will be straight up and across instead of forming a diagonal pattern.


I have written a tutorial below, but I found the free block instructions from Fat Quarter Shop to be very useful. Feel free to follow along from their PDF instead, if that works better for you!

For this block I want an autumn color palette--oranges, dark greens, reds, mustard yellows, and some gray/black all welcome. Nothing too bright, go more towards earth tones. My stash includes a lot of old-fashioned patterns because I had a fat quarter bundle of civil war prints I pulled heavily from for this block--but solids, tone on tone, batiks, and prints are all welcome here as long as they follow the color palette.
​​


You'll also need a light-colored neutral fabric. Anything in the vicinity of cream to very light beige is okay here. No bright whites. Solids or tone on tone fabric preferred, but low volume is fine too as long as it clearly reads as the light color. I have a whopping two of these in my stash.

Fabric A, autumn fabrics (scrappy preferred): 
10 2.5" squares
2 5" squares

Fabric B, cream:
10 2.5" squares
2 5" squares

First we'll make the HSTs. I use the two at a time method. Stack the 5 inch cream square on top of the autumn square, and sew a quarter inch on either side of the midline. (I always use a marker for this--more power to you if you can eyeball it!) 

Cut down the middle, and please press seams open. Repeat with the other squares. Trim all HSTs down to 4.5" square.

Next, make five four-patches as shown, with the cream and colored fabrics opposite each other. Because I'm making so many, I am using the strip method for this. Make them in whatever way works best for you and your stash. Again, please press all seams open. These units should be 4.5" square.


Arrange the units into a nine patch as shown, and sew together. You'll see the line of all light-colored squares going diagonally across the block, with the dark half of the HST pointing towards the light line. Please press all seams open for this final assembly, too! Your final block should measure 12.5" square. I'll square them up when I receive them. 

(Sorry for the shadowy photo--the hazards of late night sewing!) Of course I only expect one completed block, but *if* you end up with just extra HSTs or four-patches and want them off your hands, I'll happily receive them as individual components.

Thank you all! Please reach out with any questions or clarifications. Happy sewing! 

Hive 3 July Tutorial - Flag Star Block

Flag Star Block

Hello everyone!  I hope you are all having a great summer so far.
For July, I have chosen a patriotic block.  


I found this block on the Blue Feather Quilt Studio blog.  


Fabric selection is easy.  You will need a small piece of blue fabric, and red and white fabric.  I have not included any pictures because for me anything goes (e.g., floral, stripes, dots, solids). The background is white, but you can use low volume whites if you want to as well.  I used a white print on white fabric for my background.

Cutting instructions:
  • 1 - 3 1/2" blue square
  • 1 - 2" x 3 1/2" red rectangle
  • 1 - 2" x 6 1/2" red rectangle
  • 8 - 3 1/2" red squares
  • 1 - 2" x 3 1/2" white rectangle
  • 1 - 2" x 6 1/2" white rectangle
  • 4 - 3 1/2" white squares (these are not shown in the pictures)
  • 4 - 3 1/2" x 6 1/2" white rectangles


Sewing:
  • All seam allowances should be 1/4".
  • I am not picky about how you press your seams.  Do it as you would do your own.

Block Center:
  • Sew both sizes of red and white rectangles together on the long edges.
  • Sew the short red and white rectangles to the blue square.  (See image below.)
  • Sew the blue square and red and white rectangles to the longer red and white rectangles. (Again, see photo below.)


Flying Geese:
  • Draw diagonal lines, corner to corner, on the wrong side of the red 3 1/2" squares. (It's hard to see my line in the picture below.)
  • Place a red square on top of the white rectangle, with right sides together.
  • Sew on the line.
    

  • Trim away the excess corner, leaving 1/4" seam allowance from the stitched line.
  • Press open.
  • Repeat on the opposite side, placing the square with the diagonal as shown below.


  • Sew on the line.
  • Trim the excess corner and press open.
  • Make a total of 4 flying geese units.  They should measure 3 1/2" x 6 1/2".


Sewing Rows:
  • Row 1: Sew one 3 1/2" white square on each side of a flying geese unit.

Row 2: Sew one flying geese unit to each side of the center flag unit.  (I forgot to take a picture of this, so I am putting in the picture of the completed block for reference.)


Row 3: Sew one 3 1/2" white square on each side of a flying geese unit.


Block completion:
  • Sew the rows together as shown below.
  • The finished block should measure 12 1/2".  Don't worry about trimming it.


And there you have it.  My first ever tutorial.  I hope the instructions were easy enough to follow.

Happy Fourth Hive 3!!!

Cathy


Hive 2 July Tutorial- Pretty in Pink

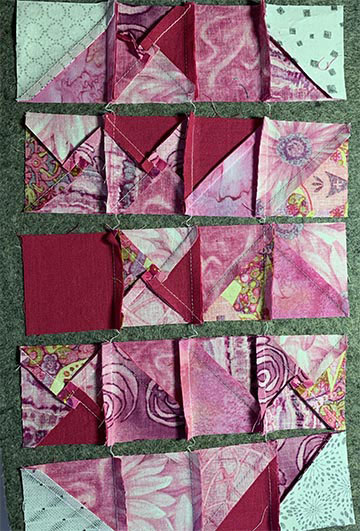
Greetings Hive Mates!  I am excited to share the July block with you.  It's titled Pretty in Pink because the focus of this block will showcase bright/hot pink!  This will be an improvisational block so let your creativity fly. The final block will measure 16.5" unfinished square. 


The inspiration for my color pallet came from a blog post I saw on Laura Loewen's blog Quilt Fort Company . Here is a post on Instagram too.

I just love that bright magenta with all of the pink and dark gray!  Here are the colors from my stash. If you have hot or bight pink, this might be the focus for your block.  I added the bright yellow, light pink, and teal blue.  Please stay away from primary colors (regular greens, regular reds, regular blues), novelty prints, batiks, and browns.  This is the time to showcase neons and brights.  Solids are welcome, but not necessary.  Blacks and greys are encouraged, and if you have fabric with both black and pink in your stash, even better.

The first step in making the block is to cut 3 to 8 rectangles in various sizes with the colored fabrics.  Try to keep all your angles at right angles and avoid a "wonky" effect. The bigger the rectangles the less time it will take to make the block. If you don't have that much time 3 is great.  If you want an improv challenge make them smaller. (I didn't end up using all of these in my block). 

Each colored rectangle  will be framed in white. I'm using Kona white, you can use something similar. Cut several white strips which you will use to "frame" each rectangle. These can be various sizes from 2" to 5" wide. The longer strips are better, and will produce less waste, the smaller ones were my scraps. 

Using the white background strips, frame out several colored rectangles by sewing the sides on first, trimming, and then the tops (square up if necessary).  Press seams towards the colored fabric, and away from the white when possible. 


Join your framed rectangles together. You will have to add more white background, or trim background to make them fit.  This part is the fun part!  There is no right or wrong, no too much background, or no too little background.  Just make sure each colored rectangle is surrounded by white. (*hint - I press and square up frequently when doing impromptu blocks). Here was the process for my block.

Then...
Then...
Trim the finished block to be a 16.5" unfinished square.

I will add white sashing in various widths between the completed blocks. I'm excited to free motion all that white negative space when the blocks fit together!

Happy creating!  😍😍😍

-Jamie Quirk

Hive 4 July Tutorial - Pineapple Block

 July Pineapple Block

There are "Note" paragraphs at the end of the tutorial. I had a chat with Helen and she pointed out to me that this block hovers perilously close to the 90-minute time limit. I admit that, as this is my first Stash Bee experience, I had lost track of that requirement. The Notes refer to ways to possibly reduce or minimize the workload. If you're short on time, go ahead and leave out all of the QSTs or just do the minimum. I only ask that it's not 100% squares. 

I did piece a third pineapple today in just over 80 minutes. This included time spent making coffee, winding bobbins. and fielding a busy text convo. I am a speedy piecer with a fast Juki and I rock a bloc-loc/turntable combo that makes trimming go by in a flash. However, my pieces were already cut, whereas the 90 minutes should include cutting time. So. With the caveat "Read All the Instructions Before You Begin the Project," here is my pineapple block.


Thanks for doing this block for me. I have been thinking of a pineapple quilt for a long time. There are many varieties of pineapple blocks in the "Quiltosphere" and they're all pretty cool, since they're, well,  Pineapples. This block is composed of 32 scrappy 2˝ squares and finishes at 8˝ x 16˝.

I'm looking for pineapples in a variety of colors. The crowns, though traditionally green, I would like to see in a variety of cool shades: Lime, Green, Jade, Teal, and even Blue. The pineapple bodies can be Fuchsia, Red, Orange, Yellow, Chartreuse, Turquoise, Violet, or Purple. Even Blue if you don't use blue for your crown. The backgrounds I used are low-volume whites with black design elements. However, low-volume fabrics with off-white, light beige, and light gray are also fine. If your design elements are in color rather than in black, no worries. They'll fit right in. You'll notice in my sample fabric pulls that an assortment of fabric types are considered 'acceptable." Though the look I am going for is mainly tonal, there are a couple of times when I used a more 'printy' fabric when its dominant color was correct. I used solids, commercial prints, Grunge, wovens, a hand-dye or two, and batiks to round out the tonal theme. I show a lot of different fabrics to show you a good range, Use as many as you like, or as few. Pretty much anything goes as long as the finished Crown and Body have an overall read as a color. Here are some sample fabric pulls from my scrap bag:

                                                                        Magenta and Teal

                                                                        Purple and Lime
         Yellow and Green
                                                           White with Black Low-volume


Each block needs 32 squares. These will either be plain squares, half-square triangles, or quarter-square triangles. The piecing method I devised for the Pineapple body will produce pineapple blocks with randomly arranged (by you!) squares, HSTs and QSTs. The number of each motif that will appear will vary from block to block and from person to person. 

Cutting:

From Crown Fabrics: Cut 7 3-1/2˝ squares. Cut all squares in half diagonally.

From Body Fabrics: Cut 18 3-1/2˝ squares. Set aside between 3-6 squares that will stay squares. Cut the remaining squares in half diagonally.

From Background Fabrics: Cut 7 3-1/2˝ squares. Set aside 2 squares that will stay squares. Cut the remaining squares in half diagonally.

Construction:

Choose 6 Background triangles and 6 Crown triangles.Using one of each, sew them into 6 HST pairs. Set aside.

Choose 4 Background triangles and 4 Body triangles.Using one of each, sew them into 4 HST pairs. Set aside.

Using the remaining Crown triangles, pair them up and sew them into 4 HST pairs. Set aside.

Using the remaining Body triangles, pair them up and sew them into HST pairs. How many? That depends on the number of body squares you removed before cutting the remaining body squares in half. You will have between 12 and 15 HSTs when you are finished sewing. From these HSTs, choose between 3 and 6 that will go on to become QSTs. Set the remaining HSTs aside.

Cut the HSTs you chose in half diagonally, perpendicular to the first diagonal seam.


Arrange your HST halves into pairs and sew them together, forming QSTs.


Add the finished QSTs to the other components you have set aside.

Trim all components to 2-1/2˝ squares.


Using the freshly trimmed components, and following the photos below, arrange the crown and background pieces as shown into 3 rows of four squares each. Note the direction of the HSTs is important to convey the look of leaves. Sew the squares into rows and then sew the rows together.


Using the remaining components, arrange your squares, HSTs and QSTs as you like them. Unlike the crown, the direction of the components is unimportant. In fact, I think the less organized they appear, the better. Sew the squares into rows and then sew the rows together.


Once your Crown and Body sections are complete, sew them together (with the crown on top!!). Wow! You're done!


A note about pressing: I don't care how you do it. That said, though I have been pressing open a lot of late, in this case, I pressed everything to one side, I pressed alternating rows to the right then the left, and I pressed all horizontal seams down. But I am happy for you to do your pressing in the manner that makes the most sense to you.


Thanks to all of you, you have made my first foray into StashBee life delightful. I am sorry my schedule made me a "Late-in-the-Day" day late. 

The "Notes!"

A note about component selection: You will notice in the Body cutting directions, there are varying amounts for you to choose to make plain squares and QSTs, with the balance ending up as HSTs. Using the higher number of squares and the lesser number of QSTs will minimize your effort, and that is fine with me, even to the point of saying that if you'd prefer using even more squares and fewer QSTs and HSTs, that is also fine. What I mostly would like to see is everyone having a good time. 

A note about cutting: I found it simpler to cut all the squares at 3-1/2˝ prior to making my components. It allowed for the most flexibility in making various components shift in number on the fly. I am someone who always cuts a little larger and then trims down to a tidy square, and having squares be a little larger than necessary didn't bother me all all. However, if you prefer, and want to decide ahead of time how many components there will be of which sort, instead of cutting everything at 3-1/2˝, you can cut all squares at 2-1/2˝, and HSTs at 2-7/8˝ (or 3˝ and trim down) and all QSTs at 3-1/4˝ (or 3-1/2˝ and trim down). Your decision. 

PS: Due to its scrappy nature, I didn't think speed piecing techniques were appropriate here.


Next up for me: The yellow pineapple!


And it's done!