Monday, October 31, 2022

October Holiday Heart for Minnie

 Hi Minnie,


What a fun block to start off the holiday season! :) Can’t wait to see all of these hearts together! 

-Nicole

Tuesday, October 25, 2022

Holiday hearts for Minnie

 I just love how many holiday hearts Minnie is getting for her month. Here are 2 more to add to the collection. She's going to have an amazing quilt when she's finished.

I will hopefully get to the post office this weekend to get them mailed out to you.

~ Diana @ Red Delicious Life

Hive 1 Hearts for Minnie

 Hi Minnie,


I love this block! I apparently have been hoarding some really pretty Christmas fabrics for awhile, I found a huge tub of them!


My mother-in-law was visiting while I was making them and has already “requested” a table runner for the holidays. 


This will be in the mail this afternoon!


~Adrienne


Monday, October 17, 2022

Hive 1 Block for Minnie


I loved putting together this quilt block! It is so wholesome and whimsical. Perfect for getting me into the holiday spirit.

My first attempt was a bit too small and I think this one might be a little bit too big, but I figured bigger was better. 

-Starla

Tuesday, October 11, 2022

Hive 1 Block for Minnie


What a sweet block you had us make this month! I used my all time favorite Christmas fabric (purchased totally on a whim several years ago). So far it's been used for a pillow, a mask, and now your lovely block! I kept the other fabrics simple so it didn't get too busy. 

Enjoy!
- Julia H.

Hive 1 for Minnie


Really enjoyed this block and it was super simple to make. I couldn't decide which colour combination I liked more so I made you both. Hope you like them!

Kathrin

Monday, October 10, 2022

Hive 5 ~ October Tutorial ~ Blue Cross Block for Laurie (aka @FujiQuilts)

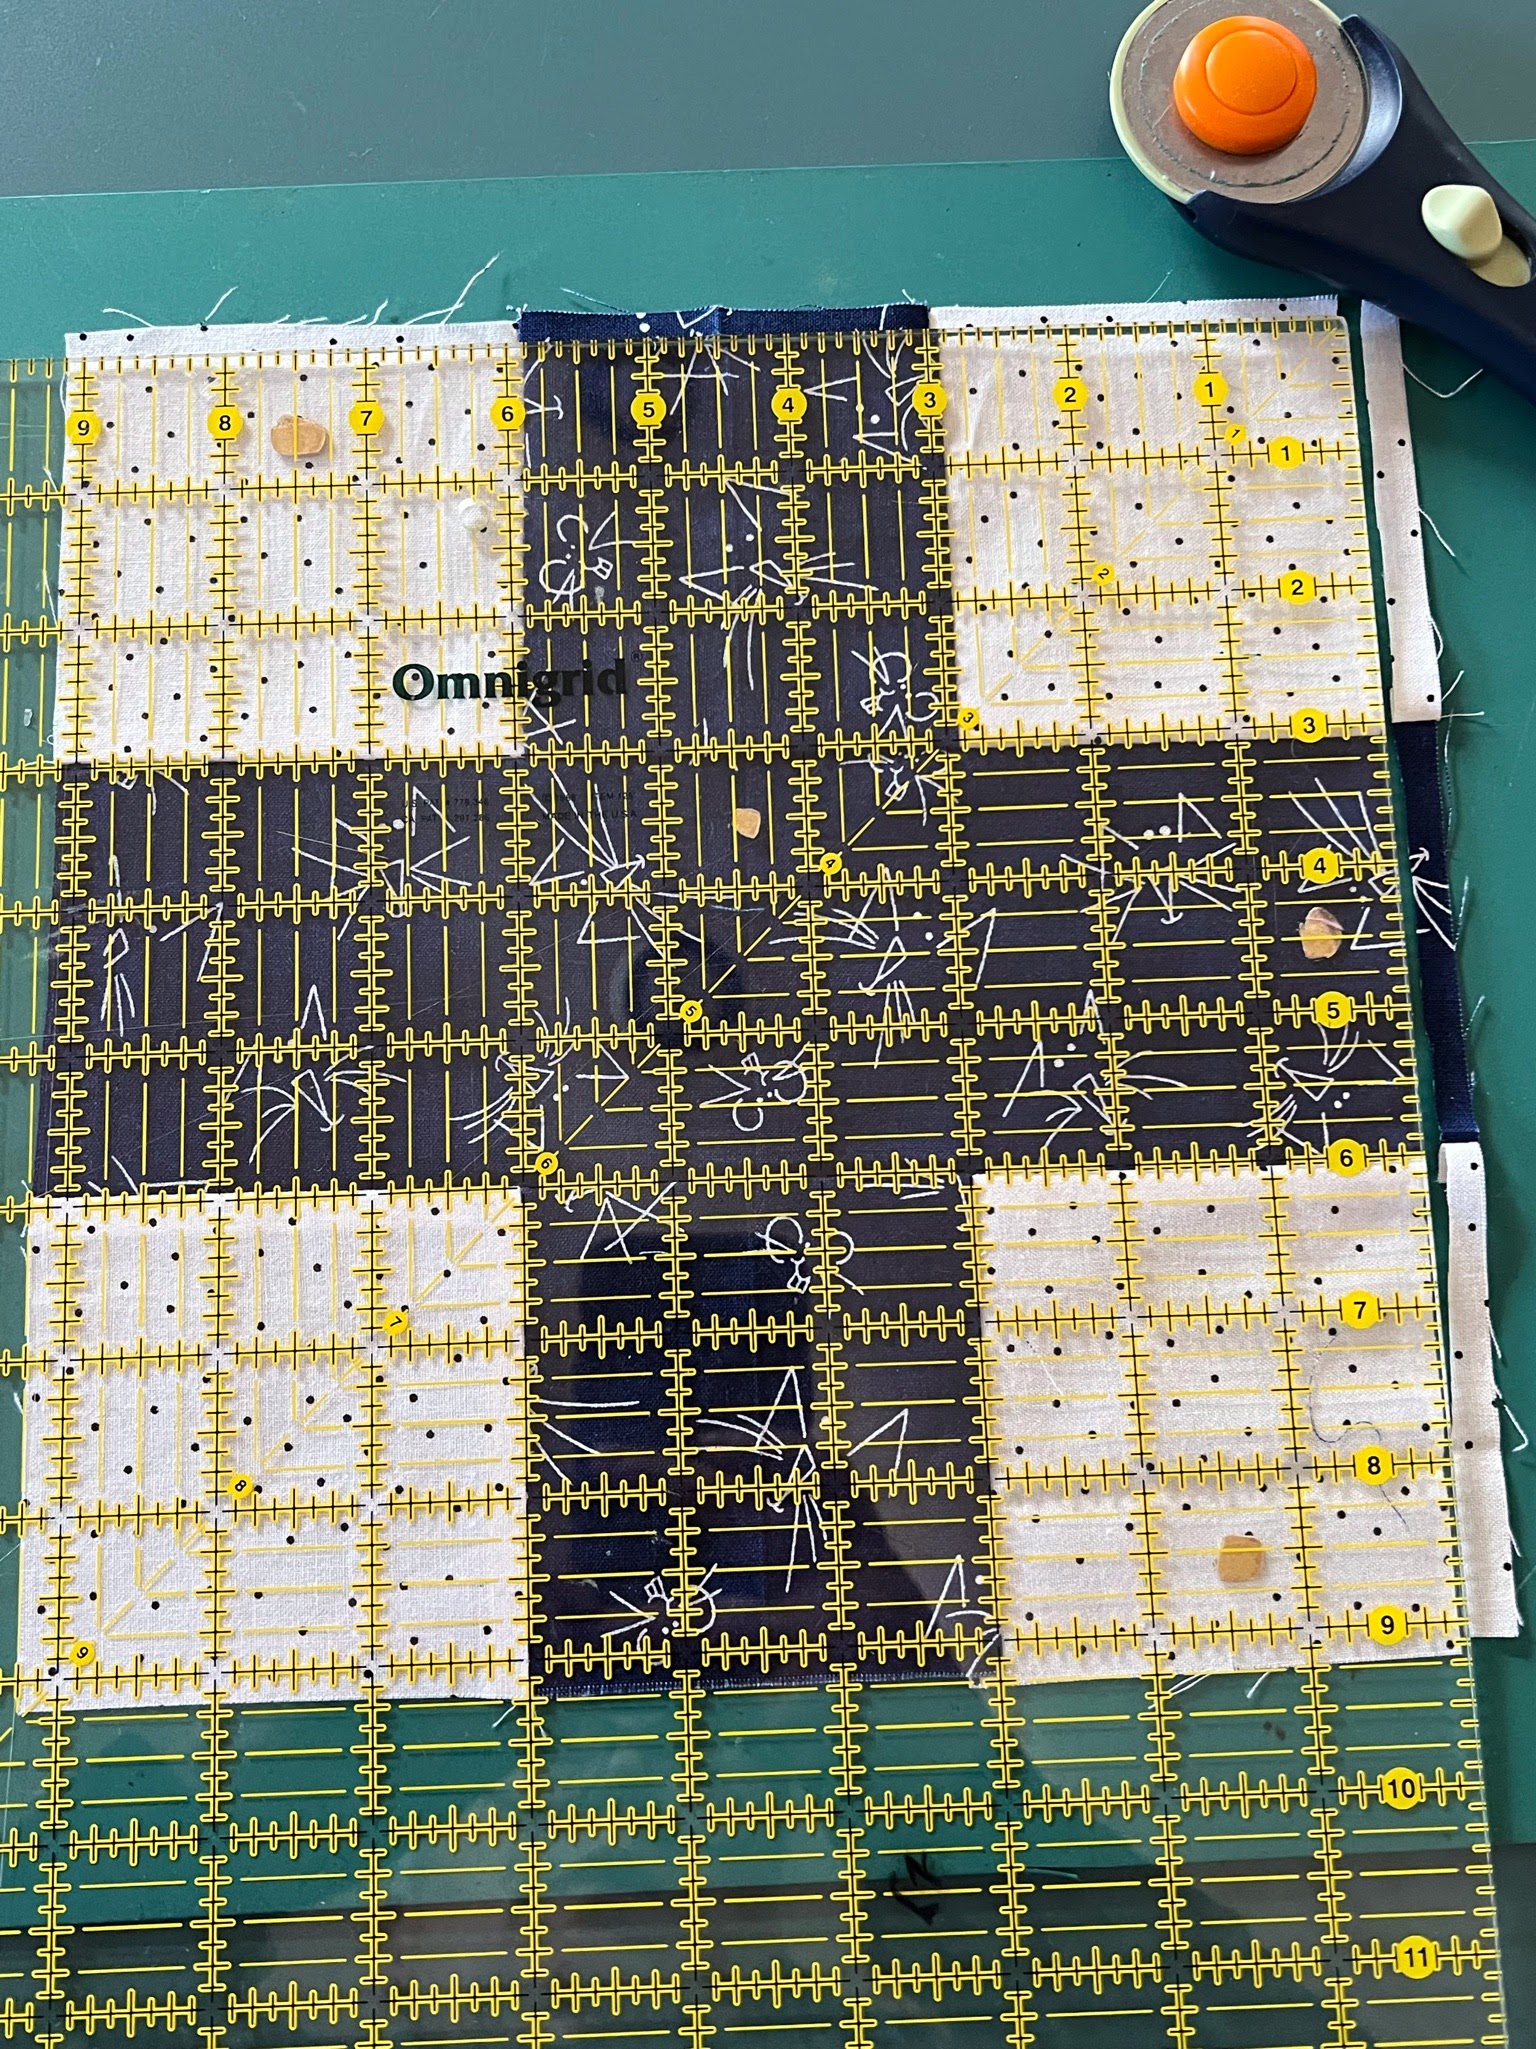
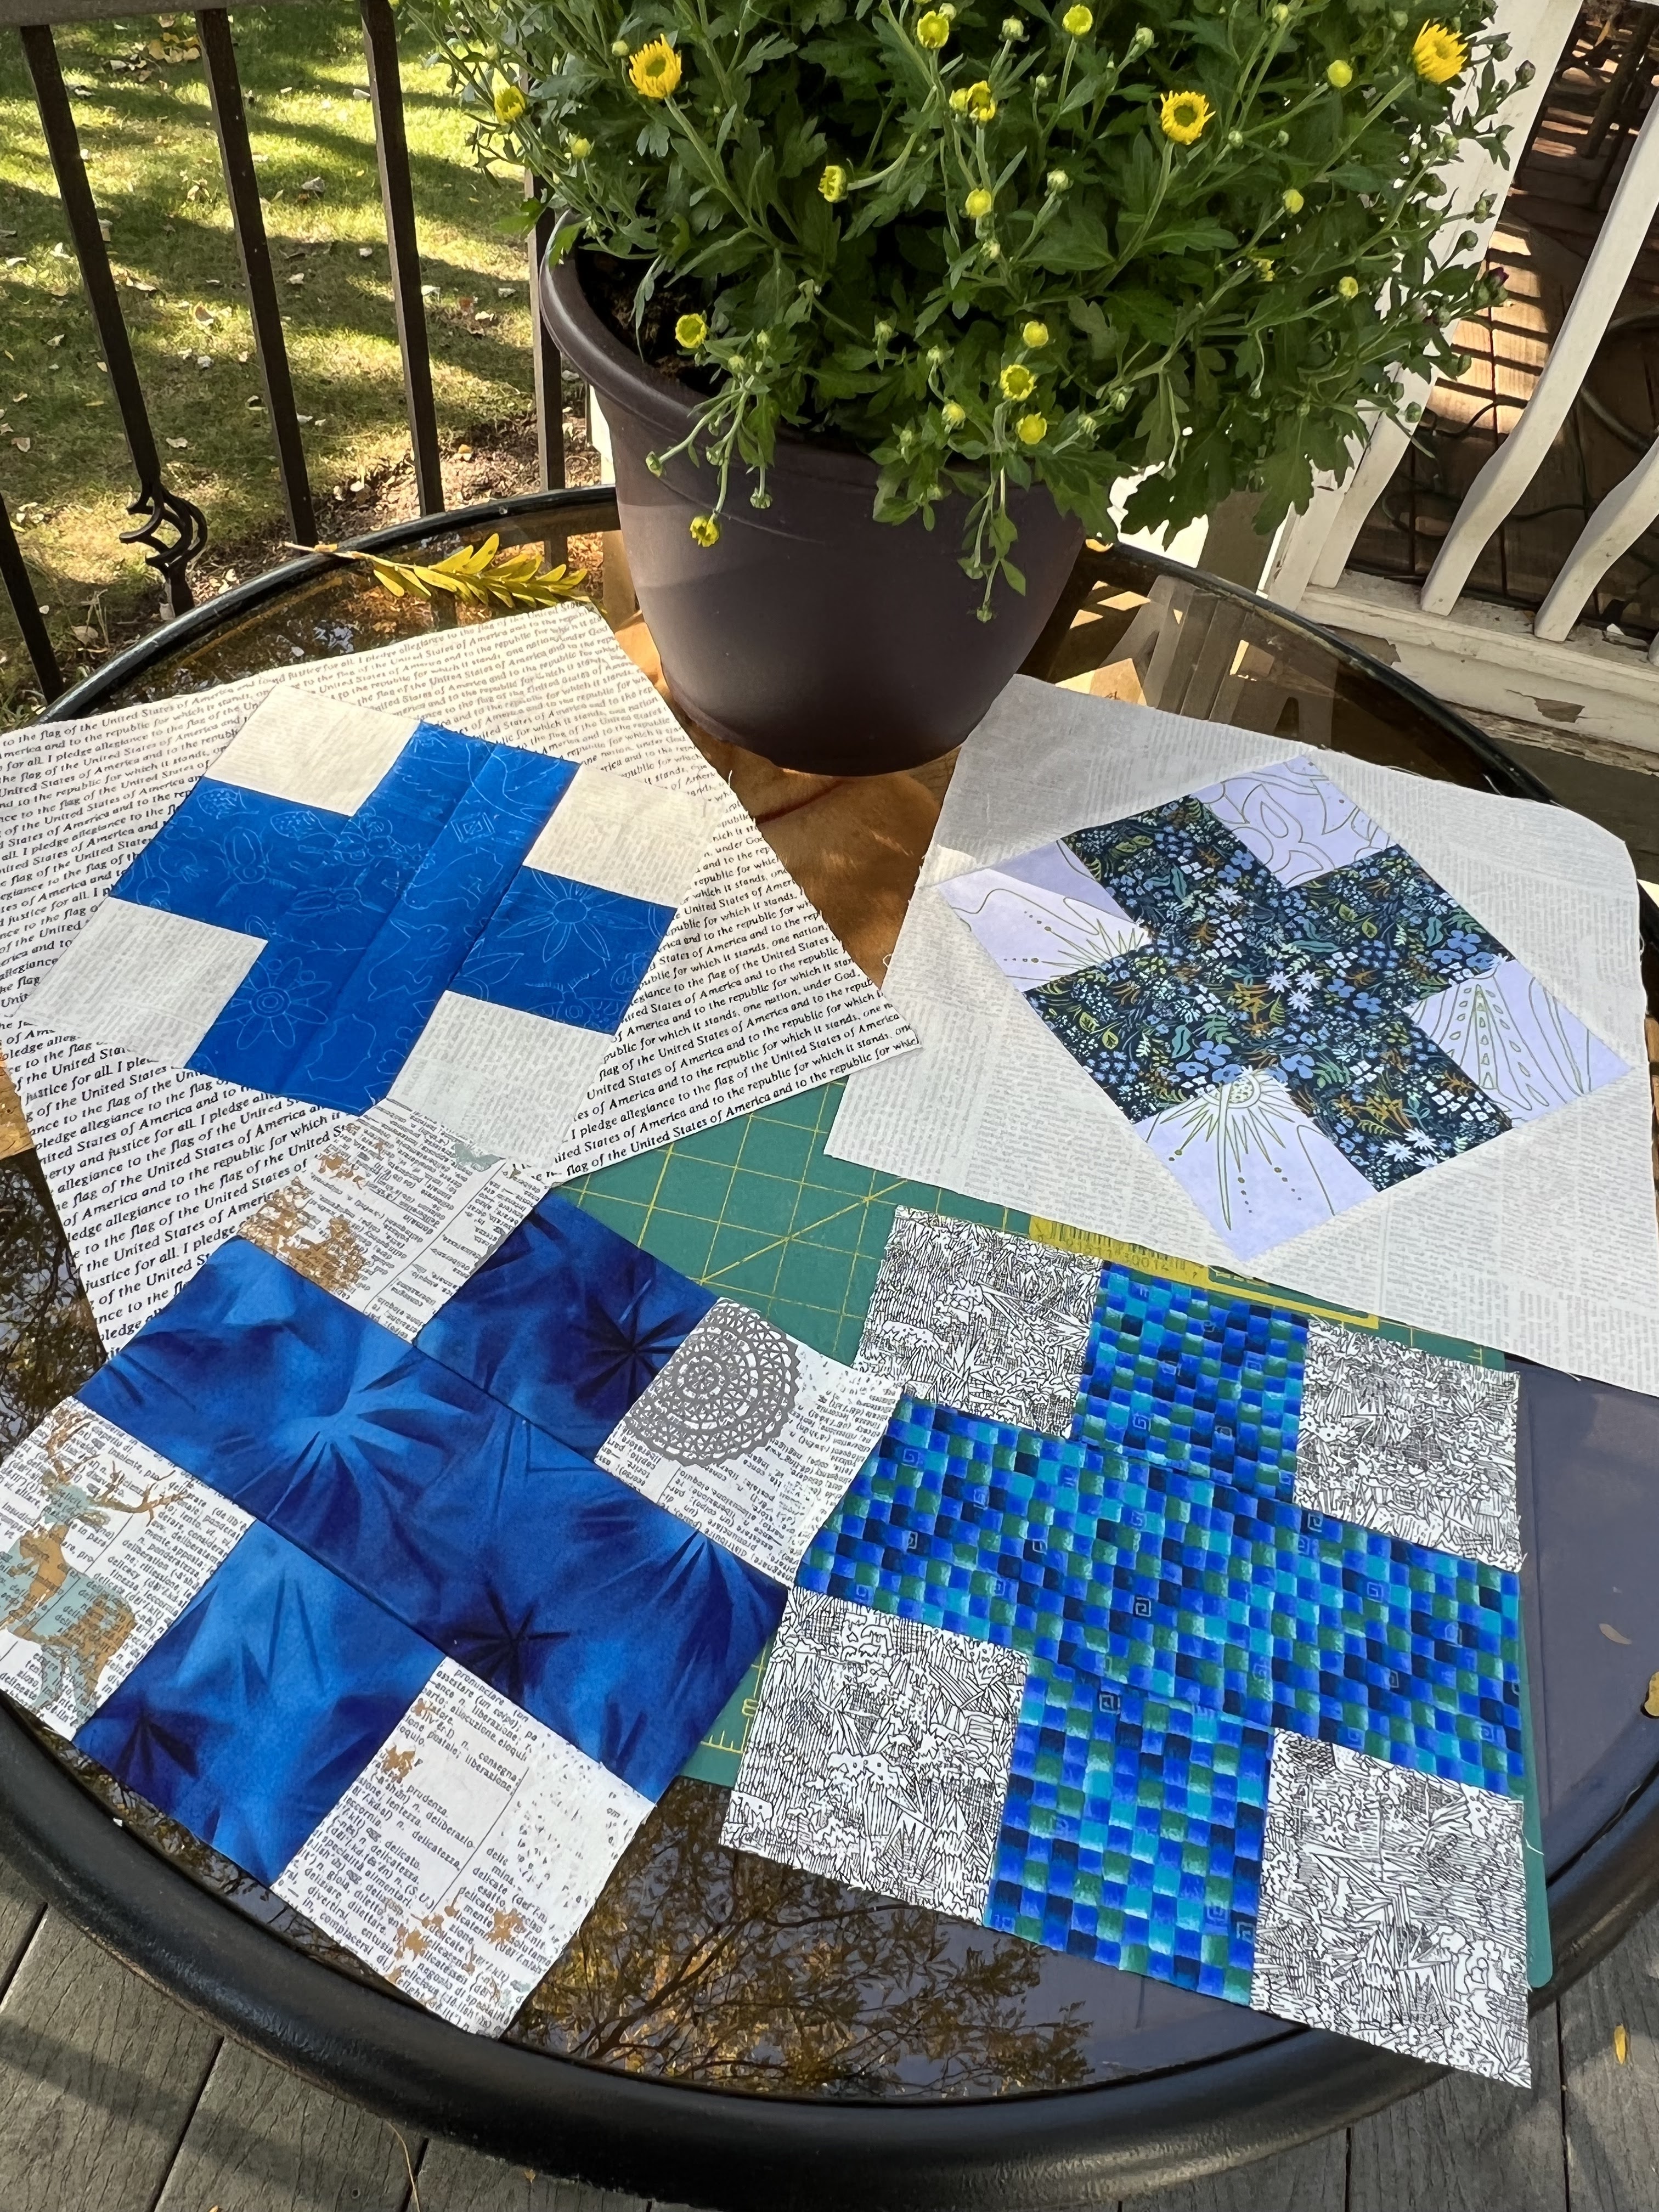
 These #BlueRKblocks are  12.5” (unfinished) and are also known as a “Raspberry Kiss” Block

Months ago, I asked @craftycop for directions and promised to send blocks.  This month, as Queen Bee, I would like to make  enough blocks (with your help) to send Jessica (@Craftycop) a quilt top!  Jessica has been a police officer in Stamford, CT now for 21 years.  About 5+ years ago she had an idea to make quilts for fallen officers’ families; however, unlike other quilt charities, hers had a hitch…someone had to have a personal connections to the fallen officer and/or his/her family to request a quilt and personally hand it off to the family.  (It might be years or months later…)

The label for this quilts mentions #BlueRKblocks and something to the effect, “it’s not how they died that makes them heroes, it’s how they lived…2017” (the year she started this)

Jessica’s account is private (I’m sure you can guess why, with her job) ; however, if she sees you are a quilter, I’m sure you can follow her on IG.  She’s originally from S. Africa…came to the US to go to Indiana University, and then later on became a police officer.  She’s an avid gardener, quilter, and knitter, and has become one of my IG quilty friends…

These blocks all feature a Dark Blue / Navy or Royal blue cross block (a 7 patch that measures 9” when trimmed (unfinished) and then adds a square in it square outside triangular borders, which result in a 12.5” (trimmed) unfinished block size.


Fabric Requirements:

To make one block, 12.5” unfinished, you will need at least this much fabric in the following size and colors:  

- Navy / Blue / medium blue fabric:  1 -  3.5” X 17” strip of fabric, OR 1 - 9.5” X 7” square
- Background low volume fabric:   1 - 3.5” X 14” long step of fabric and 2 - 7.5” squares

Cutting Instrutions:

1) For the inside cross block, you will need the following:

4 - 3.5” background squares (white / off white / beige ) 

2 - 3.5” blue squares 

1 - 3.5” X 9.5” blue rectangle


2) For the outside corner rectangles, you will cut;

2 - 7.5” background squares / low volume (white / off white/beige)
             (These shall be cut on the diagonal in half)

PLEASE use ALL the same Blue fabric in the cross and all the same background fabric for the 
4 - 3.5” squares in the inside cross block.

For the outside corner triangles - please use all the same fabric on each side, but NOT the same 
Low volume you used on the inside cross block.

If you are making a pair of blocks, you can use the same 2 fabrics, but alternate their positioning in the block.  (I cut both the outside corner triangles and the inside background squares out of each background / low volume fabric I used.)  That way, when assembled, there will be a cohesive nature to this quilt, rather than 42 random scrappy block.  (I’m not a fan of a miss mash / muddy / scrappy look…especially if I’m going to spend time making something and using nice fabrics!). 

Sewing Instructions:

1) Assemble the 7 patch cross block first.  If you are making multiple blocks, I lay out the blocks and chain piece then, assembly line fashion.


Notice in the middle picture, I fold the 3 rows (after they are pieced in half and finger press (or iron) to finish the middle of each strip.  (I alternate right sides to right side and wrong side to wrong side in each row so the fabrics will nest together when I sew them place them together in the middle.  (I’m a “pinner” or “clip user” to I attach at the center 1st, then the ends and pin in between…)


I also pin both the top row and the bottom row to the middle cross (long rectangle) so I can chain 
Stitch them at once.  (I make at least 2 blocks at once, but recommend 4, if you want to make that many at once.)

Chain stitching hints: 

- if your fabrics get sucked down into the throat plate, I recommend using fabric scraps (a spider / a leader / ender - - whatever you want to call it) when you start sewing and when you finish sewing.  Saves on thread, unless you have one of the newer machines that cuts threads automatically.
(I’m using a 25+ year old Pfaff…)

- I also recommend a 1/4” foot and engaging both feed dogs, top and bottom if you have them for accurate seams.  If you don’t, then a 1/4” walking foot will work best!


2) Trim finished cross block down to measure 9” square.  Notice how the guide marks on the ruler nicely outline the cross at 3” and 6” for trimming this block?  (Must have the 1” X 1” square on your ruler in the upper right hand corner of the block.  I trim the right and top sides first and then spin my mat around trim the other sides of the block…)


3) Now that you have your inside 9” unfinished 7 patch cross block finished, it’s time to audition sides for block and attache the square in square corners.


4) Similar to what we did with the cross block, fold your side corner triangle blocks in half and finger press to mark the centers.  Do the same with your blue cross block and match the centers when pinning the sides together.  Be careful NOT to stretch the bias edge of the triangle.  Pin the center 1st, pin the sides and then fill in pins in between.  

  • Sew opposite sides on first
  • - press or finger press - seams facing out
  • Next set other opposing sides onto the block.
  • Your block will measure nearly 13”
    • TIP:  to get the 1/4 “ outside border and NOT lose the points when the quilt blocks are sewn together…I sewed a VERY GENEROUS 1/4” seam when connecting the corner triangles.
      • If you sew an exact 1/4” seam, it will be difficult to have the 1/4” extra around the points AND still have your block measure 12.5”!!  
      • Remember, use a Wide / generous 1/4” seam when connecting the corner triangles.
      • (I ALREADY MADE THE CORNER TRIANGLES BIGGER…AT 7.5”, BUT THEN YOU ALSO NEED TO STAY WITHIN THE 12.5” BLOCK SIZE.)
      • It would be disappointing to do all that work and have the points cut off when joining the blocks together into a quilt, don’t you think?  :)
  • Press the coroner triangle seams to the outside
  • Measure twice and cut once…please be careful to leave 1/4” past your points!


5) I realize this block exceeds the parameters if you make 4 and put the corner triangles on.
    Please fell free to just make the 4 inside 9” trimmed cross blocks and send to me.  I will finish them and add side corner triangles.  (This will be like Vonnie’s 4 blocks we made then…)

Other notes:
  1. New Needle
  2. New cutting blade!  (Extremely helpful when trimming these blocks!)
  3. Please have borders read white, off white, B&W, or cream.  I do not want to see multi color fabrics, pastels, pink, red, green, etc., even if they are low volume.  It’s BOTH low volume and these color parameters…must read white/ off white / beige / B &W only.  (Some #blueRKblocks on IG just don’t work for me!)  
  4. Please use Blues that READ blue!!  
    1. Let’s skip the batiks, novelties, sheriffs badges, cartoons, pastels, old fashioned fabrics, etc.
6) Thank you ALL for your help with this volunteer quilt!  I really appreciate it!  


Best regards,
Laurie (Harris) Fujimoto
@FujiQuilts
Cell:  (630) 207-7655 (text me if you have a question!)

Thanks again!


Crashing Hive 1 -- Heart Block for Minnie

Hive Crashing!  I just had to make one of these sweet blocks!   Hope you like it Minnie!


Crashing Hive 1 for October

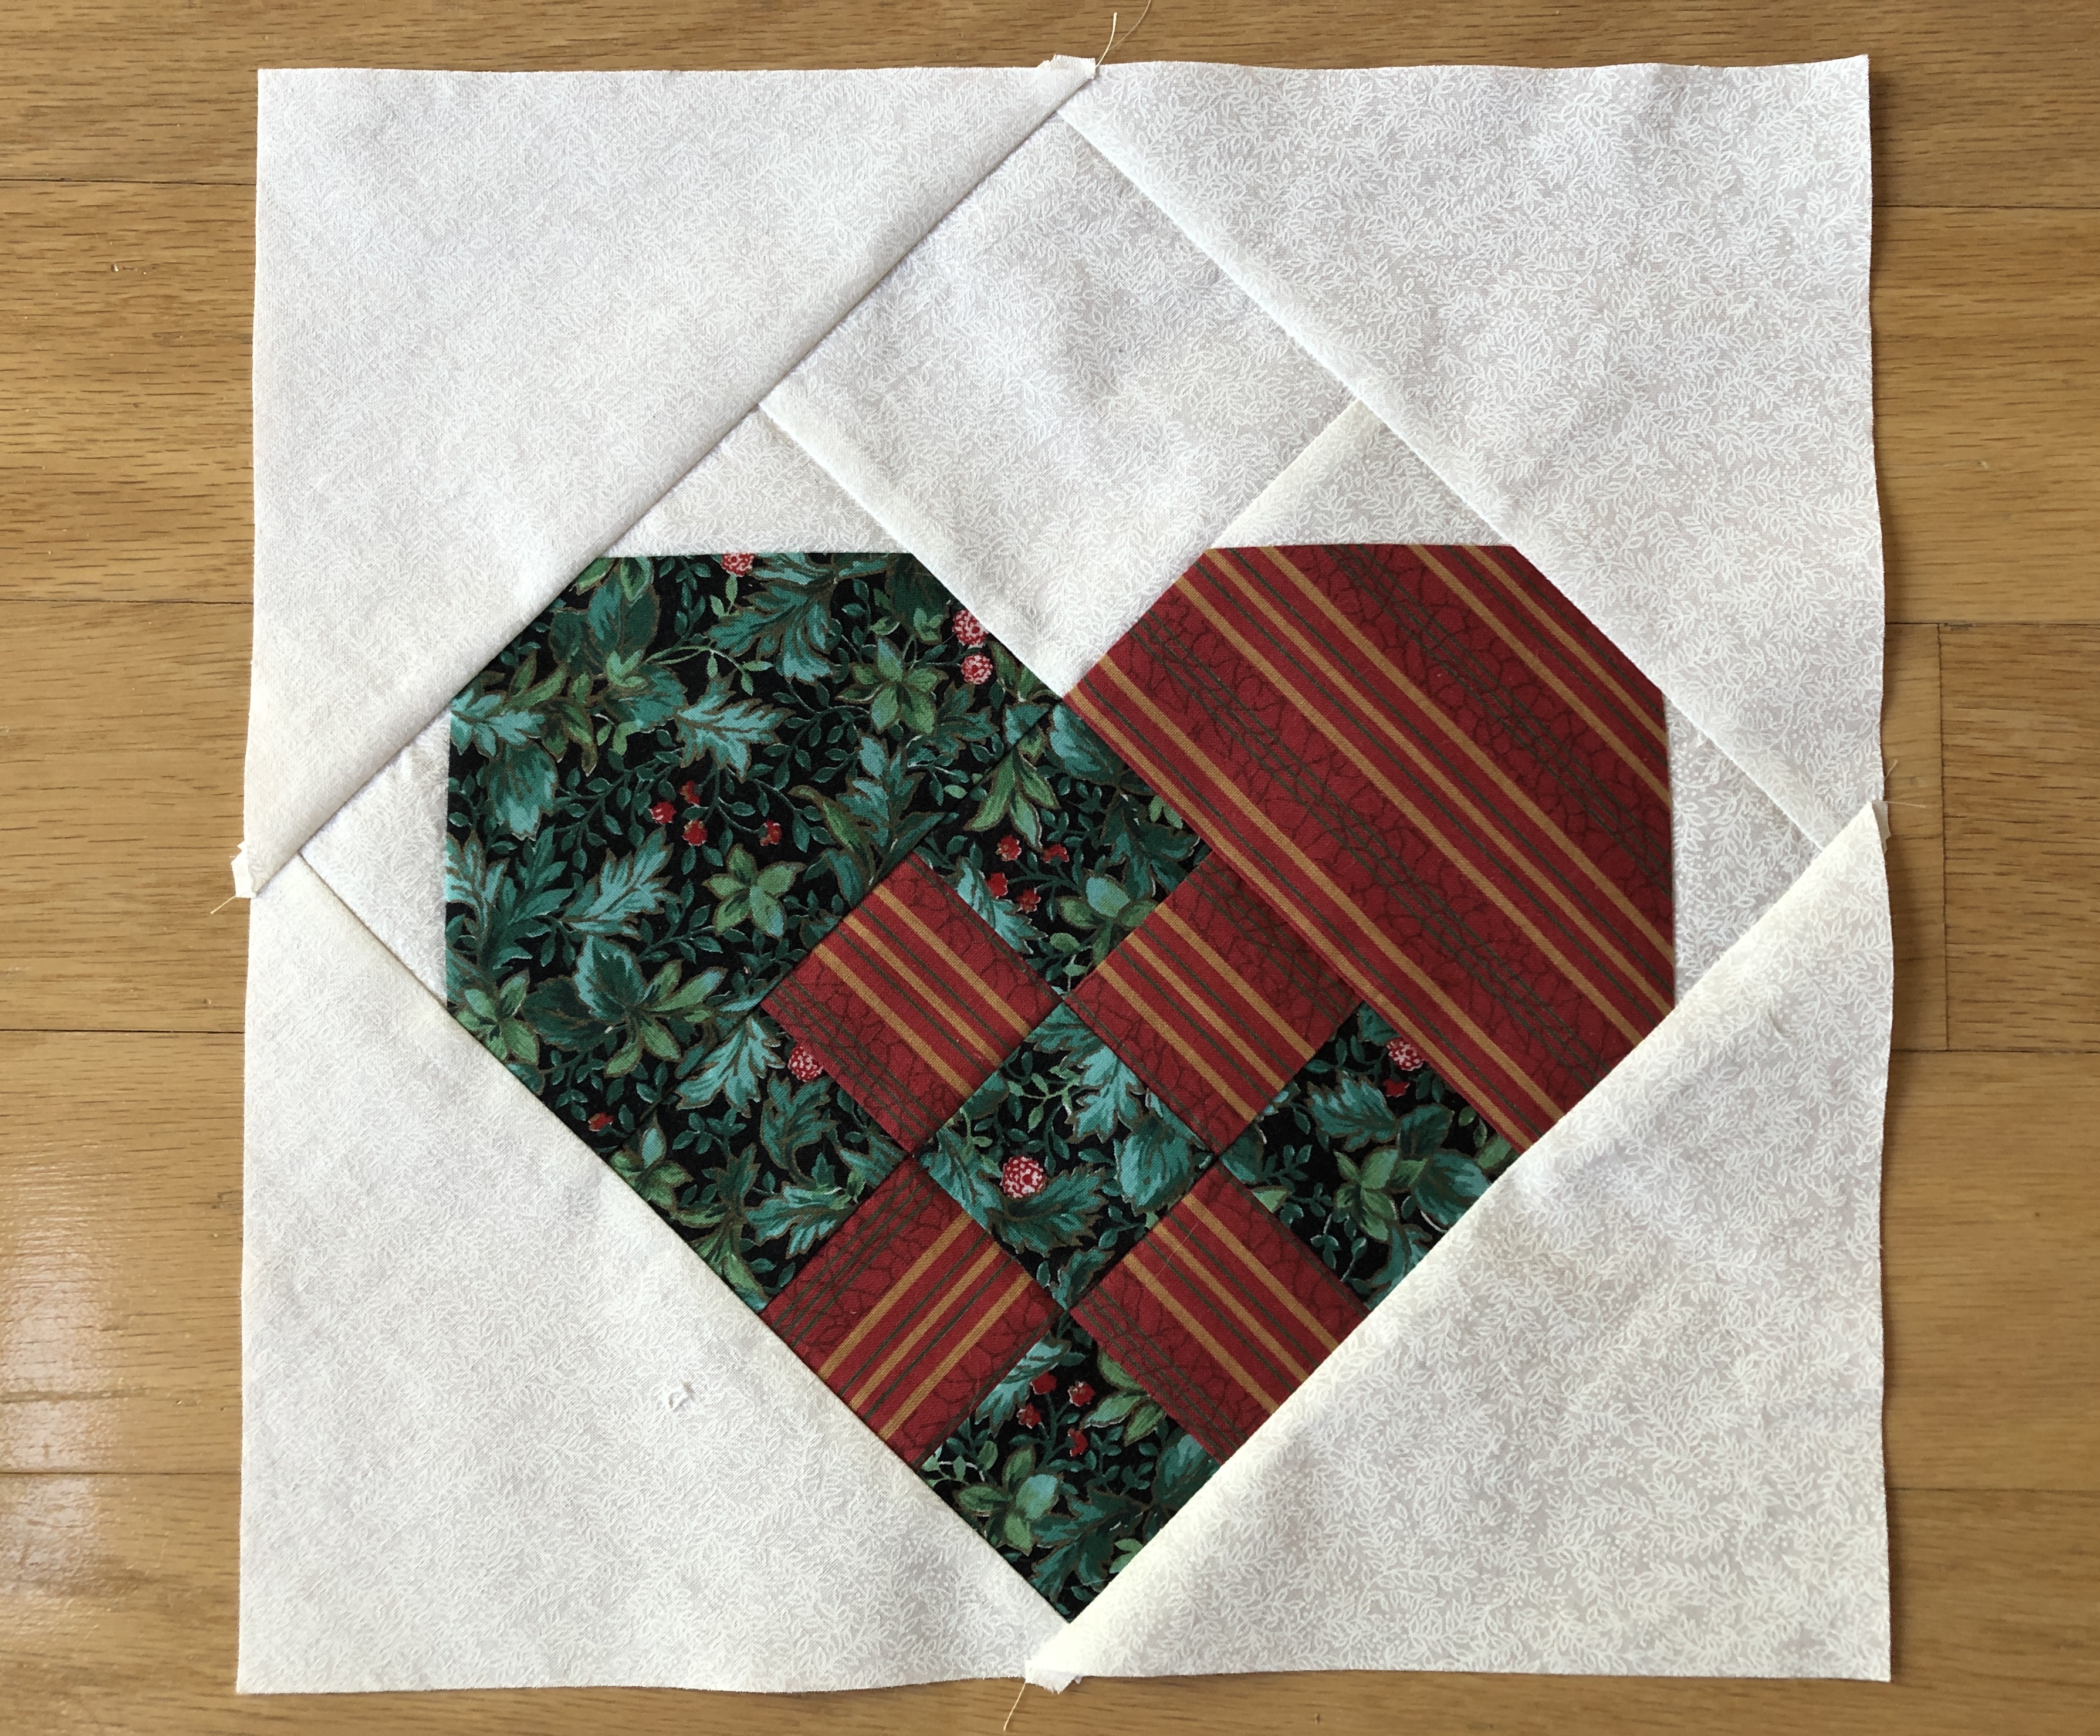
 The Swedish Heart block looked fun, so had to make one for Minnie. 


From Gayle in Hive 2

Hearts for Minnie

 Hi Minnie,


I had a lot of fun making these. It took a bit to find good colors - most of my winter stuff is ice and that just didn't seem to fit with what you'd made. But I found the green/gold at a new little quilt shop this weekend and love it. I hope you do too!


Thursday, October 6, 2022

Christmas Heart for Minnie

Hi Minnie!

Well, I sure lost my Halloween spirit while preparing this block! ha!ha!ha!

I selected the mistletoe fabric for this heart block. That should bring you lots of love, hugs and kisses for the Holiday💕💕💕

Take care,

Marie


Hive 1, October Block for Minnie


Hi Minnie,


That is a lovely, fun block! 

They came together quickly, although I struggled to find suitable Christmas fabric in my stash (shocking, I know!).

The blocks are going in the post today.

This will be such a nice quilt, can't wait to see what you do!


Happy sewing,

Rita

Tuesday, October 4, 2022

Hive 3 - October Tutorial- Ye Olde Log Cabin


Hello hivemates! 

I have gone back and forth on what quilt block I would like to choose. Thus, I am reverting back to my obsession with all things historical and choose one of the oldest, most versatile and downright lovely quilt blocks: Ye Olde Log Cabin. 

I was inspired by this blog post which is a great reference: http://delawarequilts.com/BOMs/LogCabin/index.html 

Traditionally, the center of a Log Cabin block is red: representing the warmth of the hearth as the center of the home, and I would like to stick to that for the 3.5” center block. Per the traditional version of the Log Cabin block, I ask you to choose two colors of fabrics with each side of the block being different shades of the same color (or the same fabric if you choose that. No biggie). I would ask you not to alternate colors but keep them to each side. Use whatever colors suit your fancy as long as they are:

red, orange, yellow, gold, brown, green, or purple (if it’s warm enough) Think of the colors of fall leaves and all of those rich tones of autumn. Maybe make yourself some hot cocoa and put on fuzzy socks. It can’t hurt! ;)

Some of you may wonder what “warm” colors look like. This is a picture of the fabric I chose for my block. Note how I chose six different fabrics but only two colors are represented. Yes, there is blue in one of my yellows, but it still reads as warm and fits in perfectly with the other colors!


The finished block will be 12.5.” Use an accurate ¼ inch seam with this block. If you have trouble maintaining a ¼ inch, a quick tip is to use plain masking tape cut to ¼ inch taped to your sewing machine. I make sure my fabric follows the edge of the tape, and it keeps it nice and scant! 

You will begin with a red 3.5 inch square


The rest of the strips will be strips cut 2 inches wide from your chosen colors. I prefer to precut my strips. It makes the sewing process go by MUCH quicker. I sewed my strips clockwise (or the wrong side). Regardless of how you choose to orient your block, What is important is that you continue in the same direction for the whole block. 
For my example, I will be using six colors. Like I said, choose however many or however less colors you want as long as they are within the same family on each side. You know your stash!

Cutting requirements are as follows: 

Of Color A:     1 3.5 X 2 inch strip      1 8 X 2 inch strip 
                         1 5 X 2 inch strip         1 9.5 X 2 inch strip 
                         1 6.5 X 2 inch strip      1 11 X 2 inch strip 

Of Color B:     1 5 X 2 inch strip         1 9.5 X 2 inch strip 
                         1 6.5 X 2 inch strip      1 11 X 2 inch strip 
                         1 8 X 2 inch strip         1 12.5 X 2 inch strip 

Begin with the Color A strip face down on the 3.5 inch red block. You will work your way around the entire center square.


The first round is complete. It should measure 6.5 inch square. 

You will continue on until all of your strips are added, and the log cabin is completed. Remember to go the same way the entire time.

There you have it! A 12.5 inch log cabin block! 

Please let me know if you have ANY questions! Enjoy! 

@emsquiltyadventures


Emily was unable to post this herself. I have done the best I could to transfer her PDF to this blog. If you have any questions, please contact her directly.

Monday, October 3, 2022

Hive 1 Blocks for Nicole


Sorry these are slightly late, but here are my September blocks, I had a lot of fun looking through all my favourite fabrics and finding some that will work well together.

I hope you like the colour choices :)

The blocks have gone to the mailbox today and are on their way to you!

Saturday, October 1, 2022

Finished Quilt, Hive 1, 2021, May Block


Hello Bees!

This is my second StashBee finish this year (2020's at Easter, this 2021's one in August), and I’m intending to finish this year’s as well (the top is done).

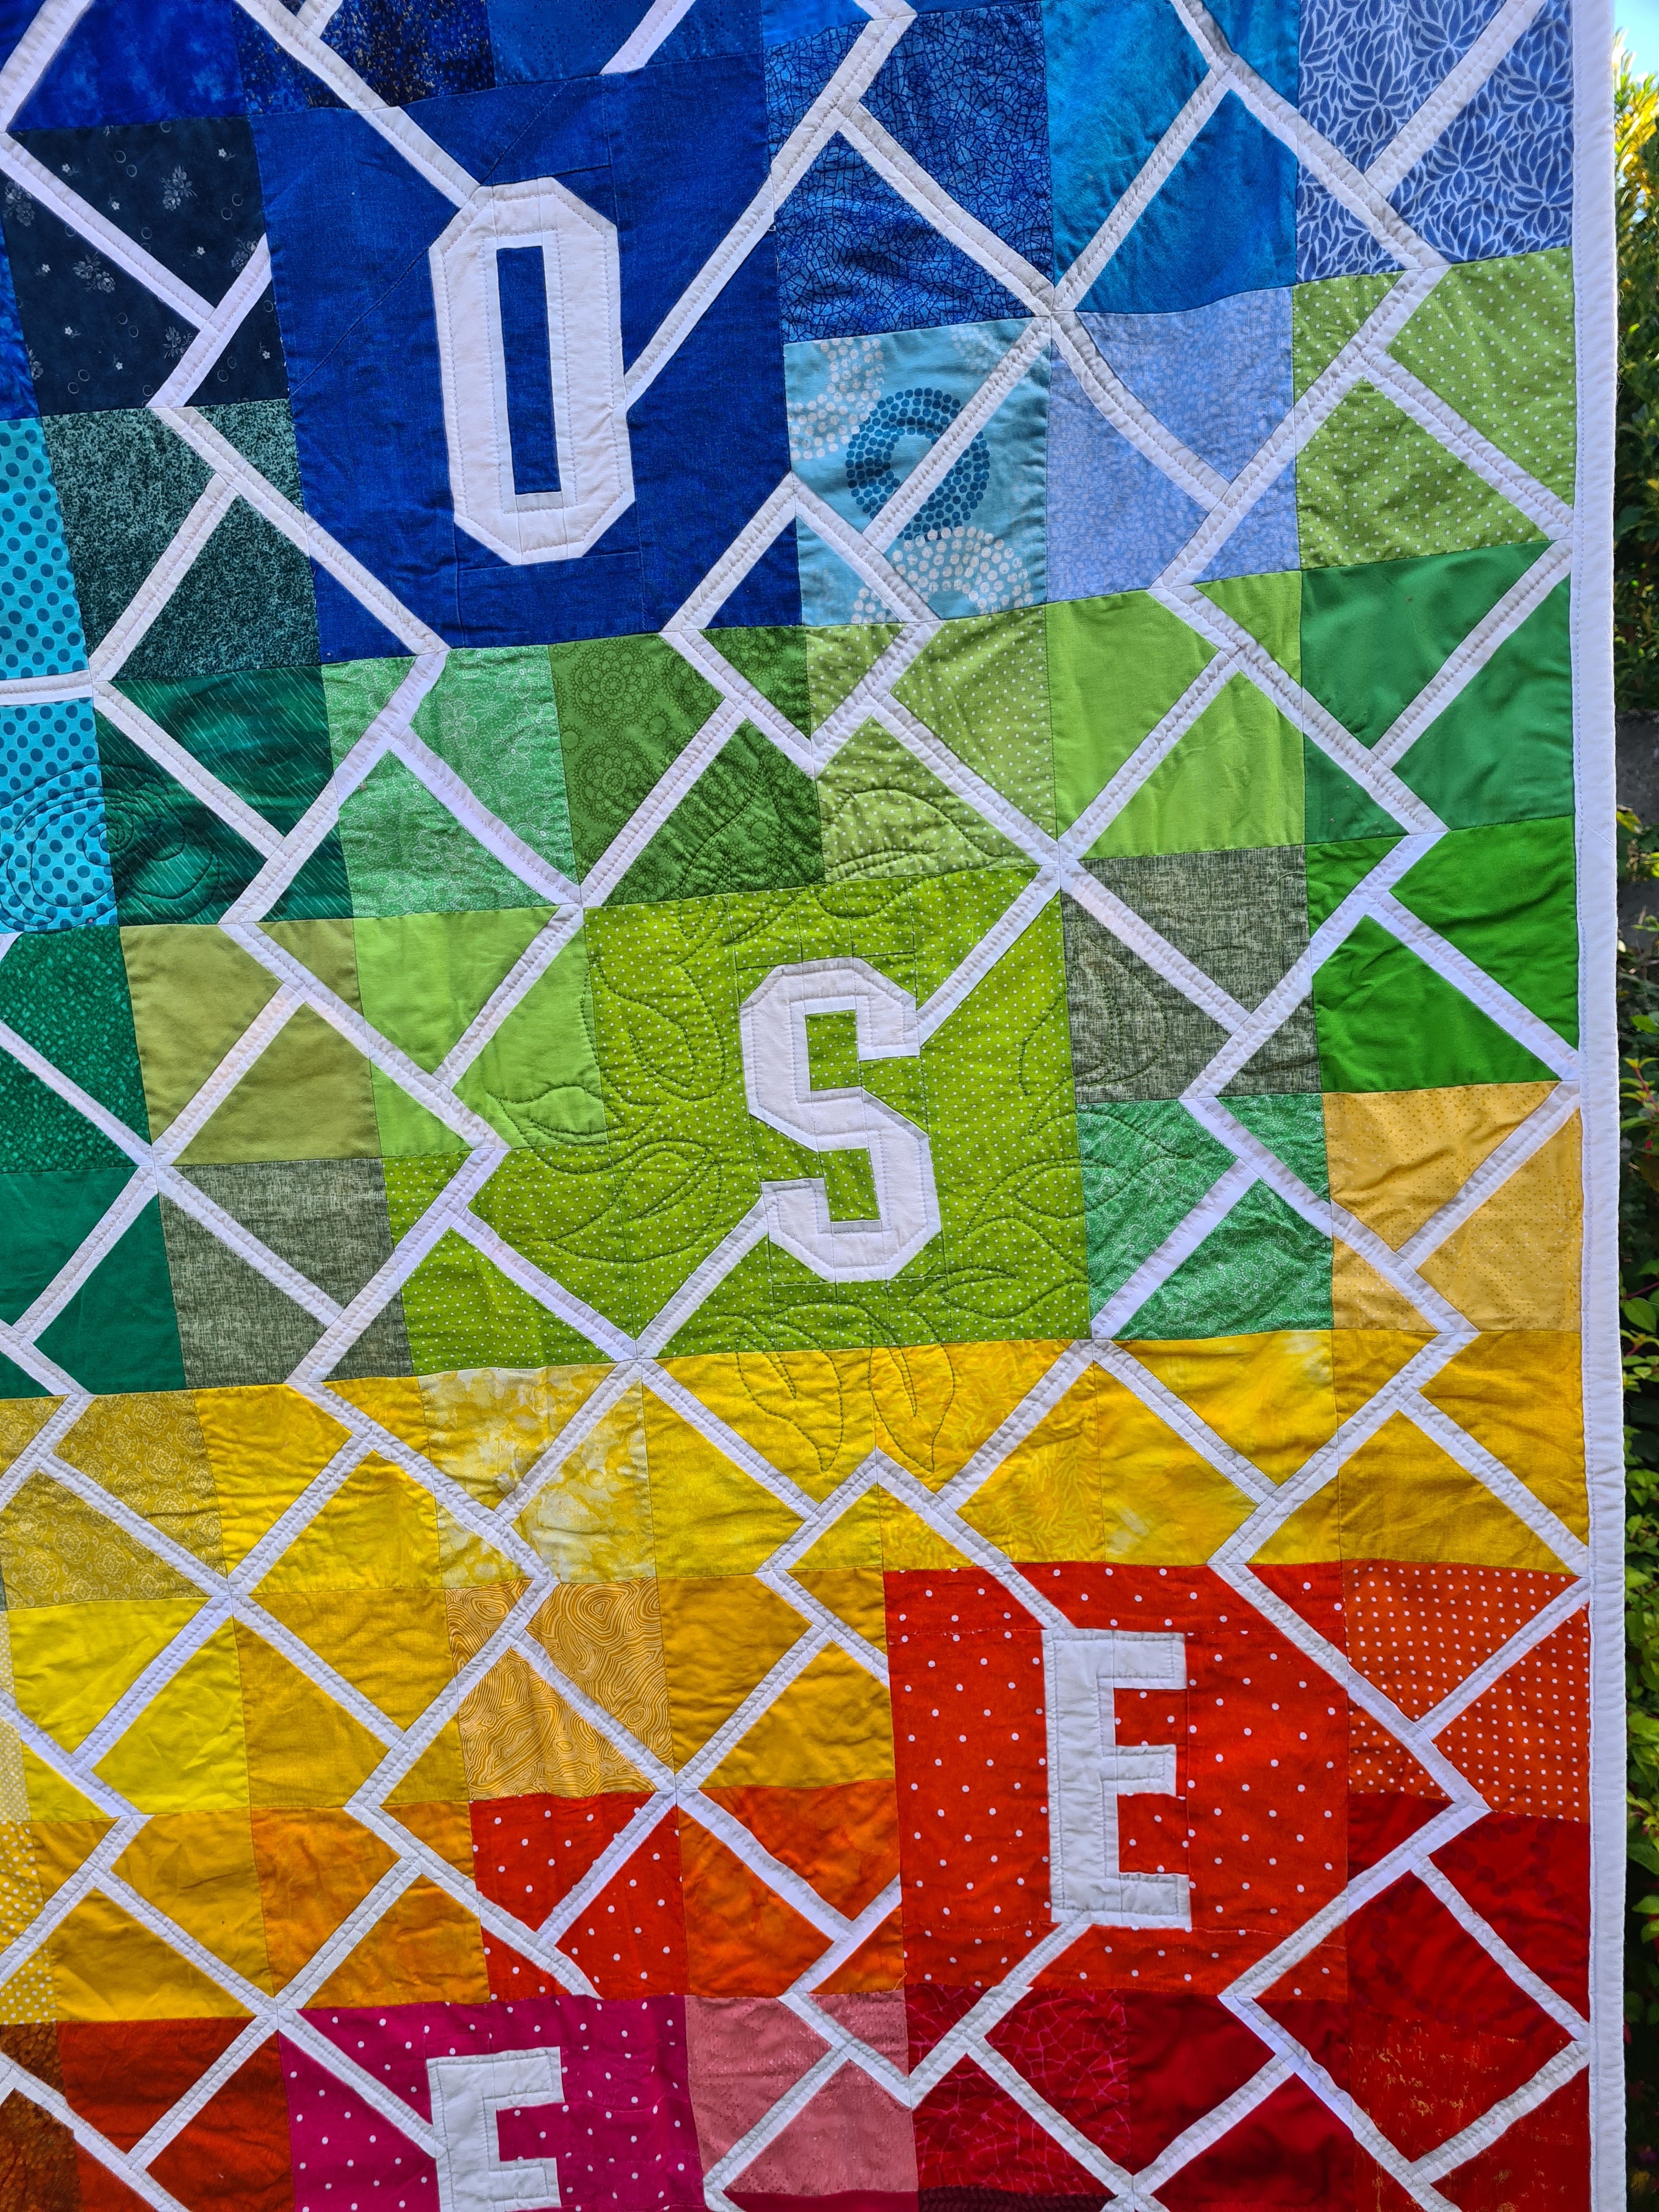
As I mentioned in my StashBee tutorial, the T-Junction block design came about, while thinking what choices I can make to improve my personal life amidst the Covid 19 restrictions (‘all those choices and decisions sewn into a quilt’ – “T-Junction Block”). 

What I didn’t mention in that post, is that I am in psychotherapy since 2019, because I suffer from depression (since I was 11). This kind of therapy is very slow, but (finally, after trying so many other methods) effective. I came to the conclusion, that I have to change my approach to keeping the depression at bay. Until then (2019), I had always pulled myself out of ‘the dark hole’ by telling myself, that ‘I get through the next day’. However, this doesn’t prevent me from falling back into it again! Now I use the approach (working on it!) to ‘choose life’ instead. 

Hence, this was the perfect accompaniment for the T-Junction block. And the quilt is overall colourful and vibrant, as my life should be.

Hoping with this statement to help others out there, who use quilting as their therapy too😉

Without the help of my hive mates, I would have never attempted this design (just thinking of piecing 155 5” blocks would have put me off!). Thanks to my very generous hive mates (one even sent me 20 instead of the asked 6! You were just amazing ladies!!), I had already about 2/3 of the needed T-blocks before starting to put the top together.

Everyone involved in producing this quilt, is mentioned in the Label, which was so extensive, that I decided to put it across the entire back 😊.

Thank you all again for helping me making this one happen.

Happy quilting,

Rita