This was a fun and easy block, and I think Caitlin's purple and red color palette will make a lovely quilt. Happy quilting all!
Pam

This was a fun and easy block, and I think Caitlin's purple and red color palette will make a lovely quilt. Happy quilting all!
Pam


Hi Caitlin,
A Log Cabin quilt is still on my 'quilty bucket list'. I might have the patience for it someday! 😉
Two blocks were the limit of my meagre purple stash (not my favourite colour...). Hope they'll do.
Happy quilting,
Rita
Hello all!
June might be a month for bright colours, but this month's hive tutorial will simply be a blue and white quilt block, 14.5" unfinished.

The inspiration for this month's block comes from The Quilters Cache.
Fabric Pull:
Background: white or white tone-on-tone
Blues: 6 different colours of blue: blenders, solids, batiks, or subtle pattern. Turquoise and teals ok to use as well.

Cutting:
White:
- 2.5"x2.5" - 17 required
- 3"x3" - 1 required
Blues: *Your LONG length blues should be dark; SHORT length blues should be lighter blue.
For the 4.5"-10.5" lengths, it's ok to have some variation of colours. You can set the strips from darkest to lightest or dark-medium-dark-medium-medium-medium/light-light. Only 'rule' is the 12.5" length is dark & 2.5" HST is light.
- 2.5"x12.5" - 2 required (dark blue)
-2.5"x10.5" - 2 required (medium/dark blue)
-2.5"x8.5" - 2 required (medium blue)
-2.5"x6.5" - 2 required (medium blue)
-2.5"x4.5" - 2 required (light/medium blue)
-3"x3" - 1 required (light blue)
Sewing Instructions:
Draw a line diagonally on the back of the white 3"x3". Place over light blue 3"x3" square, right sides together. Sew 1/4" on either side of marked line then cut on line. Press seams. Trim each unit to 2.5"x2.5".

Draw a line diagonally on the backside of ten 2.5"x2.5" squares.

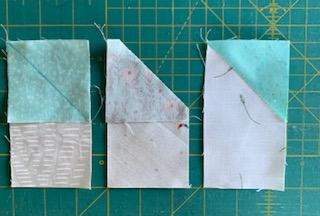
(Photo above taken prior to base unit sewn together).
Separate each size of blue fabric strips into 2 piles.
Using photo above for reference, place marked white 2.5x2.5" squares at outside end of blue strips, Each set of marked white squares is sewn in a different direction than the other set!
For each set, add a marked white square to the end of each strip and sew on the line. Trim and press seams toward white end.
Watch the direction of your marked squares: they should mirror-image each other. The white triangles of each set should point toward the base unit.
Using the photo above again as reference, sew an unmarked white 2.5"x2.5" square to the right side of the blue strips below the base unit. Press seam away from the white square.
Sew a 2.5x4.5" strip to the right side of the base unit as shown below.

Sew the matching 2.5x4.5"-with-sewn square to the bottom of the base unit, making sure to align edges & seams.

Repeat sewing the strips to right then bottom of base unit, ensuring the left & top edges remain straight.

When block is complete, trim to 14.5".
Happy Sewing & have fun! I look forward to seeing the blocks you all will sew for me.
~ Wilma

Hope you enjoy these animals (and one sunflower)! I've had a scrap of that sloth print for ages, and this is the last of it--glad it's found a home in your quilt. 🦥 -Julia

This was a fun block and I am glad that I got it done early in the month!
Beth


Hi Nicole,
I liked making these! Matching up the colours to the feature fabrics was really fun. However, my stash of 'fussy-cuttable' fabric is sadly limited. hope these are what you were looking for. If no one else makes more than 4, consider the second set 'angel blocks'. They will go on their way to you today.
Happy sewing,
Rita
Happy June! So. Two years ago I had my hive do this same block with green and yellow. Several people commented about how it looked like Notre Dame colors, and I just couldn't get that out of my head. I have no feelings either way for Notre Dame (although I was born there while my dad was attending graduate school), but didn't want my quilt to scream it.
After debating for two years as to what to do, I finally decided: we'll make more blocks with different colors! This was supposed to be my yellow quilt, so we'll stick with yellow and change the green to a different color.

Fabrics
For the fabrics, before we get into the specific colors, there are some guidelines. Please stay away from novelty prints. It turns out I have a different definition of novelty prints as others, but to me a novelty print includes something man-made. Suns, flowers, leaves, hearts, geometrics are not novelty prints. I love solids and would be happy to have you include them. Batiks are also fine.
Yellow: please choose bright yellows. Slightly mustardy is ok, but try to stay away from the brown-yellows. Please try to choose something mostly yellow or with white accents, staying away from other colors.

Other color: please choose a red, orange, or blue. If you choose orange, please make sure there is sufficient contrast between the yellow and orange. Please choose something that reads your color of choice.

Cutting
When there is a repeat color in the block (red in the left block below and yellow in the right block below) you can either use the same fabric or different fabrics. In the example I did one of each. The means that yellow 2 and yellow 3 may be the same fabric and green 2 and green 3 may be the same fabric, but they can also be different fabrics.
Yellow 1: (2) 2"x3.5", (2) 2"x6.5"
Yellow 2: (1) 3.5"x3.5"
Yellow 3: (2) 2"x6.5", (2) 2"x9.5"
Red/Orange/Blue 1: (2) 2"x3.5", (2) 2"x6.5"
Red/Orange/Blue 2: (1) 3.5"x3.5"
Red/Orange/Blue 3: (2) 2"x6.5", (2) 2"x9.5"
Sewing
Layout the pieces like the first picture below and sew together like a log cabin as shown in the second picture below. After the middle square is attached, the block should be 6.5" square. After the last square is attached it should be 9.5" square.


Fabric Requirements: Style
Patterns: Geometric print fabrics. Bonus points if you have something resembling abstract nature, i.e. topographic lines, cartography, marble, non-cartoony insects, etc.
Colors:
Dark Half: Muted shades of blue, green, or purple. Imagine a coastal grandma with some pastel goth flair.
Light Half: solid white, white on white, or whites with a bit of colored print. Please use true white, no cream or tan.
Note: a geometric print is more important to me than an exact color or tone match. Please use what you have. Talk to me if you have any doubts.

Fabric Requirements: Piecing
From both Dark and Light fabrics, cut the following:
(1) 7 in square
(1) 4 in square
(5) 3.5 in square
(2) 3.5 x 6.5 in rectangle

Assembly
1. Half square trianglesUse both Light and Dark 7 in squares. Draw a diagonal line down the wrong side of one square. Place the two squares right sides together. Sew a ¼ seam on both sides of the line. Cut along the line. Trim each half to 6.5 in. Press seams open. You will only use one of these HSTs in this block, but please send me the other half.
Use both Light and Dark 4 in squares. Repeat step 1.a. Trim to 3.5 in. Press seams open. You will use both HSTs.

Each pair of flying geese will be opposites. One pair will use Dark rectangles with Light squares. The other pair will use Light rectangles with Dark squares. These sections are tight. Use a scant seam or cut slightly bigger for more breathing room.
Draw a diagonal line down the wrong side of (4) 3.5 in squares. Place a 3.5 in square on one side of a 3.5 x 6.5 in rectangle in the opposite color where the diagonal line goes from top center of the rectangle to bottom corner, right sides together. Sew a seam on the diagonal line. Trim the outer edge ¼ in from the seam. Press seams open.
Repeat step 2.b. on the other side of the rectangle, still ensuring that the diagonal line goes from the top center of the rectangle to the bottom corner.
Trim to 3.5 x 6.5 in. Be careful to keep ¼ in on top of the triangle point so we don't lose that point in the seam.
Repeat steps 2.b-d. until you have four sets of flying geese: two dark-light and two light-dark.

Jennifer, I’m SO sorry my post and send off was delayed and I hope that by sending 2 blocks, you’ll allow grace to me!
Can’t wait to see what this quilt will look like once you’re finished.
Chris


Hello!!
These may look familiar... but I did do different color layouts from last year! Maybe having more of the same colorway will, uh, add some balance or something =)
They'll be in the mail ASAP!!


I love how you can change the placement of the colors in this block and it can look so different. I used green, orange, dark purple and cream for this one. Hope you like it!

~ Diana

This was a fun block to make. I'm sending it in units because it fit in an available envelope better!
~ Grace

Hive 5 June Tutorial – Irish Chain Bunting Block for Denise
Hello Ladies,
I’m Denise and this is my first year participating in a stash bee. I’m loving it so far, as I get to make some cute blocks and converse with some interesting ladies. I live in Tauranga, in the Bay of Plenty in New Zealand. We grow avocados, and at the moment we are in the thick of winter. My most hated season, but good for sewing. We have two daughters, one who is married, and lives in England, and the other who lives in Vancouver, Canada. My goal was to bring up strong independent women, and I have succeeded too well.
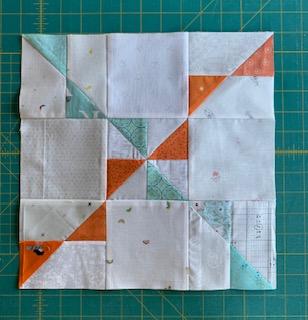
For this month, I have called on the resources of a past block posted by @evannonearth, last year. It is called the Irish Chain Bunting Block.
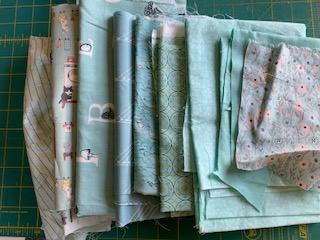
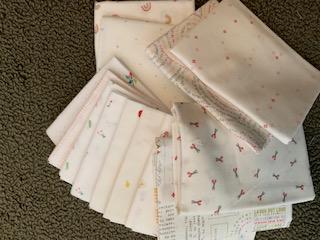
For the background fabrics I would like a scrappy mix of low volume, white or off white. Small patterns and little bits of colour are fine, but as the other colours are medium values, the background needs to be as light as possible. The main colours of the bunting chain in the block are orange and teal. Any orange and teal will be fine, but I’m aiming for a softish look in the finished quilt. Prints are fine, but no Christmas or ‘American Patriotic’ prints please.
Here is my fabric pull for inspiration.
Cutting instructions
From both Orange and Teal fabrics cut
1 - 3” x 3” square (this will be for the centre pinwheel)
4 - 2.5” X 2.5” squares
From the Background White fabrics cut
2 - 3” X 3” squares
8 – 2.5” X 4.5” rectangles
4 – 4.5 X 4.5 squares
All Seams are ¼” and pressed as directed.
Step 1. Draw a diagonal line on the back of all the orange and teal squares.
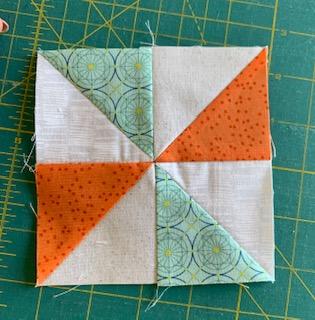
Step 2. Pair each 3” colour square with a corresponding white 3” square. Sew a scant ¼” either side of the drawn line. Cut along the line and press open with the seam to the colour side. You will have 4 half square triangles, which now need to be arranged in a pinwheel. Sew together and if possible, press the seams in the back so they form a spiral.
Trim this part of the block down to 4.5”, ensuring that the centre of the pinwheel is in the centre.
Step 3. Place one of the coloured fabrics that measures 2.5” right sides together with a background rectangle and sew on the line. Trim ¼” from the seam and press the seam towards the coloured fabric. Make 8; 4 x Orange and 4 x Teal
Step 4. Arrange all the units and background 4.5” pieces to resemble the bunting block. Press towards the background squares. Then sew the rows together to form a 12.5” block.
Finished block
Hi Jennifer,
I'm glad I had the chance to contribute to your quilt that has been two years in the making! This was a fun pattern😁, thanks for introducing me to "Changing Squares"!
Marie


I love the graphic look of those blocks!
They'll go on their way to you this coming week.
Happy sewing,
Rita