
I'll echo everyone here and say great block choice! So fun, and I got to use some of my bright scraps.
Julia C

Deana, I was worried about the curved bits, but they were fun and turned out (I think) okay!! It's in the mail already!

What a fun and funky little flower! I've used this folding technique for Christmas ornaments before, but thanks to you I've been exploring so many other possibilities! Fun!

I happened to have some scraps of blues with metallic prints, which were requested for Bonnie's tree block. So I made this one for her. Got it in the mail today.

Gayle from Hive 2
Hi Kelsey,
I am honored you wanted to use my tutorial! I have been making books for awhile (my Swap Bee block from last year, the main Reddit group swap and a sub-group swap.. lol I might have a problem).
I included one with an embroidered title, one of my favorites, Secret Garden 💖
I laid these out in possible layouts, I have been having a lot of fun with my books that also didn't use a background, there are so many possibilities!!
These will be in the mail tomorrow, I can't wait to see your finished quilt!
~Adrienne


Hi Deana,
This was such a fun block! I have never done an insert with a curve and I loved it!!!

I was super intimidated before making this block but ended up loving it! Thanks for such a wonderful new skill making the insert corners! I had a great experience and hope you like my flower block.
Can’t wait to see your whole “garden” in a finished quilt.
Chris

One thing I learned about myself in doing this months block: nothing about my life is low volume. Not my music, my car, my kid or, apparently, my fabric. So I dug deep and may have cheated a little to find some fabric that qualified and did my best to make it work. This was a fun block to make and I'm looking forward to seeing the finished project.
I may have laughed a little at the block that Diana already completed for our group, because my block also has cats on it. We must be kindred kitty fabric spirits.

I hope you like it.
With joy, Nicole
Hi Deana!
Folded inserts are now my new favorite! I’m already thinking of different ways to use the technique in future blocks/quilts. Thank you for sharing. I hope you like my contribution. I can’t wait to see the finished product.


This may be a record for me - getting my block done on the 2nd day of the month! But I just couldn't resist digging into my stash of low-volume fabrics to make this adorable flower block. I had hoped to fussy-cut that little cat, but I didn't realize that I had the directionality wrong until I had it sewn together. Sorry about that!
I'll try to get it in the mail later this week. I hope you like it, Deana!

~ Diana @ Red Delicious Life
Prairie Wind
I've been thinking about what I wanted for my block and quilt for several months now. I decided to modify a free block pattern I found online. My design will be a modified windmill. I call it the Prairie Wind block. Traveling through the Panhandle of Texas you can see windmills practically anywhere you look. Historically they have provided a power source for pumping water for farming and ranch life. Many are still in use today.
The finished block will be as shown below:

Block size
I would like finished blocks that are 12.5" square. The block is made of four sections using the same color fabrics for each. Each section will finish at 6.5" by 6.5".
Fabrics
For the background please choose a white or white on white print.
For the windmill blades you will need two prints of varying textures. Anything other than novelty prints will work fine. One print should be a darker color. The other should be a similar shade of color with white print that will coordinate with the first. See my color pulls below.

Cutting
Each completed 12.5" block will consist of:
White: 4 squares - 4.5" X 4.5"
8 squares - 2.5" X 2.5"
Dark Color : 4 rectangles - 2.5" X 6.5"
Light Color: 4 rectangles - 2.5" X 4.5"
4 squares - 2.5" X 2.5"
(The red strips below should say 2.5" X 6.5")

Block assembly
1. Draw a diagonal line from corner to corner on the wrong side of eight white 2.5" squares and four 2.5" light color squares. Orient the white 2.5" square as shown. Sew on the drawn line onto the light colored 2.5" X 4.5" rectangle. Trim .25" outside the drawn line. Press toward the colored rectangle. Make four units that are 2.5" X 4.5".


Hello Hive,
I'd like to enlist your help on a quilt for my little sister. She's getting a master's degree and I thought a bookcase quilt might be a nice graduation gift at some point. In going to use a dark brown for the background, so I'm asking that you just send me books that are not sewn together so I can attach background and assembly the shelves here.
I'm going to blatantly borrow the tutorial posted by Adrienne last year which had some beautiful layouts.
Sizing: books should be no taller than 8.5" and no thinner than 1". When laid out books can span up to 16" (you don't need to make that many, however many you'd like will be lovely). Books can be as simple as single strips of fabric, have binding stripes or even be on their sides with pages showing. Remember that you are not attaching a background to these, just send the books.
Here are a few books I've made so far. These first pictures have the background attached so you can see what a "shelf" might look like.


Colors:
For these blocks, I’m envisioning a wintery blue, gray, white & silver
metallic color scheme. I grew up in a state without snow, but moved to Idaho four
years ago where we’ve been able experience the joys of a White Christmas. Here are some photos and color palettes for inspiration:
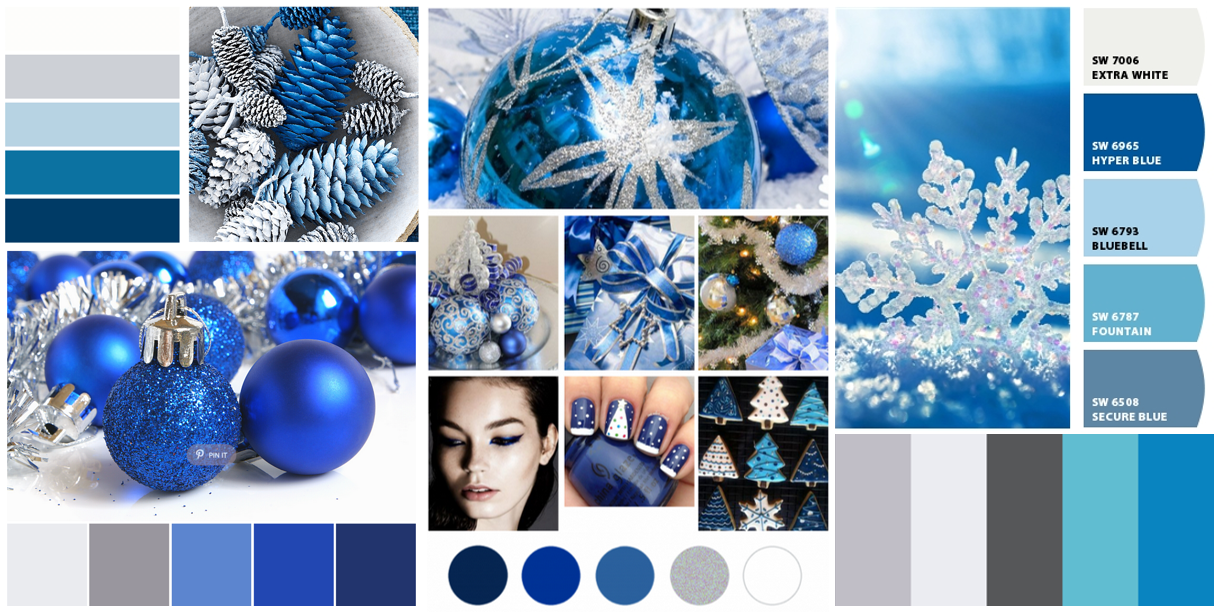
Trees: Choose between 4 and 7 different blues for a scrappy feel. I love mixing all types of fabrics, so solids, tone-on-tone, batiks, brighter reproductions, etc. are all okay. Brighter is better for standing out, so saturated, rich, vibrant jewel tones are a great option. Muted blues are also fine, just please pair with some brighter blues so they tree pops. Avoid really light light blues or really dark dark blues. Small and large prints are okay, as long as they read blue. Avoid novelty prints unless they fit the “wintery” theme (e.g. snowflakes, reindeer, presents). I want a more serious “adult” feel, so please nothing cutesy or silly-looking. Bonus points for blues with silver metallic accents. While I absolutely ADORE all metallics (yeah, I know I'm in the minority), please only use silver for these blocks.


Background: Please choose one consistent white background for the whole block. White can be solid, but I definitely prefer a little pop/design. White on white is great. Color on white is great if it is blue, gray, or silver. Avoid prints that are too busy so they don’t battle with the blues—I've got some busier prints here and I made one block with a busier background so you have an idea of how busy you can go! I just want the blues to really stand out, so if you use a busier background, make sure to use really rich blues. Bonus points for whites with silver metallic accents.

Tree Template
Please use Cluck Cluck Sew's free printable tree template found here. Remember to make sure the scale is at 100% when printing and check the 1" square with your ruler for size.

Cutting:
1x white background rectangle: 2.5 x 7.5”
2x white background rectangles: 2.5" x 3.25"
2x white background triangles (mirror images) - use the template(s) to cut the right shapes
Please Note: If your background is directional, you will need to cut the three rectangles from a perpendicular side of the fabric from the triangles so they aren't sideways in the block. If anyone has a better way of explaining this, I'm all ears.
1x gray rectangle for the trunk - 2" x 2"
4-7-ish blue strips. The longest fabric should be around
8", so that it overhangs both sides of the bottom of the template. The strips do not need to
be straight, because we will cut some (or all) of them wonky.

Assembling the Tree:
Lay out the fabric strip that will be the bottom of the tree. It should be around 7.5-8” long, but can be any height that you choose. Use your tree template to verify that the length is sufficient. Cut the top of your first fabric at a wonky angle. Steep, shallow, whatever.

Now select your next fabric and place it right side down on top of your first fabric. The edge of the second fabric should be placed along the edge where you made your wonky cut on the first fabric. Use your template to verify that the fabric is long enough. When you place the template along the bottom edge of your first fabric, there should be a little bit of the second fabric visible on either side of the template (see arrows in picture below).

Press however floats your boat. I typically press to the
dark side, which is how I was taught as a padawan, but I’ve found that
sometimes, pressing to a certain type of piece or unit works out better. For this part, there are no bulky seams or
anything, so it doesn’t really matter. I personally pressed all seams up towards the top of the tree.
Now make another wonky cut, this time in the opposite direction as you did for the first fabric. Or make a parallel cut. Or no cut, whatever. Be a rebel if you want to.


Continue adding fabric and cutting until you reach the top of the template. Once you have reached the top of the tree, use the template to cut away the excess fabric. Position your ruler along the edge of the template to make your cuts.

This will reveal the final, scrappy triangle that will be the body of the tree! I forgot to take a picture of this step, so please use your imagination...
Adding the Background & Trunk
Now you can attach the white mirror image triangles to the body of the tree. Make sure to line up the piece at the top of the tree. Cutting the little divots helps with lining up. If you attach too high, the block will not measure 7.5" and if you attach too low, the top of the tree will get chopped off when sewn to the block above. Sew, press, and then repeat on
the other side. I pressed these out towards the light pieces, but you can do whatever you want.

Next locate the trunk piece & background rectangles. Sew each of the white rectangles to either side
of the trunk piece. Sew the trunk section to the bottom of the tree. I pressed toward the trunk for all three of theses seams, but you know the drill.

I forgot to take a picture at this step as well, but at this point, the tree should measure 7.5 x 9.5”.
Add the last white
rectangle to either the top or the bottom of the tree (surprise me-- or make one of each if you feel so inclined) to bring the total size up to 7.5 x 11.5". I pressed toward the added rectangle here.


And that's the block. Thanks very much for making it for me-- I can't wait to see all of your lovely iterations! I've made 4 so far-- They come together really very quickly.
