Sunday, July 31, 2022

Hive 2 August Tutorial - Improv in August (for Karin)

Dear Bees

Right from the beginning, I wanted to make an improv block done during my turn. I don’t want it to be too crazy because at the end it will be gifted to my best friend Brigitte. 

I know improv can be quite challenging for some but I hope to keep it simple. So I tried to figure out an easy way to follow to make this block possible for all of you. At the end its still kind of improv-ish and a bit wonky but in an hopefully “neat” way.

The basic of the block is inspired by two amazing Quilters:

First by Victoria Finlay Wolf with her15-minutes Play - making fabric - it helped me to free myself just to add fabrics to each other. 

With my block we will play a little too. But to lay out the different scraps fabrics in 15 minutes - before sewing them together and then still playing, adding more scraps or turning them round.

Secondly, Maryline Collioud-Robert (Mary & Patch) with her use of color and structure. I had the chance to take part at one of her workshops back in May. And I learned lots and how easier it get if you add some underlying structures through the improv blocks.l

From her I was inspired to send you all some scraps in the same colors the week before to bring these blocks together.

So lets talk block - “Improv in August”:

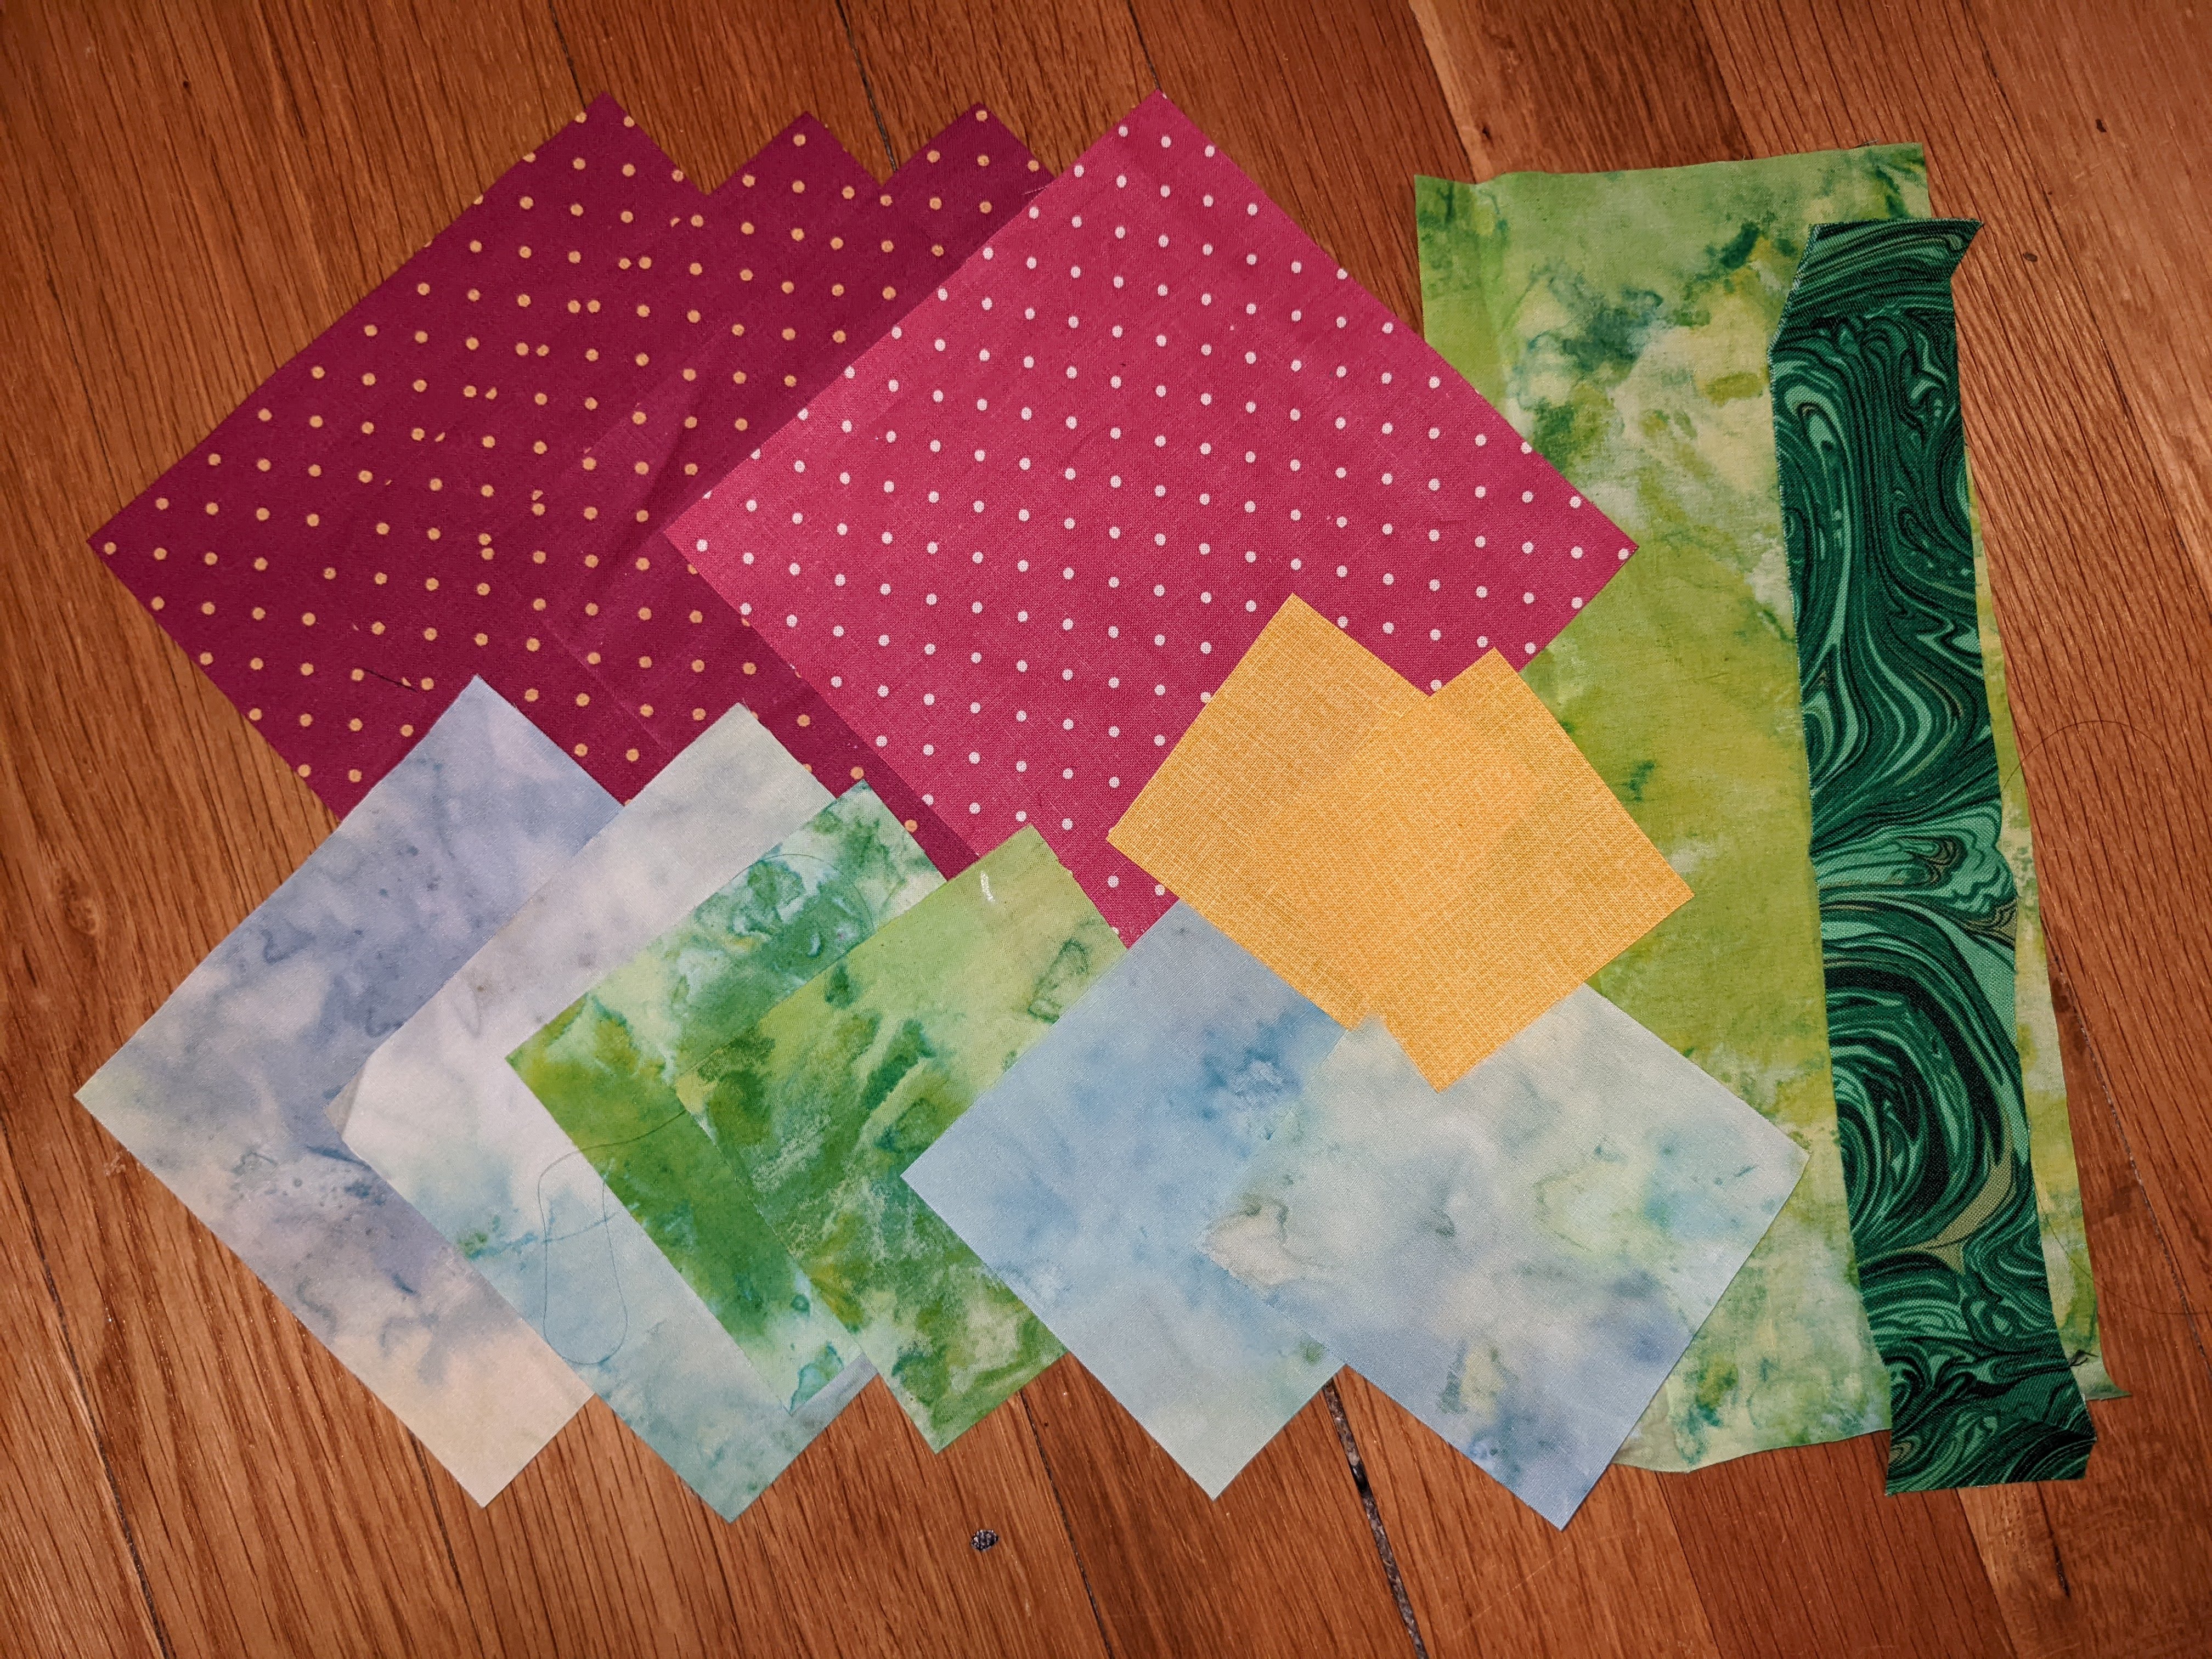
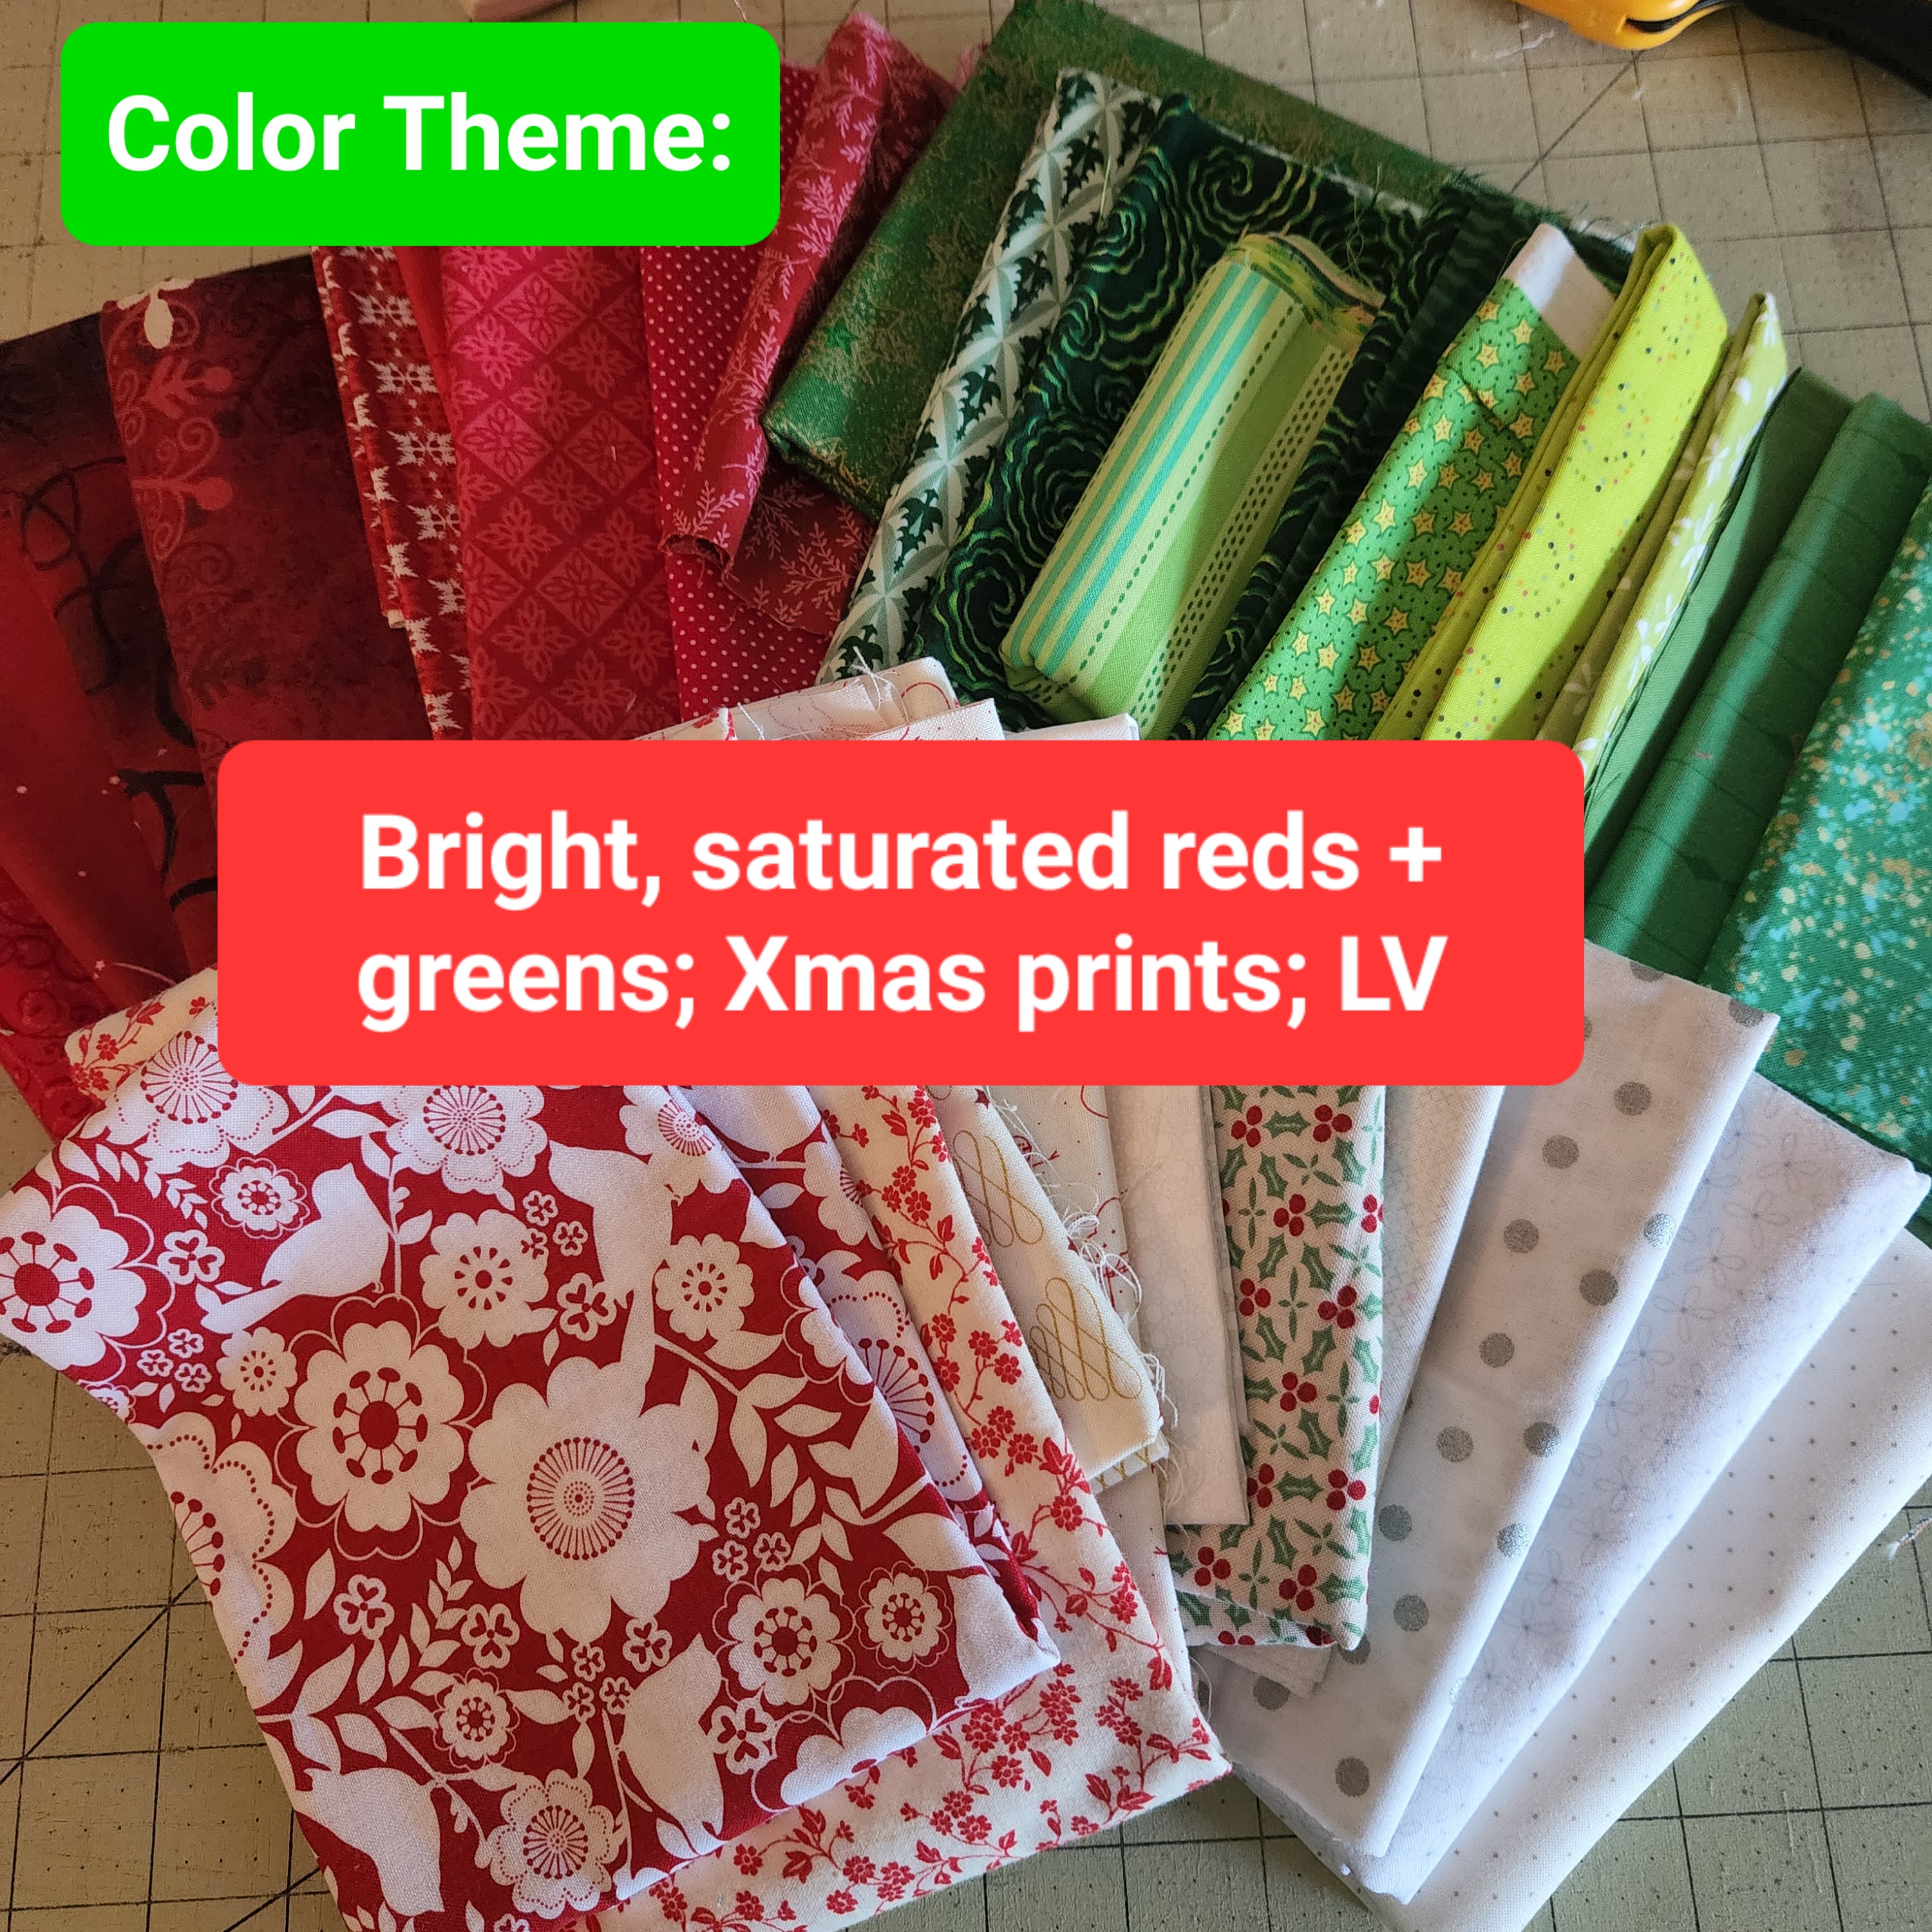
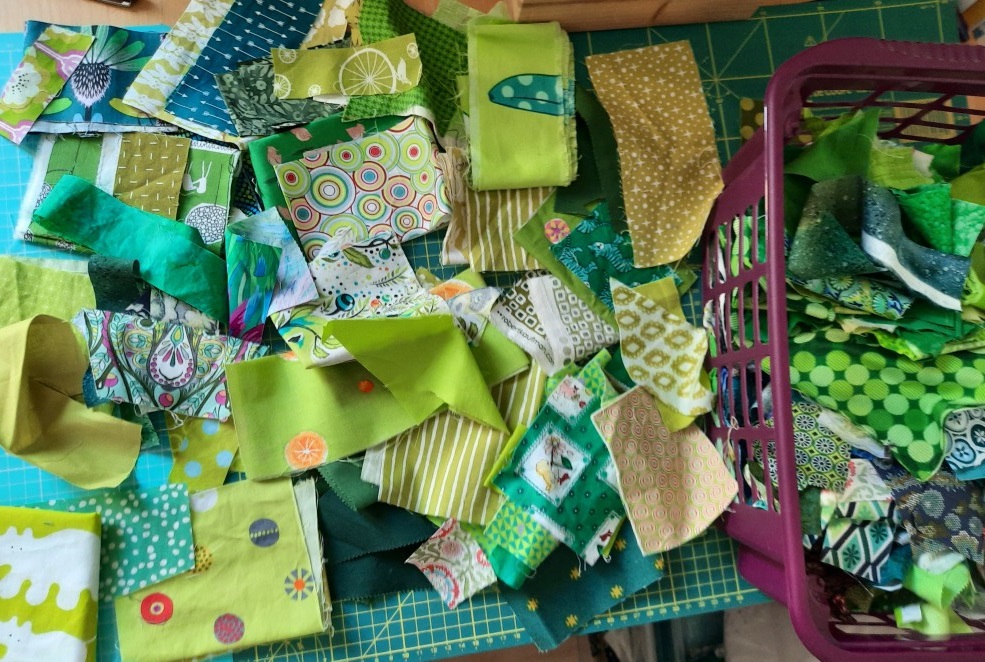
You will need green scraps in different shades and patterns. Use green in every way, uni’s, faux unis, modern patterned greens, add 1 to 3 fancy prints with green highlights. But less batik’s, no pastels or greyish shadowy greens and no recognisable Christmas themes, please.

See my fabric pull as example, actually its the scrap pull in green.


You need a roller cutter or scissor and a cutting mat. (A ruler is only needed at the end to square it up).

A bit of space beside your sewing machine. It will be easier being able to put the cutting matt with the layout beside it for sewing.

First: Take your greens and even tiny green scraps close to you. And the yellow and blue scraps I’ve sent you too.

Choose 10 to 12 of your green pieces/scraps

- after choosing your main fabrics, set the timer on 15 minutes and play !

Playfully lay down your green bits.
Fold bigger pieces of your fabric and cut smaller bits of them to fit it in.
Lay them out randomly.

Rule: Put my blue and yellow scraps in between. It should have 5 to max 7 pieces of them in your block. 

Rule: The scraps should be in a more or less rectangular shape –cut by hand and eye.

Don’t overthink it - just enjoy. 

For these 15 minutes of play –the general layout should be around 16-18-inches. If you need 20 minutes its fine as well- there’s no quilting police - only try not to overthink.

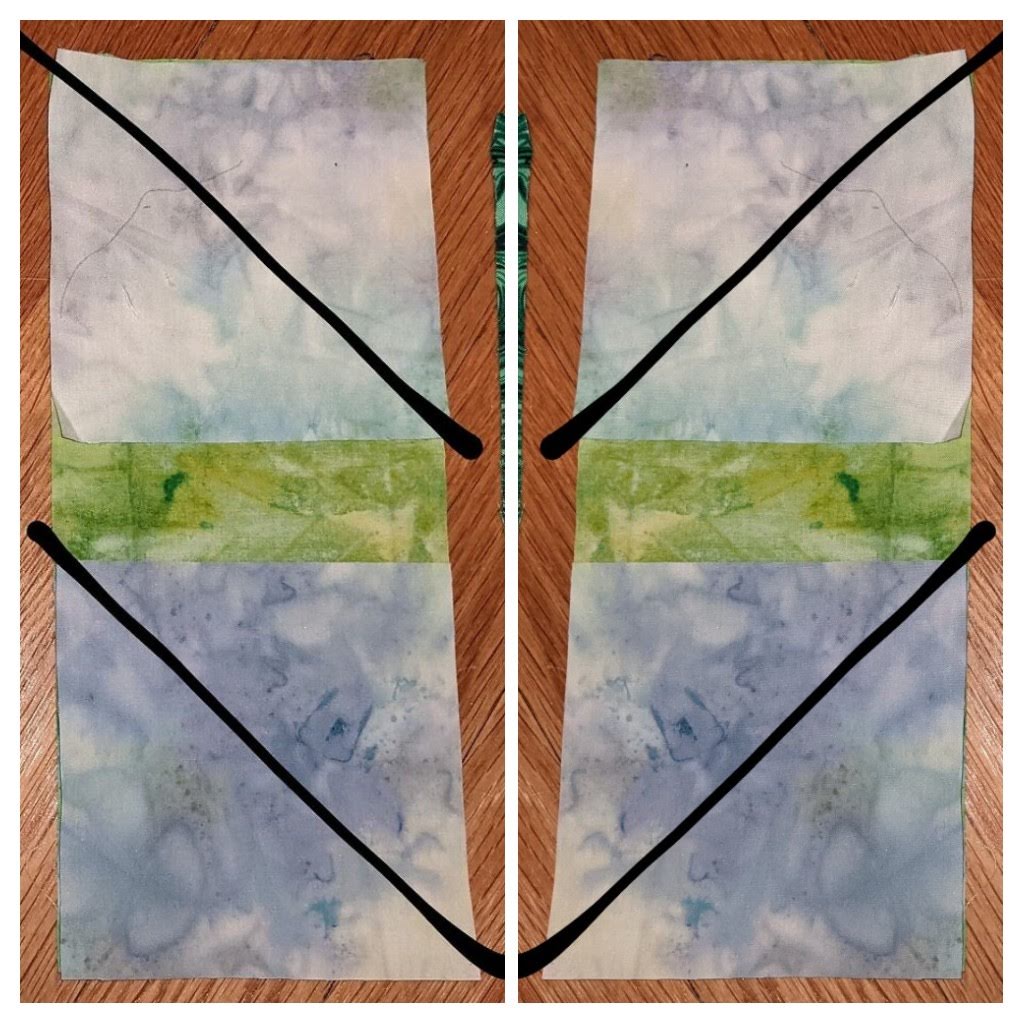
Mine looked like this: (the biggest scrap was about 4x 4-ish or 6x2-ish Inch in size)

Take your cutting matt, cutter and layout over to your sewing machine.

As well as some of your bigger offcuts, they may com handy to add sometimes a few inches. Remember it’s all a bit wonky and suddenly you may need some more fabric to extend the fabric.

Start to sew them together.
I mostly sew two pieces together, first round even in a way of chain piecing. Lay them, after a good finger press, back on the matt.


You may forget were they did “belong” to -
it doesn’t matter. Find a new spot - nobody knows.


Add the pieces together as you go along, finger press and add more.

As you see I was adding more scraps (like the bunnies) during my sewing, not only because the ¼ Inch is unplanned, also the layout is so loose - it will “shrink” you will be surprised.

Add fabric, finger press, add some more until they are bigger and you prefer to press them. Sew, press, repeat until you are done.

Straighten the edges and enjoy your piece of art.

This should be possible within the 1.5 hour rule. If your block isn’t square or you are not happy with one big piece don’t worry. I’ll take it all 😍

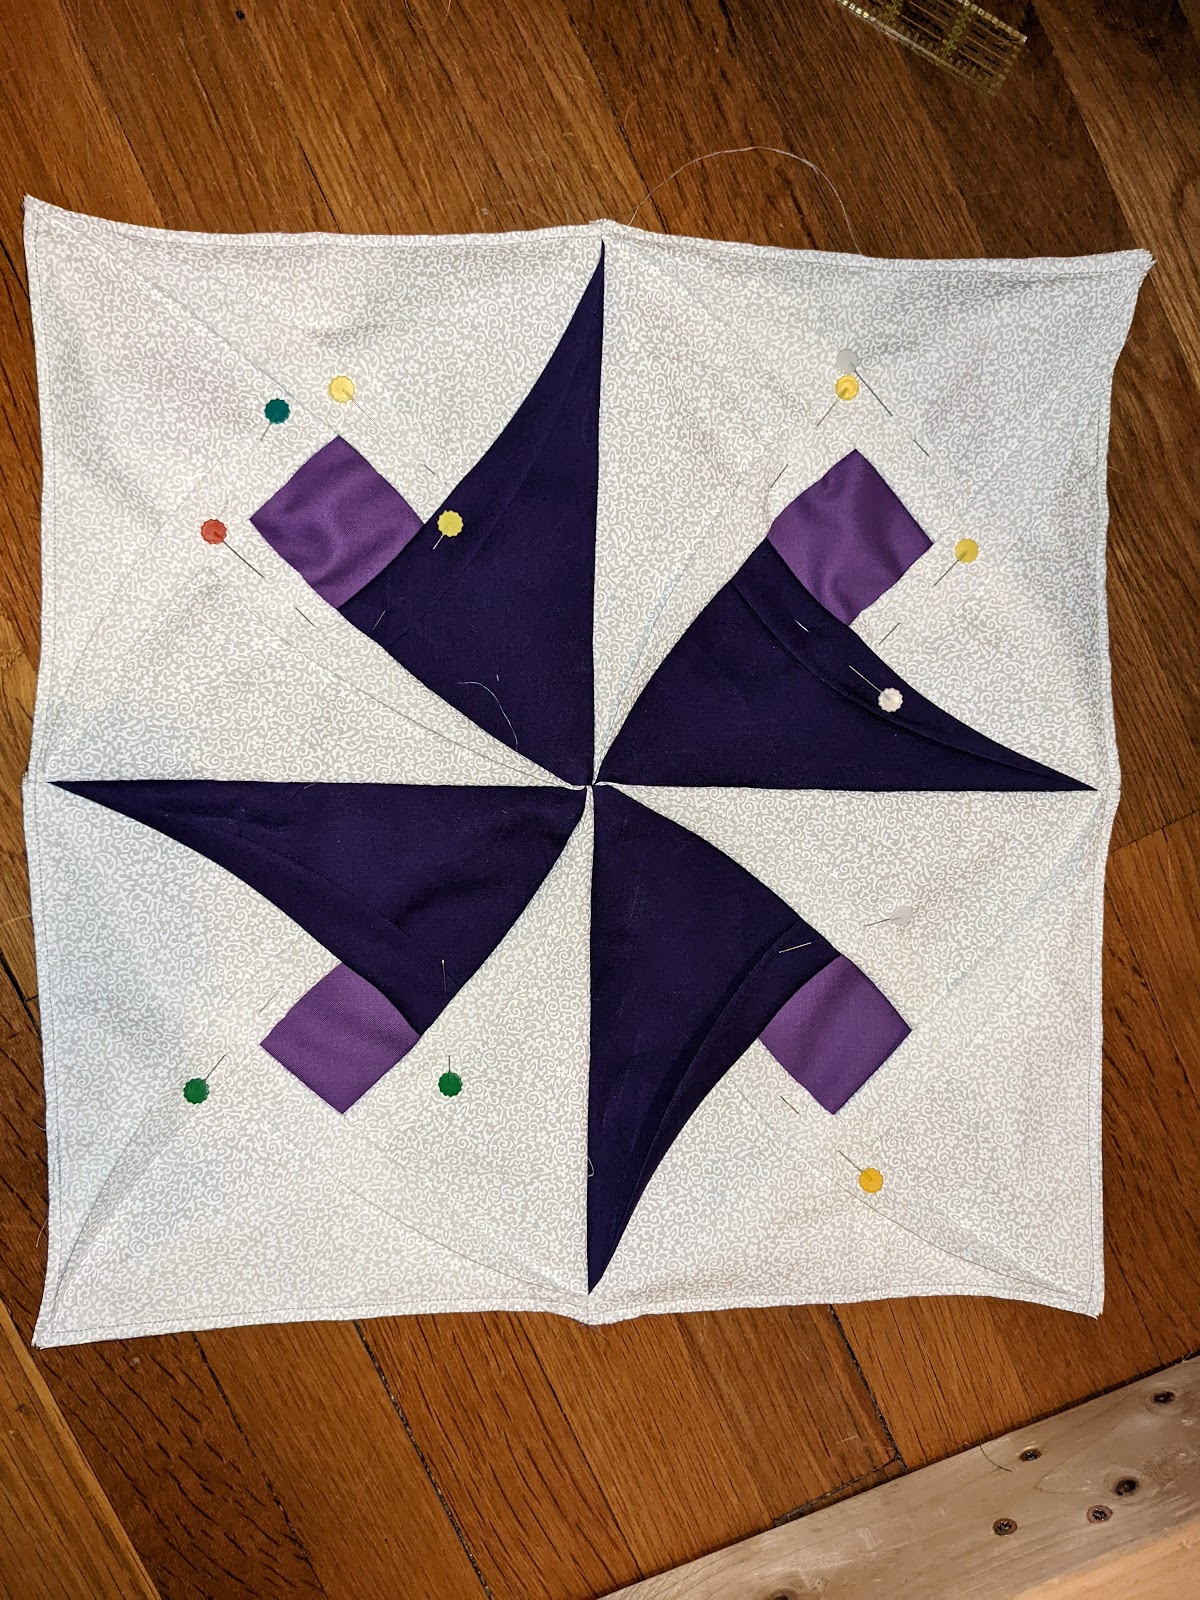
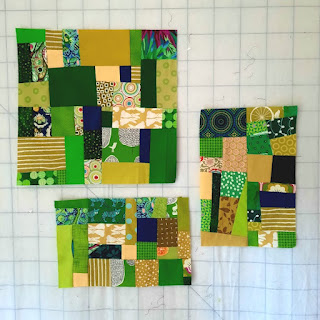
See my first block as an example. Two recatangular pieces
With so many tiny and wonky bits and I was not happy to put them together for getting my block done, so they will stay rectangular.
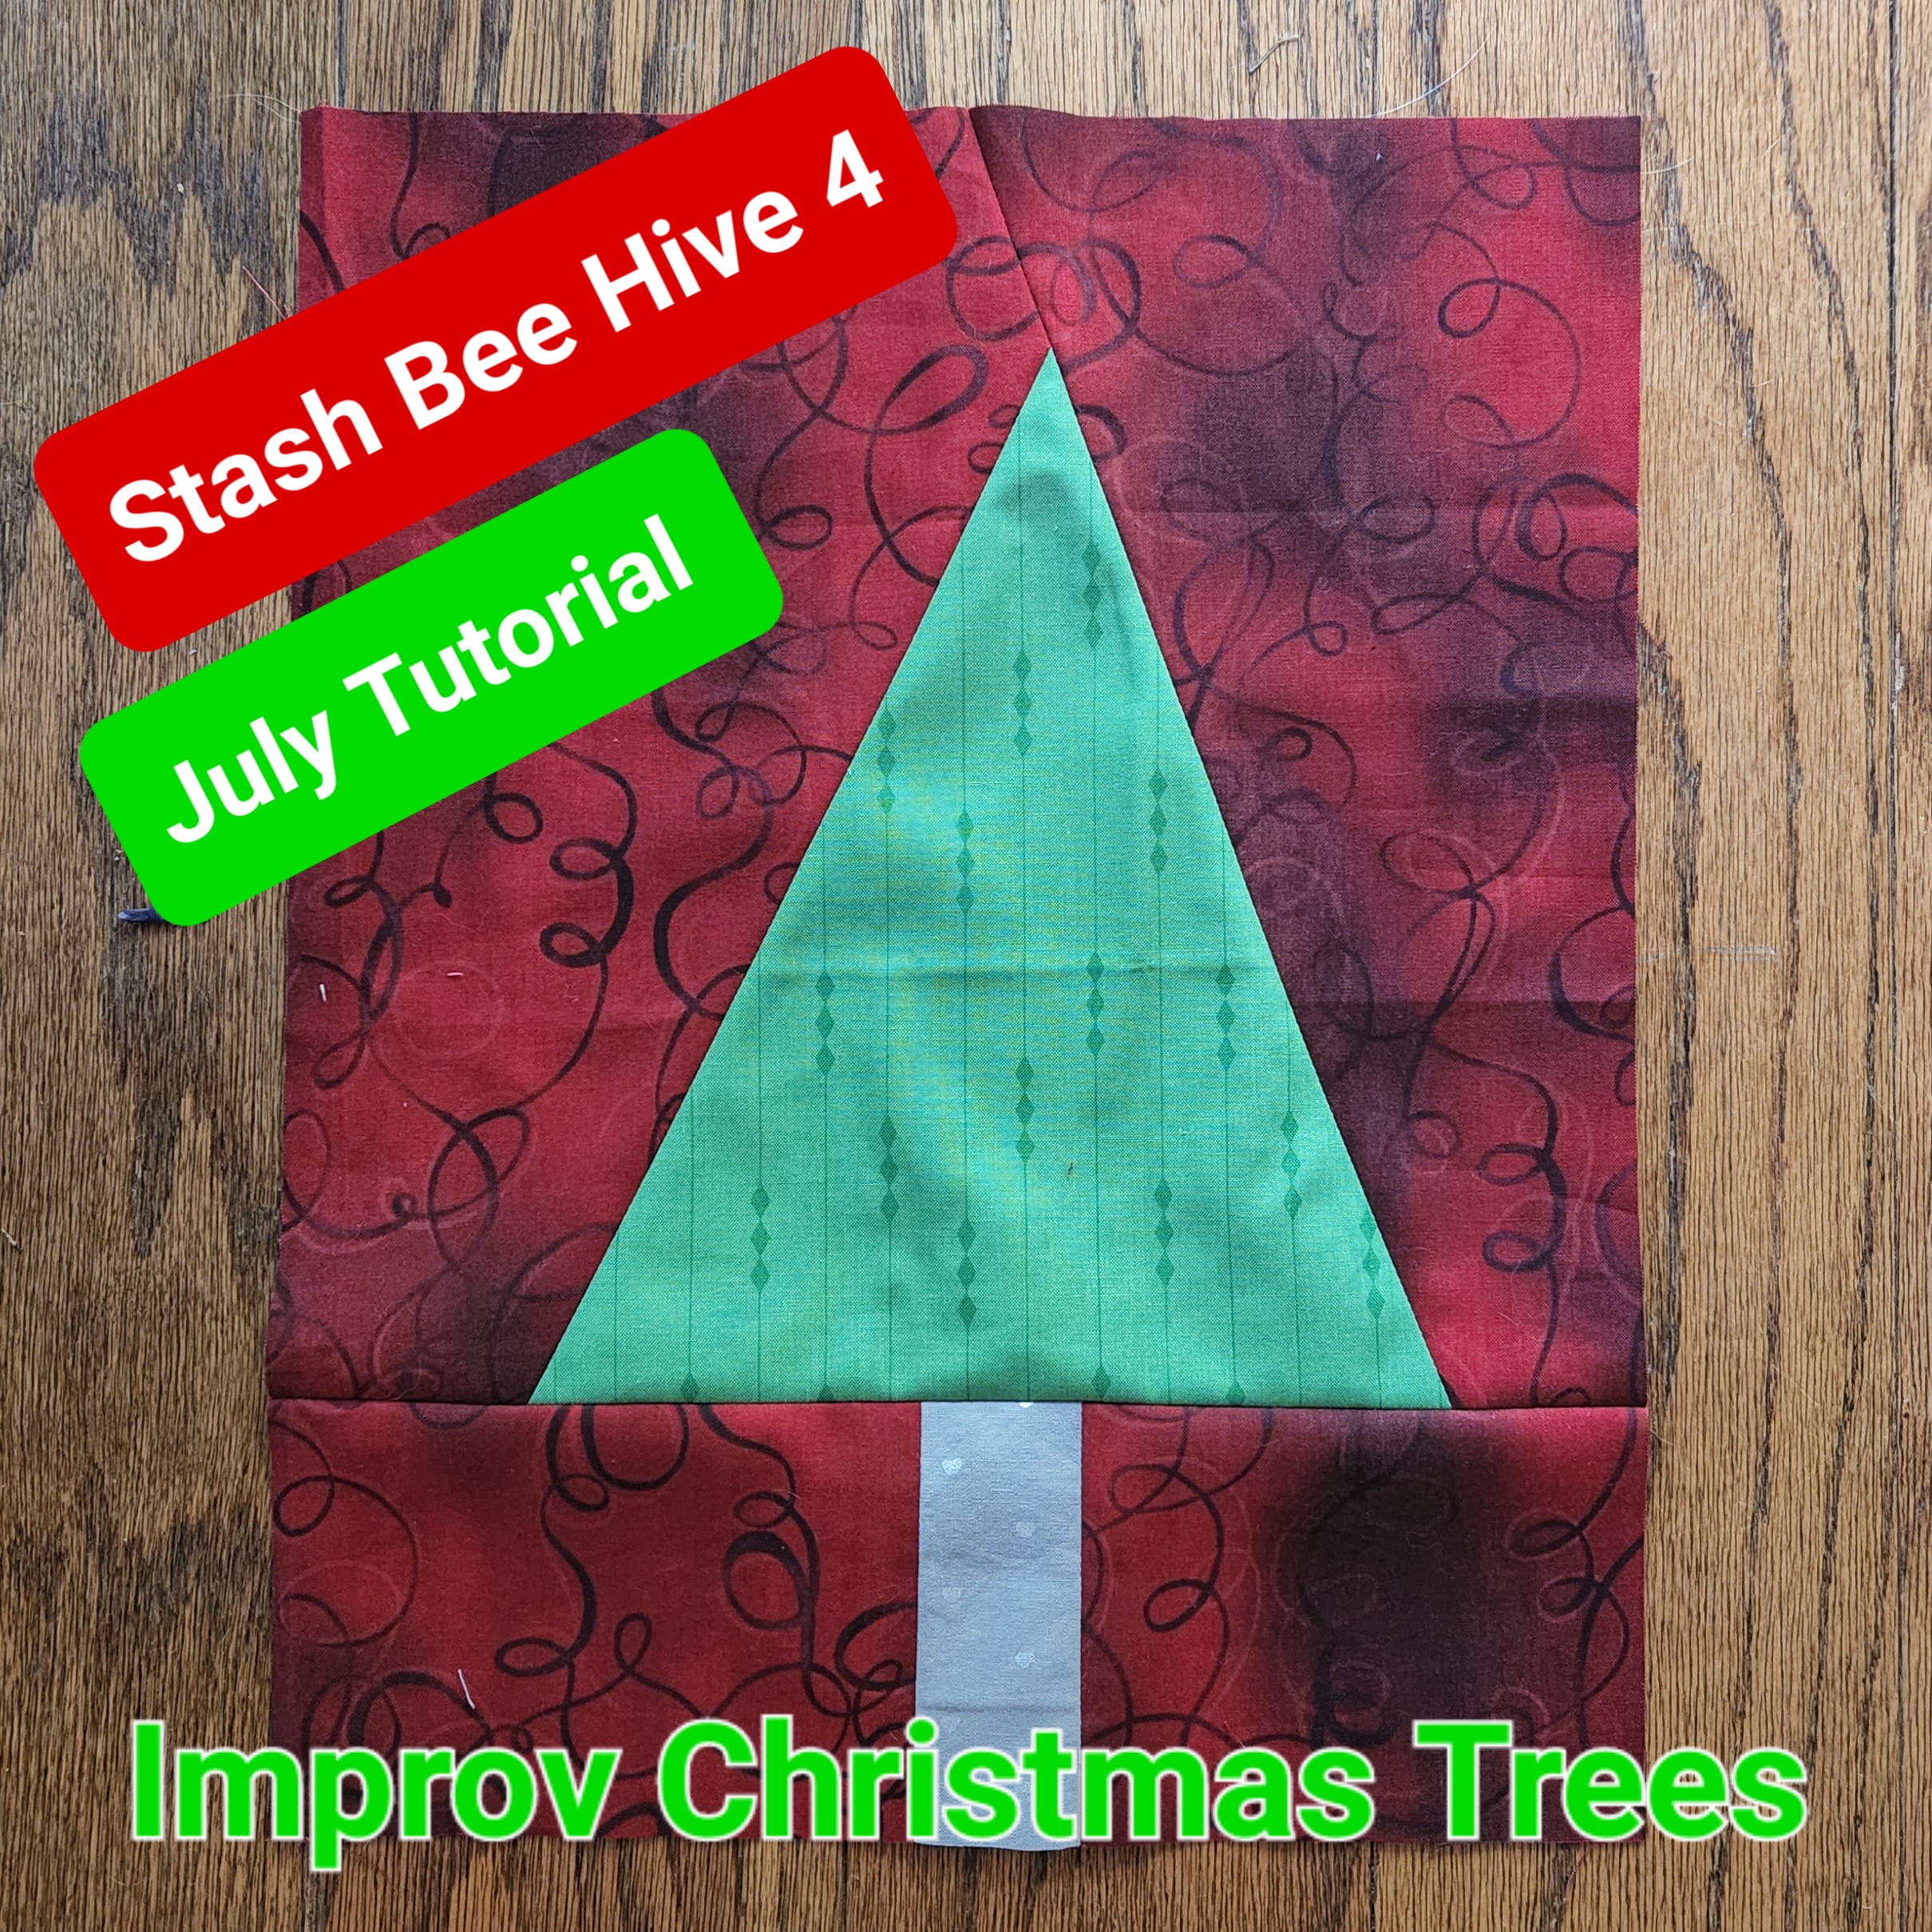


I realized that I didn’t like some parts of my first block as much as I imagined. Somehow it seemed to be too busy and nervous that’s why I adapted my guideline for my Improv in August block a bit. As a result I use less tiny pieces of different fabrics, more repetition and some bigger pieces.

Please tell me about your discoveries doing it. What did you like or not, and why?

New to improve ? Just give it a try an play.

I’m so excited to see all your “Improv in August” Blocks

Greetings from Switzerland

Karin

P.S. If you really, really struggle, just send me a message and I’ll send you an adaptable solution.


Hive 1 Block for Kelsey

 Once I selected my fabrics, this block came together so quickly. I had so many fabrics to choose from - it's like you looked in my stash and picked all the colors that I had readily on hand.

I hope this flower works with all the others you receive.


~ diana

Saturday, July 30, 2022

Hive 1 July Block (Take 2) for Kelsey


This block gave me a chance to perfect my snowballing. The flowers will make for a very happy quilt!

Monday, July 25, 2022

Hive 1 July Block (Take 2) for Kelsey


This flower is too cute! I took way too long digging through my stash but I think I found some perfect fabrics.


I can't wait to see this one finished, I added this block to my list 😁


~Adrienne


Saturday, July 9, 2022

Hive 1 (Take 2) for Kelsey

Hi Kelsey,

Thanks for so rapidly coming up with a new pattern. I love this flower! I went for "dark" and solids.

I can't wait to see how you will piece all the flowers together but one thing for sure, the bouquet will be beautiful😁.

Happy quilting!

Marie


Friday, July 8, 2022

Hive 1 July Block (Take 2) for Kelsey


Hi Kelsey,

I had two takes at your 'Take 2' block 😉.

The first one is a bit on the scant, wonky side. I'm sending both, hoping that you can accept the wonky one as angel block.

Quick and easy! Plus, I got some pink off my hands... Not my favourite colour (right after purple), but together with green, I can actually get used to it! 😃

They'll go to the post office tomorrow.

Happy sewing,

Rita

Wednesday, July 6, 2022

Hive 1, July, Take 2

 Hi again,


Sorry for the confusion this month. I got really excited about the new technique is found in the twirly cathedral block and didn't consider the fabric. Ironically, that was actually my backup block - the first one I'd thought of involved squares inset in circles and I just couldn't explain it when I tried to write it up, so this is sort of take three. Anyway, the new block is flowers based off a hollyhock quilt I saw on Pinterest some time ago. I hope you guys enjoy it. 


Fabric selections : for all fabrics please choose solids/blenders/small pattern/tone on tone. Something that reads as the color of choice. 


Pinks:  Cut 4 [5.5"x5.5"] squares. The final piece will have dark, medium and light. Please pick one of the following options for your 4 squares. (I'm trying to stay in true pinks/mulberry rather than edging into red.)


  1. All dark
  2. Dark/medium
  3. All medium
  4. Medium/light
  5. All light
Some possible pinks I found


Greens:

Medium green: 
  • 2 [3.5x3.5"] square
  • 1 [4.5x10.5"] rectangle
Dark green
  • 1 [1.5x10.5"] rectangle

Light blue:

  • 2 [3.5x3.5"] squares
  • 2 [4.5x4.5"] squares 
Yellow

  • 2 [2.5x2.5"] squares


Cut fabric


Putting the flower together:

Most of this block is just snowballing corners. We'll start with the pinks. On each pink square line up one 3.5*3.5" square (you'll have two blue and two green). Stich along the diagonal, them trim 1/4" from the seam and press back. 


Next up is yellow. We'll be adding yellow to I've pink/blue square and one pink/green square. Line the yellow block up on the opposite point from the green/blue. Sew across the diagonal, trim 1/4", press back. 


Putting the flower together: sew together the two squares with blue corners, keeping the yellow to the inside of the block. Press away from the yellow. 


Repeat with the two pink/green squares. Before stitching, ensure that the yellow triangle will end up kitty corner to the yellow triangle in the blue set (see above). 


Sew together the pink squares with the yellows in the center. 


This section should finish at 10.5x10.5". 


Making the leaf:

Line the blue 4.5" squares up on top of the 10.5x4.5 green rectangle. 


Sew diagonally across the blue squares ensuring that your stich lines are parallel. It's up to you which diagonal to sew (upwards towards the left or upwards to the right, see picture for clarification). Trim 1/4" from the seam and press back. 

Stitching options for leaf. 

Stitched leaf, pressed open. 


Add the dark green strip to one long side. Stich and press. 

This section should finish at 10.5x5.5"

Leaf options with stem added on. 


I'm not going to have you attach the flower to the leaf because I'd like to mix up the greens once I have them. So finished you'll have one flower with an unattached leaf. 


Sorry again about the confusion this month. Since the pattern is up late, don't stress about having it out by the end of the month - there'll be a time extension. I am going to leave the other tutorial up - I really do love the technique and the final block there. If you ever decide to try it please post a picture! 


Sunday, July 3, 2022

Hive 4 July Tutorial - Christmas in July

Hey team! My apologies for the late posting of this tutorial, and many thanks for being patient with me. Most of you have already since this on Instagram (since we are an Instagram hive) but here it is in blog format for posterity sake. Or something. Ha. 

My family and I were on vacation in Florida, and I'm going to go ahead and count it as a huge win that I finished and mailed my June blocks and finished all the photos for this tutorial before we left. We took the kids to Disney World for the first (and probably ONLY) time -- that place is expensive! Regardless, we had a blast. Walked over 20,000 steps every day we were there (kids probably more: small legs, you know), hit as many rides as we could, explored, ate, and had a blast. Then we went to the beach for 3 days to recover from our vacation. Ha!

Seems weird to be making Christmas blocks in July, but maybe, just maybe, this might ensure I have a Christmas by Christmas. Though, honestly, we're probably talking Christmas 2023 at the earliest. This is an easy, peasy block, and goes together really quickly. It's improv, so really, do NOT over think it!!


This is a Christmas quilt, and I'm sticking with classic Christmas colors. Please choose bright, saturated reds and greens as well as Christmas prints in those color and low volumes. Reds should be "true red" not burgundy or trending towards orange. Greens can veer toward the yellow end, but please stay away from olive/army or dark spruce greens. 


This is improv, and I'm not telling you what size to make your trees. I'll fill in the spaces when I put the quilt together. Here's what you do.  Cut a couple rectangles of the same size: at least 2, but you can stack up to 6 or so. Make 4 cuts as indicated below. 


Now that you have cut your improv tree shape, mix and match the triangle (tree) with the background. 

Add a strip of gray or brown to the middle of the bottom background pieces for the tree trunk. 


Flip the tree fabric so it's right sides together with the first background piece. The first piece you sew will be the background size with the angled cut, not the one with a single straight cut. The tip of your tree should stick out at the ¼" mark. Sew with a ¼" seam allowance. 


Since this is improv, we didn't include seam allowances, and the background will not match up with the base of your tree when you finish sewing. Sew the other size of the background on to the other size of the tree. Sew the trunk into the base background pieces. 


Trim the base of the tree top and the top of the tree trunk so you have a straight edge to line up . Sew the 2 pieces together. 


Repeat for the remaining trees. Square your blocks to any size. 


Friday, July 1, 2022

Twirly Windows, July Tutorial, Hive 1

 Hello hive,

I've been playing around with folding fabric to get fun shapes and so for this months block I'd love you all to try a fun variation on a cathedral block. I'm still not sure what the actually name of the block is (I've found it under a few different ones) but I'm going with twirly windows. 

Finished block

This block uses three fabrics: 1 dark, 1 medium/light, and one white. I'd love it if you could pick something that reads as solid from a distance - tone on tone, blenders, solids, small patterns. With regards to colors, cool jewel tones would be great. Here's a picture of some pairings I pulled from my stash. The patterned piece is what I'm hoping to use as a binding. 

Color picks and binding option

Please note that this pattern uses quite a bit of the white/off-white. Feel free to make the whites scrappy. If you go scrappy, I'd love it if you really mixed up their placement in the block, rather than having the same ones right next to each other. 


Cutting:

    4 [8.5*8.5"] squares of the dark fabric

    4 [8.5*8.5"] squares of the medium/light fabric

    12 [8.5*8.5"] squares of whites - scrappy totally good


Cut squares

Folding/Pressing

A lot of this block is actually folding. Fold each of the white and dark squares in half along the diagonal, creating a triangle. Press. At the end of this step you should have 4 [8.5*8.5"] squares in medium, 12 [8.5*8.5] triangles in white, and 4 [8.5*8.5] triangles in the dark fabric. 


Folded fabrics

Assembly

This is the fun part. We will be making 4 quadrants. For each quadrant you will need 1 medium tone square, 1 dark tone triangle, and 3 white tone triangles

Start with 1 of the medium tone squares. Place 1 of the dark tone triangles on top of it, lining up in the bottom right corner (shown below). (No sewing yet)


Add two white triangles, moving clockwise around the block (lower left corner, then upper left corner). Each triangle should be laid on top of the one previously placed. 

Addition of 1st white triangle

Addition of 2nd white triangle


Before adding the last white piece, fold the dark triangle down. Place the last triangle in the upper right corner, then unfold the dark triangle. 

Dark triangle folded back to allow the addition of the 3rd white one in in the upper right corner

Adjust as necessary to ensure you are lined up with the medium square underneath. Pin all pieces in place and sew a 1/8" seam around all four edges of the block. 

For those having difficulty visualizing this step. I found a great video tutorial of the technique here

Repeat with remaining pieces of fabric, for a total of 4 quadrants. 


4 quadrants with 1/8 inch seams. 

Putting them together 

Line the blocks up to create a pinwheel (shown below). 


Final layout

Sew the upper two squares together with a 1/4" seam allowance. Press towards the dark triangle. 

Repeat with the bottom two squares. 

Sew upper and lower half together (seams should nest), with a 1/4" seam allowance. (This gets a little bulky)

The finished block should measure 16.5*16.5". 


Finished block

You may be thinking, "this doesn't look like the block in the first picture". To achieve the window portion of the block each of the triangles will be folded back, creating a curve and exposing the medium tone block below. However, I'd like to do this after all the blocks are assembled to ensure I don't lose any points. To see what your final block will look like you can pin the fabrics back as I've done below. 

Finished block, pinned open

I hope you enjoyed trying this piece. I can't wait to see your windows!