Friday, March 31, 2023

Hive 3 April Tutorial - Irish Chain Bunting Block!

 Hello everyone from Washington, DC where we are experiencing cherry blossom fever and spring has sprung! I can't wait to go outside again with my dog for a long nature walk and see what else is blooming.


This year, I wanted to do an Irish chain block that lended itself to a scrappy mix of backround fabrics like this quilt I saw in an older Stashbee inspo post: 


I really loved this pattern, with two different colors that creates a plaid look, but the block was pretty time consuming. 


I found this cute little Irish chain pattern in a bunting style that I thought might create a similar effect from www.blossomheartquilts.com!  


My colors:  dark dark inky navys and pastel or coral oranges.  Also, if you have a lighter slate blue, then one of the 2.5" squares can be a slate blue color for a little interest!  Please no primary color oranges or blues.  Multiple fabrics are great if you have multiple that fit the bill, but if you only have one, that's fine to repeat. 

For the background, I would prefer a mix of low volume white, minor patterns are fine.  One or two squares with a near-white are also fine, but I want mostly white squares.  

I love novelty fabrics, just nothing that is for kids/babies/holiday/licensed characters.  If you want to fussy cut for something interesting to show up in the buntings, have at it!  I tried to get a bird and leopard face in mine.  

I always work on my blocks at night, so I feel like the lighting is not great, but I think you can get the idea:


Here I am trying to use the 45 degree marker to work out how the block might look after stitching...  I love this fabric, this is my color inspo.


Cutting:

Print 1 (dark navy):
1 – 3″ x 3″ (will form center pinwheel with two triangles)
4 – 2.5″ x 2.5″ (one of these squares can be a slate blue if you have one)

Print 2 (pastel orange/coral):
1 – 3″ x 3″  (will form center pinwheel with two triangles)
4 – 2.5″ x 2.5″

Background whites:
2 – 3″ x 3″
8 – 2.5″ x 4.5″
4 – 4.5″ x 4.5″

All seams are 1/4″ and press as directed.  I used a scant 1/4"

Step 1. Draw a diagonal line on the back of all print squares.

Step 2. Pair each print 3″ square with a background 3″ square to make two standard HSTs from each pair. Sew 1/4″ away from the line on each side of the line. Trim along the line and press the seam towards the print.

Step 3. Arrange the HSTs to form a pinwheel. Sew them together in rows, pressing seams towards Navy. Sew the rows together and press the seam open.

You'll probably need to trim this block down to a 4.5" square.  I measured 2.25" from the center line and trimmed the excess off each of the 4 sides to ensure the pinwheel stayed centered.

Step 4. Place one print 2.5″ square right sides together with a background rectangle and sew along the line. Trim 1/4″ from the seam and press the seam towards the print. Make 8.  Make sure all the stictch lines are oriented the same way.  


Step 5. Arrange all units and background 4.5″ squares to form the Bunting block. Sew together in rows and press the seams away from the background squares. Sew the rows together and press the seams open.


Your block should be 12.5" square :)  Thank you and can't wait to see your blocks!!  I might try to get better photos and update this blog...


Hive 5 April Tutorial -- Wonky Star block for Nina

 Hello!

This is my third year in StashBee, and I've enjoyed meeting and collaborating with other quilters so much!


I'd like my Hive 5 members to make me a 13.5" improv Wonky Star block this month. I made one for a Hive mate in my first year, in 2021, and loved it so much that I want a whole quilt of it!

There are lots of tutorials out there for the basic techniques of this simple improv block, which is a 9 patch with improv elements.

Michelle's 2021 StashBee Wonky Star Tutorial is perhaps the best - her finished size is 12.5 (she starts with 4.5" blocks instead of the 5" blocks I'm requesting) but the construction is identical otherwise. A nice, clear, simple tutorial. 

In that tutorial, Michelle reommends Scissortail Quilting's Wonky Star tutorial with a downloadable pdf. I also like HQ Stitch's Make a Wonky Star

Or if you like a video tutorial, you can check out: Jenny Doan's Tutorial

CHOOSING FABRIC

I'd like the background to be scrappy low volume and the star to be scrappy bold colours.

Background

Any low volume fabric in white, off white, pale grey -- blenders, solids, prints.

Star

I'm looking for super scrappy bright colours -- a variety of colours in each block! Brights can be blenders solids or prints that read mostly one colour. As long as you have a good contrast between the low volume background and the elements of the star it'll look great.

CUT LIST

You'll need

8 x 5" squares of various lowvolumes

1 x 5" square of a bold, bright colour, print or solid

8 scraps of brightly coloured fabric, prints or solids

Please follow Michelle's Wonky Star Tutorial for the method. 

Your finished block will measure 13.5" -- don't worry about squaring it up if it's a little over or under :)

Here are some photos I took during my own block construction:

First, I laid out my basic block -- 8 assorted 5" squares of low volume fabrics around a bold, bright 5" square in the centre. 


Pick one of four squares that get star points -- North, South, East and West. The corners stay plain. 

Place a scrap of bright coloured fabric on the square. It's best if you have a nice straight edge for sewing!
Angle it so its right sides are together with the background, and the scrap covers from near the centre of the square up the side. (but leave at least 3/4 of an inch between the top of the star point and the top of the square). 

Sew the colourful scrap to the background square and trim the excess. 


Press the coloured piece open and then trim the block to 5" square again.


Now add the second star point on this square. Take another colourful scrap with a straight edge -- angle it from the bottom of the the square up the side in the other direction. 


Sew and trim the seam. Then press the new star point out. And trim (for some reason not shown here :))


Now proceed as a normal 9 patch block.

Sew the squares into rows, and press alternate rows in different directions:

Row A -- press to the left
Row B -- press to the right
Row C -- press to the left

This will help your seams nest during construction and will help you get clean meetings between squares!

Then sew them all together :)

You can make your star points more varied than mine turned out -- narrower or less tall or chunkier or whatever. Wonky is good!

Thank you all so much for all your work -- I really appreciate being a part of this great Hive!

Nina


Hive 4 - April Tutorial- Tulip Block for Lisa!


Hi All

Much like my block last year, this too is inspired by my daughter, Melanie Ham, who at 36 died of a rare cancer.  I think all you know that she was an online content creator and left us many videos that provide great instruction and memories. Last year I mentioned one of her videos that I like to call, “You don’t have to know, just sew”.  It tells the story of how when she needed inspiration, sort of stuck, she just found some fabric and started sewing.  I find myself in that space often while dealing with grief and just the challenges of life.  If you want to know more about her offerings or her journey, her website is: www.melaniekham.com, or join her community on Facebook at Melanie Ham’s Happy Stitchers.

Melanie loved tulips!  I can’t wait to see all of the beautiful tulips you all will make!  My pattern is a slightly modified version of the one on Missouri Star Quilts YouTube Tutorials.  You can refer to that video for construction, but please follow my fabric and cutting instructions. 

Missouri Star Totally Tulips


Here are the details for my block:

The Tulip bulbs will be pinks, raspberry, fuchsia, strawberry, rich reds and should be tonal prints or clearly read as those colors, please no solids, character, juvenile – batiks are fine.

The leaves and stem are various green prints that are tonal or clearly read as green.  Please no solids for the leaves, no character prints or juvenile – batiks are fine.  Solid green may be used for the stem.

Background is white solid – like Kona Snow, Kone White or similar that is white not leaning to ivory or beige. 


Bulb Prints                                         Leaf and Stem fabric


Tulip Bulbs Instructions:

4 – 5” squares of the same bulb fabric

2 – 2.5” background squares

2 – 3.5” background squares

Draw a line diagonally from corner to corner on the wrong side of the 4 background squares.  Place the 2 - 2.5” squares right sides together with the upper 2 - 5’ bulb squares as shown on the inner / upper corners.

Place the 2 - 3.5” squares right sides together with the lower 2 – 5” bulb squares as shown on the outer / lower corners.

Sew ON THE LINE corner to corner - Roll the corner back and make sure it covers the corner and is square before trimming the excess ¼” away from the sewn line.


Press the corners back and square to 5” and sew 4 patch together pressing seems opposite each other so they will nest tightly together.  Press horizontal seem open.

 
Tulip Leaves and Stem Instructions

2 – 5” squares of different green prints

2 – 5” squares of background white

1 – 1.5” x 8.5” strip solid green for the stem

Pair 1 Green Print with 1 white 5” square, right sides together – draw diagonal line corner to corner.


Sew ON EACH SIDE OF THE LINE ¼’ – Cut on line – result in 4 – half square triangles – square to 4.5”.


Place your 4 half square triangles opposite each other and pointed like leaves - watch your placement as follows.


Sew the half square triangles together top to bottom – watching placement


Sew these to the center stem piece.  Pressing horizontal seems open.


  Now join the bulb to the leaves and stem piece with one horizontal seam pressed open.


I hope this gives everyone a little taste of spring and a chance to find some beautiful colored tulips to add to my field!


Any questions, reach out on Instagram or email.

Lisa…

Hive 1 April Tutorial - Diamond Star

Hi busy Hive 1 Bees,

Last year, I chickened out of posting a Foundation Paper Piecing (FPP) Pattern. 

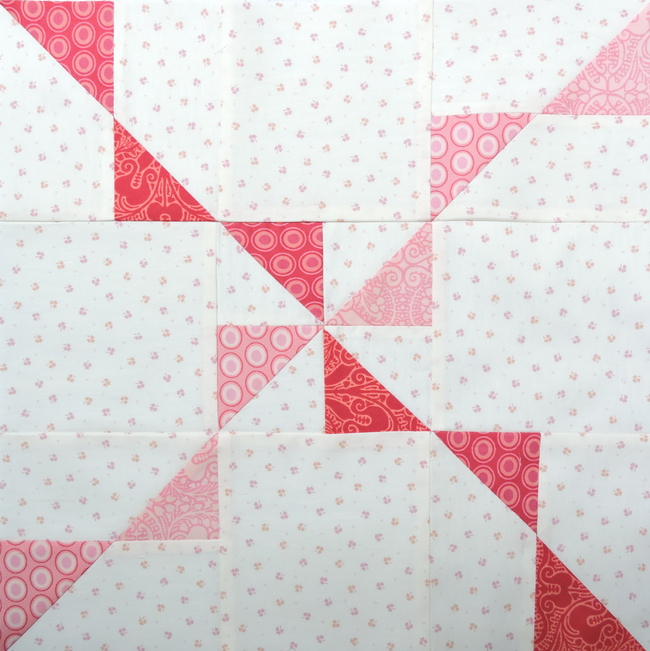
I hope, this year, you are as brave with this, as me! – I present: The ‘Diamond Star’!

Recently I got interested in 1950’s and 1960’s fabric/wallpaper patterns (during a search for fabric for a quilt I’m making for a friend) and quickly realized, that some of those patterns would be fun to create in patchwork. So, I dabbled in drafting a few FPP patterns. That’s where this block springs from. 

For those of you who are not comfortable with FPP, I’ve put basic instructions below, on how I approach this. I would encourage you to check out a few online tutorials. Here are a couple of links to videos I found very helpful: 
Violet Craft ,
Sheri Cifaldi-Morrill (On this one, the fun starts at about 8 minutes in.) 

However, people are all different, so if these methods do not suit you after you’ve tried them – don’t give up! There are plenty of other (video) tutorials on the www!

For all those who do FPP in their sleep:
If you rather wing it with your own method, go for it!

The block I am asking you to do comes (and stays!) in 4 parts, which are Right Triangles, that all finish 9 11/16 “ x 7 5/16 “ (incl. Seam Allowance). Don’t worry – you will not have to measure for trimming! That is what the template is for.

However: I can only ask you to sew two of the templates, as all 4 of them would exceed the number of pieces allowed in a Paper Piecing pattern for StashBee. You are welcome to make all 4 templates, but it is not a requirement.

If you decide to only make 2 of the templates, please enclose the fabric pieces for the remaining 2 parts, so I can complete the block. Thank you.

Please sew on 2 of the templates, but
do not sew them together and do not take off the paper. Thanks!

The pattern comes in 4 pieces, where Part A and Part B are the same, and Part C and Part D are the same and those are mirror images of A and B.


Foundation Paper Piecing is a method where fabric is sewn on to paper (template), with the printed lines on the paper template being the sewing lines and outline the areas that are covered by the different fabric pieces.

Note that the fabric is sewn to the blank side of the paper template, with the wrong side of the fabric facing the blank side of the paper template. Therefore, the final result of the fabric block is a mirror image of the printed image on the paper template.

As in normal piecing, all fabric pieces are sewn together with right sides of fabric together. 

This can be a bit confusing for beginners, as you have to keep the paper template in mind at the same time. Using solid fabric (which has no right or wrong side) helps here.

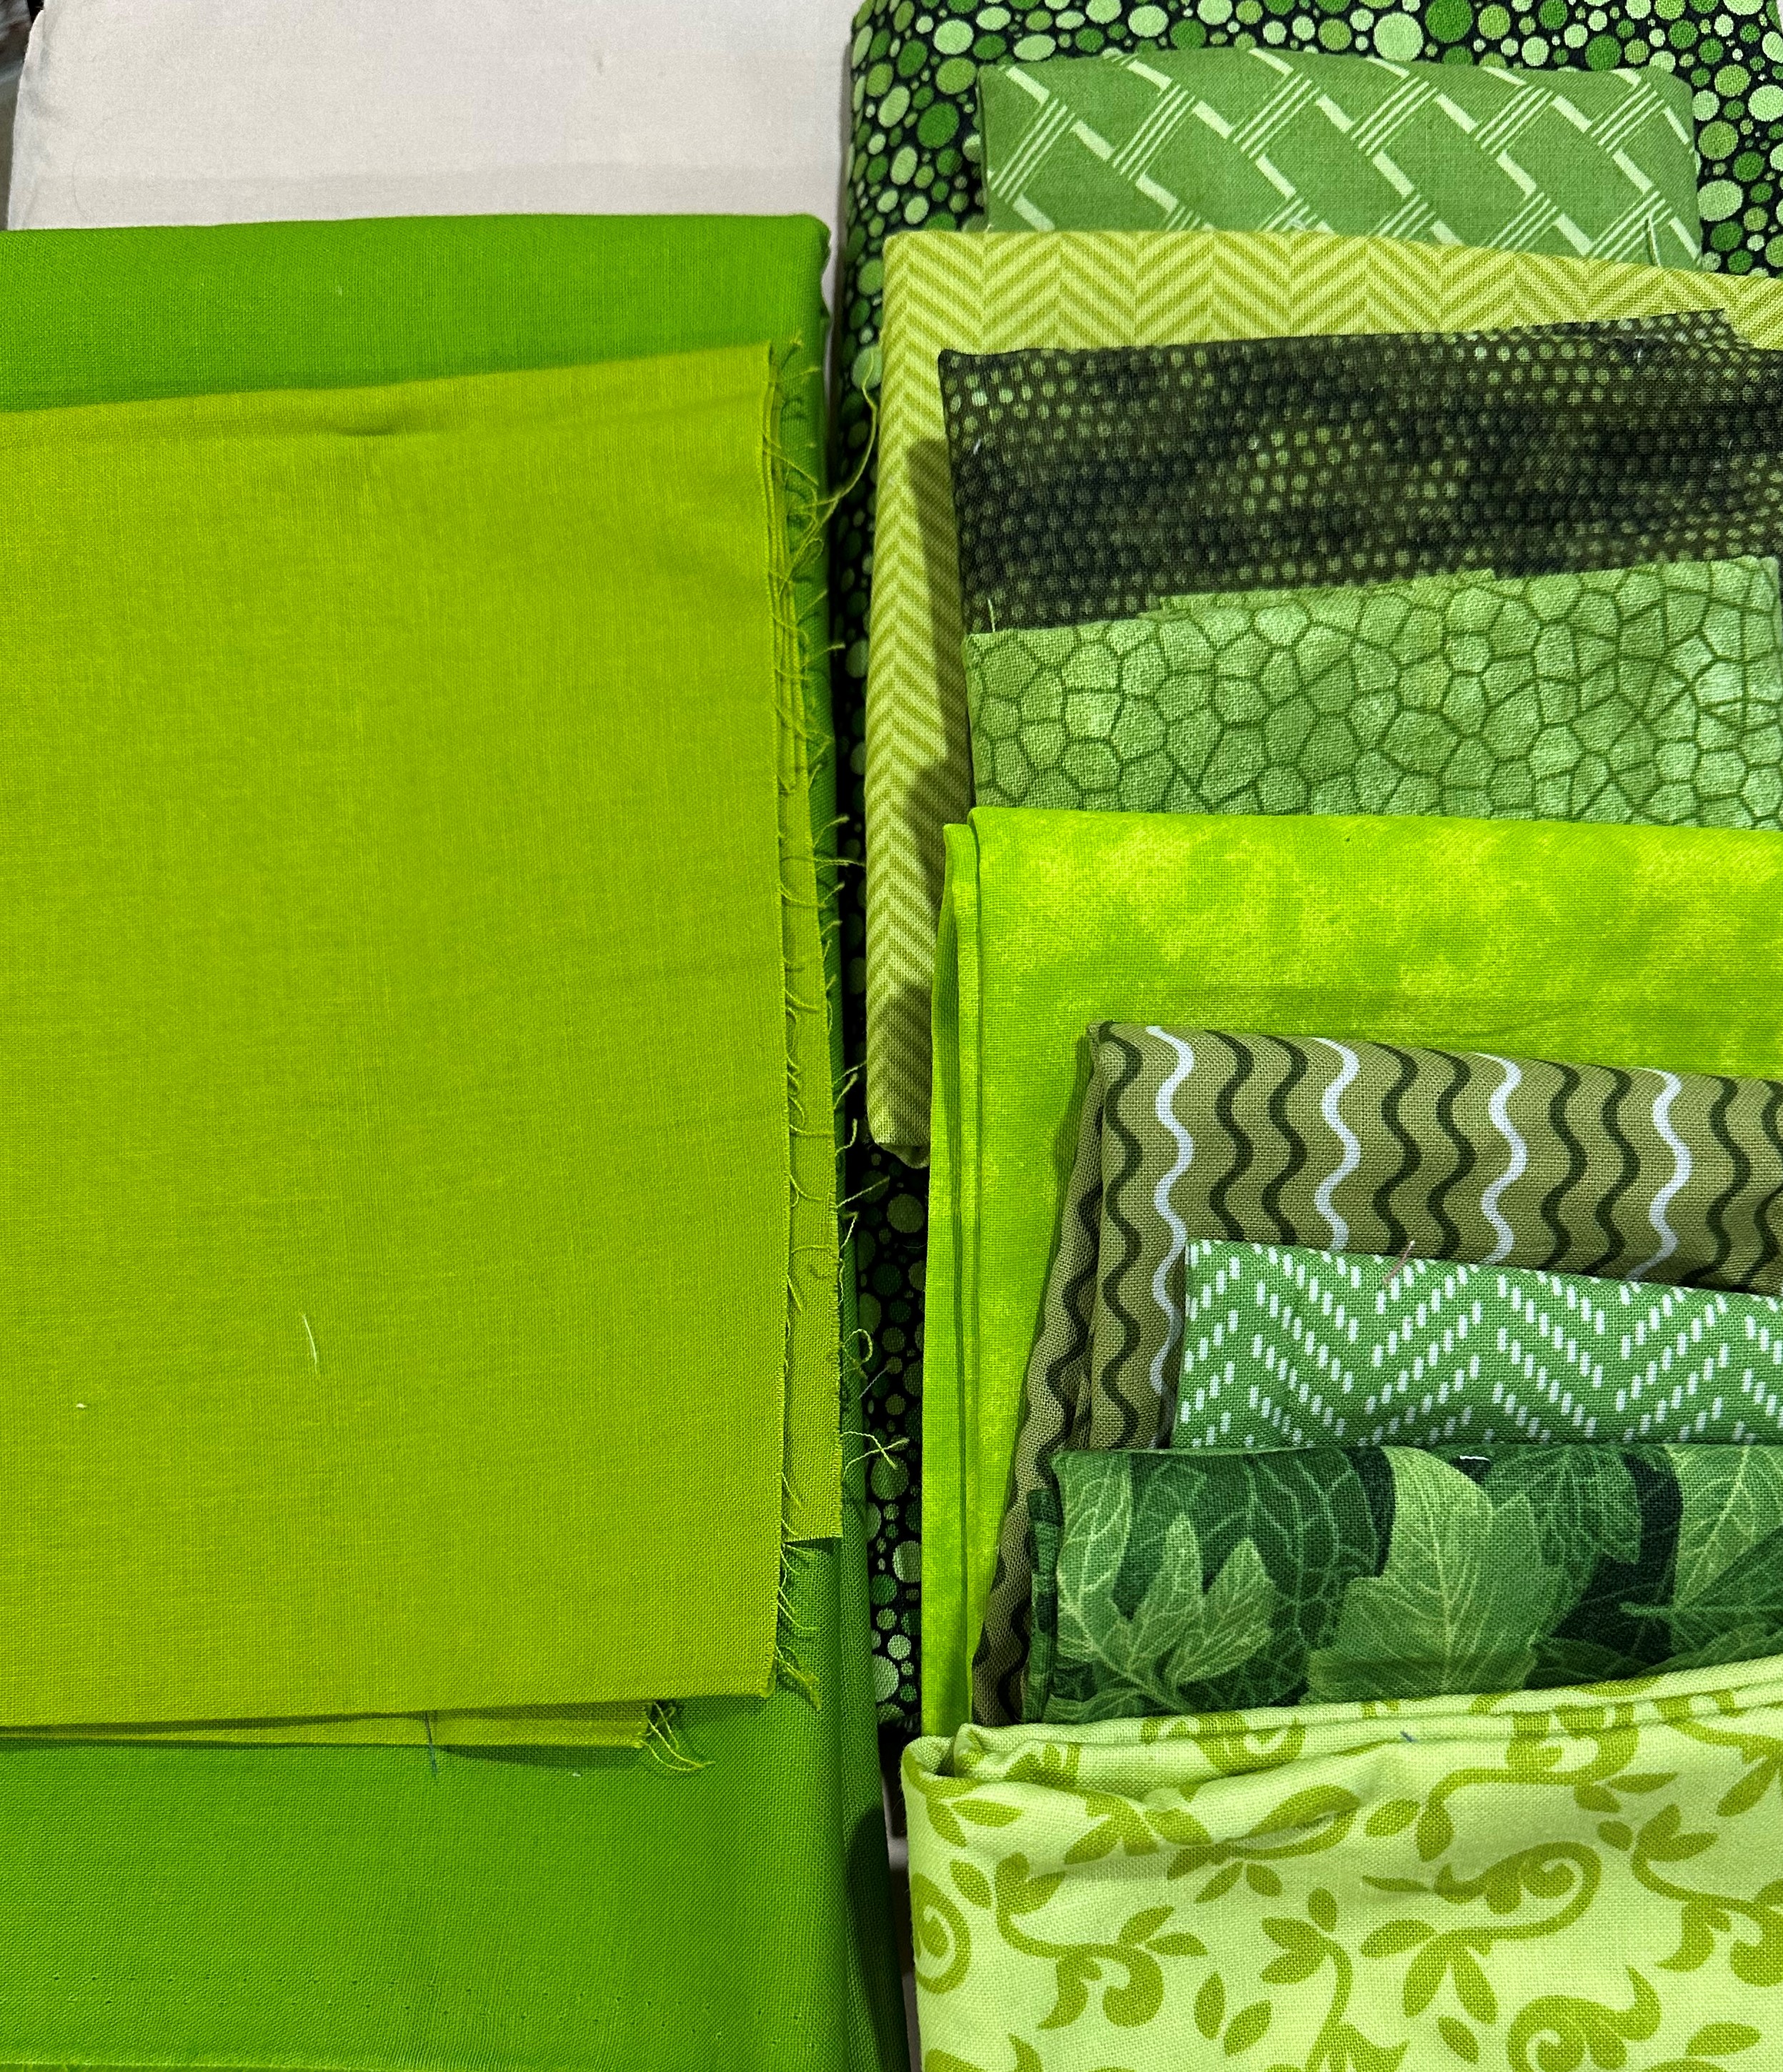
Fabric Choice and Cutting Instructions:


Please cut the fabric for all 4 template pieces, although you will only sew with half of them. Please enclose the remainder in the post to me. Thank you!


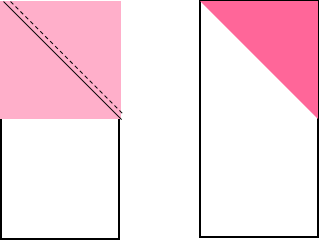
The Fabric placement on all 4 pattern pieces is the same. See the diagram below.


For Foundation Paper Piecing you’ll also need:

the Paper Template and 

either some glue stick or pins to hold the first fabric piece in place. 

I personally prefer glue, as the pins get in my way, when I pre-cut the seam allowance. 


FPP Template:

Here the Link to the Template PDF (2 pages): Diamond Star FPP Pattern

Please print this at ‘Actual Size’ or ‘100%’! 

On both pages is a Test Square: when printed at the correct size, this should measure 1” on the sides.

In order to make 2 of the pieces, you only need to print one of the pages!


Cut out the 2 templates. I find it useful, to leave a little bit of space around the dotted lines, as those are the trim lines for later.

Instructions for covering one of the templates (repeat for 2 of them in total):

For one template you need:


Step 1: Temporarily attach the first two fabric pieces to the paper template.   

Use either a dab of glue or a pin to hold the first fabric piece (Right Side Up) in place on the un-printed side of the template, so that it covers area 1 including ¼” seam allowance all around.


Step 2: Sew Areas 1 & 2 fabrics to the template.   

Turn the template over to show the printed side, and fold the paper back along the sewing line between areas 1 and 2. Cut the seam allowance on the fabric back to ¼” along the paper fold.

Align the fabric piece for area 2 with right sides facing to the fabric already attached to the template, along the just created seam allowance, so that area 2 is fully covered plus ¼” seam allowance all round. Hold in place with a pin or clip. 

At your sewing machine:

Reduce your stitch length to ca. 1.5 – this ensures, the stitching will act as perforation for the paper and also sturdy seams.

Put the template with the printed side up under your sewing needle, take out/away the pin/clip, making sure the fabric doesn’t slide. Fold down the paper. Sew along the line between areas 1 and 2, including at least ¼” beyond the sewing line intersection with the other sewing lines.


Fold back and finger press the area 2 fabric.


Step 3: Sew Area 3 Fabric to the template.   

Carefully pull the new seam from the paper to expose the intersection of the seam lines between areas 1 / 2 and 3. Turn the template over to show the printed side and fold the paper back along the seam lines between areas 1 / 2 and 3. Trim the fabric to a seam allowance of ¼” along this fold.

Align the fabric piece for area 3 with right sides facing to the fabric already attached to the template, along the just created seam allowance, so that area 3 is fully covered plus ¼” seam allowance all round. Hold in place with a pin or clip. 

Go to your sewing machine and sew on the seam line between areas 1 / 2 and 3.


Fold back and finger press the area 3 fabric.

Step 4: Sew Area 4 Fabric to the template.   

Turn the template over to show the printed side and fold the paper back along the seam lines between areas 3 and 4. Trim the fabric to a seam allowance of ¼” along this fold.


Align the fabric piece for area 4 with right sides facing to the fabric already attached to the template, along the just created seam allowance, so that area 4 is fully covered plus ¼” seam allowance all round. Hold in place with a pin or clip. 


Go to your sewing machine and sew on the seam line between areas 3 and 4.


Fold back and finger press the area 4 fabric.

Step 5: Sew Area 5 Fabric to the template.   

Turn the template over to show the printed side and fold the paper back along the seam lines between areas 4 and 5. Trim the fabric to a seam allowance of ¼” along this fold.


Align the fabric piece for area 5 with right sides facing to the fabric already attached to the template, along the just created seam allowance, so that area 5 is fully covered plus ¼” seam allowance all round. Hold in place with a pin or clip. 


Go to your sewing machine and sew on the seam line between areas 4 and 5. 


Step 6: Trim the template.   

Now all the template areas are covered with fabric,
give it a quick press – on the fabric side only. 


Then trim the template along the dotted outer line.


Repeat the Steps 1 to 6 for one of the other 3 templates.


Finished!


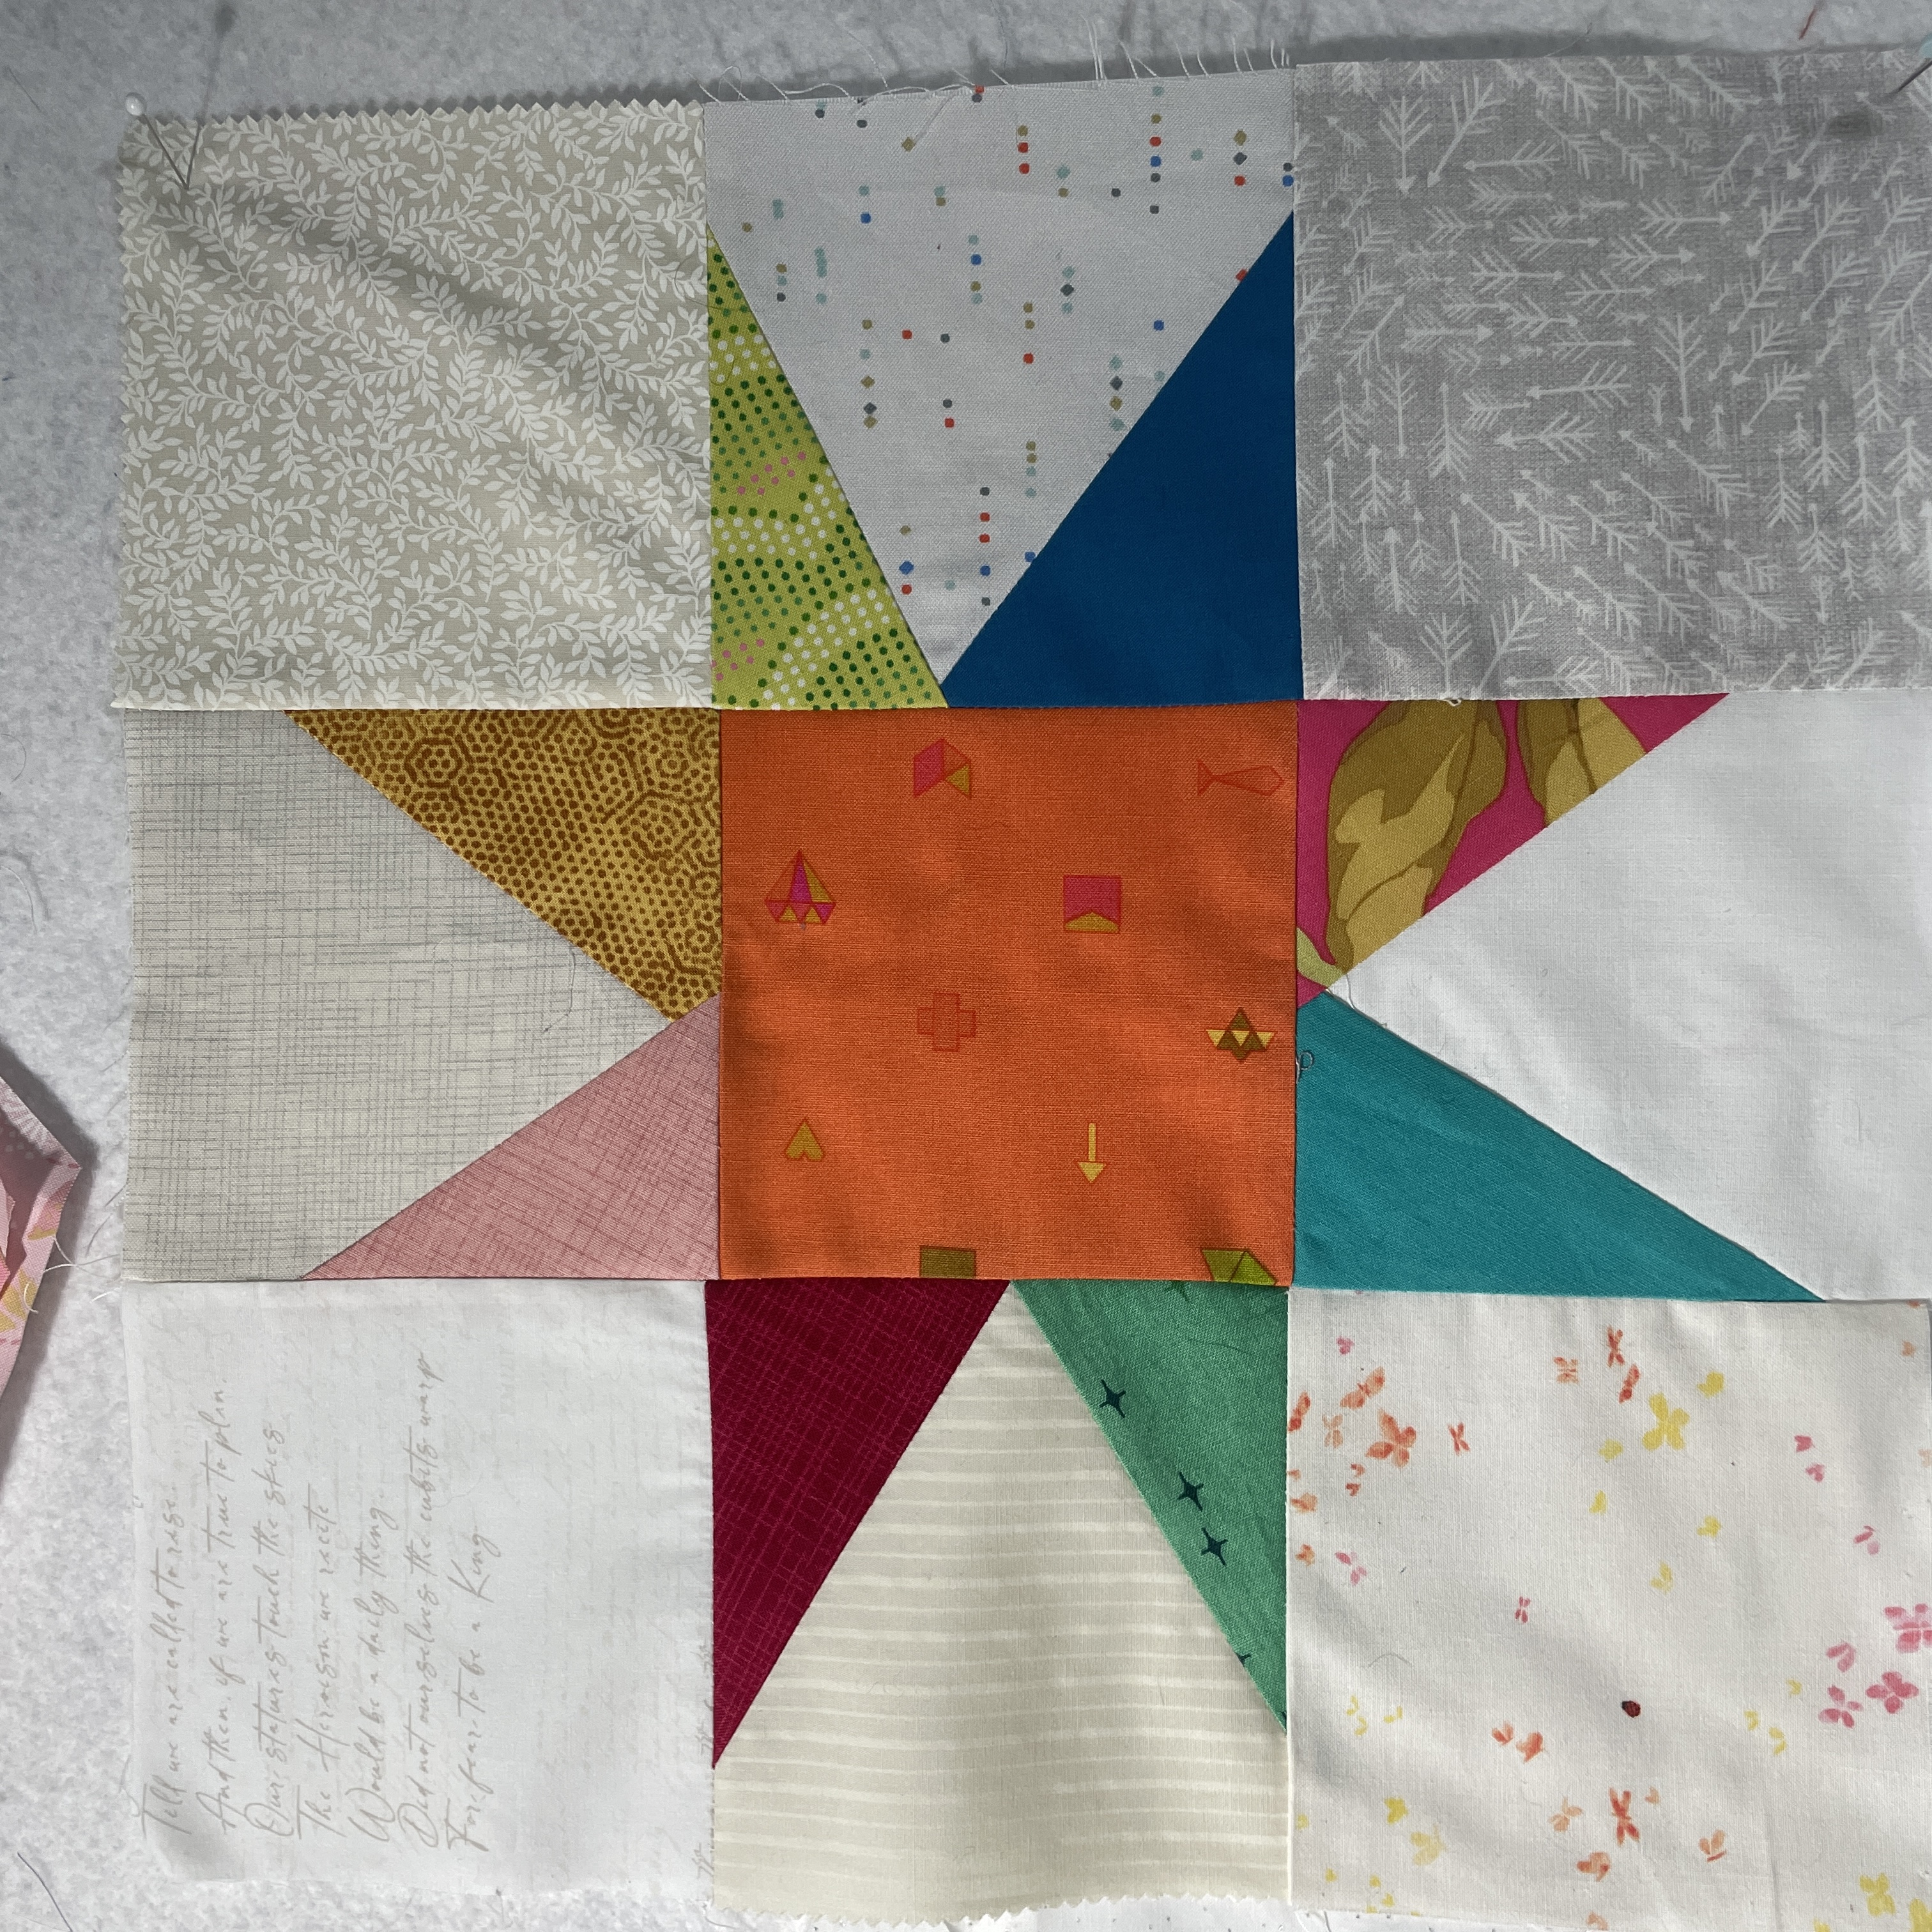
Below my sample blocks in the two colour combination choices

in darker/lighter colour and in darker colour plus black.


Thank you all for sewing for me! 
If you have any questions, please send me an email.

Happy sewing,
Rita.