Friday, January 28, 2022

Hive 1 January Block for Diana

Hi! I had a great time learning how to make this block. It was a great start to 2022. I wasn’t too happy with my initial fabric choice and made another. Im still learning but I appreciate you all for giving me the space to do so. Looking forward to February :)

Nicole


Tuesday, January 25, 2022

Hive 1 Block for Diana


 What a fun block!  It turns out I only had one light gray in my stash (who knew) and when I tried to add some darker grays it really threw off the dark blue- silver vibe. So hopefully this works.

-Starla


Sunday, January 23, 2022

Hive 1 January Block for Diana


I loved making this block! I didn't have any light grays so ordered a grab bag of gray fat quarters--probably my favorite way to add to my stash. I love the surprise! This will be on its way to you soon. -Julia C.

Friday, January 21, 2022

Hive 1 Block for Diana


What a great block to start the year with! Thank you for the great tutorial, I can't wait to see your finished quilt! I'm sure your nephew is going to love it. 

Enjoy!

- Julia H.

Wednesday, January 19, 2022

Hive #1 January Block for Diana

 Hi Diana,

I had a bunch of fun working on this block! I knew I had a bunch of navy and grey/silver in my stash, so this was a great reason to organize my fabrics to locate them! I made a test block and it ended up being really short, so I made it again with better results.

I owe you a big thank you for turning me on to those slotted HST trimmers, they are amazing! I will be making a HST's so much faster now.

I hope your nephew loves his quilt and I can't wait to see it finished! 😀


~Adrienne

Monday, January 17, 2022

Winter Block For Diana

 Spent a bit of my snow day putting this together. I love the blue and silver - I actually had some white on grey charms that I flipped over, showcasing the backs to make the prints a little more subtle and keep the silver more prominent. I hope you and your nephew like it!!


Also, this is the first square I've done with my new slotted hst trimmers. Super excited for more in the future. 


Monday, January 10, 2022

Hive 1 January Block for Diana


Hi Diana,

Making this block was super fun, thanks for the tutorial. I hope the colours are what you imagined!
The block very exactly meassures 16.5" so I hope it'll work for you.

Have a great time sewing your quilt,

Kathrin

Friday, January 7, 2022

Hive 1, January Block for Diana


Hi Diana,

The blocks are slightly short on the hight, despite my best efforts. I left the solid squares over-sized, that's why they look worse on the pictures, as they are.

Hope they'll be okay for you. 

I will pop them in the post box this evening, so they should start their journey to you on Monday.

Happy sewing,

Rita

Thursday, January 6, 2022

Hive 1 Block for Diana


Hi Diana, Thanks for the tutorial, I enjoyed making this block! I however needed more discipline than what I am used to to make ends meet, ha!ha!ha!. Your choice of color and your expert touch will make this a beautiful quilt for your (lucky) nephew. Take care, Marie

Saturday, January 1, 2022

Hive #5 January Tutorial - Patriotic Stars for Heather


Happy New Year, Hive 5!  I have what I hope will be a fun, easy block for us. I love stars and have wanted to do a RWB quilt for a long time.  We are going to make big sawtooth stars with your own choice of a center.


For colors, think any fabric that reads like any red, white and blue flag…American, British, Australian.


It can be low volume, printed, batik…whatever.  As long as it reads “traditional” R(deep,dark) W(not cream or gray) and B(dark, navy). I love prints with other colors, like the Joel Dewberry print, just have it play a minor role.

All the backgrounds for the outside star should read white.  The points of the stars can be blue or red, your choice. I used the tutorial here, No-waste Flying Geese @ Happy Quilting, to make 4-at-a-time, no waste flying geese.  I cut my starter fabrics:
White: 9-1/4" square
Points (Red orBlue): 4 - 5" squares
I also cut 4 - 4-1/2" squares white for the corners of the larger star.

I did find when making the points that I needed to trim a little off of the colored long side so that unit was 4-1/2" wide:


The inside of the star is an 8” block of your choice. It can be as simple or as complicated as you choose. Think 4-patch, pinwheel, economy, Xs and Os, etc. I have a brainstorming list if you need more ideas.  The colors of the inside block should read the same RWB but can be organized however you choose.

When assembling, I pressed toward the flying geese.

When you’re done you should have a 16-1/2” (unfinished) sawtooth star with a unique 8” center.

Hive 2 January Tutorial - Variation on courthouse steps

Happy January!  We're going to make a variation on courthouse steps this month!  I'm slowly making a quilt of each color, and this year the color is green.  This quilt will be gifted to a friend whose baby is coming in March, but they decided not to find out the gender.


FABRICS
You'll need a white center and then an assortment of greens. 
*For the white, please use a white-on-white or solid white.
*The greens should read as green, see the examples below.
*Batiks and solids are welcome, novelty prints are not. (I realized last year that everyone has a different definition of what novelty means to them.  To me, a novelty print is a print with something ("a noun") on it that is the focal point.  A few nouns are exceptions because they're so common: leaves, flowers, stars, and hearts.  Geometric shapes are not novelty prints: polka dots, squiggly lines, etc.  If the noun is arranged in a pattern or are a similar color to the background such that the noun is not really the focal point, that is fine too.) 


CUTTING
The only exact instruction I have for cutting is to cut the white fabric to a 6" square.  (It will be 5.5" after the other strips are added to it.)  The greens will need some strips of between 2" and 3.5".  The darker strips will need to be a little longer as they will be going on the outer part of the block.

SEWING
This is put together like a traditional courthouse steps block, although all the strips in a square will be the same color.  

Start with your lightest green and add it to two sides of the white square.  The exact strip width doesn't matter, but should be between 2" and 3.5" and should be the same for both pieces.  Press the seams toward the outside green piece. 

Add the other two sides of the lightest green.  They should also be the same width as the previous strips. Press toward the outside.  I often check after each border and make sure everything is still square.


Continue adding boxes in the same manner until you've reached 16.5".  The boxes should go from your lightest green to your darkest green.  If you need to sew two strips (of the same fabric) together to make a strip long enough, that is fine. If your last box width needs to be smaller than 2" or a little bigger than 3.5" that's fine; I often have a hard time with the dimensions of the last strip because the math never seems to work out easily.

I'm planning on cutting these in quarters, although I haven't decided the final arrangement yet.

Please let me know if you have any questions!

Hive 1 January Tutorial - Ziggy Block

 Hello Hive 1 and Happy New Year!

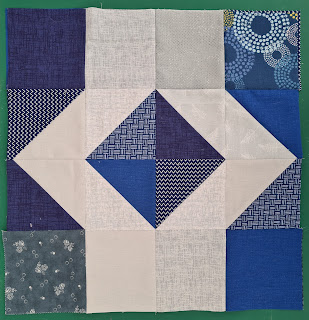
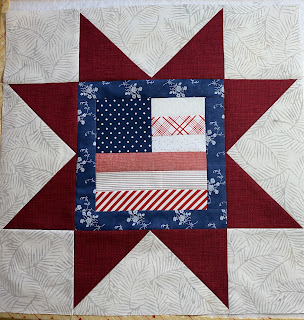
I am so excited to kick things off this year with a relatively simple block. It's actually a block that has been done before on Stash Bee about 6 years ago. It's called the Ziggy Block:


It was a free pattern that was originally found here, but the blog it links to no longer exists so I had to recreate it. Luckily, it's just made up of squares and half-square triangles so it was easy to do. 

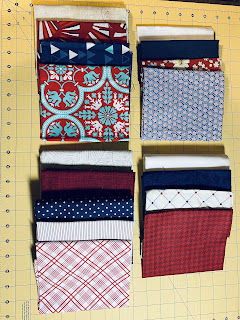
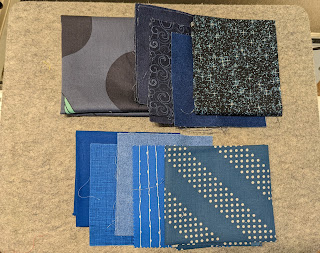
This quilt is going to be a gift for my 26-year-old nephew whose favorite color combo is dark blue and silver. I wanted a bit more depth of color to the quilt so for my blues, think navy, jewel tones, and medium blues. Please avoid light blues. Solids and tone-on-tones are great, patterns that read blue are good, but no novelty prints, please. 

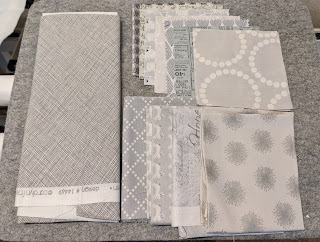
Since sliver is hard to come by with fabric, I'm opting for light grays and low-volume prints that read as gray/light gray. 


A Note About Seam Allowances and Pressing:
When sewing, please use a true 1/4-inch seam allowance. When you get into the world of scant 1/4-inch seams in a bee with 11 people, one person's scant seam is different from another person's and it can make things challenging. So please check your seam allowances and measurements ahead of time. 

For me, unless I specifically note a pressing preference, I'm fine with you pressing your seams however you choose in order to get the best block possible. 

Tutorial

I had an abundance of precut charms (5" blocks) in my stash so I wanted to try and use some of these up. If your stash allows for many different fabrics, that's great. If you only have 2 different blues or 1 gray, just use that. I'm easy. :)

Squares

BLUE: Cut (4) 4.5" squares and set aside

GRAY: Cut (4) 4.5" squares and set aside


Half-Square Triangles (HSTs) -

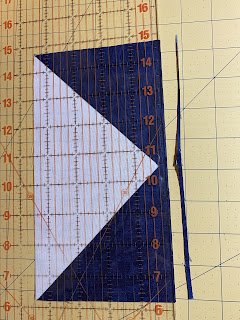
I use a specialty ruler (the Clearly Perfect Slotted Trimmers) to trim my HSTs so I was able to use my 5" charm squares to make my HSTs. For most people though, you are going to want to use slightly bigger squares, about 5.5", and then trim the HST down to 4.5".

BLUE: Cut (4) 5.5" squares

GRAY: Cut (4) 5.5" squares

Here is how I make my HSTs, but if you prefer a different method, please use that.

On the back side of your gray squares, draw a diagonal line from corner to corner. 

Pair up your gray squares with your blue squares, placing them right sides together. Sew a 1/4-inch on both sides of your drawn line and then cut ON YOUR DRAWN LINE.

Press your block open and trim it down to 4.5". Remember to trim off the little dog ears. 

Repeat this process for all 4 sets of HSTs and then lay out all of your blocks like this:


Now it's time to sew them all together, but here is where I get picky. I'd like you to sew them in 4 patches like below. The reason I do this is that the longer the stitch line, the easier it is for the accuracy to be off.


Then, once you have the 4 patches done, you'll sew these all together to get your finished block. For these last 3 seams, I'd like you to press the seams OPEN to reduce the amount of bulk.

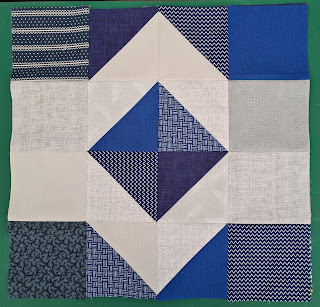
Here is what your finished block should look like:

It will be approximately 16.5" but don't worry if it's a little off. Don't trim anything. I will take care of that when I go to put them all together.

Thank you so much for sewing with me this month and I can't wait to see all of the wonderful blocks you make.

~ Diana @Red Delicious Life