Sunday, October 24, 2021

Hive 1 October block for Kelsey

 As is common behavior, when we don't like to do something, we put it off as long as possible.  When we like something, we can't wait to get to it.  You can guess my attitude toward foundation paper piecing by the timing of finishing my block.  I know some quilters swear by this method to make perfect blocks.  For me, I just swear!!  It is done, but I'll leave the final trimming to Kelsey in case something else goes wrong.   You'll end up with such a colorful balloon flight.

Kathie Laposata


Friday, October 22, 2021

Hive 1 October block for Kelsey


Thanks to this block, I now "get" paper piecing--both how to do it, and why people enjoy it so much. 

When I was in high school I had a friend who lived out in the country and if a hot air balloon was in the area it would often land on his family's property. I got to help deflate and put away balloons more than once! Traditionally the property owners would get a bottle of champagne as a thank you.

This block will be mailed over the weekend. I hope you've been enjoying your favorite month!

Julia

Thursday, October 21, 2021

Hive 1, October Block for Kelsey


Hi Kelsey,

I loved making those blocks!

We saw quite a few hot air ballons where I grew up, every summer.

I myself, went up already twice. Once in Bavaria, Germany and once over Stockholm! Hope to get another opportunity again!

After making the first block, I was so cheeky to simplify your pattern a bit. Hope that was okay.

They are going in the post tomorrow.

Greetings from Ireland,

Rita

Saturday, October 9, 2021

HIVE 2 October Tutorial - Duck Tracks block for Miriam

HI Hive 2- Sorry for the delay. we ran into technical problems trying to post miriam's tutorial. It didn't work out for her to post, so I am posting on her behalf. ❤️Alanna


Hi, everyone!  This is my first year in StashBee and I’ve spent much of it poring over all kinds of blocks, trying to decide what block to share with you…..I love blocks like Card Trick and Double Aster, where there is a lot of spin to the block – but by September, I was worn out with my jobs, two aging dogs showing signs of dementia, and helping my daughter plan for her eldest’s Bar Mitzvah.  So, the block I’ve finally settled on should be easy for everyone, and I will love having blocks from all of you to assemble into a quilt!

Duck Tracks looks like a simplified Carolina Lily and is really an elaborate 4-patch. I took my inspiration from a posting by Elaine Huff that I found noodling around the internet.  Her tutorial, if you need another way to understand the block assembly, can be found at https://fabric406.com/blogs/fabric406-blog/duck-tracks-quilt-block-pattern


For fabrics, please choose a cream or very pale tan background textural print, or text print.  You will need two medium prints of varying textures, plus a dark print.  I hope that you can find monochromatic fabrics, or ones that read primarily as a single color.  Please no licensed characters.  Metallic flourishes are fine – I love shiny objects!  If you can, please stay in the blue/green/violet part of the color spectrum.


Here are some examples to help further explain: 


CUTTING

From your light colored, cream/tan fabric, cut: 

  • eight 2.5” squares AND
  • two 3” squares

From your dark fabric cut:                

  • two 3” squares

From each medium fabric:

  • two rectangles 2.5” by 4.5”


SEWING
1) Make four HST blocks from the 3” squares: 

Draw a diagonal line on the back of the two light colored/background 3”squares and carefully stack them onto the dark-colored 3” squares.  Stitch ¼”away from the diagonal line on both sides, then cut apart on the line you drew.


Open up the blocks, pressing the seams to the dark side.  Square up the blocks so they measure 2.5” on each side.


2) On to the snowball blocks! 


Draw a diagonal line on the wrong side of 4 of the eight 2.5” light colored /background squares.  Lay each of them on top of the four rectangles, oriented as shown below:


If you are really precise about matching up the edges and corners, and stitching directly on your drawn line, the resulting half-flying goose or snowball block will be 2.5” by 4.5”.


3) Now you will need to attach the remaining 2.5” light colored/background squares to the HST’s you made earlier: 


Be sure that the triangles are all oriented as shown above, with the light colored/background  2.5” square to the left of the HST block.  These units should all measure 2.5” high by 4.5” wide when assembled.


This is what you should have to work with:


4) Stitch one HST unit to one of the snowballed units, taking care to orient all of them in the same direction! 

Check your quarter units to make sure that they each measure 4.5” x 4.5”  Once each quarter unit is complete arrange them so that a light colored/background square is at each corner of the block.


5) From here, it is a conventional four patch assembly.  It is a little tricky to line up the intersections of the two diagonals but it is really important!  Press seams to the same side for each half so that they nest when you put the two halves together.


And then one final seam (I spent a lot of time fighting with this seam to get everything to line up.  I hope it goes easier for you!


And here is the finished block…. It should be 8.5” on each side!


Thursday, October 7, 2021

Hive 1 October block for Kelsey

Hi Kelsey, I have not paper pieced successfully before. My first attempt was a block of the month for the guild and I made 2 and did not turn in either one. They were teapots and I even did one with the handle upside down. My practicing paid off. I'm very proud of myself and they measure 12.5 inches too. Thanks for getting me out of my comfort zone. The balloons represent where I live. Grapes for Sonoma County Wine Country. Farms are all around and chickens because Petaluma is the Egg Capitol. I hope you like them. I can't wait to see where all your balloons take you. What a wonderful journey this quilt will be. Enjoy, Jayne


Hive 1 October Balloon Block for Kelsey

Hot air balloons float over the nearby vineyards and often right over my house fairly often in Spring and Fall.  They are beautiful to watch and it’s fun to wave to the people who are looking down and watching us.  I apologize that the clouds on my block are a little wonky.  I imagine this is how my stomach would feel if I ever had the nerve to go up in one.  Thank you for sharing your great pattern.  And thank you to Jayne who is mailing my block to you along with her three.   Karen 


Wednesday, October 6, 2021

Hive 1 Block for Kelsey


Hi Kelsey! Congrats on that superb pattern! I will take the time tonight to remove the paper and will mail it tomorrow. That quilt top will be as pretty as the sky of the Albuquerque International Balloon Fiesta! 😁Marie

Sunday, October 3, 2021

Hive 3 October Tutorial - Spritely block for Meghan

 October Block! 

A quick one with 2.5 strips! 


Materials needed: 2 precut 2.5 strips (or 2.5 strips WOF) 

Color combination: 

Think floral and bright! I am making a charity quilt using some old 2.5 strips and your blocks will help to change up the current yellow, purple and blue theme I have right now. 


Cutting: 

Cut each strip into 4 rectangles 2.5 by 6.5 inches and 4 rectangles 2.5 by 3.5 inches. 


Construction: 

Sew 2 contrasting 2.5 by 3.5 rectangles together, short ends together. Sew 2.5 by 6.5 rectangle to the top of this unit and a contrasting 2.5 by 6.5 inch rectangle to the bottom (picture) 


Repeat to make 4 identical units (picture). 


Sew the units rotated as shown into a block. 


Finished 12 by 12 inches. 

Easy block! 

Thank you for your patience as I completed this tutorial. I was going to use a tutorial from several years backs and could not find it! 

I hope this block is quick for you and your October is glorious! It has been a beautiful fall here in VA so far! 


Please let me know if you have any questions! 

Best, 

Meghan

I found this pattern a handy pocket guide for quilting with precuts- compiled by Gailen Runge

Crashing Hive 5 for Debbie

 I made this block for Debbie. Already in the mail. 

Gayle from Hive 2

Saturday, October 2, 2021

Hive 1 Block for Kelsey


Fortunately for me, I've been working on a number of paper piecing projects lately, so I was primed to make this beautiful block! I can't wait to see your sky full of hot air balloons.

Enjoy!

- Julia D. 

Friday, October 1, 2021

Hive 1 - October Balloon Block for Kelsey

 Whew, what a quick block to make... just kidding! I was fortunate enough to test Kelsey's block for her which is why mine is done already. I'll get this in the mail next week.


~ Diana


Hive 4 October Tutorial - improv curve block for Dawn

Curved Block

10.5 inch by 10.5 inch block made out of solids or batik solids (or something close to a solid).  I would prefer jewel tones and colors that compliment them (blues, purples, pinks, teals, dark reds, dark oranges - basically not primary colors and not black, white, or gray -here's a sample: https://www.etsy.com/au/listing/732286625/jewel-tones-procreate-color-palette).

I will be cutting these blocks down to 9.5 inch blocks.

I created two short videos (links on bottom of this post), but here are some photos.  NOTE the block in the photos is different than the block in the videos (it's the same fabric but the reverse block since you get pieces to make two blocks out of the two squares).

You only need to make one block but if you want to send in the other one that's great too!

Note - if curves freak you out, just make a straight line cut or a very slight curve - whatever you feel comfortable doing.  Remember - this is just a quilt block.  The purpose is to have fun and do something different. :)

step one

Step One:  Get two pieces of contrasting fabric 10.5 inches by 10.5 inches (you could use layer cake squares).  Stack them right sides up on top of each other.  Note that with solids there isn't a right side.  There might be one with the batiks though so stack them both rights sides up.

step two

Step Two:  Make a gentle curve with your rotary cutter through both squares at the same time while they are on top of each other.  I suggest that at the bottom or the top of your curve you have about an inch that is straight or close to being straight.  This will help you line everything up when you go to sew.

step three

Step Three:  Remove two pieces so that you only have one of each (so remove one bottom and remove the opposite top).  This is your block! :)  Mark your curves - see the two lines I made- one is in pink on the light purple and the other is in white chalk on the dark purple - just those two curves are marked.

step four


Step Four:  Flip the fabric so they are right sides together.  They are NOT going to line up.  This might make you anxious, which perfectly normal.  Line up the lines you made on each curve and pin your two marks and then also pin the top part where it is straight.  This helps you get started - once I get a few stitches in I usually take out the pins but you can keep them in until you get closer to them.

Here are the two videos I made.  There are more professional videos on YouTube for piecing curves that you can check out as well.  If you have ANY questions at all, please let me know and don't stress about this - quilting is art and there are literally no rules in art.  You can email me at dmcutaia@gmail.com or send me a message on instagram: https://www.instagram.com/ms.hanna.barbera/


Piecing the block:  https://youtu.be/YuhQQEV8Pt0

Here is the first quilt I ever made using curved piecing - and I am really happy with how it turned out: https://www.facebook.com/media/set/?vanity=tunella&set=a.10159014485473524

Hive 1 October Tutorial: Dreams Away

Hello Hive Mates!


Hello Hive Mates!

October is my favorite month – I love the weather, the leaves, the first storms rolling in. So, I’ve selected something else I love for you all to make: hot air balloons. This pattern is being done as paper piecing. I know in the poll some of you indicated an unfavorable history with the technique. I’m asking that you give this pattern a try, but if things go terribly wrong, make a post ranting about it with a picture of your attempt, and don’t worry to much about forcing yourself to actually finish the block.


Diagram of piecing sections
Coloring page for the block


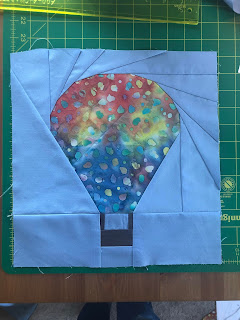
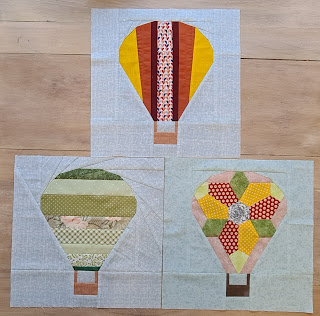
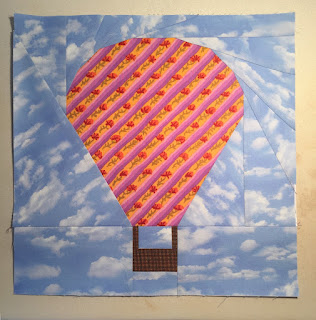
Back to the pattern. The balloon itself can be anything you like – maybe there’s a great print you’d like to showcase or a practice block that doesn’t belong to a quilt or a piece of crumb quilting (an option as I tried my hand at here). The easiest and fastest will of course just be a single fabric. I have no requests on colors (maybe no baby prints) for the balloon so go wild! I am requesting that the background/sky read as blue and the basket/ropes as brown though I don’t care if these are patterned or even scrappy. Here are a few examples of the block sewn with a crumb center, a single fabric center, and a scrappy background.   


This block is sewn in two sections, the balloon and the basket which are then joined. The final block should measure 12.5*12.5 inches. The balloon section pre-joining should measure 12.5*9.75, the basket pre-joining should measure 12.5*3.25. 

Before I jump into instructions there are two documents I want to provide you. The first is a PDF with all of these instructions, the piecing patterns, and the cutting patterns (for those who don't love working off a computer screen). It can be found here. The second is the paper piecing patterns with the cutting patterns for those who want to use paper piecing while making this, found here. Note that these will be linked several times throughout the post so no need to open them all now, I just wanted to put them somewhere convenient for you all. Whichever you print, ensure that it is set to print at 100%. If you are an experienced paper piecer and don't feel like reading instructions, please note that the cutting templates are designed to be placed on the backside of the fabrics. 

Please ask lots of questions if you have any – this pattern is one I designed and it’s my first time writing a pattern for other people. Diana and a few others have kindly tested it for me, but a pattern is always a living document, so let me know if something needs clarification! For those new to paper piecing, or who want a refresher, here are a few great tutorials on the technique – how to line things up and be sure that the pieces fully cover the intended area after sewing a seam.

        Paper Piecing Tutorial 1

        Paper Piecing Tutorial 2 

        Paper Piecing Tutorial 3


Instructions:

Cutting:

Needed: Cutting templates (found in complete instructions, and piecing documents)

              Balloon: Cut one piece using the template from Balloon cutting sheet.

              Brown: Cut 3 pieces using the templates from Browns cutting sheet             

              Blue: Cut pieces B-O using blue cutting sheets 1-4. Place the cutting sheet on the                         wrong side of the fabric.

Note: Cutting sheets have a ½ margin added to the pieces, EXCEPT the balloon, which only as ¼” seam allowance marked (because otherwise it wouldn’t fit on a page)


Figure 1; Cutting sheets for blues

Figure 2; Blues and balloon cut out

 Piecing:

1.       Cut out balloon paper piecing templates 1 and 2 and tape together at dash marks. 


2.      Start by placing piece A (the balloon) on the paper and joining piece B (blue). Press the blue piece away from the balloon. (In this section, piece A is the balloon and all others are sky).

a.       Tip for paper piecing: shorten your stitch length to make the paper easier to remove.


3.       Continue adding pieces in alphabetical order pressing between each piece.

a.       Triangles are added to the main piece by aligning and sewing along their longest edge. 


Figure 3; Example of the addition of the pieces around the balloon

b.       To make piecing easier, fold paper back along the next sewing line and trim the last added piece to ¼” before lining up the next piece (See trimming example below)


Figure 4; Trimming the edge to be sewn before adding the next piece. This is not completely necessary but will make it easier to line up the next piece.

c.       Sew directly on the line (as shown below) when adding pieces. 


Figure 5; Sew directly on the line when adding the next piece.


4.      Cut out the basket piecing templates from the basket piecing sheet and tape at the dash marks. (For the basket segment, pieces 2B, 2C, and 2D are brown for the basket. All other pieces are sky)


5.       Start by pinning section 2A to 2B and sewing across the line. Press open.

6.       Continue adding segments alphabetically, pressing and trimming as above for each segment


Figure 6; Image showing sections 2A-2E sewn together with 2F and 2G ready to add.

Figure 7; Entire basket section sewn together


7.    Join to the balloon, matching the bottom of the balloon to the rope of the basket piece. Press


8.       Trim to 12.5*12.5”


You’ve made a hot air balloon! For anyone who struggled, go treat yourself to a piece of chocolate (and anyone who didn’t struggle for that matter). Feel free to leave the paper on or tear it off if you have issues getting it into the envelope. I look forward to seeing what beautiful balloons float my way!


Hive 6 October Tutorial: A Charmed Life quilt block


My fiancé has requested a quilt for his queen sized bed. What better way to tackle my first large quilt than to outsource a few of the blocks? I reverse engineered this A Charmed Life quilt originally posted by @piecedjustsew on Instagram. Its beautifully simple design made from two basic techniques showcases how the individual parts of a quilt come together into one work of art.


You will need to pull two different fabrics: one color and one low volume cream. For the colored fabric, I am using Golden Hour charm pack by Ruby Star Society. For the cream fabric, I’m using Soften the Volume layer cake by Art Gallery Fabrics. Choose one color and one cream that you think will fit in nicely with these fabric sets. No novelty prints please, but everything else is welcome. I'm a big fan of modern prints. Most importantly, use what you already have in your fabric stash.


Once your fabric is pulled, cut to these dimensions:

·         Color: three 5 inch squares

·         Cream: three 5 inch squares and three 4.5 inch squares


Now we will make three pairs of half square triangles (HSTs) from the 5 inch color and 5 inch cream squares. Draw a line down the middle of one of the squares from corner to corner. I used a heat erasable pen on the cream squares. Stitch a quarter-inch seam on both sides of the line. Cut down the middle of those two seams to make two HST units. Repeat this twice more to make six HSTs total. Ensure that any directional fabrics are pointing in the same direction. I recommend chain piecing.


Press towards the color triangle. Trim HSTs to 4.5 inches square. Next, assemble the block like a 9 patch. I frequently struggle to get orientation of individual pieces straight, so make sure to always point the color triangle towards the upper left hand corner.


Press Rows 1 and 3 towards the left. Press Row 2 towards the right. 


Line up your rows and sew together to finish the block. The final measurement should be 12.5 inches square. I look forward to seeing your blocks come together!