Showing posts with label hive 4. Show all posts

Sunday, February 1, 2026

Hive 4-February Tutorial- Log Cabins for Sarah

Hi everyone! This month I’m asking for a Log Cabin block. My mom had a blue log cabin quilt that I always loved as a kid and I thought it would be nice to make one of my own, with your help! 


Preferred Color Palette:

I’m hoping for darker fabrics that are blue(ish) - all medium/dark shades of blue, teal, violet and lighter fabrics (white, off white, tan, light blue, light gray, beige, etc.). You’ll need a square and 6 rectangles of the darker fabric and 6 rectangles of the lighter fabric - they can all be different, or you can repeat fabrics. Solids, prints, batiks are all fine. I’d like to avoid anything with words if possible, as well as anything juvenile/licensed and holiday related. Here are fabrics I pulled and considered for my sample blocks.

Dark:


Light:

Something along these general lines, but feel free to add violet, some more medium toned blue/teal/violet, some pale grays/pale blues…


Cutting Instructions


Light Fabrics

1 rectangle - 2 inches by 3.5 inches (B)  

1 rectangle - 2 inches by 5 inches (C)

1 rectangle - 2 inches by 6.5 inches (F)

1 rectangle - 2 inches by 8 inches (G)

1 rectangle - 2 inches by 9.5 inches (J)

1 rectangle - 2 inches by 11 inches (K)


Dark Fabrics

1 square - 3.5 inches by 3.5 inches (A)

1 rectangle - 2 inches by 5 inches (D)

1 rectangle - 2 inches by 6.5 inches (E)

1 rectangle - 2 inches by 8 inches (H)

1 rectangle - 2 inches by 9.5 inches (I)

1 rectangle - 2 inches by 11 inches (L)

1 rectangle - 2 inches by 12.5 inches (M)


I did this late at night, so some of the colors in my photos below are off, but the construction should be easy enough to see.


Take the blue square (A) and sew the 2x3.5” white rectangle (B) to the top of it. Then sew the 2x5” rectangle (C) to the left side of the AB unit. 


Add the blue 2x5” rectangle (D) to the bottom of the ABC unit, then the blue 2x6.5 rectangle (E) to the right side. Continue sewing the strips on to the center unit in alphabetical order/by their increasing size. It helped me to lay the block out and sew around in a counter clockwise direction. I pressed all seams away from the center unit, but please feel free to press in whichever direction you prefer! I found some handy instructions and diagrams on the Threadbare Creations blog and on the Polka Dot Chair blog. They are both making a 12” finished (12.5” unfinished) block as well, so their cutting instructions should match mine if you prefer to follow either of their tutorials.


The blocks should be 12.5 inches square when you’re done. I’ll give a final trim when I get them, so no need to worry about that.


Let me know if you have any questions! I’m excited to see how they all come together. 

Thank you!

Sarah 

Thursday, January 1, 2026

Hive 4- January Totrial- Color Block for Laura

 Hello!  Welcome 2026 Stash Bee!

My name is Laura from sunny Florida!  

 Yes, we still use quilts here…it often gets chilly in the winter!  This morning it was a chilly 42 degrees!

This month we will be making what I’m calling  COLOR BLOCKS .  I m not sure who to give credit to for the pattern….I had saved several Pinterest pics that were very similar.  This was really easy to figure out in the size I wanted and I think it’s going to make a very cool quilt.


This is a simple and fun block to create…so let’s go!

Preferred color scheme:


INSTRUCTIONS:

Choose prints of four bright colors and a black/white or white/black neutral.  Any rainbow color will be fine.  If you have a lot of scraps of one color, it’s okay to do two of the quarters in that color.  Actually, if you want, make all four corners with the same color!  I will make it all work!!  This is all about using up your stash!!!

Quilt pieces are all cut the same size: 4.5” x 2.5”

Cut 6 of each color and 8 total of the black & white.  


Sew together like this using a quarter inch seam:


I pressed open.


I pressed away from the center, but you do you!


Again, I pressed away from the center.
All is good though.


Repeat 3 more times.


AND THAT’S IT!  I’m not sure as to my layout and color placement, so stop at this point and send.  It’s going to be fun trying different layouts and color variations!!  

The finished little block will be about 8.25 to 8.5” and when put together will equal about a 15-16” block.  I’ll be trimming the blocks to the same size once the happy mail arrives in my mailbox!

PLEASE SEND THE 4 INDIVIDUAL CORNERS UNATTACHED!  I cannot wait to play with all your beautiful blocks!!!

Thank you for being a part of Stash Bee 2026.  I’m looking forward to all of your creative ideas this coming year.

Peace,

Laura


Monday, June 30, 2025

Hive 4 - Scrappy Stripes Block July Tutorial by Pam


This is my 8th year taking part in Stash Bee, and for the first time, I’m repeating myself on a tutorial.  Last year I created my tutorial for Scrappy Stripes blocks, and received a dozen or so beautiful blocks, some of which are pictured above.  I made three blocks myself for the tutorial, so I have a nice pile of blocks already.  I'm re-sharing the tutorial for my July 2025 turn as Queen Bee of Hive 4, so I'll end up with an even bigger and more beautiful quilt, thanks to all my talented Hivemates.

HOW TO MAKE THE SCRAPPY STRIPES BLOCK:

The block will end up a bit more than 12-1/2 inches square, but because it’s improvisationally pieced, it won’t be exact, and the edges won’t be straight.  That’s fine!  When you’re finished with the sewing, don’t bother trimming the ragged edges or squaring up the sides.  These blocks are going to be all slightly different sizes, so I’ll take a look at them all before deciding what size to trim them down before sewing them into the quilt top. 

FABRIC SELECTION: 

  • ·         For the background square, one 13” or slightly larger square of any very light solid or low volume print will work.   
  • ·         For the scrappy stripes, two strips of any bright solid or print fabric, about 1-1/2" to 2-1/2" wide and at least an inch longer than the height of the background square.  Note that the strips do not have to be an even width, they can be wider at one end and narrower at the other.
  • ·         Small scraps of various prints or solids to make the pieced stripe.

Background of the block:

To get the approximately 13” size of background I wanted, I laid my 12-1/2" square ruler over a piece of fabric, then roughly cut around about 1/2' from the sides of the ruler.  Don't worry if the edges aren't straight!


Inserting the stripes:

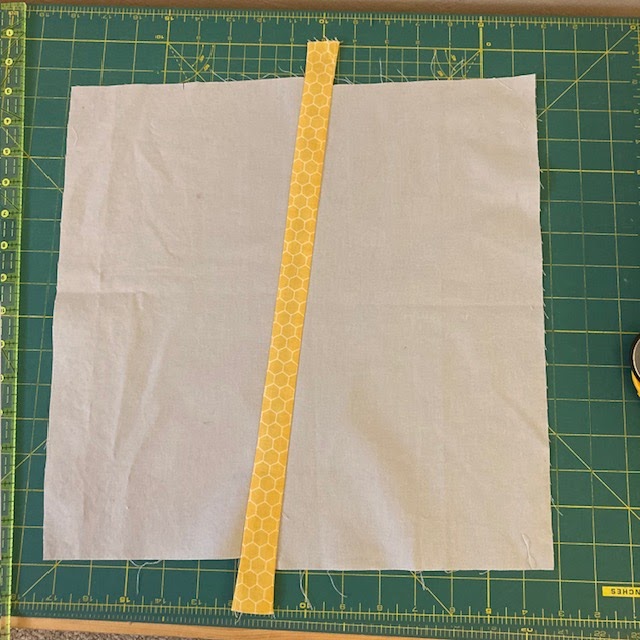
Cut across the background square, either vertical or slightly diagonal--just eyeball it.


 Take one of the bright strips and insert it into the sliced background as shown below:


I pressed the seams toward the stripe, but how you press isn't important for this kind of block

Next repeat to add another stripe to the block.


Adding the scrappy stripe:

To make the scrappy stripe, take the small fabric scraps that you like and sew them together into a piece long enough to go across the background square, then cut a strip from that long piece.


Sew the scrappy stripe into the block same as before.  For the pieced stripe, it was easier to press the seams toward the background, because of all the seams on the stripe.  

 YAY, YOU'RE DONE!  

Thursday, May 1, 2025

Hive 4 May - Stars for Sarah


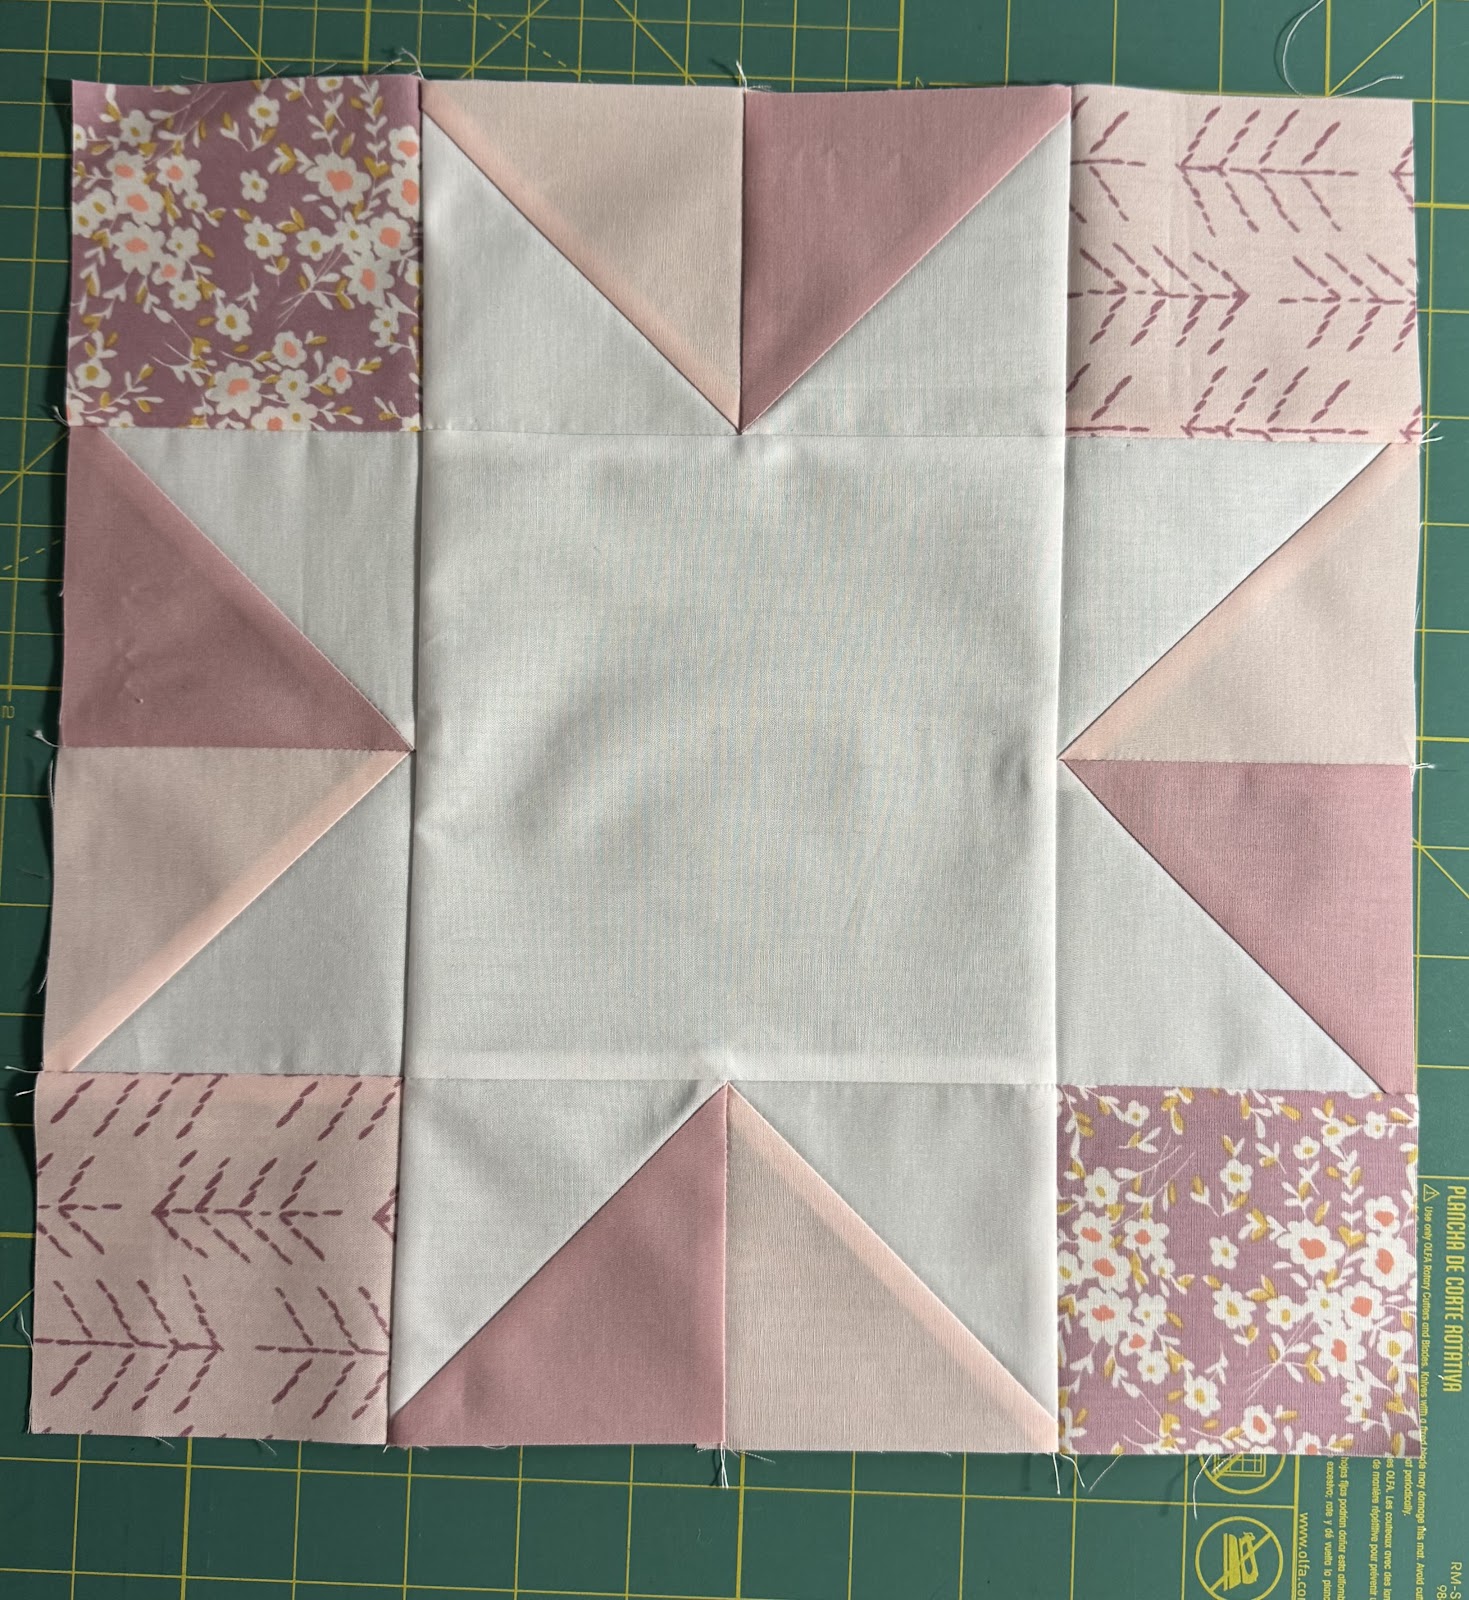
Hi Stashbee friends - Happy May! The weather is warming up where I live and I love seeing spring arrive. For this month, I picked a star block (the pattern for the whole quilt is written up here, Corsage by Ariga Wilson for Robert Kaufman) in pinks and purples.


Fabric Selection: You’ll need a variety (2-6 fabrics) of pinks and purples for the background color - solids, low volume, batiks, smaller prints are all great. No character/juvenile prints, nothing too bright (no hot pink or electric purple), and please avoid a print with writing if possible. I tend to lean towards more muted or softer shades of pinks and purples (light or dark - example of each shown below). You’ll also need 1 low volume or solid neutrals/whites/really pale pinks or purples for the star. I’m not sure if that’s the best description, so let me know if you need clarification!


Cutting Instructions:


Fabric A (neutral/white)

  • Cut (1) 6.5 inch square for center of block

  • Cut (4) 4 inch squares for Half Square Triangles (HST) *you may want to cut these a bit oversized if accuracy with HSTs feels tricky

Fabric B (pink or purple)

  • Cut (2) 4 inch squares for HSTs *you may want to cut these a bit oversized if accuracy with HSTs feels tricky


Fabric C (pink or purple)

  • Cut (2) 4 inch squares for HSTs *you may want to cut these a bit oversized if accuracy with HSTs feels tricky


Fabric(s) D (pink or purple - this could be from 4 different fabrics, or the same pink/purple fabrics used for B and C - totally up to you!)

  • Cut (4) 3.5 inch squares


Piecing Instructions:


  1. Half Square Triangles - 2 at a time

  • Pair each of the 4 inch pink/purple squares (Fabrics B and C) with each of the 4 inch neutral squares (Fabric A), right sides together. Mark a diagonal line, corner to corner, on the wrong side of one square. Sew ¼” away from either side of the marked line. Cut down the marked line and press toward the darker side (or open if that’s your preference).

  • Repeat with your 3 remaining sets of 4 inch squares.

  • You should have a total of 8 half square triangles - 4 AB HSTs and 4 AC HSTs. Square up to 3.5 inches.


    *If you want to make this scrappier, feel free to make individual HSTs and use a variety of pinks and purples with the 1 white/neutral fabric. The HSTs should be trimmed to 3.5” to work for the next step.


  1. Take 1 of your AB HSTs and 1 of your AC HSTs and sew them together as shown below. Repeat until you have 4 pairs. I pressed toward the darker fabric, but press however you’d like. If you decide to make this scrappier and use more than 2 fabrics for the HSTs, please avoid putting the same fabrics right next to each other.


  1. Arrange your HST pairs with the 6.5" square (Fabric A) and 3.5" squares (Fabric(s) D)
    as shown below:


  1. Sew the units together to create 3 rows. Press however you’d like. I pressed away from the HST units so I could nest seams in the next step, but totally up to you!


  1. Sew the rows together to form the final block. It should measure 12.5 inches, but no need to trim.


That’s it! Thanks so much for contributing to my quilt - I’m so excited to see it all come together!

Sarah


Tuesday, April 1, 2025

Hive 4 April Tutorial: Mountain Range(s) for Pennie

Hi everyone. We’ve made it through the 1st quarter of the year, and spring is starting to popup in my area of the country.  This month, I’d like to try a foundation paper piecing project. (I can hear the groans from here!) I promise this one is easy. It is a simple mountain range, that can be made in as little as 3 colors or as many as you want.


The designer is Etive & Co in the UK and you can get a copy of the pattern for free (or you can give a small donation if you would like - but it is NOT required). Here is where you can get the pattern: https://payhip.com/b/79nB. The tutorial they created on youTube is very easy to follow: https://www.youtube.com/watch?v=XObmGh8qYac. Here is the block from that tutorial.


This pattern finishes as a 7” square (7.5” unfinished). Because of the small size I would like to get 2 squares from each of you, and if you are feeling energetic and generous 4 squares would be over the top. If you find it easier, make them all the same. My basic color choice is blue sky, purple mountains, and green foreground. 


If you want to make 2 different colored blocks, try another season color scheme. Fall could be blue sky, brown mountains and gold/orange/red foreground.

Winter could be light gray sky, dark gray mountains, and white foreground.

Spring could be bright blue skies, light green mountains, and yellow/pink foreground. 

Any type of material is fine - batiks, solids, prints, etc. Please note the sky does not have to be all the same blue, you can mix it up a little. I did made one block with all different blues for the sky, but that overwhelmed the pattern - you couldn’t really tell the sky from the mountains. So not too many diff patterns!
 
I made 2 small changes when following the tutorial, she pins the 1st piece of material to the pattern, I used a glue stick. Also, when cutting the pattern from the paper, I left a 1/4 inch around the edges so I wouldn’t have to remember to do it when cutting the material (you will see this in the tutorial).

Etive & Co Mountain Range

I hesitate to send you to see any other beginning FPP tutorial, because they all seem to use an economy block pattern. That assumes precut rectangles and putting together the pattern in a way that makes me wonder why use a pattern at all. But in case you need it, here is one from Karen Brown at Just get it Done Quilts.

Here is a link to Cutting your Fabric to the Correct Size (as you go) from Sew Terie. I found this to be super helpful!

And if you want to use freezer paper, here is a tutorial from Whole Circle Studio that shows you How to Trace the pattern onto the Freezer Paper.

Thanks for whatever you send along!


Saturday, March 1, 2025

Hive 4 March Tutorial - Checkered Garden Block for Maureen


Hi! I'm Maureen and am the Queen Bee this month for Hive 4. The block I have chosen is the Checkered Garden, a free tutorial by Ashley of Film in the Fridge. Here is the picture of the blocks I have already made:

Sample Blocks

The Checkered Garden tutorial can be found here.

I created a checklist to go along with the tutorial. It doesn't replace the instructions in the tutorial, but will help keep you organized as you go through the steps. I have also clarified pressing instructions in the checklist. The checklist PDF can be found here.

Fabric Parameters:
  • The colors are coral, peach, aqua, teal, green, yellow green, and navy plus the low volume whites and creams. Below is a picture of fabrics I have used already, which should give you a good idea of the types of fabrics I like as well as the palette:
Fabrics

  • No batiks, please
  • Print or solid fabrics are fine, but no licensed character prints. I love anything from Ruby Star, but not other character fabrics
  • For color C in the tutorial, please use a cream or white low volume fabric. See example below. Color C is the center light color that runs through the block.  
Sample Block


If you have any questions, please reach out to me in the Instagram chat for our group.


Wednesday, January 1, 2025

Hive 4 January Tutorial: Perfect Pink Flying Geese for Debbie


Happy New Year!  I'm starting out our 2025 Bee with something pretty easy and straight forward and I hope you all have fun with it. 

2 finished 6.5x12.5 strips

For my block, I would like you to make 2 strips of 4 flying geese.  Each flying goose (geese?) will be 3.5x6.5 unfinished.  All 4 should match.  Each strip should be different fabrics but you can make both of them identical if you want to!  I prefer the geese all be flying in the same direction but we know sometimes they don't so an occasional strip with a different layout is fun.  Please do NOT sew the 2 strips together-this will give me more flexibility in the final placement.  Each strip should measure 6.5 x 12.5.

Fabric Choices

Below are photos of some great choices of fabrics for this block.  Pink.  Lots of pink.  Stick to any shade of pink, with occasional white, red or maroon.  I really want mostly pink.  Solid or print.  If you choose a print, stay within the warm family as much as possible.  Pink, red, a little yellow or orange.  Whites with colored prints should follow the same guidelines - the colors should be pink or red with limited yellow or orange.  Leaves and stems are green and that's fine but the overall colors should read pink or red or maroon.  In making these, I have found really busy prints don't work very well for the look I want.  


Construction

There are lots of ways to make flying geese.  For this particular block, the 4-at-a-time method works perfectly!  This is the tutorial I like to use.  She has done all the math!  There are many sizes listed - use the line for the unfinished block size 3.5 x 6.5.  You will see choices based on experience level.  This will determine the amount of extra fabric you'll trim off.  Use the one that works for you.  Just beware of the beginner level - there is a lot of overlap and there will be a couple blocks that show the raw edge and picking that out is a a pain.  Alternatively, you can go with a one-at-a-time method.  Just make sure at least 4 are identical.  And make sure the unfinished block is 3.5 x 6.5. Here is a good tutorial for the flip and stitch flying geese that finish at 3 x 6 (3.5 x 6.5 unfinished).


I love this Creative Grids ruler to accurately trim my Flying Geese.  I am always amazed how much I use it.  Make sure to leave the 1/4 inch allowance from the tip of the triangle to the top of the block so you don't lose your point in the seam.

Here is the layout I am working on - nothing is sewn together and some blocks are 
longer than 4.  This isn't the finished layout at all and I'll be making a lot of these 
to fill out the quilt. 


Flying geese are a pretty basic block used in a ton of quilting but, if you are new and this is overwhelming, message me on IG and I will get you thru it!  It's a good skill to have!  
Thank you for helping me make my Perfect Pink Flying Geese!  

Debbie