
Hello all. I was really torn this year on what block to do. Last year's blocks helped to make a quilt for my daughter. This year, it will be my 14 yr old son's turn. We will be doing a 16.5" Foundation Paper Piecing string block but don't worry. It isn't hard. (At the end I'll give you another option if you just really can't do FPP)

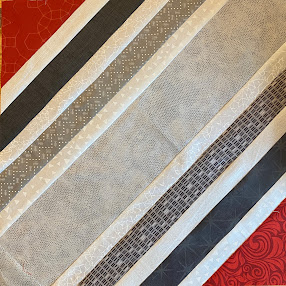
I follow a lot of quilters on Instagram and when I spotted this Monument quilt by Rachel Hauser of Stitched In Color, I knew I wanted to do something with it. My son liked the pattern but wanted something a little more masculine. He loves red but is also really into vintage comic books so I wanted to do something in whites and shades of gray with a splash of red.
In Rachel's tutorial, which was actually created for a quilting bee she was in, they each made 4 - 8.5" blocks. I didn't want to put that much on everyone so I resized the block to create one large 16.5" block. 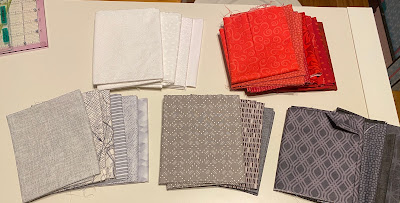

First, the fabrics...
You'll need between 5-8 prints depending on whether you want to use the same print for each color or mix it up.
Since this is for my son, I'd prefer more tone-on-tone prints that read as solids or low contrast. Nothing novelty with characters, etc. Would prefer more geometrics vs. florals if you have them. If not, make do with what you have. :) Scrappy is fine.
You'll need
- 1 or 2 Red prints (can range from bright red, to blood red, to more burgundy)
- 1 White print solid or low volume (prefer bright white as opposed to a warmer cream)
- 1 Light Gray print (should have some contrast from the white)
- 1 or 2 Medium Gray prints (good contrast between the light and the dark gray)
- 1 or 2 Dark Gray prints (not black but can be fairly dark)
- Glue stick (optional)
- 16.5" Square of tracing or thin paper (optional)
Since this is a foundation paper pieced block, you'll first have to print out the pattern. It is large, so you'll have to print it on multiple pieces of paper and tape them together.
For the fabrics, you can cut them beforehand, or sew then cut as you go. Doing the latter will save time. You just want to make sure your 'strings' are big enough. I know that some might be a little long so if you need to seam two pieces together, that is okay. Just don't seam them right in the middle of the strip so that it has a little more variety. If you have jelly roll strips lying around, they work well for the gray and white strips, then you can trim them down. The sizes given below include a .25" seam allowance for sewing.
 Printing the pattern...
First, you will want to download and print the pattern. Please make sure you follow these steps carefully so that the pattern ends up the correct size.
If you find working with the pieces of paper taped together to be difficult and have a large piece of tracing paper, feel free to trace the pattern and use that. You can also use freezer or parchment paper. But don't make extra work for yourself if you don't have to.


Layout the printed papers and put them in order. They are marked where they go. They line up at the edge. There is no overlap. Then tape the together. I just used a few small pieces of tape and made sure not to put it over any of the lines where I will be stitching. Lastly, trim off the excess paper. I actually left a bit of a border around the actual block mostly because I didn't feel like taking the time to precisely cut it. This works fine.
Note.. set your stitch length to 1.5. This makes it easy to remove the foundation when finished. This is an important step.


Repeat this process with the rest of the strips on this end including the half triangle. Make sure the strips are wide enough to cover the width of the pattern. Then rotate your block and repeat this process again with the other half of the block working towards the other end. When you are done, it should look something like this.
When you are done, you can carefully pull away the paper foundation. If you used a 1.5 stitch length, the paper should pull away very easily since you essentially perforated it. Don't worry about trimming the edges of the block. I can do that. In the end, it will be a 16.5" square.
Tutorials...
For the fabrics, you can cut them beforehand, or sew then cut as you go. Doing the latter will save time. You just want to make sure your 'strings' are big enough. I know that some might be a little long so if you need to seam two pieces together, that is okay. Just don't seam them right in the middle of the strip so that it has a little more variety. If you have jelly roll strips lying around, they work well for the gray and white strips, then you can trim them down. The sizes given below include a .25" seam allowance for sewing.
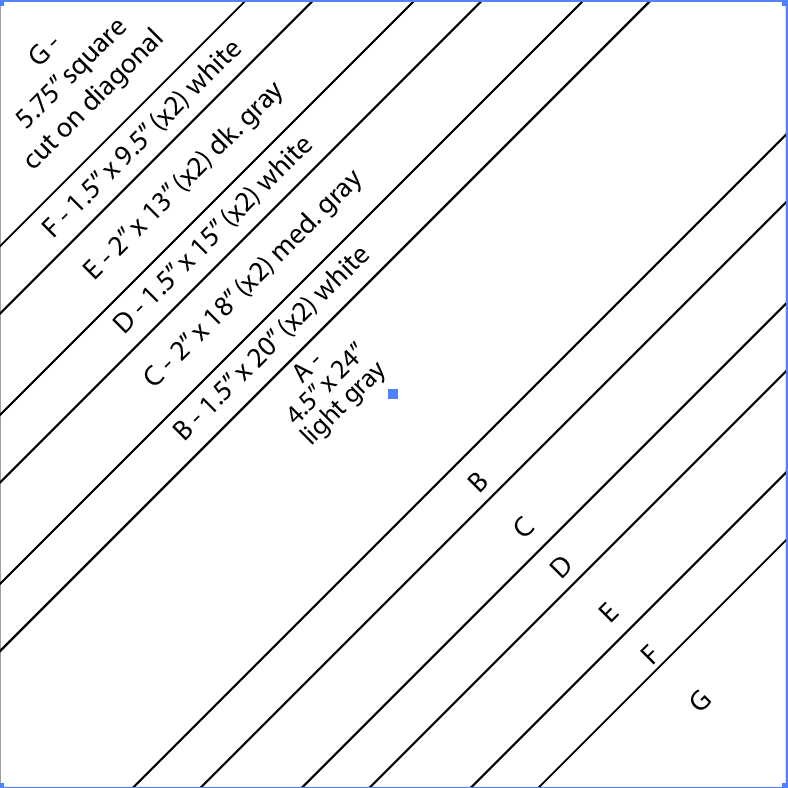
- (A) Light Gray - 4.5" x 24" cut 1 (seam the strip if you need to)
- (C) Medium Gray - 2" x 18" cut 2 (from same or different fabric)
- (E) Dark Gray - 2" x 13" cut 2 (from same or different fabric)
- (G) Red - 5.75" square cut on a diagonal. (If you want to use 2 different reds, feel free)
- (B,D, F) White (you can use all the same whites. If you have scraps and want to use different ones, go ahead)
(B) 1.5" x 20" cut 2
(D) 1.5" x 15" cut 2
(E) 1.5" x 9.5" cut 2
First, you will want to download and print the pattern. Please make sure you follow these steps carefully so that the pattern ends up the correct size.
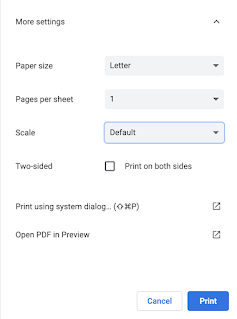
- You'll want to print on lightweight 8.5x11" paper. The lighter the better.
- When you go to print, make sure you are not scaling the document. It should say "default" Also make sure not to print on both sides. In the end, you'll have 4 pieces of paper.
- Once printed, make sure the 1" square, is in fact, 1".
If you find working with the pieces of paper taped together to be difficult and have a large piece of tracing paper, feel free to trace the pattern and use that. You can also use freezer or parchment paper. But don't make extra work for yourself if you don't have to.
Layout the printed papers and put them in order. They are marked where they go. They line up at the edge. There is no overlap. Then tape the together. I just used a few small pieces of tape and made sure not to put it over any of the lines where I will be stitching. Lastly, trim off the excess paper. I actually left a bit of a border around the actual block mostly because I didn't feel like taking the time to precisely cut it. This works fine.
Assembling the block...
Note.. set your stitch length to 1.5. This makes it easy to remove the foundation when finished. This is an important step.
First, you'll need your center string (A). Even if you don't precut the others, this would be a handy one to have cut. Turn your printed pattern over so the printed side is face down. You'll add your fabric to the backside. 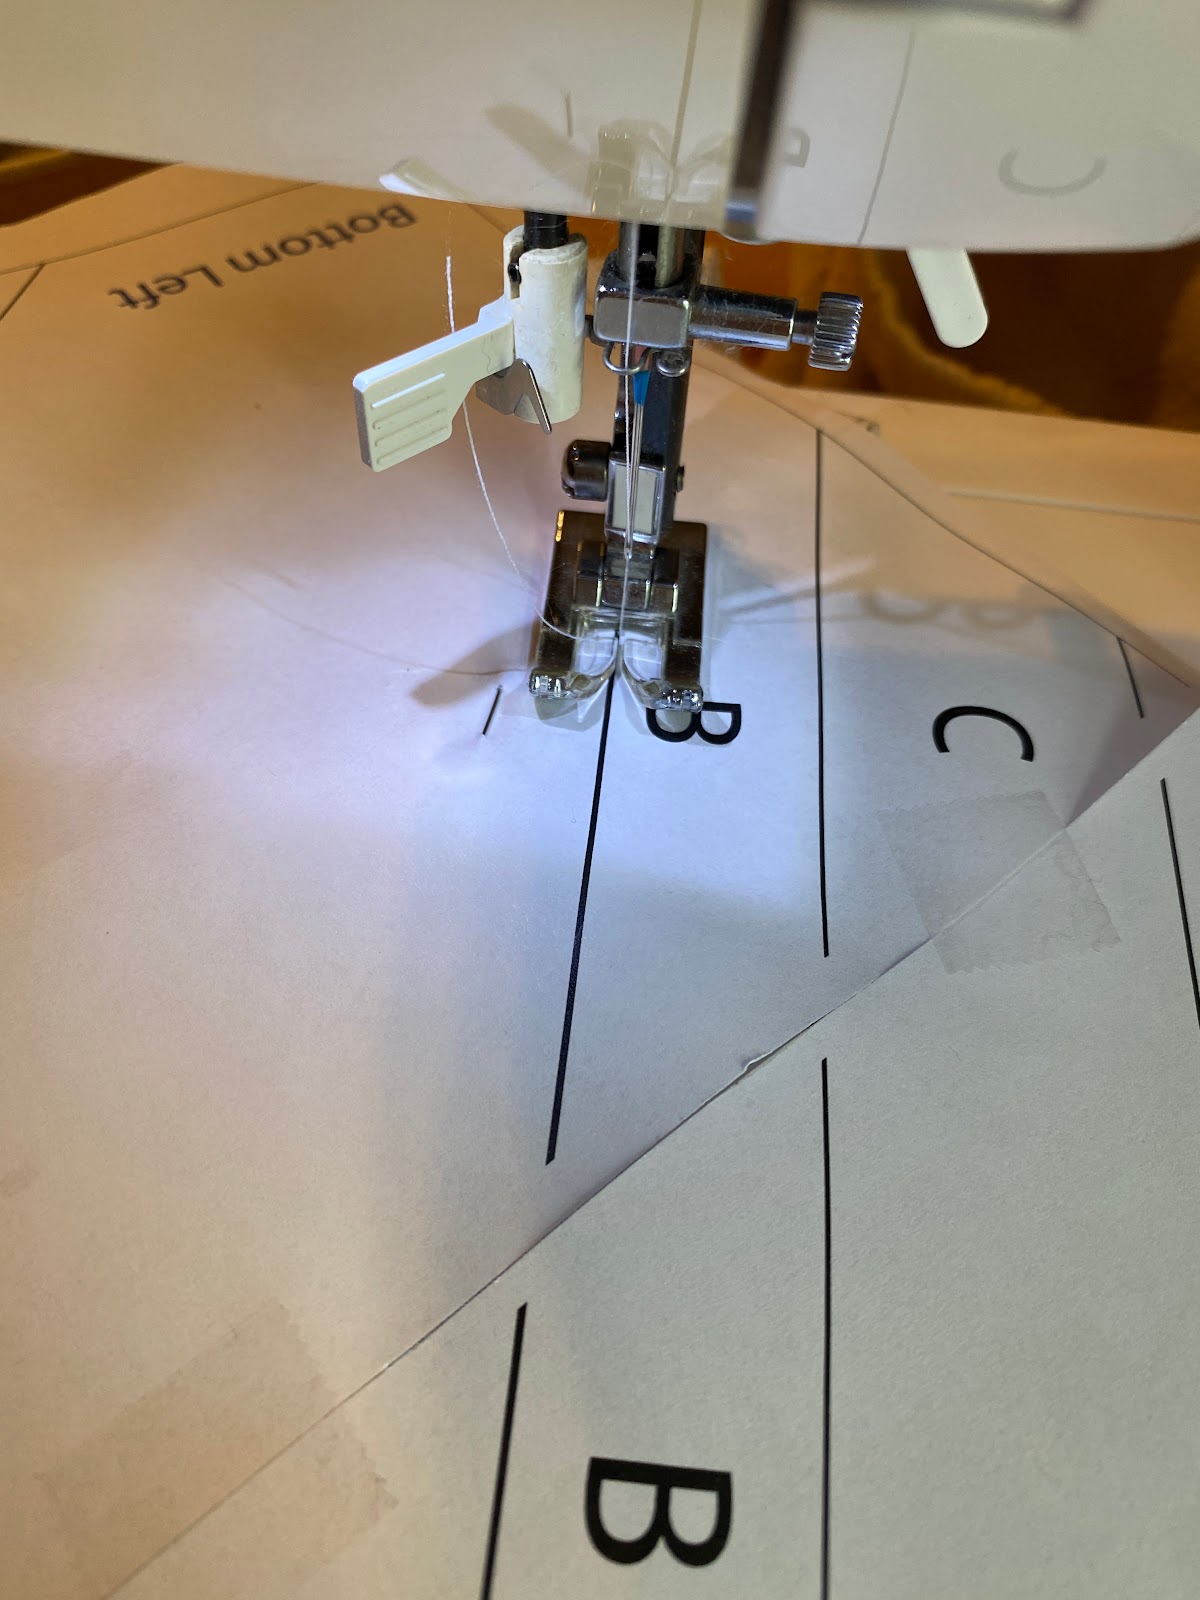
Take the gluestick and run a small line in the middle of the block in the A section. Stick the light gray strip down on it, making sure it covers that area. The strip should be at least .25" beyond the lines on the pattern. What worked best for me, was taping the block to a window. Then using the glue stick and some pins, putting the block in the right spot. This is probably the most annoying and tricky part of the whole thing because the block is large. Sorry! Don't hate me.
Take the gluestick and run a small line in the middle of the block in the A section. Stick the light gray strip down on it, making sure it covers that area. The strip should be at least .25" beyond the lines on the pattern. What worked best for me, was taping the block to a window. Then using the glue stick and some pins, putting the block in the right spot. This is probably the most annoying and tricky part of the whole thing because the block is large. Sorry! Don't hate me.
You'll then work from the center to one end first, then repeat on the other side. Next take a white strip (B) and put it face down on the light gray strip, lining up the top edges. You can use a thin line of glue stick or pins to hold it in place. If using the glue stick, make sure you do not rub over the area where you will actually stick. That gums up the needle. Now turn the pattern over and sew along the line.
Using your iron, press the fabric open towards the point. DO NOT STEAM. Just use heat. If you precut the strip then it should extend .25" past the next line.
If you didn't precut, fold the paper pattern out of the way on the line above where you just stitched and cut .25" past the line. (I missed taking a photo on this step with the white string so here are some with a different section later on where I just used a big scrap rather than pre-cutting)


Tutorials...
Here is a good step by step blog post showing how to do FPP. This was helpful for me with this block even though the pattern is for a different style of block.
Alternate assembly method...
If you absolutely hate FPP, don't have access to a printer or just don't want to deal with it, there is one other option you could do but you just want to try to be more precise with your cutting & piecing as in the end the blocks need to line up.
- Pre-cut all your pieces. Fold each strip in half to find the exact center. You can make a little mark in pencil on the back near the edge.
- Line up your strips in the proper order, making sure to line up the centers before stiching a .25" seam. Press the seam away from the center towards the point.
- Repeat with each strip until you reach the ends.
- Make sure the block is 16.5" if you trim it down.
I hope this block will be fun for everyone. I have always wanted to learn to do FPP but it seemed daunting. Having a block that was basically just strips, made it a good introduction for me. Now I feel like I understand the process and am ready to try more complicated blocks.
Also note... I will be out of the country from June 10-18 with limited internet access so I may not be able to answer any questions until I return.
Thank you!
Kelly
Also note... I will be out of the country from June 10-18 with limited internet access so I may not be able to answer any questions until I return.
Thank you!
Kelly
No comments:
Post a Comment