
For those of you who were in the HIVE4 in 2020 you’ll remember this as Em’s block in February! Ever since I made it, I have been obsessed with this block! I reached out to Em and she is happy to allow me to use the same pattern! (I did do some research and found out this pattern on a website called www.gigisthimble.com. I used this website’s tutorial as a guide to writing my block.)
Here we go!
PS - Being Canadian, I spell “colour” with a U and “centre” a
little backwards.

Fabric
I want to see your pink scraps!
Pinks: You can use the lightest
of blush to the deepest of fuscia; bubblegum, coral, hot pink, pink lemonade, salmon,
ballet slipper, peony, strawberry, rose, watermelon, cherry blossom, flamingo, raspberry
and everything else in between. When
using prints, please keep the other colours in the prints muted so the pink
stands out. I really don’t love batiks so please stay away from them. If you have some fun, novelty fabrics that
you can fussy cut, like I did with my raspberry and strawberry fabrics, have
fun with it.

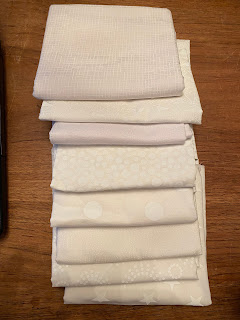
Background: I would l like white’ish. White on white would be preferred, but if you don’t have white on white, solid white works great. I would prefer that the background pieces are all same fabric.
Notes on Fabric:
- I know that the rules say that I can’t ask for
more than 10 fabrics, so if you need to stick to the max 10 fabrics, that is totally
fine. But if you have loads of pink scraps feel free to use as many as you have.
- For the pink 2” x 2” please try to use as many
different fabrics as you can. If you
don’t have that big of a variety in pink, when you are making your central grid
please try to keep the fabrics that are the same far apart.
- For the pink 4.25” X 4.25” blocks, you can use
four fabrics or eight. I chose to use eight, so my block had a lot of variety.
Cutting
(20) 2” x 2” pink squares
(4) 2” x 2” white squares
(4) 4.25” x 4.25” pink squares
(4) 4.25” x 4.25” white squares
(4) 2” X 3.5” white rectangles


Make center of the star
Step 1: Using sixteen of the pink 2” squares, create a 4x4 grid. If you aren’t using
20 different pink fabrics, please make sure that no two of the same fabrics are
side by side or one on top of the other.

Step 2: Using a ¼”seam allowance, sew the squares together in rows. Press the seams of each row to the same side, alternating the top row to the right, the second row to the left, the third row to the right, the fourth row to the left.

Step 3: Sew the rows together.
To save time, sew row 1 to row 2 and then row 3 to row 4. Then press the
rows and then sew together rows 1 & 2 to rows 3 & 4. To get nice straight lines, try butting up the
alternating seams together. Press the row seams in one direction.

Make the star points
**If you are
using four different pinks:
Step
1: Draw a diagonal line across the back of the pink 4.25” x 4.25” squares.

Step 2: Pair one pink square with a white square, with rights sides together (RST) use a quarter inch seam allowance and sew on each side of the line.

Step 3: Cut down the centre of the block along the line, which will make two half square triangles. Press the seams to the pink side. Repeat for the other three 4.25” x 4.25” squares, you will end up with eight half square triangles.
Step 4: Press to the pink side.

Step 5: Using a ruler trim the blocks to 3.5” squared.

**If you are using eight different pinks:
Step 1: Cut
the eight pink 4.25” x 4.25” squares on the diagonal and cut the four white
4.25” x 4.25” squares on the diagonal.
Step 2: Sew RST, one pink and one white triangle to each other along the long sides. Note – If you are going to use this method, you will be sewing on the bias, so you need to be gentle and make sure that you don’t pull the fabric out of shape.
Step 3: Press to the pink side.
Step 4: Using a
ruler trim the blocks to 3.5” squared. I used my long 4” x 14” ruler because it
has the 45-degree angle on it.

Make corners of the block
Step 1: Sew each of the four remaining 2” x 2” pink blocks, RST,
to one of the four 2” x 2” white blocks using a ¼” seam allowance. Press seams
to the side of the pink fabric. If you
are using fussy cut fabrics make sure you are a cognizant of the direction that
you want the image when you are sewing.

Step 2: Sew each of those pieces to one of the 2” X 3.5” white rectangles. You will need two segments with the rectangle on the right and two with the rectangle on the left.

Layout the block ***I forgot to take pictures at this stage!
Step 1: Place the four-by-four grid in the centre.
Step 2: Lay out the 3.5” x 3.5” squares around the grid; two on
each side of the grid. Long sides of the white half of the HST together. Reference the image below.
Step 3: Place the corner blocks. Make sure the pink blocks are on
the outer corners of the blocks, rectangles of the corner blocks should be
along the pink long sides of the HST. Reference the image below.

Sew rows together
Step 1: Top Row - Sew centre HST blocks together. Then sew the corner blocks either side of the pair of HST block.
Step 2: Middle Row - Sew the left side HST together, then sew the right side HST together. Then sew each pair to either side of the grid.
Step 3: Bottom Row - Sew centre HST blocks together. Then sew the corner blocks either side of the pair of HST block Step 2: Press the seams to either side.
Sew the rows of the block together
For this portion of the block, I used lots of pins as there are so many seams. I nested the seams where I could.

Step 2: Sew the top and middle rows to the bottom row
Voila! The block should measure approximately 12.5” x 12.5”. Please do not trim the block. I will trim them when they arrive!


Thank you so much in advance.
No comments:
Post a Comment