

My pick for this year is a simple block. This block has been used in antique quilts and I found the free Lozenges block done by Bonnie Hunter and scaled it up in size.
You will need 4 different fabrics from my color choices of any shades of blues, purples, and grays. Below are examples of the fabrics in light and dark shades. I prefer prints. They can be textures, blenders, small prints, grunge and batiks are okay. I would like them to read mostly as one color, it is okay if there are just tiny bits of another color in them (for example, the purple in the darks, fourth from the left has little bits of red, yellow and green). Solids would be my last choice, but you can use if you need to. (If you have some fabrics that are closer to a middle value for the center fabric, just decide if it is closer to light or dark and make sure you have a good contrast for the corners.)


You will make two halves that will be sewn together to make one square block. One half will have a dark center and light triangle corners and the other will have a light center with dark corners.
For one block:
1 - light 5 by 9 1/2 inch rectangle
1 - dark 5 by 9 1/2 inch rectangle
4 - 2 3/4 inch dark squares, all same
4 - 2 3/4 inch light squares, all same

Mark the diagonal on the 4 squares.
NOTE: Please read through all the directions and follow these next piecing and pressing instructions. This will allow the seams of the units to nest and get a perfect match at the diagonal seams on the edges when sewn together.
Place your rectangle right side up and place a square corner in the upper right hand corner and the lower left corner. Sew on the marked diagonal lines.

I find this hint makes the flipped corners more accurate. Do not sew exactly on the drawn line but just a hair to the outside of it, closer to the block corner.

Press these out to the corner, then flip back the edge triangle and trim the seam to 1/4 inch of the two layers below.
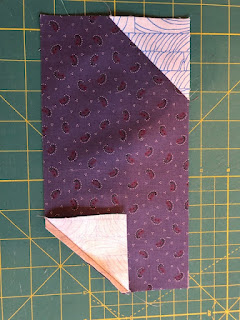
Now take the two remaining squares to the upper left and bottom right corners and sew the diagonal. This time, before pressing, trim the excess layers first and then press these seams towards the center.

So now you should have a unit that has opposite seams each going one direction and the other two the other way, matching the photo below.

Make the second unit exactly as above but with light center rectangle. Next you will sew them side by side, lining up the seams so they nest nicely. This will create a good match at the edges. Iron toward the block with the darker center.

The square now should measure at 9 1/2 inch square, (9 when finished).
Here is an assortment I have made so far.

Contact me if you have any questions. I can't wait to see all your scrappy variations!
No comments:
Post a Comment