HIVE 2 - AUGUST 2020 - Queen Bee: Saraj Cory
Hi Everyone, I get to bee the queen bee for August.
I’m requesting a "Random Stripey Square" block using 2 colors.
Color & Fabric Choice:
I am requesting blocks in the triadic colors of #1 (yellow), #9 (turquoise) , or #17 (pink), or shades thereof from my color wheel shown below.
- The block uses only two colors, you get to choose which two.
- These are pure colors, as bright and pure as you can.
Here is a picture of the color wheel on my wall for your reference.
- I would like one solid and one print, you will need 12" x 18” of each.
- NO GRUNGE please
- If you don’t have a solid you could try a fabric that can read as a solid such as an umber, marbleized, batik, or other blender.
- Have fun, just make it a bright.
Here’s a sample of a test block from a friend who had no solids. This batik blender worked well. She chose a turquoise print and a pink batik.
About color wheels and triadic choices:
From Wikipedia:
This color wheel from wikipedia shows the colors I am using.
My Fabric Pull:
Here are some of the fabric samples I pulled from. Sadly, I've discovered I have almost no yellows in my stash. Probably because I look jaundiced in yellow. Oranges are in abundance, but sticking to the color wheel, there are shades of yellow that easily qualify. Work with what you have.
Cutting and Block Assembly Instructions:
Step 1:
Cut a 12"x 18" rectangle from the 2 colors you choose.
- again, one solid (ish) and one print
Set one fabric on top of the other, right sides up.
- My turquoise solid is on the bottom, the pink print on top, both right side up.
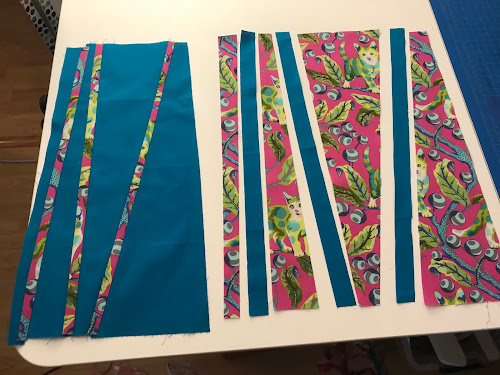
With your ruler and rotary cutter, cut three 1” wide strips at slight diagonals top to bottom semi random. Straight strips, but cut at diagonal.
- All my friends, except my son, got stumped by this: “what is 3 x 1” strips? I confess, I’ve been reading knitting charts for the last four months. As for sewing, from the stacked fabric, you want to cut out 1” wide strips, but only three of them, from anywhere top to bottom on the fabric. Angles make it more interesting.
- You’ll end up with seven pieces three of which will be 1 inch wide strips.
Keeping pieces in order, separate solid from print.
Step 5:
Exchange every other piece of solid with the equivalent piece of the print fabric- You are creating two blocks with every other piece.
- The blocks will each have an odd number of pieces, so the blocks will start and end in the same fabric (either solid or print).
- Solid / print / solid / print / solid / print / solid (inverse for the other block)
Step 6:
Sew back together with exchanged pieces.
- Try to sew seams in alternate up and down directions so the new block doesn’t bow. The blocks will be a bit wonky, and that’s fine.
- Iron:
- I like to iron each seam as I go.
- Don’t iron open.
- Do iron to one side or the other.
Step 7:
Stack again right sides up.
Step 8:
Cut three 1" wide strips, like in step 3, this time going side to side, diagonally at an angle.
- In this picture the blocks are turned sideways, easier for me to cut and photograph.
Step 9:
Exchange pieces, like in Steps 4 & 5 above.
Step 10:
Sew back together exchanged pieces.
- Remember to alternate direction of sewing so as not to end up with a bendier block than you're already going to get (because of all the diagonal cuts)
- Don’t worry about matching up the cross sections precisely as you would for a pinwheel or half square triangle — this is scrappy — sometimes they’ll line up, sometimes they won’t.
- This is more about color play than piecing alignment. If your OCD goes off the hook, have a cup of tea, glass of wine or beer, and play again.
Step 11:
Trim each section, sew together.
- If you can’t decide which way to sew them together, just leave them separate, I’ll collect all the blocks and see what works with what.
- Here’s my final block. The two halves are reflected (i.e., the top one is facing down. Put yours together however you like it.
Step 12:
Trim to 16 x 13-3/4” or thereabouts.
Have fun!
Thank you.
Contact me with any questions.


No comments:
Post a Comment