

Monday, May 7, 2018
Hive 1 May Circle of Friends
Sunday, May 6, 2018
Circle of Friends block for Liz

Once again, colours I would not have thought to put together. My hivemates certainly keep expanding my horizons! I really like the "minty feel" of the pate green and grey.
I used the "Magic 8" method for making the HST units. I had never done it before. As I am a trim-it-down kinda girl, I used 7" squares to start with. This is the pile of trimmings after making all 32 units.

Liz asked that we press our seams open. I had a hard time getting my intersections to line up, and I had a lot of bottom seam allowances flip over, so... there may have been a wee bit of cursing and a whole lot of unsewing going on in my basement today. It all worked out, though. Yay!
I hope you'll share a picture of Anne & Kristen's quilt once it's complete.
~Kathy
Saturday, May 5, 2018
Hive Crash for Sue
I have become really fond of blocks that look like things so I was really excited to see Sue's toadstool block this month. I had never seen a toadstool bock before! I had a red floral print that I thought would look great; I hope Sue agrees! I'm also a big fan of novelty prints, so I used some of my "novelty neutrals" in the block as well. I'm sure Tilly will love her quilt!

Emily, Hive 6

Emily, Hive 6
Tuesday, May 1, 2018
Hive 4 - Amandas April Block
The last day of the month, but I am happy to report that Amanda's block was put in the mail yesterday. Was a fun block to make.


Hive 5 May 2018 Tutorial: Star Block Choose Your Own Adventure
My name is Julia and I’m a librarian living in the Boston area. This month’s block is a bit of a choose your own adventure. I love star blocks and the night sky. I’ve planned various star quilts but can never decide on what block to use. So, inspired by T's post last year I’m asking my hive to choose a star block they want to make. I’m including links to some of my favorites but feel free to make any star block that you love.
I’m thinking of a twilight quilt. My fabric pull/palette is a deep blue background and yellows for the star. You can make the block scrappy, use fabric with metallic accents, use solids, use multiple prints, low volume or high contrast. Whatever inspires you.
Any size block is fine with me. In terms of how many to send, it depends on the size.
Make one if your block 10" or larger
Make two if your block is 6"-8"
Make four if your block is 5" or smaller
Here is my fabric pull

Here are a few of my favorite star block tutorials
- Thought and Found created a quilt-a-long called Oh My Stars that has tutorials for a variety of star blocks.
- Here is a ribbon star block tutorial by Becky of Patchwork Posse
- This tutorial is for a 12.5" wonky star block. Created by Victoria Gertenbach of Silly Boo Dilly and is based on Gwen Marston's liberated star.
- A tutorial by Lynn Carson Harris for little star blocks based on the tutorial above
- Cath Hall of Wombat Quilts has created an array of beautiful paper pieced star blocks that are available to download from her site.
- This is a great way to make a LeMoyne Star from Natalia Bonner & Kathleen Whiting's blog Piece N Quilt.
- This tutorial by Bec of Chasing Cottons makes a friendship star with a cute fussy cut center
- This tutorial will give you a block with one or two wonky stars. It's created by Dominique of Running Thimble.
Hive 1 May 2018 Tutorial - Circle of Friends
Hive 1 - Circle of Friends
Happy Spring to my Hive 1 friends!
Happy Spring to my Hive 1 friends!
My name is Liz and I live in northern New Jersey. I'm a school nurse and work at a school for students with special needs. This is my sixth year there, and it gave me a whole new perspective on life and made me realize just how lucky I am!
This is the post for the block that I used in my hive last year. I'd like to make Anne and Kristen's quilt larger, so I'm asking for your help. Please let me know if you have any questions, and thanks again for pitching in!
Liz
PS. Maureen and Sharon are currently doing a second QAL - Community Sampler. Check it out - https://www.sharonhollanddesigns.com/sew-along/
~~~~~~~~~~~~~~~~
Happy September everyone!
I’m very excited to have you all help me make a quilt for my niece and her wife! I had made them an Ohio Star quilt before I knew they planned to get married. When I make a wedding quilt, I try to make one with intertwining circles. I told them I would make another quilt with circles.
I’ve been following Sharon Holland and Maureen Cracknell’s Sewcial Bee Samplers sew-along and when I saw Sharon’s block #19, I thought it would be a great block for Anne and Kristen’s quilt. I have contacted Sharon Holland and she has graciously given me permission to use her block!
Here’s the link to the sew-along https://www.sharonhollanddesigns.com/sew-along/
If you scroll through and click on block 19, you’ll open the pdf for Circle of Friends.
I would like to make the block bigger-15x15 finished, so all HSTs and center square should be cut to 3” so they finish at 2 ½” in the block.
For my block, I would like the following colors – Fabric A-pale green, Fabric B-grey, and Fabric C-pale yellow. The colors were Anne and Kristen’s request, placement was my idea!
These are my two sample blocks:


For the one the top block, I decided to make HST the traditional way-cut 16 squares each of grey and green to 3 ¾”, marked diagonal from corner to corner, right sides together and sew ¼” on either side of line. Trim to 3” squares.
For the bottom block, I decided to use Sharon’s method—this was my first time doing HSTs this way. Cut 4 squares each of grey and green at 6 ¾” and follow her directions. I did trim these to 3” after cutting although they were very very close to 3”. There’s much less waste with Sharon’s method as you from this picture! You decide which method you want to use.


For this block, please don’t use a scant 1/4”-I did on the top block and it ended up at 16” rather than at 15½”. Also, please press the seams open. On the top, I pressed to the dark and some of the seams were very bulky—came out much better on the bottom! I’ll end up taking the right block apart and re-sewing. No need to trim your blocks-I’ll take care of that when I get them all.
Please contact me if you have any questions.
I look forward to putting all the blocks together and gifting it to Anne and Kristen! Thank you so much in advance!
Liz
Liz
Hive 7 May Tutorial
Hi everyone! This month I'm asking Hive 7 to make the Wanta Fanta block from Blossom Heart Quilts' The Bee Hive patterns, designed by Janice from Better off Thread. I had chosen this for a bee I was in last year, and I love the blocks I received so much that I'd like more so I can make a bigger quilt! I'm aiming for 25 blocks in total, and I have 12 so far. I considered making the rest myself, but I'm hoping everyone else's fabric stashes can help me achieve a scrappier black and white look!

I've chosen blacks and very dark grays for the “background”, and whites and off-whites for fabrics A, B, C, and D. I’d ask that your choices mostly read black and white, and that other colors are kept to a minimum if possible. Please also avoid lighter grays and anything that reads more cream or gray than white.
This block involves a little bit of paper piecing but it goes pretty quickly (and the instructions in the link above are great!). You'll need two copies of the template page; when printing, make sure the test square measures 1". It may require some adjustments to your printer settings to get it right, but if the printing size is off the block will finish at the wrong size.
I can’t wait to see what you make! Feel free to email me or message me on Instagram if you have any questions. The photo below shows a selection of my other blocks together for more fabric selection inspiration.
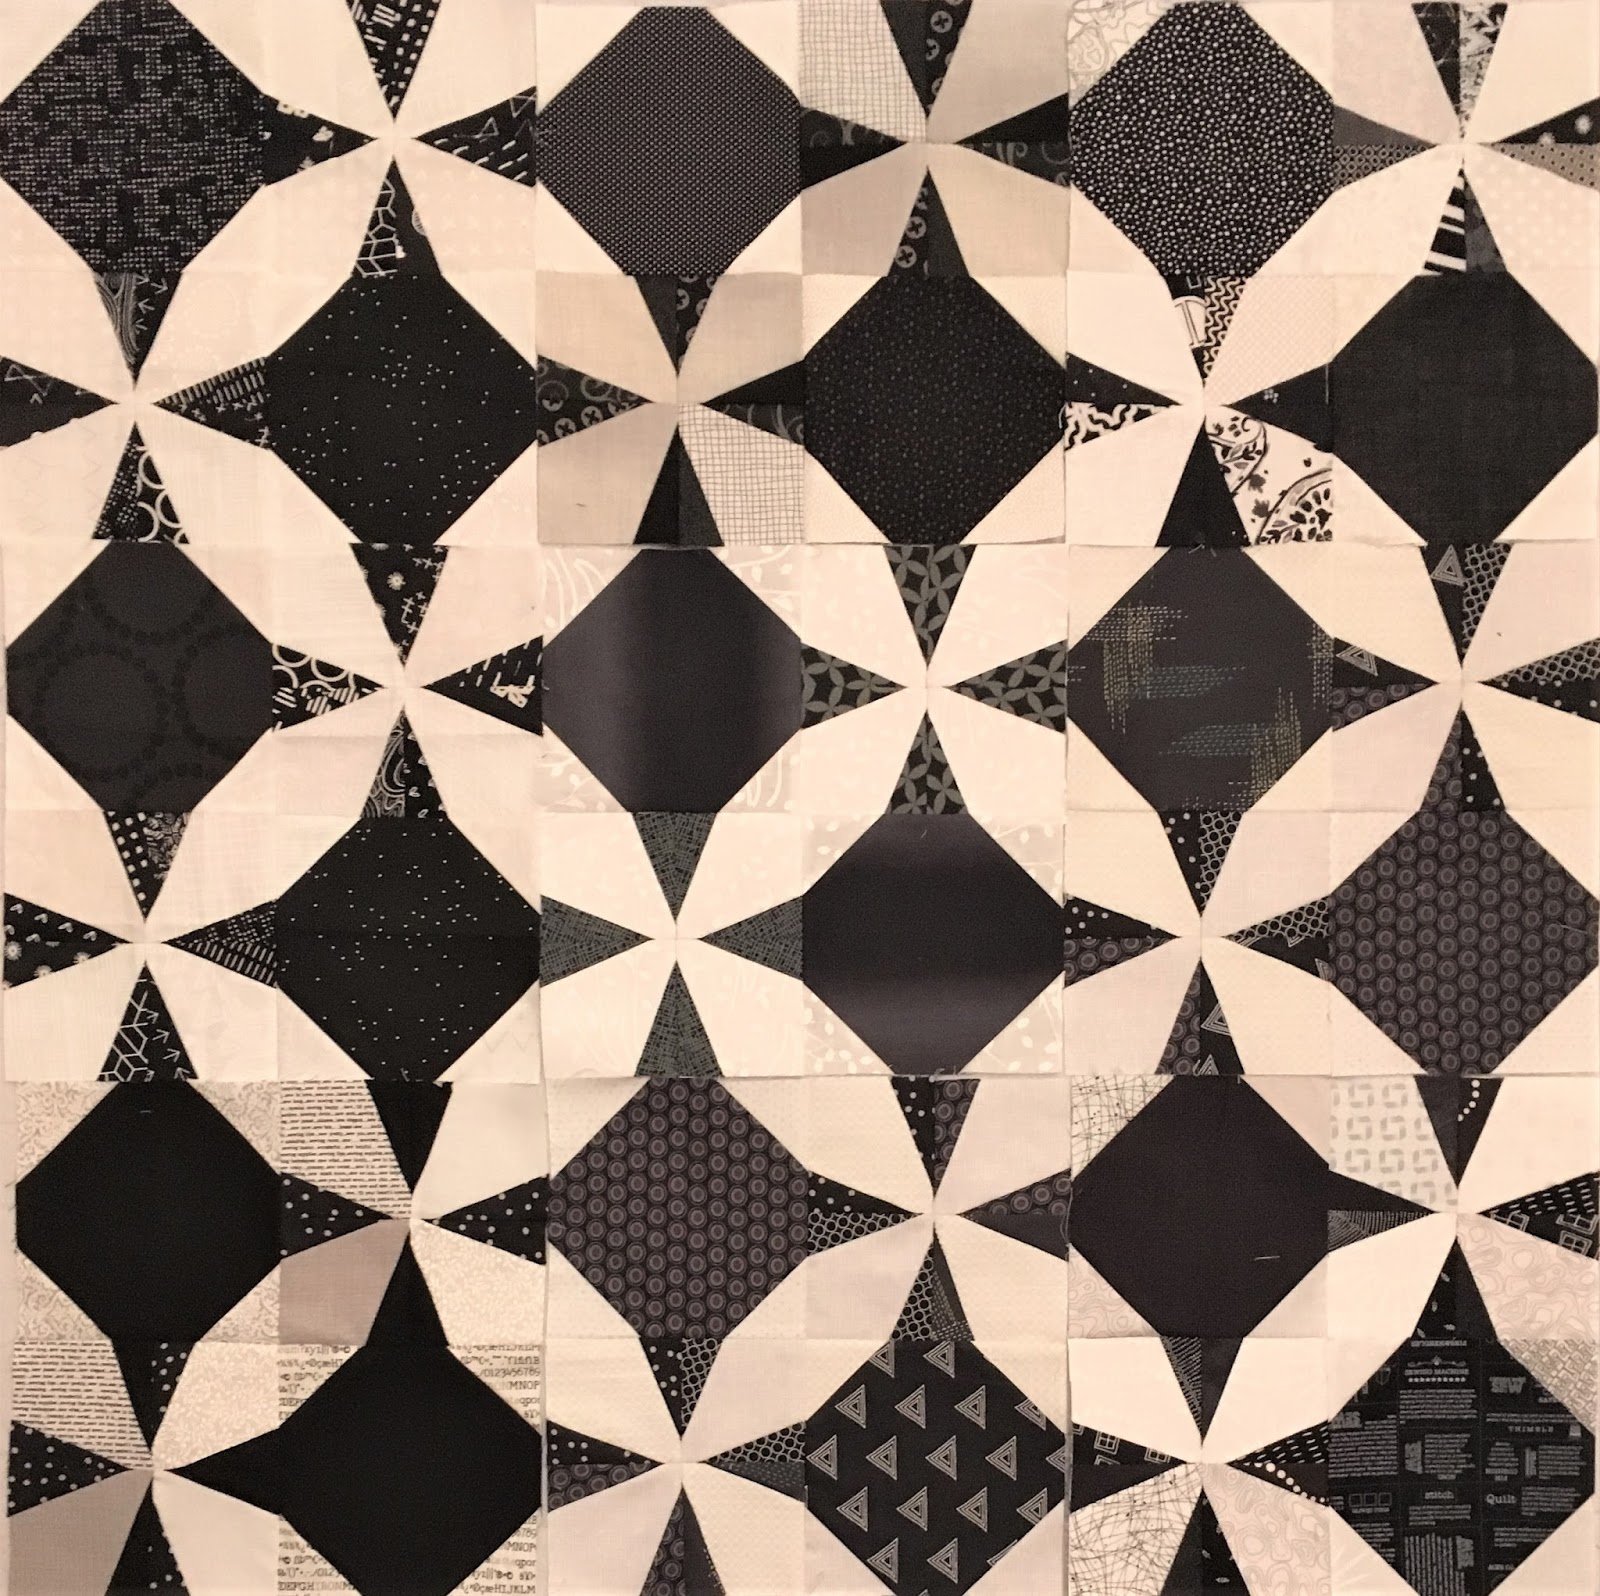
-Alicia (@qvilt)
Hive 6 May block tutorial - M-Cat block.
Hi gang!! I have recently been really into making quilts for Project Linus, Ronald McDonald house, etc. So I would ask you all to help me make one for a little person please.

I made this block in about 30 minutes tops, I actually made 2 at the same time as it is easier to sew 2 blocks so I am honestly requesting for you each to make 2 blocks as if I asked for 4 it would end up being a request for an 18 inch block and that exceeds our maximum block size so if you could make 2, that would be completely awesome!!
 I am asking for fabrics in yellows, golds, rusty colors. I guess when I thought about it, a certain cat came to mind. Do any of you remember the yellow cat named "Morris the Cat" from the Friskies Cat food commercials? So I am requesting your version of Morris the cat. We actually had a beautiful cat like that named Milo who went to kitty heaven not too long ago. He ended up diabetic the last year of his life and I said I would never give insulin shots to a cat, but I lied. We all loved Milo so much and he was like my 4th child as my kids grew up with him. So this is the M-Cat quilt.
So for the cat body, yellows, golds, rusts... Anything that makes you think of Morris and Milo.
For the back ground any low volume fabric would work just fine. You can also use a light solid as well, but I do prefer the low volume.
This pattern is geared to using a layer cake fabric (10 x 10) so if you have some left over layer cake sized pieces, please use them.
For the cats you need 2 - 10 inch square fabric pieces.
For the background you can get the background for both cats with 1 - 10 inch square block.
Cutting for the Cat:1 -
place 2-10 inch squares on top of each other and cut in half. you will have 2 - 5x10 inch pieces.
From one 5x10 cut off 1/2 inch and you will have 1- 5 x 9.5 piece for each cat. From other 5 x 10 inch piece cut 1 - 3 x 5 inch rectangle and 2 - 2.5 inch squares.

From the background square again cut it in half resulting in 2 -5x10 inch pieces. Stack them on top of each other and cut 1 - 5 inch square, 1 - 2.5 x 5 inch rectangle and 1 - 2.5 inch square.

You will have a total of 3 - 2.5 inch squares. 2 cat and 1 background fabric. Draw a diagonal line on the back of each small square.

Next take the 2.5 x 5 inch background square and line them up as if to make a flying geese block and sew on the diagonal lines. Trim the seam allowance.


I made this block in about 30 minutes tops, I actually made 2 at the same time as it is easier to sew 2 blocks so I am honestly requesting for you each to make 2 blocks as if I asked for 4 it would end up being a request for an 18 inch block and that exceeds our maximum block size so if you could make 2, that would be completely awesome!!

So for the cat body, yellows, golds, rusts... Anything that makes you think of Morris and Milo.
For the back ground any low volume fabric would work just fine. You can also use a light solid as well, but I do prefer the low volume.
This pattern is geared to using a layer cake fabric (10 x 10) so if you have some left over layer cake sized pieces, please use them.
For the cats you need 2 - 10 inch square fabric pieces.
For the background you can get the background for both cats with 1 - 10 inch square block.
Cutting for the Cat:1 -
place 2-10 inch squares on top of each other and cut in half. you will have 2 - 5x10 inch pieces.
From one 5x10 cut off 1/2 inch and you will have 1- 5 x 9.5 piece for each cat. From other 5 x 10 inch piece cut 1 - 3 x 5 inch rectangle and 2 - 2.5 inch squares.

From the background square again cut it in half resulting in 2 -5x10 inch pieces. Stack them on top of each other and cut 1 - 5 inch square, 1 - 2.5 x 5 inch rectangle and 1 - 2.5 inch square.

You will have a total of 3 - 2.5 inch squares. 2 cat and 1 background fabric. Draw a diagonal line on the back of each small square.

Next take the 2.5 x 5 inch background square and line them up as if to make a flying geese block and sew on the diagonal lines. Trim the seam allowance.

Now take the background 2.5 inch square and choose which way you would like your cats to face, and line it up and place on one corner of the solid 5 x 9.5 background, trim and press away from the center of the blocks and you will have these.

Now it's simple block assembly time. Take the cat ears and sew them to the 3 x 5 inch cat piece to make the cat head.

Then take the 5 inch solid piece and sew the head to the background again being aware where your cattail is so as to sew the background to where the white triangle is on your cat body.

We're almost done! super simple, right? Easier to do then it is to write this tutorial! :)
Next take the cat head and sew it on to the body, again the white corner lining up with the background fabric.

And now, tada!! You did it! Here are the 2 that I made stacking my fabrics when I cut. Super simple and quick. Thank you for helping me to bring joy to little people!

Any questions, please let me know. Thank you again and I truly appreciate your efforts!
Hive 3 May Tutorial - Scrappy String Block
Hi,
Gayle here and this is my third year in Stash Bee and for this month I would like a scrappy string block. I would like to make a quilt similar to the one on the cover of Today's Quilter magazine issue 31. I contacted the designer Carolyn Forster and she granted me written permission to share this block.
http://www.todaysquilter.com/magazine/issue31/

This is very scrappy so go through your scrap baskets. For color choices, you will need some low volumes, whites, off whites, prints or solids for the center strips. For other strips mostly light mediums to mediums with an occasional dark or bright in any colors (except black or browns and no juveniles please).


 To start you will need to make a paper pattern. If you don't have a large enough piece of paper you might need to tape two pieces of copy paper together. Cut a 9 1/4 inch square and cut diagonally once to make the triangle. The base of the triangle should be 13 1/4 inches. You will NOT be sewing to the paper, it is just used as a guide and for the final trimming of the triangles.
 Cut all strips between 1 1/4 to 2 1/4 inches wide. The center low volume needs to be at least 7 1/2 inches tall. The block can have a bit of a wonky look, so the center strip can be cut at a slight angle. And see below when trimming block.
 Sew strips together using the paper triangle as a guide to make sure each colored strip is tall enough to allow for trimming later. Each strip can be slightly shorter as you add to the edges and I found if you have any half square triangle pieces lying around, they work well for the outermost strips. Iron both sides away from the center strip. It usually takes 4 or 5 colored strips on each side to cover the paper.
 Lay paper guide over the strips and cut an even straight cut along the bottom. Then lay your ruler over the two angles and trim to the paper piece. For more wonkiness the tip of the paper triangle can be offset from the center of the white strip like shown below (or centered if you like). You will need to make 4 of these triangles.

At this point you can send me the four triangles not sewn together or sew two together like below and then sew these pairs together to make the final block. Please be careful sewing these edges as they will be on the bias.
 The block will be 12 1/2 inches (12 inch finished). I think this is an easy block and gets you to use up small scraps, so have fun. Here are some blocks I have already made.
 If you have any questions, please contact me. Looking forward to see what you all make.
Thank you - Gayle
Gayle here and this is my third year in Stash Bee and for this month I would like a scrappy string block. I would like to make a quilt similar to the one on the cover of Today's Quilter magazine issue 31. I contacted the designer Carolyn Forster and she granted me written permission to share this block.
http://www.todaysquilter.com/magazine/issue31/

This is very scrappy so go through your scrap baskets. For color choices, you will need some low volumes, whites, off whites, prints or solids for the center strips. For other strips mostly light mediums to mediums with an occasional dark or bright in any colors (except black or browns and no juveniles please).


At this point you can send me the four triangles not sewn together or sew two together like below and then sew these pairs together to make the final block. Please be careful sewing these edges as they will be on the bias.


Thank you - Gayle
Hive 2 May Tutorial – 10-inch Toadstools
Hello Hive 2
I’m Sue I’m a fabriholic and happy about it! I live in Perth, Western Australia and you can find me blogging at SevenoaksStreet Quilts and on Instagram @sevenoaksstreetquilts. This is my second year
in Stash Bee. I’m thoroughly enjoying myself again this year and I’m inspired
by what I’m seeing on your Instagram feeds as well.

This month we’re making a toadstool quilt for
my great-niece Tilly, a term that makes me sound like I’m 150
The block has been tweaked – up scaled, turned
into a square, simplified slightly, and the tiny HST units have been removed
(you’re welcome) – from this block by Iam LunaSol. It turns out that it now looks very similar to this block by Patty
Sloniger. When I couldn’t find the pattern in her shop I checked with her and
she has given her consent to me using it so long as I acknowledge that she came
up with it first. I’m more than happy with that!

FOR FABRIC CHOICES I would prefer a red and white print for the
toadstool tops if you have it or black and white if you don’t, low volume
prints (not pictured) on a white or off white background for the background fabric, a mid to dark grey print,
blender or solid for the stem and a pale grey print, blender or solid for the
gills. Since Tilly is coming up to her third birthday feel free to add prints
with some novelty value.

CUTTING INSTRUCTIONS
From the red print
Cut
one rectangle 5 ½” x 10 ½”
Cut
two 1 ½” squares
From the pale grey
Cut
one 1 ½” x 10 ½” rectangle
From the darker grey
Cut
one rectangle 4 ½” x 3”
From the low volume
Cut
two rectangles 4 ½” x 4 ¼”
Cut
two 3 ½” squares
SEWING IT TOGETHER

Mark the diagonals on the two low volume
squares and the two red print squares
Line the low volume squares up in the corner of
the red print rectangle so the line cuts across the corner, and the same for
the red print squares on the pale grey print rectangle. Stitch along the marked
line. Trim and press.

Stitch the two low volume rectangles to either
side of the darker grey rectangle.
Stitch the three sections together to form a
toadstool.
And we’re done!
POSTING TIPS
Please read the postage tutorials on the Stash
Bee blog to avoid ridiculous costs.
Please also add an airmail sticker or write it
on the envelope. Without that it runs the risk of coming by boat which will
take about two months!
I know you guys will do a stunning job and I
can’t wait to see them!
Subscribe to:
Comments (Atom)