Showing posts with label 2021. Show all posts

Saturday, February 25, 2023

Finished quilt: Autumn Jacob's Ladder


Sharing a finished quilt! This was made with the help of 2021 Hive 1. You can see the original block tutorial here.

This quilt came out beautifully--absolutely the cozy autumn quilt I had imagined. I'm sharing a few close ups with fabrics that I especially love.


Thank you to 2021 Hive 1 for all your help!

Tuesday, September 13, 2022

Finished Quilt Hive 1 November 2021

 Dear Hive 1 Bees,

Thank you for your generous contribution to my November 2021 request for improv blocks. I have added flower panels from @suezipkin and completed two quilts!

While quilting, I could admire every block, made with lovely fabric. Every block was simply perfect. 

Thank you again everyone!

Marie


Tuesday, December 7, 2021

Finished Quilt - Hive 2

 Here is my finished quilt from February 2021 with blocks made by Hive 2. I feel happy that I received the blocks and finished it in the same calendar year! Looking forward to participating again in 2022!


Tuesday, November 30, 2021

Hive 1 Block for Marie


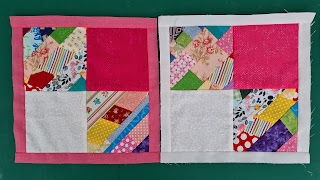
Thank you for the great tutorial, Marie! I had a lot of fun with this one - it was my first time doing "improv" for the two diagonal squares! Can't wait to see your pink quilt when it is finished.

Enjoy!

-Julia D.

Monday, November 29, 2021

Hive 1 November block for Marie


What a fun and cheerful way to end the year! I was determined to get two blocks done to finish strong. Thank you for the great tutorial, Marie--and an early happy new year to all!

-Julia C.

Sunday, November 28, 2021

November Block for Hive 1

 Down to the wire but this will be in the mail tomorrow! Marie, I hope you like the pink I picked - it's one of my favorites. 


Hive 1 November Block for Marie

Hey Marie! I hope you had a good thanksgiving! Your block was my only goal once my extended family finally left! I think this is going to be quite the cheerful quilt. 

I did a flamingo quilt for my mom last year with a pieced border that used up almost every last scrap of pink that I had! I hope this pink floral reads pink enough for you!!! Everything else I had was in strips or too small!


Sunday, November 14, 2021

Hive 1, November Block for Marie


Hi Marie,


I do love going through my scrap bags - so many quilty memories. Some of the scaps I used were left over from the first queen size quilt I made, for my best friend, no less. Others from the quilt I made for my mum last year and some already pieced strips, that are still hanging around from a wedding quilt I made for friends...

Pink fabric left overs are plenty in my stash, as I usually buy FQ bundles and pink is always 'left behind'. It's my second least favourite colour, after purple! ;)

Hope the blocks will help create the cheerful quilt you envision.

They are going in the post box today, so will start their journey to you tomorrow.

Take care, happy sewing,

Rita

Friday, November 12, 2021

Hive 1 November block for Marie


I really enjoyed making this block.  The colors and the design are on point! It’s going to make a cute quilt all put together. Enjoy! Carolyn

Monday, November 8, 2021

Hive 5 November Tutorial- HST Block for Alicia

Hive 5 November Block for Alicia


Credit for this Tutorial goes to Rochelle of Hive 4 who made this tutorial in February 2021

This month we are making a modern HST block from Steph Jacobs Designs 2019 HST block of the month. The original block and tutorial can be found here:

https://www.stephjacobsondesigns.com/2019/01/modern-hst-block-of-month-january-2019.html


For fabrics I'm looking for black and white only.  You can use solids, tone on tone and/or small modern prints that still read white or black (please no large prints and no batiks). If you use solids, use both a black and a white solid, if you use prints, use both a black and a white print. I'd like to alternate solid blocks with printed blocks in the final layout (if you have any doubts on your fabrics just go ahead and use solids, those solid blocks will be just as helpful since I have to make quite a few for a king).

Here are a few things I pulled from my stash:


You will need:

8 - 5" black squares
8 - 5" white squares


You'll make a total of 16 HSTs, trimming to 4 1/2" (unfinished).  I love my Quilters Magic Wand for marking HST lines 😊


I don't think I need to go through the HST making process but if you do need help, Bloom Heart Quilts has a great tutorial and several HST methods. I chose to make my HSTs the old fashioned way (2 at a time),  if you like to make 4 or 8 at a time - feel free to use your preferred method.  Please iron all seams open throughout, this will make my life much easier when I am quilting 😉

Most HST cheat sheets say to use 4 7/8" for a 4 1/2" unfinished block but I like the warm and fuzzy feeling of using a larger size and then trimming down. Using the 5" square I did not have much trimming to do.


Here is the layout for your HSTs, I had to keep going back to my photo to make sure the layout was correct.


 I sewed the first two and last two blocks of each row together.


Then completed each row.


With all the rows complete, I attached the top two rows and bottom two rows (sorry no photo here but I think you get it). Also, if your block doesn't look quiet right, rotate it and see if it then matches.  Previously, this was a bit confusing.

And finally sew the last center seam and you're done! Your block should measure 16 1/2" (unfinished).  A nice big, simple block! Please let me know if you have any questions.

Friday, November 5, 2021

Hive 1 November for Marie

 I'm always glad to raid my strips and put them to use.  Hope they brighten your day.

Kathie Laposata


Tuesday, November 2, 2021

November Block for Marie

Hi Marie, I hope you enjoy these bright strips pulled from my never ending supply of scraps.  Thank you for the opportunity to use some of them!   I hope the pink is not too overwhelmingly bright for you.  Like last month, Jayne, the mailing expert, will be sending my block to you along with hers.   Karen


Monday, November 1, 2021


Hello from Hive 1,  Here is a surprise for Kristin, my fellow guild member. I love batik, and had the rainbow colors in my stash. It's going in the mail tomorrow my friend! Marie


Hive 1 November Tutorial - Pink Four Patch for Marie


Hive 1 November Tutorial: Four Patch Block with improv stripes

Hello Bees! 

Already at the last block of the year! Thank you for this wonderful year in the hive! I thought we could finish the year around the color pink, to help us see La vie en rose!

I am assuming you have lots of scrap fabric, you are reluctant to throw it away, and you know that it will be useful "someday". That day has come. Let's go down that pile and make a bit of improv with your leftover fabric! 

I am hoping for a bright, cheerful quilt, with lots of pink. Bright and cheery fabric, solid and/or prints of leaves and/or flowers. Please, nothing too dark!
I have designed a simple four-patch 10.5"x 10.5" quilt block with improv stripes and sashing.


The four squares are each 5" and will be assembled as follow:
  • Top left: one stripped square with the strips ascending from left to right, 
  • Top right: pink square, either pink or reads pink, any pink works,
  • Bottom left: white square, either white or reads white, and
  • Bottom right: another stripped square, with strips ascending from left to right. 
The white and the pink squares can be from a charm pack, or from your fabric.

Now for the striped blocks. I am suggesting here a method to obtain diagonal stripes.  If you have your own method, please make two (2)  5" squares your favorite way!

Step 1: Piece together scraps from your stash into strips. The more scraps in one strip, the merrier.  Each strip of scrap fabric should be at least 7" long.  Square up the edges. Repeat and prepare more strips! How many strips? It depends of the width of each strip, so find the answer in Step 2!


Step 2: Sew the strips together. Once sewn, the strips should make a rectangular block about 15"x 7". Larger block is even better! 

Here are a few examples of strips sewn together:


Step 3: Prepare two (2) 5"x5" square fabric to be used as a template. You can certainly use a square from a charm pack or, if none are available,  you can make your own paper/cardboard 5"x5" template.

Step 4: Place the 5" square template on your newly created striped fabric. Make sure you follow the orientation of the stripes vs template so that the 5" squares are placed with corners up/down, one square above/under the other, over the stripes that are aligned vertically. 


Step 5: Cut two 5"x5" squares out of your striped fabric using the template.

Voilà! The resulting two squares will each measure 5"x5" and will have a diagonal striped pattern.


You should now have the four squares needed for assembly. Complete the block with a 1" sashing. You can use white or pink sashing...you choose! Sew the sashing on the left and right side first, then finish with the sashing at the top and bottom.  


Here is an example of some completed blocks:


Thank you in advance for working on this block! I will cherish every block and will be forever grateful for your contribution to my quilt.
Best,
Marie

Hive 4 November Tutorial -- Wonky Rainbow Log Cabin

Hello!

My first stash bee has been wonderful. Every block has been a delight and gets me flexing different quilting muscles. Thank you so much! Kristin 

Block:

Ready to make a Wonky Rainbow Log Cabin block? Yay! 

This is intended to be both fun and a stash buster. Unless you don’t find wonky fun, then you can make them as perfectly square as you’d like. 

Fabric: 

Pull from your stash any type of fabric that reads ROYGBV. They can be solids, batiks, novelties, jewel tones, muted tones—I’m very open. Get a bag of Skittles to inspire you!

Size: 

No smaller than 4” x 4” and up to 9” x 9”
 

Wonky:

You can leave them wonky and not perfectly squared up. Again, if you are uncomfortable with wonky, I think you should give it a try! Or you can measure out a strip that is about 2” wide by whatever length. 
 

Log cabin:

You can start with a red center, which is traditional. Or you can do the reverse and start with a purple (or violet for ROYGBV). With the talent this group has shown, I am confident we’ve all sewn at least one log cabin block before. If not, here is a very traditional tutorial to go along with my snazzy photos below. Also, I press my seams open, but you can do whichever pleases you. 

 
I’m only looking for one block from each member of this hive. However, be warned they are fun to make, and I usually make a bunch at a time. I will take whatever you'd like to send! 

Process photos:
 
I started with a bunch of rainbow-colored batik strips. 


The center red square about 2.5” from the strip (which are 2.5”).

Then an orange piece lined up next to red, cut to length. Then a ruler-free cut down the middle of the orange piece so it’s not too wide. Plus, the wonkiness can go from subtle to exaggerated as you build. 
 
Then the yellow piece, same as orange (yellow piece shown slightly smaller below after sewing, your eyes do not deceive you).

 
Then green piece, turning as you go, same as orange. 


Then blue. 


Then purple. 


Then voila! You have a small block (approx. 4” x 4”)


If you do two rounds you will have the larger size block (up to 9” x 9”)

Here is completed with red in the middle. 


Then completed with purple to start. 


Side by side. 


As shown above, you can leave them as they are, meaning don't worry about them being squared up. 

My end goal is a funky, wonky, rainbow, scrappy, log cabin quilt! And I thank you for all your rainbow goodness in advance. 
 
Thanks for a great year. Cheers! 

Kristin


Hive 3-November Tutorial-Acorn

 I've been thinking of making a fall quilt for some time.  This free pattern of an acorn from Geta Grama, a Romanian pattern maker, hit my inbox at the exact right time.  I plan to expand the quilt with fall leaves.  

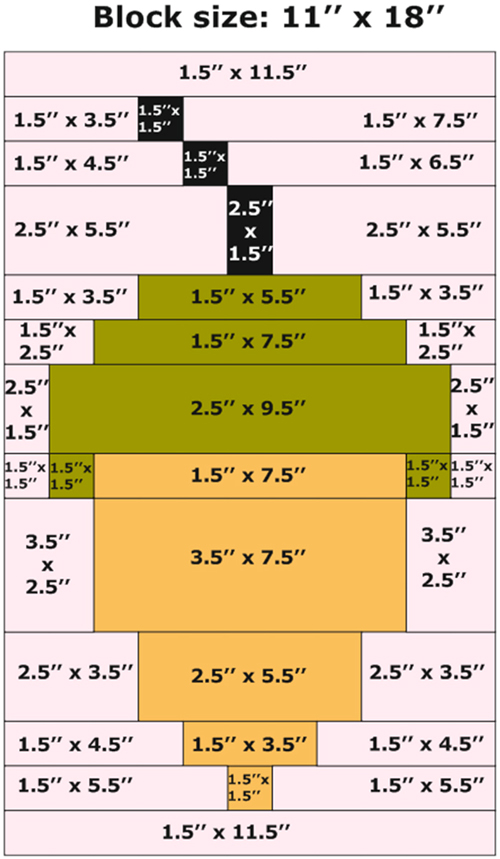
 The block size is 11"x  18" finished.  I like bright colors and used black Kona cotton for the background.  While going through my stash I found some other fabrics that would work well.  The gold metallic fabric would actually make a good top for the acorn---my next one.

Any bright fabrics, including some with green will do, again, the brighter the better...


The pattern for the block is actually a diagram of cutting sizes.  I found it easier to use if I printed it out for reference.  The easiest way to do this is to right click on the diagram and select the print option.  

Please do not press the seams open, but press to whatever side the fabric wants to turn.


 Thanks, and stay safe out there

~Mary Ann Hayre