Monday, December 16, 2024

Hive 1-Book Block for Megan

 This is very, very late and very, very sorry from me. But I finally got it done.


Sunday, December 8, 2024

Sign Up for Stashbee 2025 is Live! Sign up by Dec 20th


Registration for StashBee 2025 is Live!

CLICK HERE to access the sign-up form. 

Registration will be open until December 20th 2024, and Hives will be announced before the new year via email. 
Please share the link with your Quilty Friends and encourage them to sign up too!


New to Stashbee? Read on, to find out more!


What is StashBee?

Stash Bee is an annual modern, international, online quilting bee.  It runs for 11 months (January-November) on multiple platforms including facebook, instagram and on this blog. 

StashBee is open to new and returning members. Stash Bee is international friendly. All hives can expect to have a mix of countries. In the past, the majority of participants have been American, with 1-3 hive members from other countries. Participants are responsible for the cost of mailing blocks to their Hive Mates.
Participants are divided into several hives, each containing 10-11 Hive Mates.  The total number of hives will depend on how many people sign up, so invite your friends! We need 10-11 people per hive, so there may be a wait list if there is an incomplete hive.
Each of the members acts as “Queen Bee” for one month. Before their month arrives, the Queen is responsible for testing out their choice of block and creating a tutorial post on the Stash Bee blog for their Hive Mates to follow. All of the hive members then create the requested block from their own fabric stash, and mails the block to the "Queen Bee".
As "Queen Bee" you specify the block, and the color scheme and type of fabric you would like your hive mates to use (ie. solids, prints, low volume, novelty, florals, tone on tone etc). Since this is a modern bee you  can ask for modern blocks, or a classic block but with modern fabrics. 
By signing up, everyone commits to making 10 blocks over the course of the year (January to November). In exchange, when its your turn as "Queen Bee" you will receive 10 blocks.


Reasons to Join

1) One block a month is an easy commitment!
2) Make new Quilty Friends around the world!
3) Try new blocks and new techniques!
4) Make a dent in your stash!
5) Make a quilt with a great story, and a wonderful diversity of fabric from other people's stash!
6) Have fun!

Rules & Expectations

Please review our Rules and Participant Roles & Expectations before signing up. 


If you have additional questions you can email me at the StashBee email:  Stashbee.blog@gmail.com


During the sign-up process, you will be asked what platform you would like to use (facebook, instagram, or the blog). Hives will be assigned based firstly on platform preference, then skill and design/fabric style preferences will also be taken into account. Anyone not assigned to a hive will be placed on the waiting list in the order that they signed up.

One more thing...

Follow our StashBee Instagram profile, and tag us in your StashBee makes!


@StashBee.blog


Tuesday, December 3, 2024

Hive 1 Book Block for Megan

 Sorry I missed the deadline. I put too many things on my plate!  Will mail today.

Chris

Monday, December 2, 2024

Finished Quilt, 2024 - Quarter Log Cabin - Hive 2

 Had the top together for a while, but just got around to quilting it. Did an easy diagonal grid on home machine and walking foot. Happy with the result. Thanks to Hive 2 members!


Saturday, November 30, 2024

Hive 1 Bookcase Block for Megan's Mom

 Hi, Megan,

I hope your mom likes this block I made. You said she liked cats so I embroidered her a marble one. I also top-stitched some pages into some of the books.


This kitty will be there fro you soon.

-Caela


Wednesday, November 27, 2024

Bookcase block for Megan('s Mom)


I've been in love with the idea of a bookcase quilt for as long as I've been quilting, but this is the first time I've actually made a bookcase block! Thanks for the great block idea, Megan. I hope your mother likes it!!

Monday, November 25, 2024

Hive 1: 📕📗📘📙 block for Megan's mom!

Woohoo bookshelf block! These are always fun :)

This is pretty basic, but hopefully Mom will still like it!


Saturday, November 23, 2024

Library Books for Megan


Hello Megan and Mom,
Here are some books to add to your collection.
I added interesting reads on pagodas and the Eiffel Tower😉
Happy Stitching!
Marie


Friday, November 15, 2024

Hive 1: Bookcase for Megan


My bookshelves are always too full and we frequently have to jam things in wherever they can fit, especially library books! So here’s a little taste of that chaos for your mom’s quilt. I hope she has fun building her bookcase!

Monday, November 4, 2024

Hive 1, November Block, Bookcase, for Megan


Hi Megan,

As Reading is one of my oldest hobbies, I did enjoy 'making' books again! Hope your Mum likes them. They'll go on their way to her today.

Happy quilting,
Rita


Sunday, November 3, 2024

Crashing Hive 4 - my town blocks for Ruth

 I've had my eye on this pattern for a while and couldn't resist making a tree and house for Ruth. These were so easy to cut and sew that I'm definitely putting it my To Do pile.


I can't wait to see your finished town Ruth!


Friday, November 1, 2024

Hive 5 - November 2024 Tutorial - 1/4 Log Cabin for Susan

Hello from the rainy Northwest. Winter has come to Vashon, WA, and that makes me want a little more color in my world.

This is my first block exchange, and I've really been enjoying making the blocks we've worked on this year. I look forward to seeing what each of you has done with the blocks you've received.  Another thing I have loved about the process has been getting to know my own stash again and finding bits of fabric I had completely forgotten about!

I went back and forth over which block to request, and finally decided on a 1/4 Log Cabin block. The design is based on the classic log cabin block, starting with a square and building out around it - but you only add 'logs' on two sides of your original square, so that first square ends up being in one corner of the finished block.


The photo below shows the colors I started with, based on a "quilt challenge" from my local quilt guild. Participants each received one color each month for 6 months, and we did NOT know (at the beginning) what any of the future colors would be. In order to get the next month's new color, we had to show at least one block using the previous month's color somewhere in the block. We received the most colorful block (with birds and flowers and swirls) first, so that's the main palette I decided to include in each block somewhere.


Since I didn't know what to expect, I decided to do a really scrappy block, and it's been such a fun process I thought it would work well for this block exchange, and then I'll have more to add to this quilt!

No need to have every log in your cabin be one of those colors - I'm hoping each block will have a bit of one of those colors in it somewhere, but it's more important that the colors in your block blend with or complement those basic colors. The overall look of the squares can be quite scrappy, with the unifying theme between the blocks being that bit of blue aqua/lime/grass/salmon pink range.

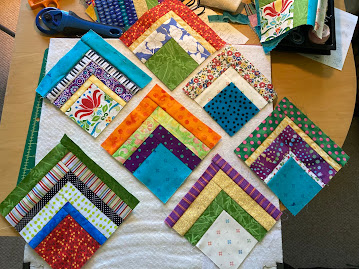
Here are some of the squares I've sewn so far - you can see they're all over the place with color:


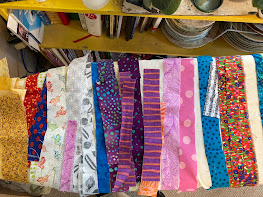
And here are some photos of my scrap strips laid out for picking from as I'm working on new blocks. I'm going with the bright colors, dots, stripes, tone on tone, florals, batik - all OK as long as the fabric is bright and complements at least one of those 5 basic colors. No cartoons, juvenile prints, or logo fabrics, no solids. Other than that, this is an opportunity to use up some scraps and express your wild, playful side.


Please make TWO 6.5" blocks for me. 

Kim Brackett has a good tutorial on making the 1/4 Log Cabin block at her Magnolia Bay Quilts blog here: 1/4 Log Cabin Tutorial.  She explains the "squaring up" process really well too, with annotated photos (which I couldn't quite figure out how to do) so that part might be extra helpful in a way I am not provide below (sigh).  

The biggest difference between her tutorial and the blocks I am requesting is that all the blocks should start with a 3.5" square.

Your log strips that border the two sides of the 3.5" square can be any width strip between 1" - 2.5", your choice.  

Start by cutting a 3.5" square of fabric, and choose a different color for the first log strip you will add.


Build the square by adding a 3.5" long strip on the top side of the block.  Press open the log you just attached, toward the outside. Measure the new length of of the right side and cut your next strip piece (the same width and fabric as your previous piece) long enough to extend along the full length of the right side of your block. 


Add this new strip on the right side of the block. I find the simplest way to do this is to precut my strips the width of the fabric, and then just lay the strip across the side I need to cover and cut the needed length (plus a 1/4" or so, just in case...) and then square it off after each log is added.


Sew that log on, press open toward the outside of the block, and trim any edges that extend beyond the block edge. I neglected to take a photo of this process for the first striped row, so here are photos for the next row on the same block where you can see the places that need trimming.  You can also refer to Kim Brackett's tutorial for good photos on trimming your block too!


And here's a photo of the block so far, ready for one last trim before adding any other rows:


Continue in this manner, adding one strip on the "top", pressing open toward the piece you just sewed on, trimming any extra fabric, adding another strip of the same color on the "right" side of the block, pressing open and trimming until your square is at least 6.5". And then your block is done!  

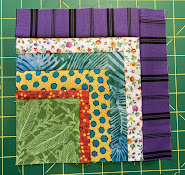
Here are a few more photos of my blocks so far.


I hope you enjoy making these blocks as much as I have. Please let me know if you have questions about any of these instructions. I look forward to seeing all the results of your color play this month!

Happy holidays all.

Susan


Hive 3: November block for Debbie

 Dear fellow Stash Bees,


I have so enjoyed making all your blocks and using up some of my “Stash”. 


For my block, I am excited to have you make me blocks for a summer picnic quilt. 


My inspiration came from a free pattern called Ventanas by Timeless Treasures. I can no longer find it on their website, but had kept a copy for myself ages ago wanting to use it for just this purpose.


It is made from a log cabin variation starting in a corner and building only on 2 sides. .There are several different blocks making the interesting patterns as they are joined.

  I am including 2 different blocks for you to choose from.  You only need to do ONE.  


My colors are red, white/cream, and light, dark or medium blue.  Each block has 6 rounds, so you will need 6 fabrics. A variety of shades and patterns are great.That’s what gives it interest and lets your eyes wander. You can use plain white or cream or evensmall prints with reds and blues.  I wouldn’t mind a patriotic print, but otherwise no novelties. 


Here are 3 different blocks I made. You can see the variety of fabrics.


Here is another sampling of fabrics.


The only difference between the 2 blocks are the size of the strips. The construction is still the same.


Each letter is a different color : A , B, C, D, E, and F. B and B1 are the same fabric , C and C1 are the fabric, and so one. 6 different colors radiating from the corner.

Block A

A     4 3/4 by 2 3/4                        

B    4 3/4 by 2 3/4                        B1    5 by 2 3/4

C    7 by 2 3/4                               C1 7 1/4 by 2 1/4

D    8 3/4 by 2 3/4                        D1     9 1/2 by 2 1/4

E    10 1/2 by 2 3/4                        E1 11 3/4 by 2 1/4

F    12 1/4 by 2 3/4                        F     14 by 2 1/4

Here are all the logs cut out and placed in position.

Sew in order of position : A ( the bottom right corner ) to B, then both pieces to B1, Add C and then C 1, and so forth until you get all the logs in place.


Finished block: should be 14 inches square.


Back of the block: I ironed all the seams towards the outside.


Block B

A     2 3/4 by 1 3/4

B     2 3/4 by 1 3/4                            B1     5 by 3 3/4

C     5 by 2 1/4                                  C1     6 3/4 by 2 1/4

D     6 3/4 by 1 3/4                             D1     8 by 1 3/4

E      8 1/4 by 3                                 E1     10 1/2 by 3

F     10 1/2 by 4                                 F1      14 by 4

Placement after cutting: may appear slightly different from actual block, measurements adjusted.

Sew in order of position : A ( the bottom right corner) to B, then add both pieces to B1, Add C and then C 1, and so forth until you get all the logs in place.

Finished block: 14 inches square


Hive 7 - November 2024 - Circles & Rings

When I signed up for this bee, last year, I knew exactly what I was going to ask for. I had a vision in mind, a mock up and draft instructions saved back. However, I’ve enjoyed everyone’s theme/idea based blocks so much that I started thinking about a theme for my turn. I had pretty much settled on my themed idea when a friend passed away unexpectedly.

Her passing made me rethink everything, I decided I’d wanted to re-frame my quilt to celebration life. My sister turns 40 soon, so I’d like to use my bee blocks to commemorate her 40 orbits around the sun. Symbolized with a bright organic shape against a neutral background.

I'm thinking rings, circles, ovals but am open to your interpretation of an organic shape, circle, ring, orbit, etc. For example I totally think snowballs, dresdens or log cabins would work for this request. And I'm very okay with any method to make this block, be it applique, raw-edge applique, reverse applique, improv, quarter circles, improv stack and whack, inset circle, drunkard's path ... whatever works for you will work for me. I'm good with any size, but share that if you are piecing a circle or ring shape larger diameters are easier.


Colors:

I'm looking for Rainbow Brights (Red, Orange, Yellow, Green, Blue, Indigo, Violet) against Neutrals (White, Gray, Black, Navy). I'd like any solids to read as one color for the most part and solids are welcome. Here are examples of the fabrics that are suitable backgrounds in my thoughts. Please keep the ring or circle colors bright and saturated with a high contrast against the background.


Here are some of my in-progress blocks. 


Tutorials:

Hive 2 - November Tutorial – 9 Patch Block for Jai


Hive 2 Tutorial for November – 9 Patch Block for Jai


Hello, Hive 2! I’m so excited to be the Queen Bee for November, and I can’t wait to see all the amazing blocks you create this month. For this tutorial, we’ll be working on a 9 Patch block.

Fabric Selection and Color Inspiration:

I’m looking for a striking contrast between bright yellows and bold black-and-white prints to give our blocks some real punch. Here’s a quick breakdown:

  • Black on White Prints (A) – Feel free to mix and match 4 different black-on-white prints if you have them, but it’s not required. Please avoid holiday or novelty prints. Florals and small geometric designs are great!
  • Solid Bright Yellow/Gold (B) – Go for vibrant yellows or golds. Yellow on yellow or gold on gold tone-on-tone prints are fine, as long as they read as solid.
  • Solid Black (C) – Black on black prints are welcome, as long as they read solid.
  • White on Black Prints (D) – Again, avoid holiday or novelty prints. Two different prints are preferred but not necessary.

To help inspire your fabric choices, I’ve included a color palette and fabric pull below!

Color Inspiration:


Cutting Instructions:

You'll need 1/4" seam allowance for all seams. Here's the breakdown:

  •  Black on White Prints (A): 
    • Cut four (4) 4 ½” squares (one from each print, or repeat if needed)
  • Solid Bright Yellow/Gold (B): 
    • Cut one (1) 4 ½” square
  • Solid Black (C):
    • Cut two (2) 4 ½” squares
  • White on Black Prints (D):
    • Cut two (2) 4 ½” squares (one from each print or repeat if needed)

 Piecing the Block:

Now for the fun part—let’s piece everything together!

1. Lay out your fabrics for the 9-patch as follows: 

  • Row 1: D - A - C
  • Row 2: A - B - A
  • Row 3: C - A - D


2. Sew each row together using a 1/4" seam allowance:

  • Press the seams outward for rows 1 and 3.
  • Press the seams inward for row 2.


 3. Sew the rows together:

  • Match up the seams and sew row 1 to row 2, and row 3 to row 2.
  • You should end up with a 12 ½”x 12 ½” block

Finished Block:


And that’s it! You’ve created a 9 Patch Block with a bold, graphic look. I can’t wait to see what you come up with—happy quilting!

Warmest stitches, 

Jai