
This Queen Bee block packs a dramatic punch while being super simple to construct and it’s oh so adaptable so everyone to put their own unique spin on it. I've named it "Bridges and Flyovers" because it is similar to the partial log cabin block called "Tunnels" but IMHO this one is so much more!! Take a look at a few of the units I've sewn together. This sample below is the equivalent of eight 12.5” blocks. Awesome right?

There are two units in the quilt block. One is called "Bridges" and the other is called "Flyovers".
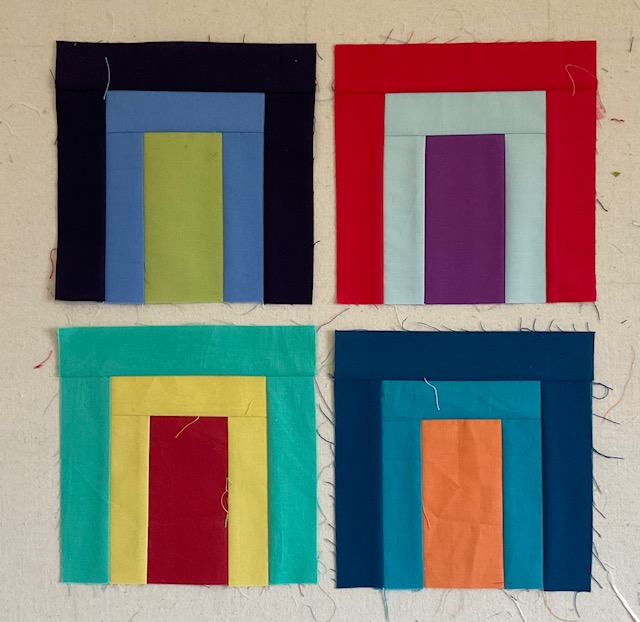
BRIDGES
Each bridge unit is a partial log cabin block. You can choose to make it in any of the following sizes.
4.5" x 6.5" Bridge
For this Bridge, you will need
1) one 2.5” square of any solid fabric,
2) two 1.5 x 2.5" rectangles and one 1.5 x 4.5" rectangle of the same contrasting fabric;
3) two 1.5 x 3.5" rectangles and one 1.5 x 6.5" rectangle of a third contrasting colour.
You all know how to construct a partial log cabin block, but here is how I did it. First, sew a 1.5” x 2.5” rectangle to either side of the 2.5” square . Then sew the 1.5 x 4.5” rectangle to the top.Then sew the remaining rectangles to the sides and top to make the finished unit.

6.5" x 6.5" Bridge
You will need
1) 2.5" x 4.5" rectangle of any solid fabric
2) three 1.5" x 4.5" rectangles of a contrasting fabric
3) two 1.5" x 5.5” rectangles and one 1.5” x 6.5” rectangle of a third contrasting colour.
See above method for sewing everything together to make the 6.5” bridge.
It can be constructed in the following sizes.
6 1/2" x 6 1/2" Flyover
This unit requires
1) a 2.5" square of any solid fabric
2) a 1.5 x 2.5" rectangle of black/white feature fabric
3) two 1.5" x 3.5" rectangles and one 1.5" x 4.5" rectangle of the same contrasting fabric
4) a 1.5" x 4.5" rectangle of black/white feature fabric
5) two 1.5" x 5.5" rectangles and one 1.5" x 6.5" rectangles of a third contrasting fabric.
Alternate 6.5" x 6.5" Flyover
1) a solid 1.5" x 4.5" rectangle and a 1.5" x 4.5" black/white feature fabric.
2) three 1.5" x 4.5" rectangles of a second contrasting fabric.
3) two 1.5" x 5.5" rectangles and one 1.5" x 6.5" rectangle of a third contrasting fabric.
The construction method is the same as before. Start with the Center square or rectangle and sew the strips around it.

6.5” x 8.5” Flyover
I’ve made two versions of this unit also.
Version 1
1) a 2.5” x 5.5” rectangle of any bright solid
2) two 1.5” x 5.5” rectangles and one 1.5” x 4.5” rectangle of a second solid
3) a 1.5” x 4.5” rectangle of the back/white feature fabric
4) two 1.5” x 7.5” rectangles and a 1.5” x 6.5” rectangle of a third bright solid
Sew the 1.5 x 5.5” rectangles to both sides of the 2.5” x 5.5” center rectangle, and the 1.5” x 4.5” rectangle to the top. Then sew the 1.5” x 4.5” black black/white rectangle to the top of the first round. Finally sew the 1.5” x 7.5” rectangles to the sides and add the 1.5” x 6.5” rectangle to the top to complete this Flyover unit.
Alternate 6.5” x 8.5” Flyover
1) a 2.5” x 4.5” rectangle of any bright solid
2) three 1.5” x 4.5” rectangles of a second solid
3) two 1.5” x 4.5” rectangles of different back/white feature fabric
4) two 1.5” x 7.5” rectangles and a 1.5” x 6.5” rectangle of a third bright solid
Sew the 1.5 x 4.5” rectangles to both sides of the 2.5” x 4.5” center rectangle, and the last 1.5” x 4.5” rectangle to the top. Then sew the 1.5” x 4.5” black black/white rectangle together and then sew to the top of the first round. Finally sew the 1.5” x 7.5” rectangles to the sides and add the 1.5” x 6.5” rectangle to the top to complete this Flyover unit.

8.5” x 12.5” unfinished Flyover

4.5” x 7.5” Unfinished Flyover

4.5” x 5.5” unfinished Flyover

12.5” x 12.5” unfinished Flyover

a) one 6.5” Bridge unit; one 6.5” Flyover unit; one 6.5”x 8.5” Flyover unit and one 4.5” x 6.5” Bridge Unit

b) four 6.5” Bridge units

c) Three 6.5” Bridge units and one 6.5” Flyover unit

e) one 8.5” x 12.5” Flyover unit; one 7.5” x 4.5” Flyover unit and one 5.5” x 4.5” Flyover unit

f) one 12.5” x 12.5” Flyover unit.

As you can see, there are multiple combinations (many more than I’ve made samples of) that will end up in a 12.5” unfinished quilt block. Choose one of these, or make up your own. Feel free to mix and match Bridges and Flyovers. Its all good.
As far as colours go....solid fabrics only please.
Please use your stash of bright solids to build the Bridges and Flyovers - white and grey can make an occasional appearance too. Please don't use any solid blacks; otherwise the sky's the limit. Just make sure that there is lots of contrast so the bridges and flyovers really pop.
When building your Flyovers, please make sure the feature strip (black/white) reads as black and white or black with white. Steer clear of fabrics that read mostly white for these inserts. Here are some example feature fabrics that I chose for my test blocks.

All of the blocks are built using 1.5” or 2.5” strips of fabric. The centre is a 2.5” strip or square. For ease of construction I cut one 1.5” x WOF strip and one 2.5” x WOF strip of lotsa different colours and sub-cut into the correct sizes as I went along.
This is such a fun and simple block to sew. I am very eager to see what the finished blocks look like.
No comments:
Post a Comment