

Hello Hive 1 Bees,
This year I would like you to help me sew a ‘sophisticated’ Sofa Quilt for myself.
Last year, after my husband moved out, I bought a lovely second-hand chaise as sofa for my living room. As this is quite an elegant piece (in my opinion), I think, it deserves an equally elegant quilt to go with it.
Below a picture of the sofa, with Dana in front of it, ‘helping’ me baste the ‘Cleveland Ricky’ quilt.

I found the free quilt pattern ‘Enchanted’ by SewCanShe, which I find, would look really classy in black and white.
https://sewcanshe.com/enchanted-free-fat-quarter-friendly-quilt-pattern/


So, I’m following her instructions to sew the block, but will ask you to add the sashing already on two sides.
This will make the completed block (incl. seam allowance) then 16 ½“ by 16 ½“ big. Just the maximum I can ask you to do.
Below the tutorial I’ve put together for one block, but if you want to check out Caroline’s instructions as well, go to the link above.
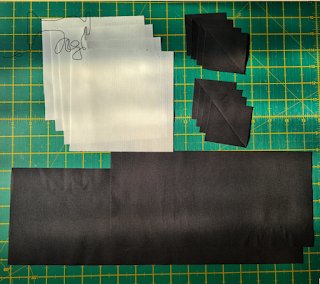
For One Block you will need:
For this quilt I would prefer plain black and plain white fabric.
- White-on-white will be okay.
- If you don’t have any solid black fabric, please go for the one fabric in your stash, which is nearest only black looking.
White Fabric:
- 4 times 6” x 6” square
Black Fabric:
- 8 times 2 ½“ x 2 ½“ square
- One 5 ½“ x 11 ½“ rectangle
- One 5 ½“ x 16 ½“ rectangle

For all steps I am assuming ¼“ seams. All pieces are sewn right sides together.
Step 1 – Snowball Corners
Add 2 black snowball corners to opposite sites of the white squares.
For this you will need the white 6” x 6” squares and the black 2 ½“ x 2 ½“ squares.
Mark diagonal lines on the back of all of the black 2 ½“ x 2 ½“ squares.
Pin two of the black 2 ½“ x 2 ½“ squares right sides facing to one white 6” x 6” square on opposite corners and sew on the marked lines.


Trim the seam allowance to ¼“ on both corners and press the seams open or to the black corner.

Repeat with the remaining 3 white and 6 black squares to make four snowballed squares in total.
Step 2 – Join the Snowballed Squares
Lay out the four snowballed squares like in the diagram / pictures below and sew them together, first into rows, then the two rows into the (part) block.
Pressing the seams open, is the most practical option for this step.


The resulting (part) block should now be 11 ½“ x 11 ½“.
Step 3 – Add the Sashing Strips
Sew the one 5 ½“ x 11 ½“ black rectangle to the right side of the (part) block.
Press the seam open or to the dark side (if you are a Jedi like me…).

Then sew the 5 ½“ x 16 ½“ black rectangle to the bottom of the resulting piece.
See pictures below. Press the seam open or to the side, as you prefer.


The resulting block should now be 16 ½“ x 16 ½“.
Thank you all so much in advance for sewing for me.
If you have a question, just send me an email.
I am looking forward to receiving lots of post this month – for a change!
Happy sewing,
Rita.
No comments:
Post a Comment