Friday, July 19, 2024
Hive 1 July Block
Tuesday, July 9, 2024
Hive 1 - June Changing Squares for Jennifer
Jennifer, I’m SO sorry my post and send off was delayed and I hope that by sending 2 blocks, you’ll allow grace to me!
Can’t wait to see what this quilt will look like once you’re finished.
Chris
Monday, July 8, 2024
Drunkard's Path and crumbs for Leah
Hi Leah,
Here is my contribution to your quilt. I aimed for complementary purple and yellow. Crumbs are crumbs so other colors were added, but I still hope in the end that everything will fit well in you plan!
Happy quilting!
Marie
Tuesday, July 2, 2024
Hive1, July, Crumbs on the Drunkard's Path Block for Leah
Hi Leah,
Great Block for using up scraps!
Easy-peasy Block, they came together quickly and will go on their merry way to you today.
Happy quilting,
Rita
Monday, July 1, 2024
Hive 6 - July tutorial - Old Missouri block
For my July block, I wanted to remake an antique block called Old Missouri. I originally found this pattern in my box of saved patterns from the Kansas City Star. I grew up in Missouri, and I still live here. I have a great love for my state. I want to make a red white and blue quilt.
The Fabrics: You can use solids, patterns, or blenders for any of these fabrics as long as they read red, white, or blue. Kitschy or patriotic fabrics are welcomed.
![]() |
Finished practice block![]() This is the 1932 newspaper template that inspired this block |
- 3 blues: Line them up from darkest to lightest. The darkest for the corner triangles, second darkest for the bars, and lightest for the center piece.
- Red: Any red for the two quarter circles.
- Background: white, white-on-white, or off-white
- Print out the templates I've created and cut them out. I have modified the original pattern to include seam allowances. Once it is printed, check to make sure the templates match the measurements. I realized that I had to download the pdf document to get the right sizes instead of printing from the web. (Note: the measurements I've written of the template reflect the original pattern, without seam allowances)
- Use template piece 1 to cut a 4 1/2 x 4 3/4 a rectangle in the lightest blue for the center piece. You could also just cut this without the template.
- Use template piece 2 to cut a 2 3/4 x 4/14 TWO medium blue bars. You could also just cut this without the template.
- Use template 3 to cut two tringles in the darkest blue, or cut a 4 1/4 x 4 1/4 inch square and cut it on the diagonal.
- Fold your background fabric in half and use template # 4 twice to cut four background arches, two facing each direction.
- Use template piece 5 to cut two red quarter circles.
- Sew two opposite facing background arches together on the short straight seam, right sides together. Then, sew the other two opposite pieces together, right sides together. You will end up with two of these.
- Fold the quarter circles in half and finger press them to find the center. Line up the center of the quarter circle with the center seam of the arch. Using a quarter-inch seam, carefully stitch the arch to the quarter circle. Here is a video you can watch about how to sew this drunkard's path. Repeat for the second drunkard's path. This was my first time sewing curves on a quilt block. Mine practice block is not perfect, so I am not expecting perfect blocks from you guys either.
- Next sew the two medium blues (pieces # 2) on to both sides of the center piece (piece #1). Press toward the darker blues. Press toward the red.
- Find the center of both dark blue triangles by folding them in half. Align this crease with the center of the medium blue bar stitch a triangle onto both medium blue bars. Your path now has light center (piece 1), bookended by two medium blue bars (pieces 2). These are bookended by two dark blue triangles (pieces three) that form the corners of the block. Press toward the darker blues.
- Sew one drunkards path on to both sides of the path. I pressed to the white to reduce bulk. You can press toward the blues.
Hive 1 July Tutorial: Crumbs on the Drunkard's Path for Leah
Start with one 10.5" square of solid fabric (or print! But one solid piece.) A second 10.5" square should be a crumb block, an orphan block, or if you don't want to bother with crumbs, just a busy print that contrasts with the other block's calmer color/print. I'm happy with any color, as long as the two squares contrast. Please keep the most prevalent colors in one square on the opposite side of the color wheel from the most prevalent colors in the second square. I'd like them to be complementary colors as demonstrated on this color wheel image, or near to complimentary.
Hive 3 July Tutorial - Log Cabin(ish) for Emily
This is a little different than a traditional Log Cabin. The “traditional” one would have you start with a light square next to the center. This one has you start with a dark square next to the center. It gives it a slightly different look.
For this block you will need 2 1/2" strips or scraps in varying lengths.
Fabric requirements:
Note: Please no holiday*, word fabrics or glitter
* Holiday exception would be Halloween. Use whatever bat, skulls, rats, spiders, and witches you like but please no words (Happy Halloween, boo, scary, etc…)
** If your low volume is light in your stash, please feel free to only use 3 fabrics as in my block example. Otherwise it can be as scrappy as you like.
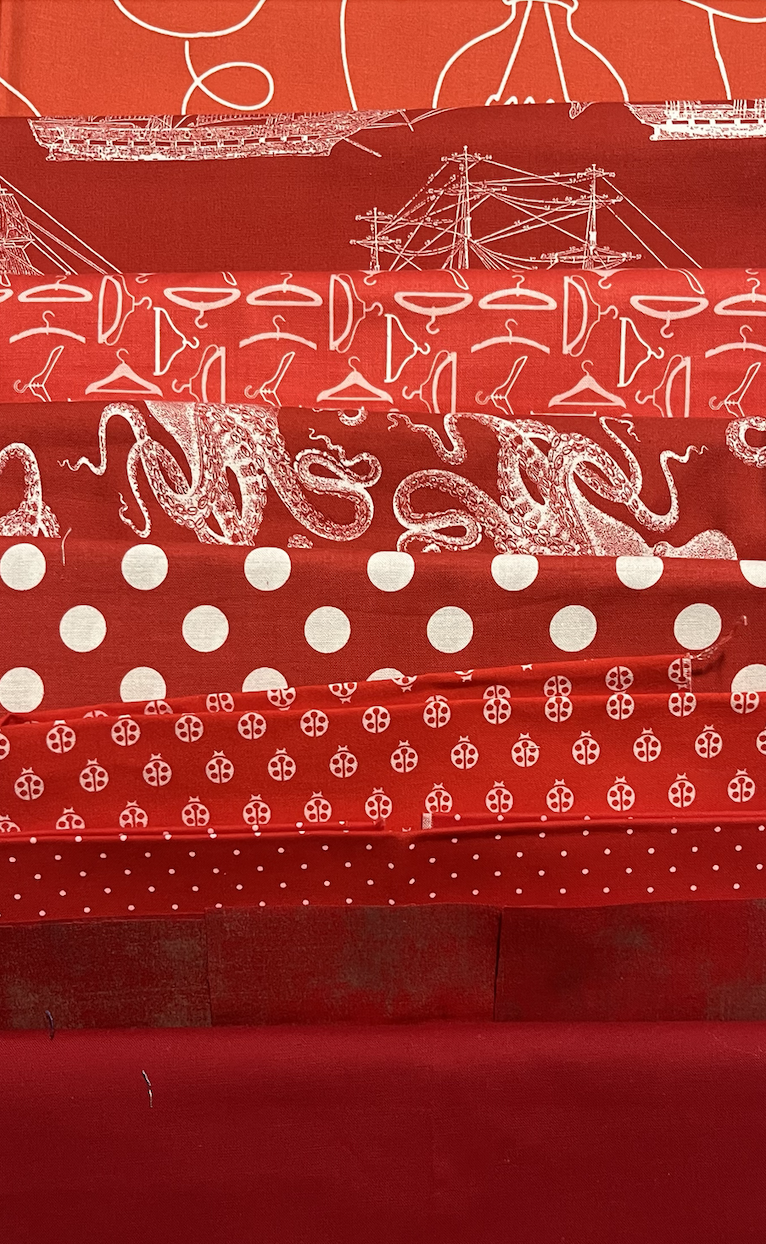
Bright red
It can be solid or it should read as a solid. Here are a few I pulled from what I have.
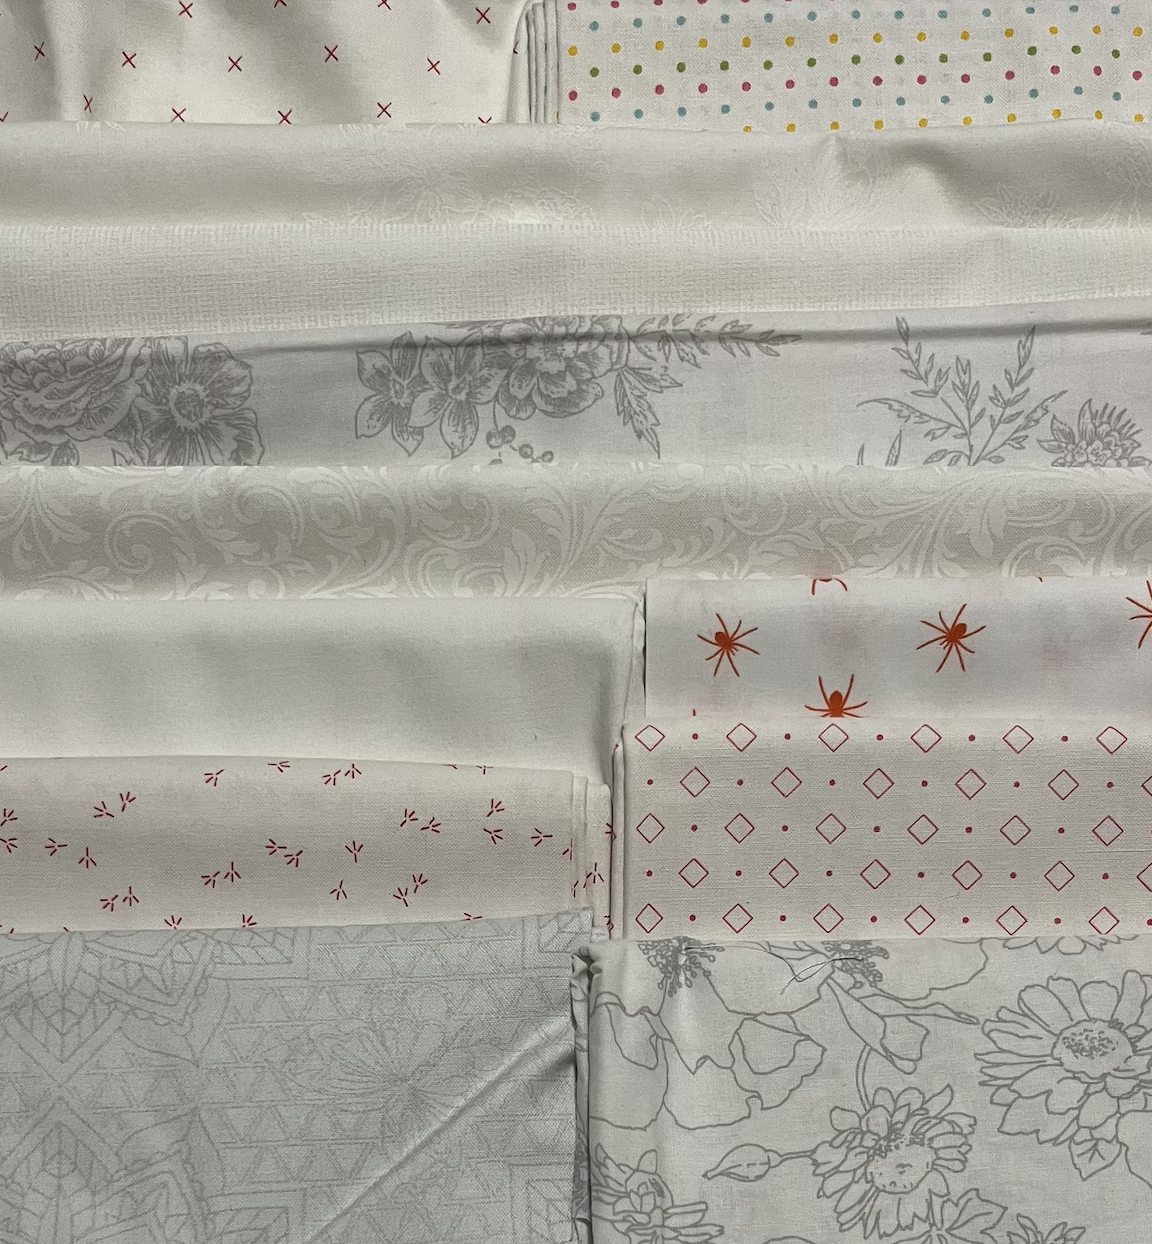
Low Volume
These can be solid white, low volume, or white on white.
Here are a few samples from my stash.
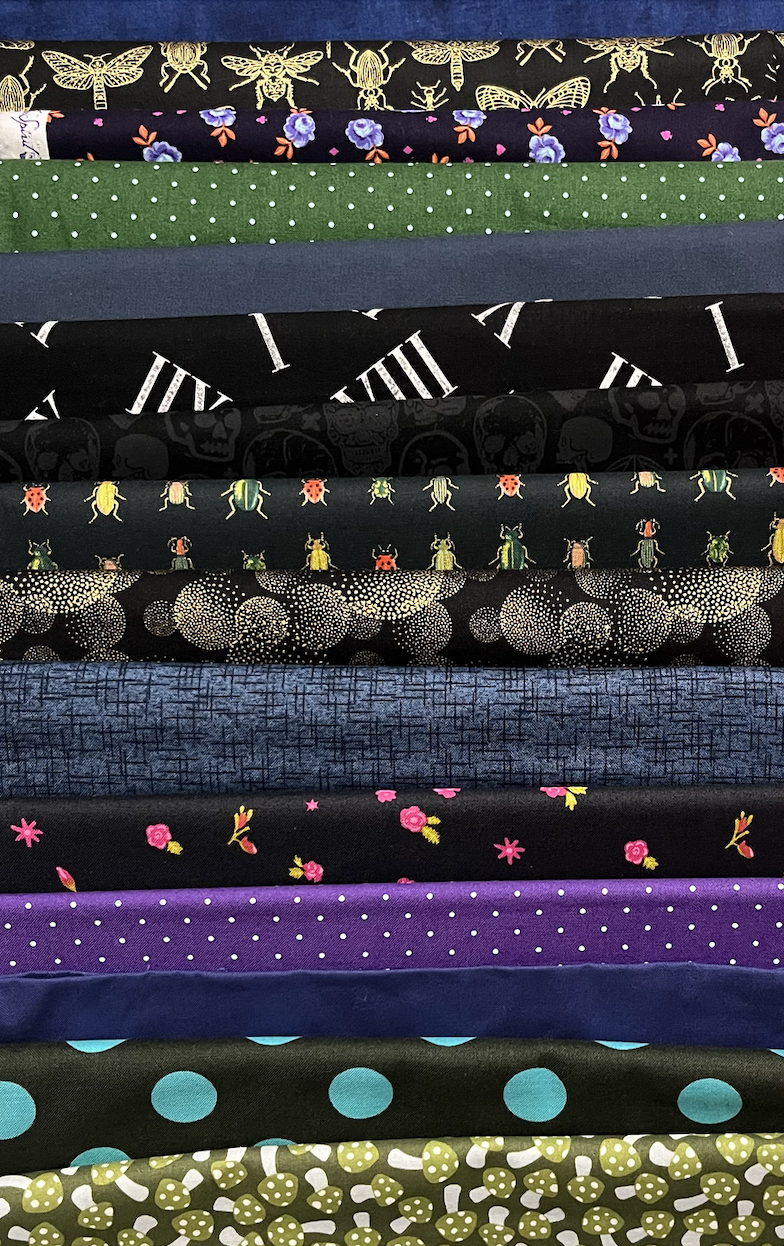
Darks
These can be almost any darks you have in your stash.
Please compare your fabric choices to your red center square to make sure it has a high contrast.
Cutting Directions:
Red
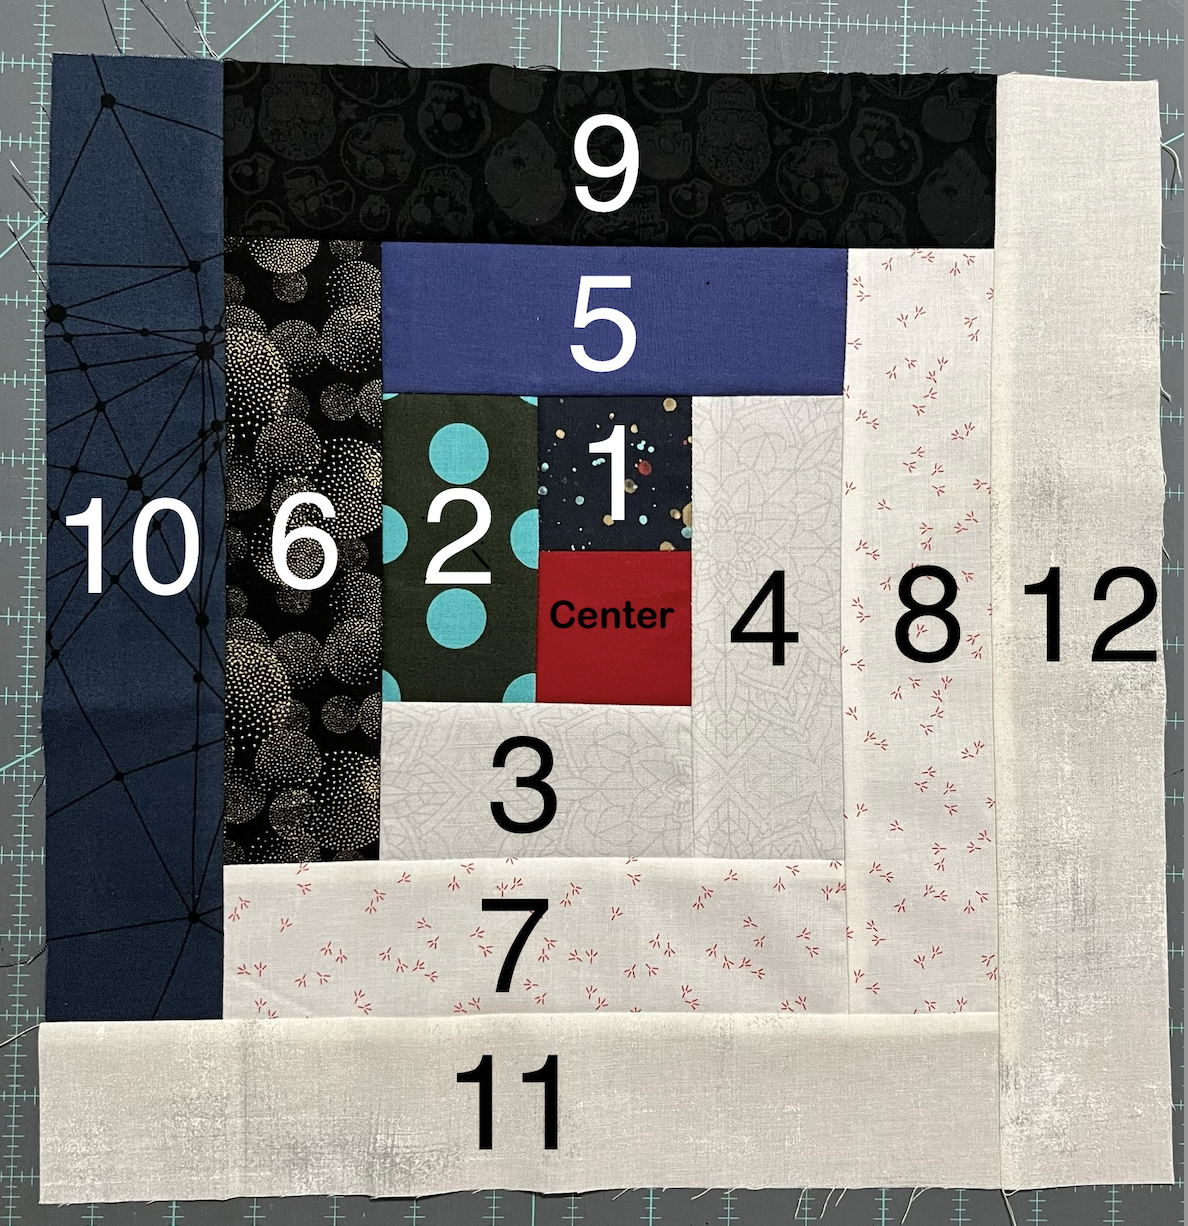
Cut 1 - 2 ½” square (Center)
Dark
1 - 2½” Square (1)
1 - 2½” x 4½” rectangle (2)
1 - 2½” x 6½” rectangle (5)
1 - 2½” x 8½” rectangle (6)
1 - 2½” x 10½” rectangle (9)
1 - 2½” x 12½” rectangle (10)
Low Volume
1 - 2½” x 4½” rectangle (3)
1 - 2½” x 6½” rectangle (4)
1 - 2½” x 8½” rectangle (7)
1 - 2½” x 10½” rectangle (8)
1 - 2½” x 12½” rectangle (11)
1 - 2½” x 14½” rectangle (12)
Assembly
Start with the red 2½” square and the dark 2½” square and sew together.
Turn the block and add the dark 2½” x 4½” rectangle counter clockwise.
Continue adding strips in cutting order as shown in the picture below.
Press seams away from the center.
Block will measure 14½” square.
Hive 7 - July Tutorial - Tree Blocks for Sara
I went back and forth on a few ideas for blocks this month but decided to stick with another choose your own adventure block. A while back I came across Wombat Quilts’ Wonky Tree Forest quilt, and really liked the style and color choices. I’ve since seen other quilts with a similar style and I think it’ll be a great Bee quilt.
Here is the original inspiration:
I am looking for blocks that are 12.5” tall by either 6.5”
or 12.5” wide that contain at least one tree. Trees do not need to take up the
whole height or width of the block but can be surrounded by low volume to make
up the remaining dimensions. For the trees, I am looking for a variety in realistic
shades of green, with brown for the trunks. I would prefer ‘forest’ type trees
– not palms or potted. Press as desired.
Fabric Selection:
Trees: I would prefer solid, blender, or low/medium contrast prints greens or browns to be used. Greens should be used for tree canopies, and brown for tree trunks. In the photo below, the greens to the left work well, while the prints in the greens to the right are too busy to come across as realistic.
Low Volume: Whites, creams, and low value tans are preferred, with light/medium contrast. In the photo below, the fabrics to the left were ones that I used. The ones to the right would be ok in moderation but had darker contrast in the prints so I omitted them.
Since this is a choose your own adventure, I’ve got a couple
tutorial options written but have also linked to several other resources. There
are so many ways to approach this block.
If you need to see larger pictures, either click on them or drag the image to the search bar. If that fails, please let me know!
Tutorial 1: Classic Pine
Cutting Directions
- For the tree branches (green): If using one color, cut one 2.5" x WOF strip, then subcut.
- Cut 1 – 2.5” x 4.5” strip
- Cut 1 – 2.5” x 6.5” strip
- Cut 1 – 2.5” x 8.5” strip
- Cut 1 – 2.5” x 10.5” strip
- For the tree trunk (brown):
- Cut 1 – 2.5” x 2.5” square
- For the background (low volume): If using one color, cut two 2.5" x WOF strip, then subcut.
- Cut 10 – 2.5” x 2.5” square
- Cut 2 – 2.5” x 3.5” strips
- Cut 2 – 2.5” x 1.5” strips
- Cut 2 – 2.5” x 4.5” strips
- Cut 1 – 2.5" x 10.5" strip
- Cut 1 – 2.5" x 12.5" strip
Piecing Directions
- Using eight 2.5” low volume squares, snowball the corners of each green strip. On the first strip, which is the shortest, trim the first seam before doing the second corner. (Pictures 1 & 2)
- On four squares, draw a line from the top right corner to the bottom left corner. On the other four squares, draw a line from the top left corner to the bottom right corner.
- Align each square with the edge of the strips, right sides together. The diagonal lines should be aligned so that they lead to the bottom corner of the strip.
- Sew directly on each line.
- Press as desired.
- Trim the outer excess to leave a ¼” seam.
- Repeat for all green strips.
- Using the background strips, assemble each individual row (Picture 3). Sewn rows will be 10.5” wide and 2.5” tall. Press. I've included a diagram to show which piece goes where below.
- Sew rows together (Picture 4). Trim to 10.5” square. Press.
- Attach the 2.5” x 10.5” low volume strip to any side of the block, resulting in a rectangle that is 10.5” by 12.5” (Picture 5). Press.
- Attach the 2.5” x 12.5” low volume strip to a short edge, resulting in a 12.5” square block (Picture 6). Press.
- Unfinished block should be 12.5" x 12.5".

Fabrics
- For each tree:
- One green square or rectangle (can be pieced)
- One brown rectangle
- Four small low volume remnants
- Low volume for background
Piecing Directions
- Make the tree canopy by snowballing either the corners or edges of the green square or rectangle with low volume fabric. (Pictures 1-5)
- Make the tree trunk by attaching low volume background fabric to either side of the brown rectangle. This rectangle should be the same size or larger than the tree canopy. (Picture 6)
- Sew the tree canopy and tree trunk together. Press. Trim, if desired. (Picture 7)
- Continue to add background fabrics to the square to create an unfinished block 12.5” tall by either 6.5” or 12.5” wide. Press. (Pictures 8-10)
Other Options
There are so many fantastic tree blocks out there! I’ve got
a few different styles linked blow as reference, but this certainly is not a
complete list.
- Wombat Quilts' Wonky Tree Forest Tutorial
- The Sewing Loft's Patchwork Tree
- Scrap Fabric Love's Scrap/Crumb Tree
- Bonjour Quilt's Tree Block for #bushfireblocks
- Other #bushfireblocks are linked on Wollongong MQG's webpage
- Threadbare Creation's Tree Farm - Three Ways
- Daydream of Quilt's Single Tree Block
- Daydream of Quilt's Two Trees Block
Hive 5 July Tutorial for Laura
Hello Bee-mates!
I am so excited to return to Stash Bee in 2024! I believe I participated in Stash Bee for 7 years….first as a hive mate, then as a Hive Mama, then assisted Alana when Diana stepped down in 2019.
I needed a break as well and have been gone for a few years. But it’s so good to be back and creating again!
My color inspiration- rich pinks, oranges and yellows - also white or low volume:


.heic)


.heic)