
What is your name?
Dana
Where do you live?
Currently in the Greater Kansas City Area on the Kansas
side.
Tell us about your
family.
My husband and I have been married for 12 years. We have a toddler and four crazy dogs. Things get a little hectic at our house.
Tell us about how
you got interested in quilting.
About 5 years ago, I wanted to make a t-shirt quilt out
of some old band t-shirts. It looked
like something a beginner could do, so I dove in. I happened to work with a quilter, who was
going to teach another co-worker how to quilt, and she invited me over so that I
had someone who could answer questions and have quilting company. It was all over after that.
How do you
organize your fabric stash?
I use comic book boards as mini-bolts.

For fabric that is too short to wrap, I have
scrap boxes that I sort by color or by project they were used on. These look like they are about to bust—they
are pretty full.

Who is/are your
favorite fabric designers?
I tend to be drawn to bright, colorful Moda fabrics.
What is one thing
you have learned that you wish you knew when you first started quilting?
How much ironing is involved! I had no idea. Although, maybe it’s good that no one told
me, because I may not have started. Now,
I’m in too deep to let the ironing stop me.
What is your
favorite sewing/quilting tool and why should we all go out and buy it?
My 6x24 inch cutting ruler and my rotary cutting
handle. The versatility of the long
cutting ruler has come in handy for many projects. Not only is it long, but it also has angle
markings on it. The rotary cutter handle
is much more comfortable and easy to grip.
I didn’t think it would really matter until I tried one. Now I can’t live without it.

Who is your
favorite fictional character and why?
Growing up, I would have to say Nancy Drew. I liked the mysteries and I liked having a
strong, smart female character as a role model.
I also recently found some Nancy Drew fabric, so of course I had to buy some!
The Mystery at Lilac Inn was one
of my favorite books as a child!

Now, on to the tutorial:
I saw this blog
post on the Moda Bake Shop page and decided that the Simply Woven Quilt would
be fun with lots and lots of bright stash scraps.
Here is the link
to the Moda Tutorial for more information
To make one Simply Woven Quilt block, you will need:
2 light
colored* pieces 4 inches x 8 inches
2.5
inch wide strips in bright bold colors** cut into
1
strip—8 inch length
2
strips—9.5 inch length
2
strips—11 inch length
1
strip—12.5 inch length

*Your light colored fabric can be white, cream, beige, light
gray, white on white pattern…you get the idea.
For my sample blocks, I used a marbled cream fabric and a white on white
fabric. Lighter and toned down is
better, but since the goal is to use our stashes, I don’t want anyone to have
to go out and buy something, so use what you’ve got!
**The strips can be solid or patterns, single color or
multi-color. Please just try to avoid
pastels.
Step 1
Sew the light colored pieces to the long edges of the 2.5
x 8 inch strip and press seams open***

***I usually don’t care too much about which direction
the seams are pressed. However, it is
much easier with all the cutting and re-sewing that is part of this block if
the seams are pressed open.
Step 2
Rotate the piece so the strip you just sewed is
horizontal. Make a cut in half
vertically. You should have 2 pieces
that are 9.5 x 4 inches

Step 3
Take one of your 9.5 inch strips and sew the above pieces
to the long edges. Press seams open.

Step 4
Rotate so that the piece you just added is
horizontal. Cut a 1.5 inch strip off of
the left side.

Step 5
Take your remaining 9.5 inch strip and sew the above
pieces to the long edges. Press seams
open.

Step 6
Rotate so the strip you just added is horizontal at the
bottom of your block. Cut a 1.5 inch
strip off of the left side.

Step 7
Take one of your 11 inch strips and sew the above pieces
to the long edges of the strip. Press
seams open.

Step 8
Rotate so that the strip you just added is horizontal at
the bottom of your block. Cut a 1.5 inch
strip off of the left side.
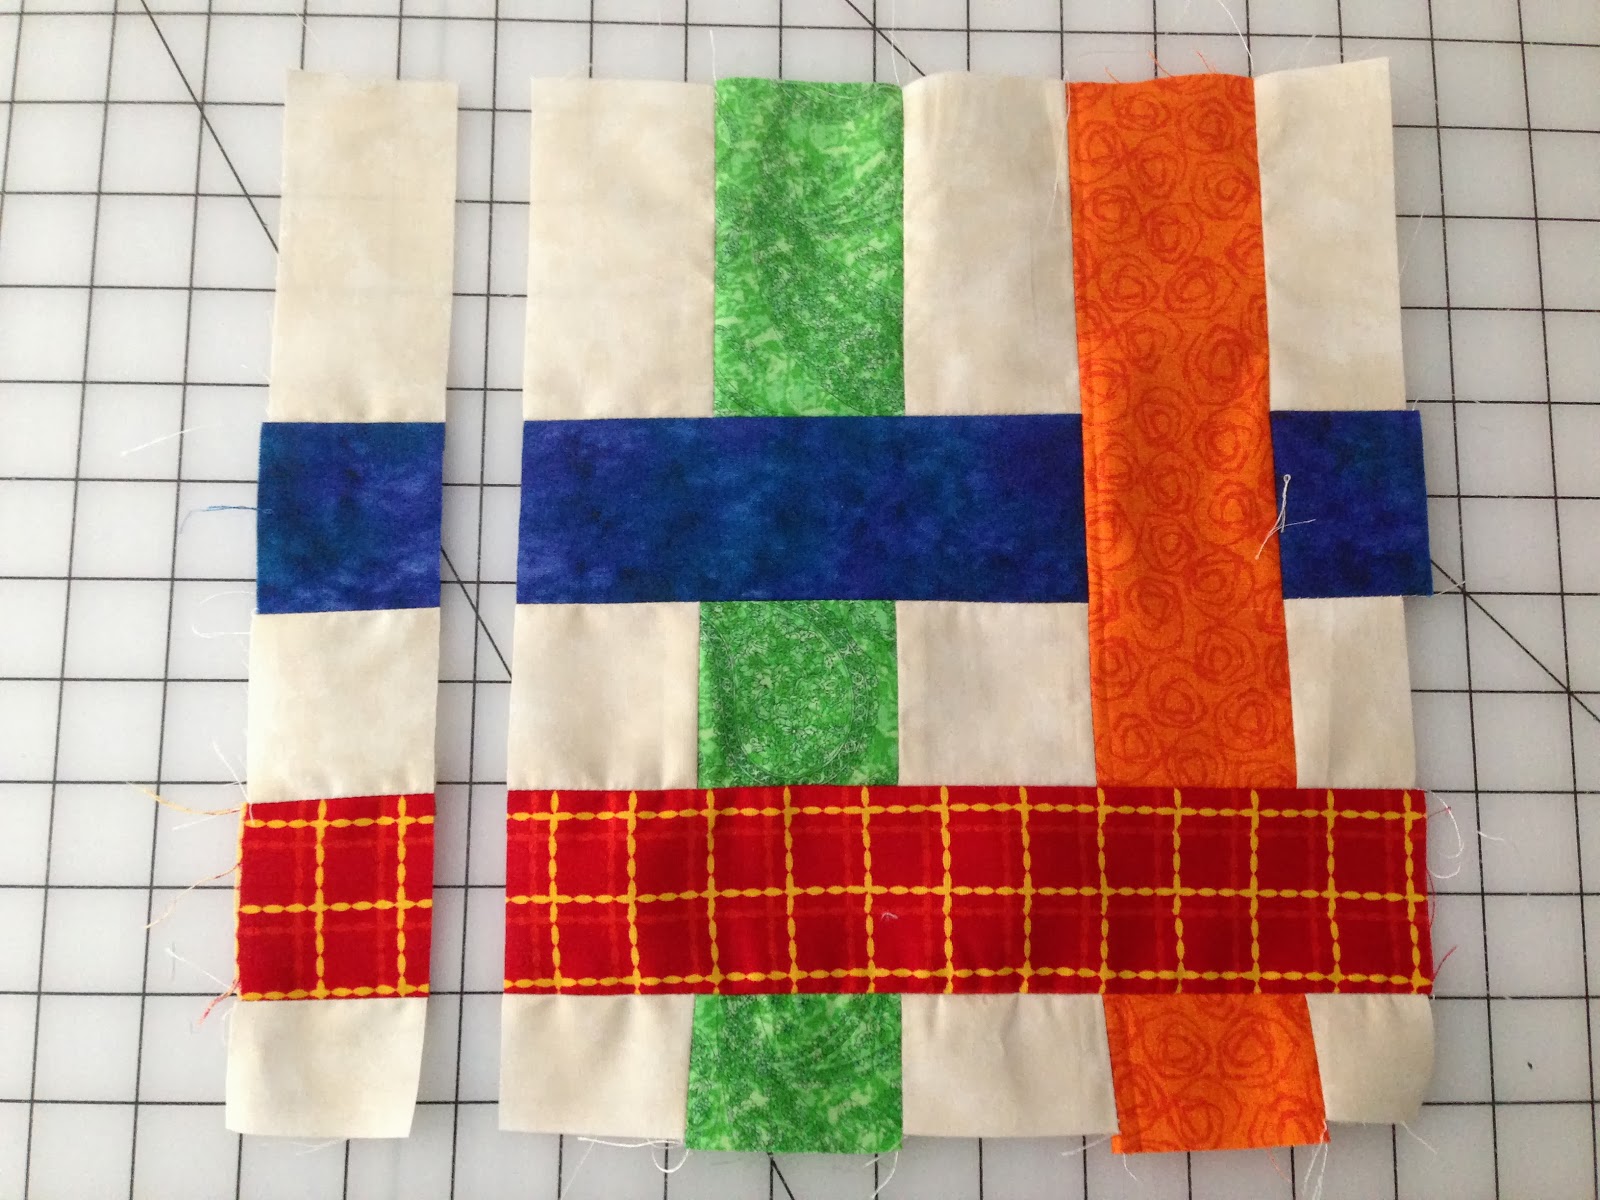
Step 9
Take your remaining 11 inch strip and sew the above
pieces to the long edges of the strip.
Press seams open.

Step 10
Rotate so that the piece you just added is at the bottom
of your block. Cut a 1.5 inch strip off
of the left side.

Step 11
Take your 12 inch strip and sew the above pieces to the
long edges of the strip. Press seams
open.

You should now have a 12.5 inch block that looks
awesome!
Mine actually came out to just over 12 inches, so as long
as yours are somewhere between 12-12.5 inches, then that’s ok. I guess my seam allowances are a bit
generous! I would like for the blocks
to be at least 12 inches though. If you
want to send more than 1 block, I’m totally ok with that too! They look complicated, but are actually
pretty easy to make.
Here are a few others I made:


Enjoy!
Dana
1 comment:
Can't wait to start this one! :)
Post a Comment