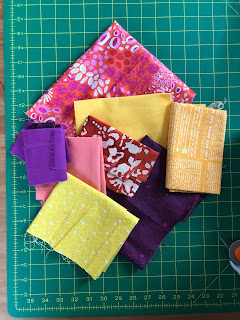
Hi Julia,
This block was great fun, and I love the colour selection you asked for!
Ill be sending this block in the mail on Monday. Hope you enjoy! :)
Kathrin

Hi Julia,
This block was great fun, and I love the colour selection you asked for!
Ill be sending this block in the mail on Monday. Hope you enjoy! :)
Kathrin

Sorry this posting is late (compared to when I put the block in the mail)! This was such a fun project and a great excuse to go through all my strip-scraps to pick out the lovely bright colors. Can't wait to see it altogether!
Enjoy!
Julia D.

I hope I was not too wild in my selection of bright fabric and that this block will come together nicely with the other bees' blocks for your quilt.😄
Happy quilting!
Marie

These were very fun bright colors! I hope this block will work out for you! I'll drop this in the mail today so it should be there soon. Can't wait to see the final quilt :)
- Nicole

Hi Julia,
Hope my fabric choices for your block, is what you are looking for. This was fun to put together!
Unfortunately, it's too late to get it to the post office today. Posting rules to the US have changed and I need now a post-printed customs declaration for sending the blocks. It will probably be next Saturday, that I get the chance to post it to you.
Looking forward to seeing the quilt you are making with this. I love the colour combo. Purple is my least favourite colour, but after seeing this, I might throw it in more often! ;)
Happy sewing, stay safe,
Rita
I confess that with quilting, I seem to gravitate toward easy blocks, that when put together, look far more complicated. After spending waaay too much time perusing Pinterest and other quilting sites, I came across a free pattern from Kitchen Table Quilting. See: kitchentablequiltingblogspot.com The scrap quit tutorial is called "Plaid-ish," which I love.
This is a nice and quick block, because if you are like me, I feel squeezed this month for time--planning a garden, spring cleaning, maple syrup season, and prepping for my retirement in May. It is a bit crazy here.
For this block, we will need fabrics with a dark value, mid value and light value:
Here is my fabric selection:

From the dark fabric, cut 4 5" squares.
From the medium fabric, cut 4 rectangles measuring 1.5" x 5"
From the light Fabric, cut 1, 1-1/2" square
Here are my cut pieces:

Sew together in rows as follows:

For the 5" squares, press toward the darks, but if you want to nest when sewing together, press the mediums to the light for the middle piece.
Sew together.
Done! It should measure 10.5" x 10.5"
These blocks will be used in a quilt I am making for my brother, Bob.
 |
| Broken Frame - Practice block, alternate color way |

Fabric
You’ll need three colors for this block: light blue, medium to dark blue, and light to medium gray.
I like tone on tones and modern prints. I would prefer no batiks, solids, or licensed character/novelty/children’s prints. If your patterned fabric has white, gray, black, or blue in it, that’s alright, as long as the fabric still reads as the main color. Please try to stay away from multi-color prints.
Here’s my fabric pull:
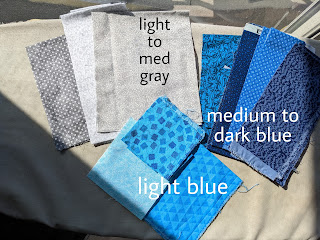 |
I could only get so much natural light and couldn't get around the shadow :( |
Light blue can range to aqua, but don’t use anything too green. Medium to dark blue can be royal, navy, cerulean, sapphire, etc. I feel like I didn't have a great variety of blues in my stash, so if you have any questions, feel free to ask! I like to use the four-at-a-time flying geese method, so those pieces end up being the same fabric, but feel free to get as scrappy as you want! I’d love a variety of fabrics.
Cutting

To create this block (or rather the components of the block), you’ll need to cut the following:
4 - 5.5” gray squares
1- 5.5” medium to dark blue square
1 - 6.5” gray square*
1 - 6.5” light blue square*
4 - 3.5” gray squares*
4 - 3.5” light blue squares*
*I use Melanie Ham’s four-at-a-time flying geese tutorial, which is where I got the measurements for the flying geese pieces. If you prefer a different method of creating flying geese, the starred pieces are the ones you would substitute for your own method’s measurements.
https://melaniekham.com/no-waste-flying-geese/
Assembly
As mentioned above, here is the tutorial I like to use for four-at-a-time flying geese:
https://melaniekham.com/no-waste-flying-geese/
*There is a video at the bottom of the post if you prefer watching instead of reading :)
Of course, feel welcome to use whatever method you like best!
You'll make 4 gray-center geese and 4 blue-center geese:

Then, you’ll piece the flying geese together into four "arrow" units, the pieces of the frame:

And that’s it! I would like for the block to be sent deconstructed, so there's nothing more to do :) I can’t wait to see all of your beautiful blocks!
-Amy Gatto
I've chosen a zipper quilt block variation for my month. This is inspired by a quilt by Rachel Hayes, which I originally saw on Pinterest. She has since shut down her quilt-specific blog but you can see some quilts at her personal blog here.
Colors:
Bright, true yellows, oranges, pinks/corals, magenta into purple. Please keep these bright and saturated--avoid pastels or anything that reads outside of the color group (so no brown-y oranges, no blue-y purples). Prints, solids, batiks all welcome.
You will also need some black and white fabrics.
Cutting:
Of colored fabrics: cut 16 6.5x2.5 strips.
Of black and white fabrics: cut 16 2.5x2.5 squares.
Optional: replace one colored strip with black and white, and one square with a colored fabric.
Sewing:
Match up each strip with a square to make 8.5x2.5 strip units.
I had an orphan block in the same colors, so that got turned into strips! Feel free to do the same with any of your scraps/orphan blocks, if you want.


Finished block: 14.5 x 14.5
Color scheme: lime green/apple green/grass green (preferably solid) and bright pink or bright purple - solids or small prints as long as it reads bright pink or purple
Cut:
(1) 16.5 x 16.5 lime green block
(1) 16.5 x 16.5 bright pink or bright purple block.

————
Place the blocks on top of each other - both RIGHT SIDES UP. With a solid there is no real right side obviously.
________
Make your four cuts

—————
Take away two of the top and two of the bottom so the colors alternate.

———
Sew together with scant 1/4 inch seam allowance. It’s ok to use a smaller seam allowance since the block is getting trimmed down
Trim down to 14.5” x 14.5” - but I can trim down for you :)
Watch this video for more info.

Hello Hive 3 friends! I am so blessed to again be part of Stashbee (my 4th year). I've love getting to know other quilters through stashbee and IG, I love getting to make new blocks that use techniques I've never tried before, and of course, I love it when it is my turn to be Queen and get blocks in the mail all month long! For this month, I've chosen a deceptively simple "Ocean Waves" block inspired by few quilts I've seen on pinterest or IG (here's one example from Fat Quarter Shop).