July Pineapple Block
There are "Note" paragraphs at the end of the tutorial. I had a chat with Helen and she pointed out to me that this block hovers perilously close to the 90-minute time limit. I admit that, as this is my first Stash Bee experience, I had lost track of that requirement. The Notes refer to ways to possibly reduce or minimize the workload. If you're short on time, go ahead and leave out all of the QSTs or just do the minimum. I only ask that it's not 100% squares.
I did piece a third pineapple today in just over 80 minutes. This included time spent making coffee, winding bobbins. and fielding a busy text convo. I am a speedy piecer with a fast Juki and I rock a bloc-loc/turntable combo that makes trimming go by in a flash. However, my pieces were already cut, whereas the 90 minutes should include cutting time. So. With the caveat "Read All the Instructions Before You Begin the Project," here is my pineapple block.
Thanks for doing this block for me. I have been thinking of a pineapple quilt for a long time. There are many varieties of pineapple blocks in the "Quiltosphere" and they're all pretty cool, since they're, well, Pineapples. This block is composed of 32 scrappy 2˝ squares and finishes at 8˝ x 16˝.
I'm looking for pineapples in a variety of colors. The crowns, though traditionally green, I would like to see in a variety of cool shades: Lime, Green, Jade, Teal, and even Blue. The pineapple bodies can be Fuchsia, Red, Orange, Yellow, Chartreuse, Turquoise, Violet, or Purple. Even Blue if you don't use blue for your crown. The backgrounds I used are low-volume whites with black design elements. However, low-volume fabrics with off-white, light beige, and light gray are also fine. If your design elements are in color rather than in black, no worries. They'll fit right in. You'll notice in my sample fabric pulls that an assortment of fabric types are considered 'acceptable." Though the look I am going for is mainly tonal, there are a couple of times when I used a more 'printy' fabric when its dominant color was correct. I used solids, commercial prints, Grunge, wovens, a hand-dye or two, and batiks to round out the tonal theme. I show a lot of different fabrics to show you a good range, Use as many as you like, or as few. Pretty much anything goes as long as the finished Crown and Body have an overall read as a color. Here are some sample fabric pulls from my scrap bag:

Magenta and Teal
Purple and Lime
Yellow and Green
White with Black Low-volume
Each block needs 32 squares. These will either be plain squares, half-square triangles, or quarter-square triangles. The piecing method I devised for the Pineapple body will produce pineapple blocks with randomly arranged (by you!) squares, HSTs and QSTs. The number of each motif that will appear will vary from block to block and from person to person.
Cutting:
From Crown Fabrics: Cut 7 3-1/2˝ squares. Cut all squares in half diagonally.
From Body Fabrics: Cut 18 3-1/2˝ squares. Set aside between 3-6 squares that will stay squares. Cut the remaining squares in half diagonally.
From Background Fabrics: Cut 7 3-1/2˝ squares. Set aside 2 squares that will stay squares. Cut the remaining squares in half diagonally.
Construction:
Choose 6 Background triangles and 6 Crown triangles.Using one of each, sew them into 6 HST pairs. Set aside.
Choose 4 Background triangles and 4 Body triangles.Using one of each, sew them into 4 HST pairs. Set aside.
Using the remaining Crown triangles, pair them up and sew them into 4 HST pairs. Set aside.
Using the remaining Body triangles, pair them up and sew them into HST pairs. How many? That depends on the number of body squares you removed before cutting the remaining body squares in half. You will have between 12 and 15 HSTs when you are finished sewing. From these HSTs, choose between 3 and 6 that will go on to become QSTs. Set the remaining HSTs aside.
Cut the HSTs you chose in half diagonally, perpendicular to the first diagonal seam.
Arrange your HST halves into pairs and sew them together, forming QSTs.
Add the finished QSTs to the other components you have set aside.
Trim all components to 2-1/2˝ squares.
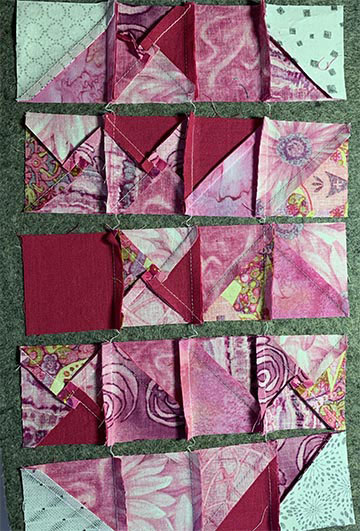
Using the freshly trimmed components, and following the photos below, arrange the crown and background pieces as shown into 3 rows of four squares each. Note the direction of the HSTs is important to convey the look of leaves. Sew the squares into rows and then sew the rows together.
Using the remaining components, arrange your squares, HSTs and QSTs as you like them. Unlike the crown, the direction of the components is unimportant. In fact, I think the less organized they appear, the better. Sew the squares into rows and then sew the rows together.
Once your Crown and Body sections are complete, sew them together (with the crown on top!!). Wow! You're done!
A note about pressing: I don't care how you do it. That said, though I have been pressing open a lot of late, in this case, I pressed everything to one side, I pressed alternating rows to the right then the left, and I pressed all horizontal seams down. But I am happy for you to do your pressing in the manner that makes the most sense to you.
Thanks to all of you, you have made my first foray into StashBee life delightful. I am sorry my schedule made me a "Late-in-the-Day" day late.
The "Notes!"
A note about component selection: You will notice in the Body cutting directions, there are varying amounts for you to choose to make plain squares and QSTs, with the balance ending up as HSTs. Using the higher number of squares and the lesser number of QSTs will minimize your effort, and that is fine with me, even to the point of saying that if you'd prefer using even more squares and fewer QSTs and HSTs, that is also fine. What I mostly would like to see is everyone having a good time.
A note about cutting: I found it simpler to cut all the squares at 3-1/2˝ prior to making my components. It allowed for the most flexibility in making various components shift in number on the fly. I am someone who always cuts a little larger and then trims down to a tidy square, and having squares be a little larger than necessary didn't bother me all all. However, if you prefer, and want to decide ahead of time how many components there will be of which sort, instead of cutting everything at 3-1/2˝, you can cut all squares at 2-1/2˝, and HSTs at 2-7/8˝ (or 3˝ and trim down) and all QSTs at 3-1/4˝ (or 3-1/2˝ and trim down). Your decision.
PS: Due to its scrappy nature, I didn't think speed piecing techniques were appropriate here.
Next up for me: The yellow pineapple!
And it's done!