


Hi Caitlin,
HSTs and myself are not on friendly terms, nonetheless, I managed to get some Friendship Stars out of them. 😁
These blocks go on their way to you today.
Happy sewing,
Rita

HSTs and myself are not on friendly terms, nonetheless, I managed to get some Friendship Stars out of them. 😁
These blocks go on their way to you today.
Happy sewing,
Rita

I hope these blocks work well for you and find their place in your collection of "Friendship Stars"!
Happy Quilting!
Marie
As soon as the hurricane passes and I can get to the post office, these blocks will be on their way to you. Hope you like them!

Abby, I'm (gasp!) also in that other swap group, but I had to sit out economy blocks because the timing wasn't great for me. Thank you for getting me back in! I was regretting missing it, but got to have the fun of learning to make these blocks anyway. They'll go out to you tomorrow.


These were fun to make! I loved searching my stash for whimsy prints. Hope you like them and that your quilt ends up big enough to 'drown in it' 😃.
They are going on their way to you today.
Happy quilting,
Rita
Hi Abby!
Thanks for this fun request for your "extra long" quilt. I did my best to avoid introducing blue fabric, but I failed😂.
Happy Sewing!
Marie

The number of times I have gone back to Christina Cameli’s tutorial on
the double disappearing 9 patch (dd9p) block is embarrassing.
Her Blog ‘A Few Scraps’ is a wealth of great stuff and here is her tutorial
https://www.afewscraps.com/2014/07/double-disappearing-nine-patch-improved.html
her original tutorial really inspired my thoughts on color/background and layout ideas:
https://www.afewscraps.com/2011/08/double-disappearing-nine-patch.html
In 2020, another stashbee participant, Em from @moonlightsewing, did another dd9p tutorial withdifferent dimensions. Hers uses charm squares and ends in a 19.5” finished block
https://stashbee.blogspot.com/search?q=double+disappearing+
This is going to be following The first tutorial for a 10” finished block.
The basics of this block are sewing a nine-patch block from your small squares,
cutting that nine-patch into quarters, adding the large squares to create a new 9 patch.
Then you'll repeat the process of cutting, rotating blocks and sewing.
This makes sense when you see it, I promise.
For the stashbee, I’m going to have you stop after creating just the first disappearing 9 patch block.
From here, I’m going to cut them into quarters to create final blocks. I want to play with mixing and matching
parts of the blocks that you have created!
I’m going to post a whole tutorial so you can have it if you want to make some dd9p in the future for a project of yours!

I love a bright rainbow of colors. Think as ‘Neon’ as you can possibly get- like those packs of highlighters or
‘astrobrights’ paper. If you have solids, great! If not, please try to have the fabric read as color-true as possible:
tone on tone, small prints, blenders. Bonus points if you have really cute little prints that have wild/weird things like starry, tula pink, ruby star or other modern designers.


Background: Low volume brighter whites, light greys
Bright Colors:
Cool Colors- turquoise blue, lime green, purple
Warm Colors- Pink, Magenta, Orange, yellow
Please Do NOT use brown/cream, batiks, patriotic, large prints
Cutting list:
Small Squares 3”x3”
(4) Background/White
(4) Bright Colors for corners
(1)Contrasting Bright Center Color - this will remain paired with your corner colors
Large Squares 4”x4”
(1) Center Color - this will remain paired with your corner and first center colors
(4) Background/White
Make a nine-patch block
Your corners and middle should be your brightly-colored fabric, while the middle pieces will be your white/background fabric

Here's an example with prints and a light grey background instead of white. Please keep your background the same print/color.

Square up your fabric after cutting.
Prepare to cut your nine-patch down the middle both ways
Spread the blocks out, keeping the original middle block at the center.


*****STASHBEE- STOP HERE - DON’T TRIM - Send as is!*****
You’re going to stop here and send me your disappearing nine-patch.
I am going to trim and quarter these to mix and match them up for the final product!
I can't wait to see the fun things that you send out!
Otherwise:
If you are following along to make your own dd9p:
Cut your new nine-patch down the middle in both directions,

rearrange opposing corner blocks by rotating 180 degrees, so your corner blocks now are in the center. Sew this together and you now have your dd9p!


12” finished square- 12.5”with seam allowance
This is based on an image of a block I saw once and have no
idea where and cannot find again since I don’t know what it’s actually called.
This isn’t an original idea, and I would happily give attribution to whomever
did think it up if anyone knows who that is.
Color choices: colors
1 and 2 should contrast though they don’t have to be straight color opposite.
Color 3, where colors 1 and 2 intersect, should also be quite different from 1
and 2. Try not to use directional prints or patterns with words as I will be
turning these different directions when assembling the quilt top.
For colors- think “Obnoxious” and go BRIGHT (does
not have to be light- see examples below) and BOLD and BUSY. Please- Not
pastels & not muted. Prints are ok-
but please no children’s patterns or thematic- they should be generic images
not specific ones. Batiks are ok. Neon is ok, but not exactly what I mean by
bright. There are some examples at the bottom of the instructions.
Fabric needs and cutting:
1.
Color 1-
a.
1 of 6.5” square
b.
4 of 2.5” squares
2.
Color 2-
a.
1 of 6.5” square
b.
4 of 2.5” squares
3.
Color 3-
a.
2 of 2.5” squares
4.
Background- plain black or something that reads
very dark black (I used Kona black, but I’m ok with black on black or dark grey
on black)
a.
16 of 2.5” squares
Sewing:
First the snowball blocks
1.
Need to make a 6.5” snowball for each of color 1
and 2 using black in the corners-
a.
start with the 6.5” color square and 4 of the
2.5” black squares for each of color 1 and color 2.
i.
Draw a diagonal line across the wrong-side of
the black fabric from corner to corner.
ii.
Line up the small black square right sides
together on top of the 6.5” color square in a corner. The diagonal line you
drew should look like it cuts off the corner.
2.
Sew along the diagonal and then trim the comer
off ¼” above/outside the seam you just sewed- actually cut off the corner!
3.
Repeat for all 4 black squares putting one on
top of each corner of the colored square.
4.
Open the black triangles so the center becomes
an octagon with black triangles in the 4 corners- press seams out towards the black.
(instructions and based on https://scissortailquilting.com/quilt-block-library/snowball-quilt-block/)


For each nine patch you need:
2 of 2.5” squares of color 1;
2 of 2.5” squares of color 2;
1 of 2.5” square of color 3; and
4 of 2.5” squares of black;
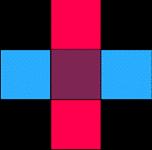
Arrange with the 1 of the color 3 square in the center, the
4 black squares in the outer corners. The squares from colors 1 and 2 should be
on opposite sides of the center block, one going across and one going up and
down. You should have 2 of these nine patches at 6.5” square when you have
finished
Sew: Row 1- Black, Color 1, Black; Row 2-
Color 2, Color 3, Color 2; Row 3- Black, Color 1, Black
For rows 1 and 3 press seams out towards the black, for row
2- press seams in towards middle color 3
Sew the 3 rows together and press seams outwards towards rows
1 & 3.
Assembling the block
Now lay out your snowballs on the top left and bottom right
corners. Put the nine-patches in the other corners- top right and bottom left.
The colors at the edges of the the nine patches should meet the same colors at
the edges of the snowball- if not rotate them until they do. Ideally- it’ll
look like the color is flowing from the pool out through the pipes- see
examples at the end.


Sew them together for final square of 12” finished, 12.5”
with seam allowance

Here is an image of some of the blocks I made in trying to
create these instructions, for inspiration:

Hiya Hive 1! I can't believe it's already September. This year is flying by! You've all pushed us to make such unique and interesting blocks this year, and I've really enjoyed branching out and learning new skills!
I do have a confession to make to y'all. I participated in... another block swap this year. (*cue scandalized gasps*) Please forgive me. I just have a need to swap!
The block I made for the other swap was a 6" (finished) economy block. Between my main swap group, a few side swaps, and all the blocks I made that I couldn't bear to part with, I ended up with about 90 economy blocks.
 |
| This is how they're arranged on my design wall at the moment. I haven't started sewing them together yet. |


