Happy new year! I am starting off the year right with a block I made for our Hivemate Kieran's month last year. Kieran gave us the option to make any star in a certain color palette, and this is one of the stars I chose and ADORED. It is the Spinning Star block designed by Lissa Alexander and featured in Moda's Blockheads 5. For color, you have free rein, just keep it tone-on-tone. Here are a few examples from my pull, and I'll be working mine in purples:
Start with cutting the following:
- Color A: two strips 1 3/4" x 22"
- Color B: two strips 1 3/4" x 22"
- Color C: four 3 3/8" squares, cut in half diagonally, and four 4 3/8" squares, also cut in half diagonally
Take your strips and sew them together along the long edges. Press to your preference.
Trim the left edge of your strip at a 45 degree angle. This will set the angle for the rest of your cuts.
Once you have that edge set, put the three inch line of your ruler on that edge and cut a diamond shaped section.
Repeat for the rest of this strip and do the same thing on your other strip. You should wind up with eight total diamond shaped pieces.
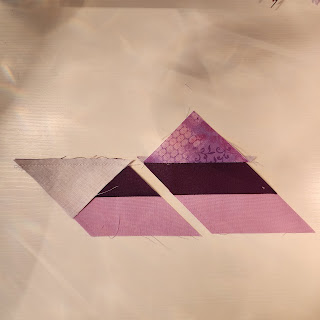
Next, we are going to make FOUR left side units. Take four diamonds and four of your smaller triangle units, and with your diamonds' stripe running horizontally, sew the triangle to the left hand side. (You can check your alignment by making sure the dog ear extends by 1/4" beyond the diamond's edge.) Press to your preference.
Then we will add the larger triangle to the top of this to complete the triangle. Align the triangle at the top, sew, and press to your preference.
Next we will make our right side sections! Take your remaining four diamonds and four smaller diamonds, and this time, we're going to attach the smaller triangle to top of whichever color was on top in the left side units. These units will spiral together, so the color direction matters!
Finally, we will triangle up these units and add the larger triangle to the seamed edge.
Now we're going to start seeing stars! Take a right and a left unit and sew them together along the long edge to make a square.
Next, keep joining your blocks:
Finally, join your two halves, and you have a spinning star block!
This test block was a little wonky, but I used this example so you could see how forgiving the block can be. The alignment can be a little janky but the overall effect is going to be all about color, so don't let it stress you. Thank you all for kicking off the new year right with a quilting project!


No comments:
Post a Comment