
Hello Hive 7 lovelies! I hope spring
has finally arrived for everyone in the Northern Hemisphere!
What is your name?
I'm Sylvia. I blog at http://flyingparrotquilts.com and am
on Flickr and Instagram as flutefishy. This is my first bee and I am having so much fun!

Where do you live?
I currently live in Athens, Georgia, where I am
trying to finish up a PhD in marine science. I will be defending my dissertation at the end of June. After that… if anyone needs an ocean studied, I'll be looking for some oceans to study…
Tell us about your family (Spouse, kids, grandkids, pets, etc.)
I’ve been married to my wonderful husband Adrian for just over two years. We have one cockatiel named Pizzicato. They both help with my quilting: my husband is very patient in fabric stores, and my cockatiel is always available to pull pins out of projects and throw fabric on the floor.


Tell us about how you got interested in quilting.
I learned to sew when I was a kid,
but didn’t do a whole lot with it beyond making the occasional clothes or
costume. But a few years ago, a couple of my friends were into quilting. I’d
never really been exposed to it before, but after looking at some more pictures
online I thought it looked pretty neat and decided to give making a quilt a
try. I didn’t realize how addicting it would be!
 |
| "Morning's Born with the Lights of Love" |
How do you organize your fabric stash? (Picture appreciated)
I’m very fortunate to have the bonus
room in our house as my sewing space. I won’t show you a picture of the whole
thing because it’s eternally messy, but my fabric stash is in wire baskets from
IKEA.
 |
| Yep, there's a drawer for Tula Pink. Don't be fooled though, it's nowhere near full. So sad. |
Who is/are your favorite fabric designers?
I tend to focus more on the patterns
than the designer. If it’s got birds or a marine theme, I must have it! That
said, I fell in love with Tula Pink over her amazing Salt Water line, and I’ve
been buying fabric from her collections ever since. Other lines I've been crushing on lately are Carolyn Friedlander's Botanics, Violet Craft's Waterfront Park, and Sarah Jane's Wee Wander. (The latter two have bird and feather prints… I'm predictable.)
What is one thing you have learned that you wish you knew when
you first started quilting?
How to choose fabrics that I’ll
actually use. It took me a long time to realize what my style was and what fabrics actually make it into quilts, and that no
matter how cheap or how pretty a fabric is, it’s not worth buying it if it’s
just going to sit in my stash. Now I just need to stop falling into the “I
don’t want to cut this one up” trap…
What is your favorite sewing/quilting tool and why should we all
go out and buy it?
I love my Add-A-Quarter and
Add-An-Eighth rulers for paper piecing. I also recently got a Clover ThreadPic. It’s like the world’s tiniest crochet hook, and it is so useful for
helping to bring up your bottom thread as well as retrieving stray threads
after you’ve already sandwiched your quilt top.
Who is your favorite fictional character and why? (Could be from
a book, movie, TV show, etc.)
I don’t really have an all-time favorite character, but since Game of Thrones is back on TV I'll go with Danaerys Targaryen and Jon Snow. All the characters, in the books especially, are really nuanced and so interesting, even when they're not very nice. And so many great female characters!
Okay, on to the block!
I had the hardest time picking a block, but I hope you’ll enjoy
making this one. I’m asking you to make a mini lone star hexie block. This is a
smaller version of the great tutorial by Alia of card table inc.

For the background, please use a navy solid. I used Kona
Navy, but you should use whatever you have--as long as it’s a dark blue it will work just dandy.
Since I’m a scientist, I really like making quilts that convey
some aspect of science. Stars of different temperatures have different colors
(just like flames), and I thought it would be fun to have these blocks reflect
that. So for the actual star, please choose any color from this chart! Go with the “Actual apparent color” column (to avoid the browns) but don’t
worry about the precise colors listed--straight up yellows, oranges, and
reds as in the "Conventional color description" column are fine.
So, your choices would be lighter blues, whites (low volume prints would work great for this), yellow, orange, red, magenta, or even black (grays are fine; one option might be to make the center black/dark grey and the rest a lighter gray so that the star doesn't disappear against the background). Prints, solids, and batiks (there’s one in my block) are all great. The general idea for the layout I’m planning is something like this (the Hertzsprung-Russell diagram if you are interested in that sort of thing):
So, your choices would be lighter blues, whites (low volume prints would work great for this), yellow, orange, red, magenta, or even black (grays are fine; one option might be to make the center black/dark grey and the rest a lighter gray so that the star doesn't disappear against the background). Prints, solids, and batiks (there’s one in my block) are all great. The general idea for the layout I’m planning is something like this (the Hertzsprung-Russell diagram if you are interested in that sort of thing):
 |
| When I was little, I was scared of black holes under my bed. Much more terrifying than monsters. |
Here are some fabrics I pulled to show what might work:
 |
| Counterclockwise from top left, decreasing star temperature! |
Instructions:
Here is how this block will be assembled. We will make 6 units with 4 diamonds each. There will be 3 each of 2 different fabric arrangements.

For the star, you will need 8 strips of fabric, 8” x 2”, in 6 different fabrics. Cut 2 strips from two of the fabrics and one strip from each of the other four fabrics.
 |
| The left two sets will form one set of diamond units, and the right two sets will form the other ones. |
Sew the strips together in sets of 2, but instead of
aligning them like you normally would, shift the top strip up by 1 inch before
sewing:

The strips will look like this:

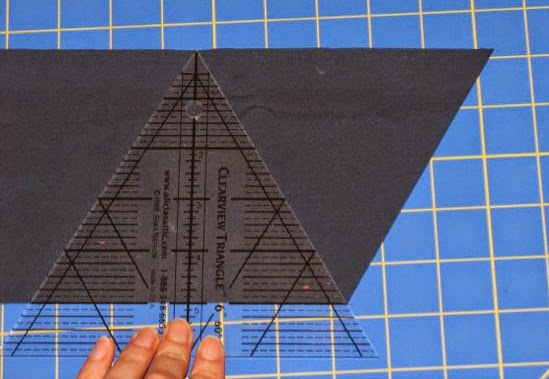
The higher strip should be on the right hand side. Now using the 60 degree line on your ruler, cut the corners
off your first set of strips:

Then, from the edge you just cut, cut 2-inch strips. You'll get 3 units out of each set of strips. You
can keep aligning the 60 degree line with the other edge of the fabric to make
sure you are staying accurate:

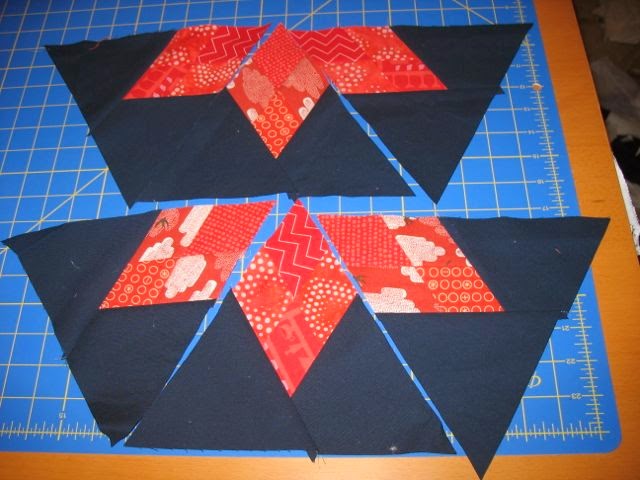
Repeat for all strip sets:
 |
| Those two units on the left weren't arranged correctly. Oops. Repeated patches should be in the same position as on the right. |
The matching fabrics should go
across from each other like this:

Alia suggests cutting off the points of one of your
units for each diamond by lining up the point with the 60 degree line and ¼
inch line, and this is a great idea and really helps later. You'll want to do this on one of the middle (repeated) fabrics.

Now you can use that corner to line up your strips and then
sew them together:

A tip for getting the points to line up perfectly: see how
in this picture, the corner of the top fabric piece is just a little bit to the
left of the hole in my stitch plate?

Logic says it should line up, but I found that if I let it
go just to the left, my points lined up much better. It could just be my
machine, but look, perfect points!

Don’t worry if yours are not like this! I’m not always this
accurate. :)
Decide which way your points will go if you haven't already.

For the background, you will want to cut 12 4” equilateral
triangles. Cut a 4” strip (one full width of fabric strip was more than enough, but if you are using a fat quarter you’ll need 2 strips).
Trim the edge using the 60 degree line on your ruler:

Then cut triangles by using the other 60 degree line:

If you have a handy dandy 60 degree ruler like I do, you can
cut two at once!
You can trim one corner off each of these as well to help
with alignment. Here’s how to do it if you have the same triangle ruler as I
do:

Then line up with the outer edge of one of your diamond
units and sew:

After you do that, trim off the extra corner:

And then add the other triangle:

Then you’ll sew 2 sets of three triangle units together, alternating the different units:
If you press your seams open at this point, it will help to
reduce the bulk at the center. Plus, you can still use the points to help you
align the third triangle in each set:
 |
| Sorry fuzzy photo :( |
Finally, you will sew the two halves together! At this point
I used a few pins to help me keep things lined up:

All done! The finished block should measure just about 7.5" on each edge and 13” across from edge to edge. (Yours will have a little less background than shown here since I cut my outer triangles too big.)
 |
| Proxima Centauri, a main sequence red dwarf star. |
Thank you ladies so much--I can't tell you how excited I am about this quilt! I am so looking forward to seeing what you come
up with, and please let me know if you have any questions or problems!
6 comments:
I'm REALLY excited about this one!!! (Do I say that every month? I feel like I do. But I really am!)
Oh fun!
oooh this one is exciting! love your idea and vision for this quilt! I am off to look for Kona navy for you - hopefully I can get it locally!
Emma, I hate for you to have to buy fabric since this is a stash bee! Any brand is fine, and as long as it's a deep dark blue it will look lovely (e.g. Kona Nightfall, Marine are also dark blue). I'm also happy to just take the diamond units and can add the background on myself--I got a whole bolt of Kona Navy on sale a few months back! :)
That was fun to make! I'll get my photo uploaded and drop it in the mail this week. I went with pale blues. :-)
Awesome, thank you!! I appreciate the even distribution of colors you guys have been making! :)
Post a Comment