
 |
| Quatrefoil Block Example 12" x 12" in Finished Quilt |
 |
| A Quatrefoil Quilt collage created using images of practice blocks I made using the App, Pic Stitch. |
Welcome to my tutorial for July's Hive 5 block! After much bumbling around with ideas for my quilt, I lit upon the Quartrefoil block. There are a few tutorials with variations of this classic block online, but I decided upon this one: http://www.blossomheartquilts.com/2015/09/the-bee-hive-quatrefoil/ , by Clover and Violet (note there is a link for a printable pdf at the end of that tutorial).
Looking for color ideas, I saw this image on Pinterest and fell in love:
 |
| Inspiration Image of a Moroccan styled room. I love these colors! I want to be there right now! |
http://betterdecoratingbible.com/wp-content/uploads/2014/07/moroccan-style-decor-better-decorating-bible-blog-intricate-african-persian-style-carpet-patterns-bone-inlay-chair-exotic-living-room-tw-black-inc-key-west-florida-200903_1000-watermarked.jpg Maybe you can see it better by going to the link!
It did not take me long to hit my stash to pull these possible fabrics.....I love the vibrant, saturated colors, as well as the lighter tints. You may notice that most of these fabrics are "Modern," by the likes of designers from Cotton and Steel, Victoria Findley-Wolfe, Anna Maria Horner, Alison Glass, Lizzie House, and others. Being partial to Modern fabrics, I would ask you to steer away from Batiks and Retro prints, but not be limited by these designers. |
| Fabric Pull from Inspiration Photo |
If you are curious, on Instagram there are a few hashtags you might like to look at to see what some other folks have done recently with this block. I was in the 2015 BeeHive https://www.instagram.com/explore/tags/beehivequilts/ online bee, in Swarm Elizabeth https://www.instagram.com/explore/tags/beehiveswarmelizabeth/. We made the Quatrefoil block last year and I have found some other examples that are terrific: https://www.instagram.com/explore/tags/quatrefoilquilt/
I was quite inspired by https://www.instagram.com/p/BF43Ydwv4TM/?tagged=beehiveswarmmelissa, but wish my quilt to be a little more saturated. Can you tell?
Do not spend too much time looking at these links, or else you might fall into the deep dark Instagram hole and fail to work on my block!
The directions in the linked Clover and Violet tutorial are very clear for the most part, and I will only explain my process and add a few tips and photos. The block is simple, fast and fun!
So, onward; print out or pull up the pdf from the tutorial: http://www.blossomheartquilts.com/wp-content/uploads/2015/09/Quatrefoil-Quilt-Block-Clover-Violet.pdf to follow along and get ready, set, sew! Let's do it! Let us make this block! If you wish to swarm me with several, or hive crash, you just go right ahead.
I thank you for whatever you produce, from the bottom, top and middle of my heart, in advance. And I hope you thank me for introducing you to this addicting, beautiful, fast and easy block. Think strip cutting, chain piecing, power trimming and pressing! The block should end up, unfinished, at 12.5" x 12.5" (12" x 12" in the finished quilt).
I thank you for whatever you produce, from the bottom, top and middle of my heart, in advance. And I hope you thank me for introducing you to this addicting, beautiful, fast and easy block. Think strip cutting, chain piecing, power trimming and pressing! The block should end up, unfinished, at 12.5" x 12.5" (12" x 12" in the finished quilt).
Please read all directions from the beginning to the end and feel free to ask me any questions if need be. To summarize the tutorial linked, 3 block units will be constructed, forming a nine patch block.
These three block units are identified as:
- the petal blocks (4 units)
- the center block (1 unit)
- the corner blocks (4 units)


Fabric and Cutting Guide
Using the images above of the Moroccan Room and/or the Fabric Pull, and my suggestions below, select your fabric!
Fabric A: Main Fabric in Petal Blocks
Please choose a green, blue or turquoise fabric, either with a small print, tone on tone, or not overwhelming print (preferably one that" reads" solid). Do not be afraid to have a little fun and surprise me! Get scrappy, so long as your block reads uniformly in color and/or fussy cut if you wish!
- Cut 4 - 4.5" x 4.5" squares
Fabric B: Contrast Fabric for Center Unit and Corner Units
Select a contrasting or darker valued red, green or blue fabric with a small print (one that "reads" solid) or tone on tone.
- Cut 4 - 2" x 2" squares for the Corner Units
- Cut 2 - 1.5" x 2.5" rectangles for the Center Unit
- Cut 2 - 1.5" x 4.5" rectangles for the Center Unit
Fabric C: Corner Unit Accent and Center Unit Accent Fabric
I will have provided a specific fabric to my bee mates . If it does not arrive, or you are a wonderful Hive Crasher, please use something similar to the sparkly gold of Cotton and Steel's Cotton + Steel Basics Goldilocks Netorious Yardage SKU# 5000-11.
- Cut 5 - 2.5" x 2.5" squares
Fabric D: Background Fabric
I used Moda Bella Solid Bleached White SKU #9900/97
http://storefront.unitednotions.com/storefrontCommerce/itemDetail.do?item-id=42040&order-quantity=1&customer-item=1867.05376&order-uom=&warehouse-id=6&item-number=1867.05376
http://storefront.unitednotions.com/storefrontCommerce/itemDetail.do?item-id=42040&order-quantity=1&customer-item=1867.05376&order-uom=&warehouse-id=6&item-number=1867.05376
Please use a similar white.
- Cut 8 - 2" x 2" squares (for Petal Units)
- Cut 4 - 2" x 3" rectangles (for Corner Units)
- Cut 4 - 3" x 4.5" rectangles (for Corner Units)
 |
| I subcut squares and rectangles from strips of the fabrics. |
 |
| Making sure all the pieces are ready. |
 |
Petal Block
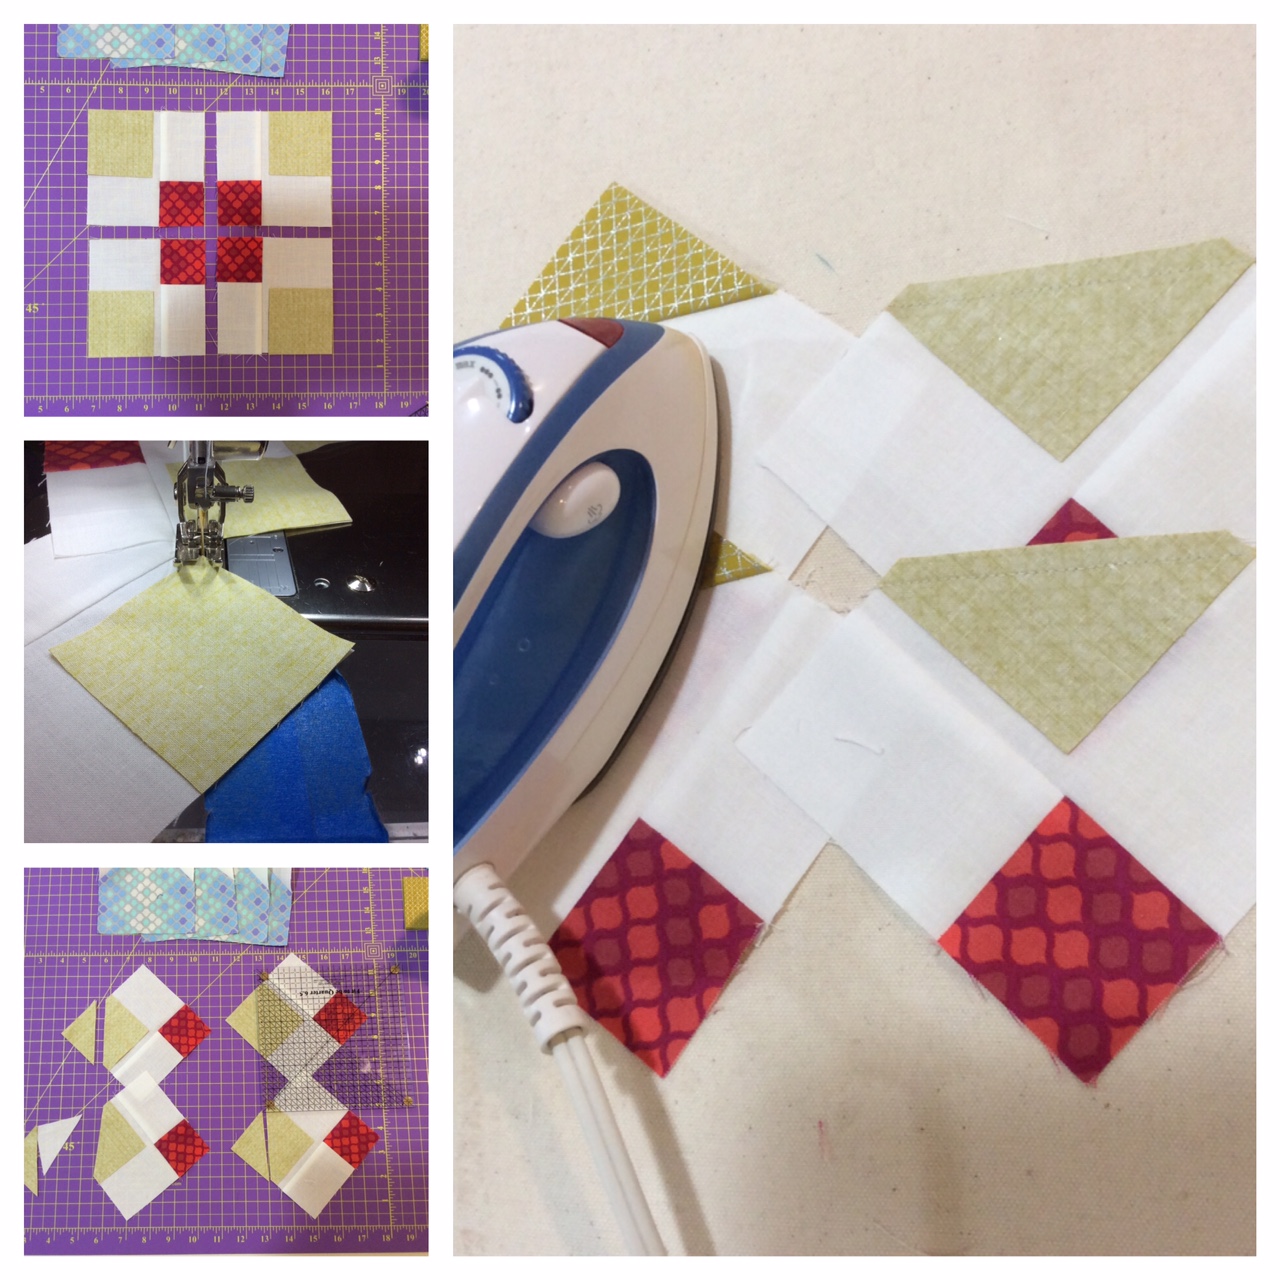
Following the directions from the tutorial, I prepared my Petal Blocks. I chain pieced the square background Fabric D corners onto the Fabric A squares, trimmed 1/4" from the center, as directed and pressed the block.
Set the seams and Press the triangle corner toward the Dark Side (toward the Petal), away from the background, a little tricky, but no big deal. Please do not press any seams open, unless I ask (and herein, I do not).
|
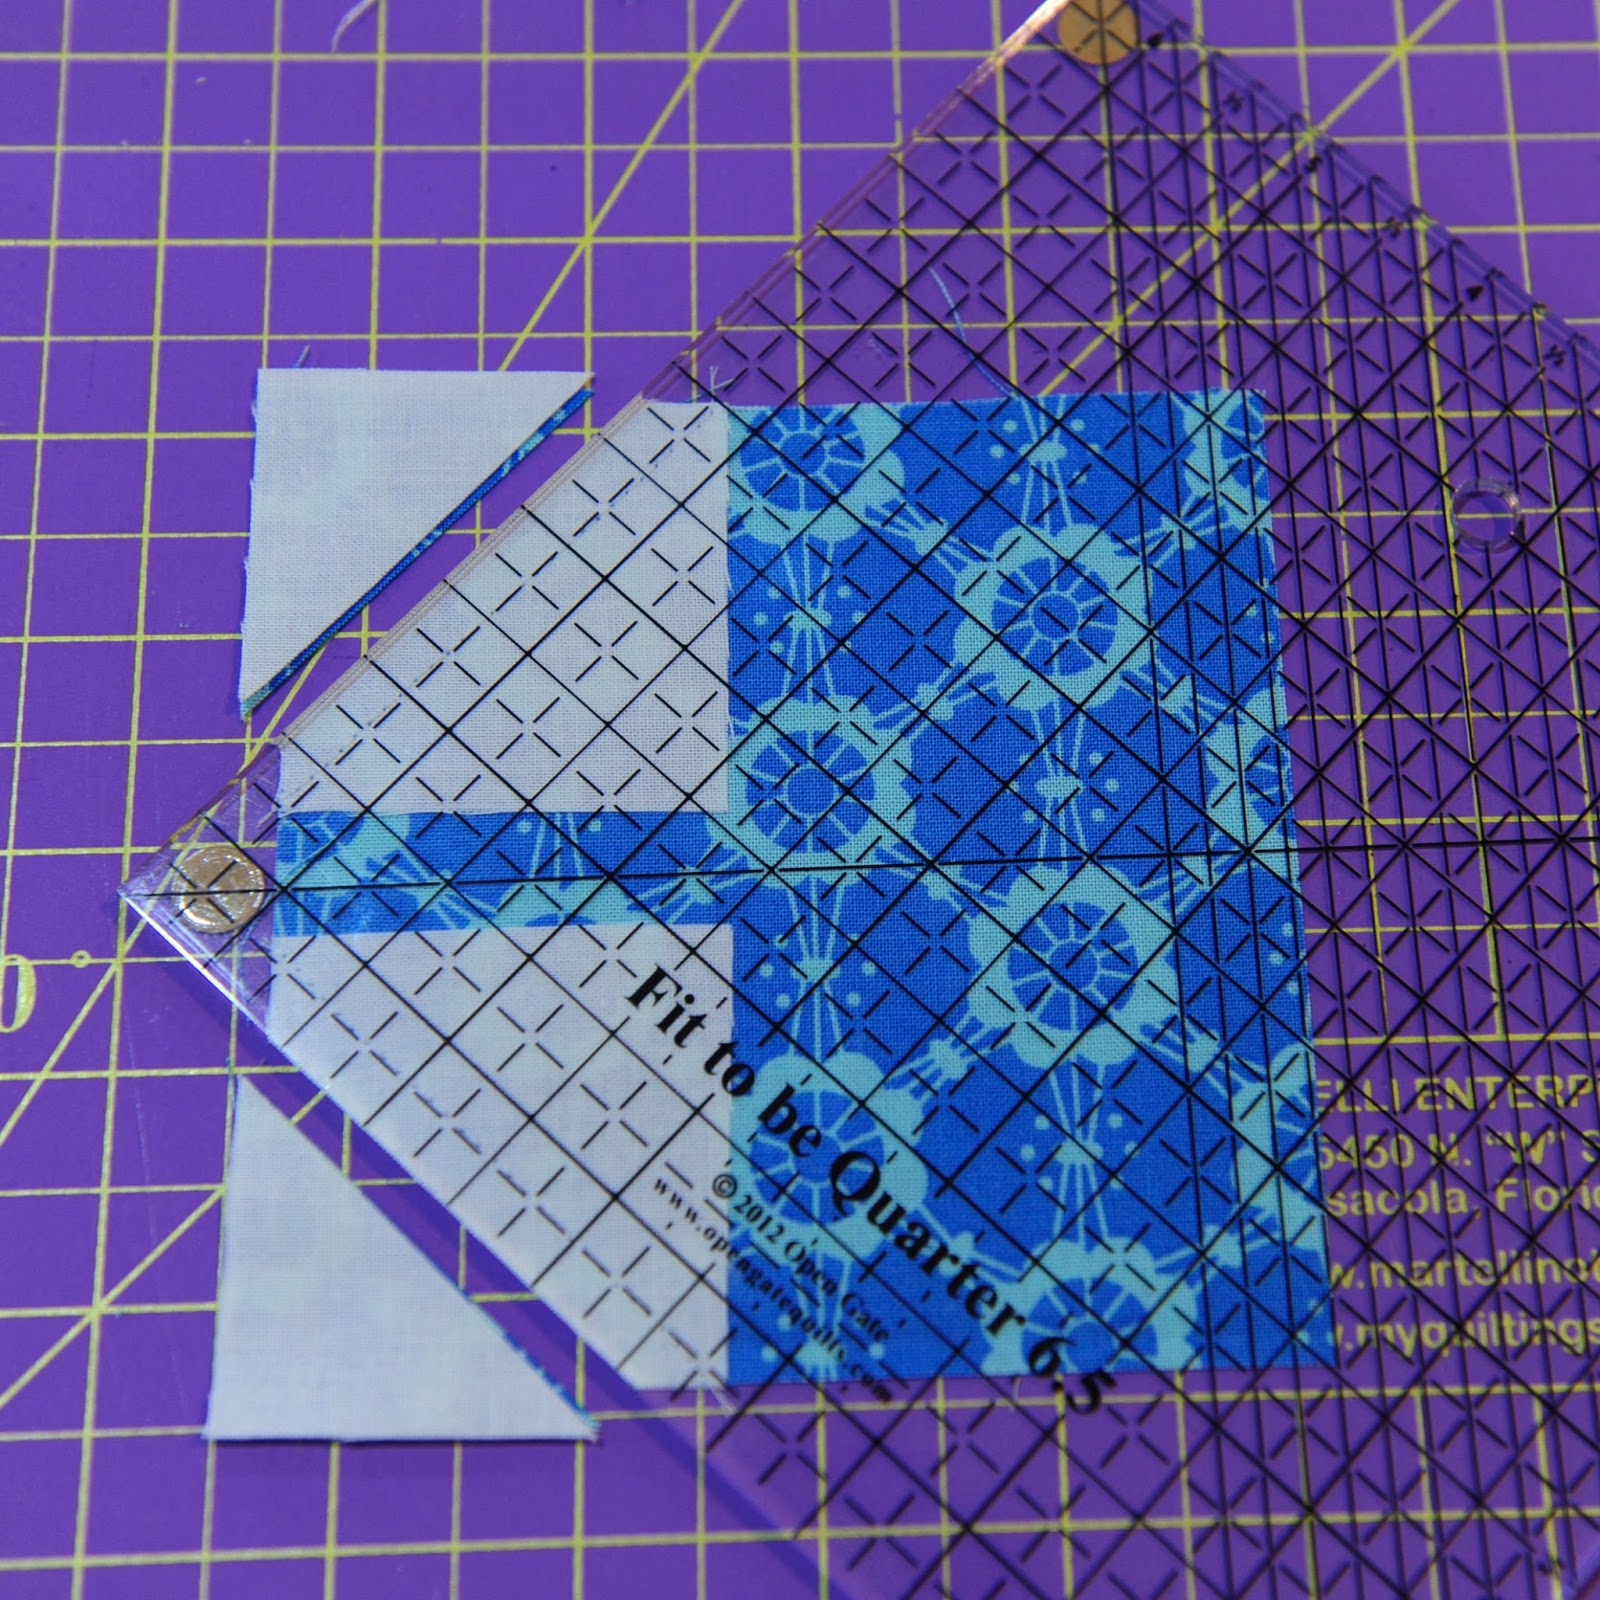 |
Handy Tip 1: I was able to "speed" trim my blocks using my Fit to be Quartered 6.5 Ruler.
It was there and I grabbed it! Works great!
Handy Tip 2: I have heard tale that it is helpful to trim the corners from the block prior to pressing.
I choose to believe this at the moment, but have not tested to prove it true.
|
 |
| Center Block
Following the instructions from the tutorial for the Center Block, using Fabric B and Fabric C, this little center block is a breeze. Set the seam and press the small B rectangles toward The Dark Side. Then add the larger rectangles and do the same! Easy Peasy.
Handy Tip 3: Do you notice the piece of wood near the iron in the image above? It is my "tailor's clapper," which is really a piece of shelving I found left over from a renovation. It is supposed to help you press your seams and blocks nice and flat. But, I just read that you are supposed to use steam and the wood should be unfinished to absorb the steam, so oops! A stack of magazines or books work as well, to absorb the moisture.
|
 |
Corner Block Part 1
Following the instructions in the tutorial to begin the construction of the Corner Block, I chain pieced the Fabric B squares to the small Fabric D background rectangles. Since I want the subunit pieces to line up vertically, I oriented the fabrics as shown above. Two of the larger rectangles should be sewn onto the left of the smaller subunits and the other two sewn on the right of the smaller subunits. Once again, set the seams and press all toward The Dark Side.
|
Construction of the Corner Block Part 2:
 |
Corner Block Part 2
To complete the Corner Blocks, I followed the instructions in the tutorial. I found it much easier to complete the corner blocks by placing the accent corner Fabric C onto the complete base block from Part 1, as shown above (rather than sewing it directly onto the larger background rectangle first, as I was initially tempted). It really helps to keep the orientation correct.
Set the seams and then press the triangle corner toward The Dark Side (the accent fabric in this case).
Handy Tip 4: In the image above, although hard to see, I show how I sew my diagonal corner pieces. I do not usually mark the fabric. Blue painters tape is inline with the center of the needle plate hole on my sewing machine (not touching the feed dogs). This allows me to eyeball my straight sewing line. I also scoot over to the right of my imaginary line about a thread's width. Not shown, the fabric is guided using a stiletto, which keeps everything neat and tidy feeding to the needle. This seems to increase the accuracy of my corner, when unfolded, keeping it square. Hope that makes sense!
|
Building the Block:
 |
Building the Block
Yes! Almost done! Following the instructions in the tutorial, I lined up my sub-blocks into three rows, creating a nine-patch square. When sewing the pieces together, all seams are set and Pressed Toward the Petal Blocks! Taa Daa! If you are as excited as I was, you will immediately swarm and make more of these! It is fun and addicting to see these blocks come together!
|
Another Collage from Blocks I have Made:
 |
| I cannot wait to see the real deal! Totally in love with this! |
Thank you so much for your kindness and care in making my month as July Queen Bee of Hive 5 fantastic!
You Bee-Friends are the best!
As an aside, when you post your block, could you tell me about another interest you have? For example, I recently learned that our Hive 5 beemate, Jane, distills lavender to make essential oil and hydrosol. Cool! Happens to be something I am interested in as well. My still is a small copper alembic still from Portugal. Mostly, it is decorative, as I have only used it once to make rosemary hydrosol. I missed catching the essential oil, as I was not really expecting to get any.
Patty
5 comments:
Hello Patty,
Super clear instructions and I'm so inspired by your fabric choices and colors! I won't have any trouble pulling these rich and saturated colors from my stash for you! I must wait to start your blocks as I'm off to Sisters OR for the Quilter's Affair immediately after the 4th of July weekend with family on Whidbey island which starts today. But soon as I get back I'm on it!!!
Susan
Great color scheme! Looking forward to this one!
Thanks for the generous fabric kit to make these blocks. I have a love affair with saturated colors and had an easy time finding some fun combinations for your blocks. This is a gorgeous block. I am interested in your finish; it will be lovely. With the bees' help, you'll have some fabulous variety.
These blocks are so wonderful. I wonder if Patty posted photos of her finished quilt(s) and, if so, where. Thanks!
Post a Comment