Monday, April 30, 2012

Hive 2 April Blocks Received!

It's April 30th and the mail has come and gone already.

As of today I've received blocks from:
Jackie
Judy
Mary
Rebeckah
Lynne
Rachel
Helen
Laurel
Tara
Dana
Vicki
Camille

And these are the people who have posted their blocks but I haven't received them yet:
Annaliese
Miki

Thank you so much everyone!!! I'll take a picture of my design wall with all the blocks on it tomorrow when I have some good lighting and post the picture here. (Edit: Posted!)


-Stephanie

Edit #2: As of 5/10 I have received blocks from Miki, Lucy, Rachelle, and Amelie.  Thanks ladies!

Edit #3: As of 5/23 I have received them all! 

Gothic Windows blocks

As requested by Colby,here are a couple of photos of the blocks I have received so far.

After several attempts to take the photos outside it became clear that was not going to happen.
It has been pretty windy here the last few days.  Can you see the super cute little ring pincushion
that Tanya( at second chance tan) sent me?  It is just adorable,Thank You I love it :)


As soon as Midas saw me put the little ring pincushion  down he had to come check it out.
Then he tried to run off with it!!  So I had to rescue it before he ran off and hid it!  Which he is
very good at doing.  I still have to find the earring he hid from me,the little rascal :)  Sorry Colby,it
looks like I cut off the siggy block you made me!  (I was snapping the photo in a hurry so that I could
grab Midas before he got away)

Anyway ladies,I am so thrilled with all my windows and am looking forward to receiving the rest
of them :)  Thank You!

Hive #3 - May Block for Nancy D.

Hello May!  Wow, this year is flying by...
The Details:
Needed for one block:
*~* 24-  2-1/2” black, gray and white print fabrics
*~* 2-1/4” block plus enough scraps of the colorful fabric to make the rainbow starburst color of your choice (red, orange, yellow, green, blue, indigo, violet or colors in between)
  1.  I started with six 5” charms – two gray, two black, two whites and two charms with the color for the starburst (purple is my favorite, so I’m using that as my go-by block).  You can use other scraps for the blocks.  I just ask that you have at least six different patterns/color (for variety) and keep the black, white and gray balanced.  You can use solids sprinkled in as well, I just wouldn’t like them to be all solid or too dominant.  The starburst center color needs to match color wise with the starburst points, but doesn’t necessarily need to be exactly the same fabric.
2.  Chop those babies up into 2-1/2” squares and shuffle!  You’ll need all twenty-four of the black, white and gray blocks  and one of the colored blocks for the base of the block.
    3.  Then place them in a five by five pattern.
There are actually three spots you can place the colored starburst 2-1/2” block.  Center, Corner, Side

4.  Now it’s time to make the wonky starburst points.  I’m sure there are some of you that know exactly how to make the wonky points.   But for those who have never made wonky before, I’ll share two different ways with really the only difference being the amount of fabric used to make the point.

        4a.  Option 1 (the frugal fabric saver –> ie have as little waste of fabric as possible = me most the time):
I took one of the 2-1/2” purple blocks that I cut for the middle of the starburst and cut it diagonally so I had two right triangles.  To make them wonky, you want them to be a little off, so lay the first triangle right sides to the square fabric.  Sew ¼” seam along the long side of the triangle (or hypotenuse). {It’s shown roughly as the red dashed line in the picture below} 
Flip it over and iron it flat.  (Sorry, forgot the picture of that step).
Place the second triangle on top of the fabric and repeat, sewing along the long side of triangle and ironing it flat, again, making sure that when it’s flipped over it covers the entire corner. 
After it’s sewn, flip in over and iron flat.  Here is how it turned out:
4b.  Option 2 (a little more waste, but less stress in placement ):
I took one of the other 2-1/2” colored square and laid it on top of the white print.   Sew the ¼” seam (red dashed line), flip it over and press flat: 
Repeat with a second square.   
5.  When both sides are sewn and pressed, flip the block over to the back and trim excess off as shown in the picture with blue dashed lines.  Some people trim the seams at ¼” so there is less bulkiness.  {Kat’s tutorial shows that} I found I like the base square (white print in this case) left intact because it helps me line up the other blocks around it when sewing the rows together.  Either method is fine.

6.  Once all four of the starburst points are sewn, line them up and begin sewing the 2-1/2” blocks together

    6a.  Sew the 2-1/2” squares together into the five rows, then pressed the seams.  
6b.  Sew the five rows together to produce the final block.  Press seams.
And voila – the final product!  It should yield a 10-1/2” x 10-1/2” unfinished block.
You can trim the blocks or leave it to me.  Please use black or gray thread.  I’d love any 2-1/2” or bigger scraps of the fabrics you may have left over – especially the colored ones.  I plan on making a scrappy inside border (shown with the purple dashed lines below).  I really would like a variety of colors, so if you can, please check to see what colors people are posting as they complete and post them so there is a variety.  One block from each member is all that’s required, but if you’d like to make more that would be awesome!  Oh, and small signature blocks are welcome, but not a requirement either.  I’ll use them on the back of the quilt.

I really enjoyed making this block and hope you will too!  Please let me know if you have any questions at all! 

Blessings to you all!
Nancy D. :0)

Hive 3 - Nancy's Block

Hey Everyone, I hate to be the overachiever, but I was really excited to get started on Nancy's block.

Nancy, you did a great job with your first tutorial. I hope you like what I did:)

Hive #1 Block

I made and sent this a couple of weeks ago but I forgot to post it!!

Here is my block for CeLynn:
Stash Bee - April Hive 1
I love the way they are all looking! Please show us a pic of them all together!

April Hive #2 block

I've had this finished for a couple weeks and mailed it at least a week ago, so you probably already have it by now.  I'm just late posting. 

I decided to do a tree house, and I did several things on this block that were new to me-- curved seams, which were pretty easy, and applique using some fusible web.  I also used some of the many decorative stitches my machine has but that I haven't used in the ten years since I bought it-- so thanks for giving me something different to try!

Stash bee Hive #2 May blocks


Stash Bee Hive #2 May blocks for Helen

So, in case you haven't guessed from the photo, this month I'm after wonky stars!

The requirements are as follows:
1. Use Kona Coal as the background colour

2. Use bright, modern, rich colours for the stars themselves, as scrappy or not as you can (if you are in a fix, I'm happy for them to all be one colour but would prefer scrappy :-)

3. Main colours to use are purple, pink, orange, green, blue, yellow - but all rich, bright colours (i.e. not pastels) I've made a mosaic below to give you an idea of what I mean, but don't feel limited to these collections fabric wise.


1.Cocoon Valori Wells 2. Heirloom combo in Amber by Joel Dewberry 3. Joel Dewberry Heirloom Collection 4.Sapphire from Joel Dewberry Heirloom Collection
5.Weekends -by Erin McMorris 6.Free Spirit Anna Maria Horner 7.Free Spirit Anna Maria Horner Loulouthi 8.Art Gallery Fabric - Bespoken Collection by Patricia Bravo
9.LouLouThi Fat Quarter Bundle Anna Marie Horner


4. Please use modern fabrics and avoid batiks

5. You can either make one or two 12.5" stars or any number of smaller stars (of any size) as individuals or sewn together as long as the total surface area comes to 12.5" or bigger. (am I making this as complicated as it sounds!?)


6. If you own Modern Blocks compiled by Susan Woods then Stargazing (above) on page 178 is a perfect pattern for multiple wonky stars in one block. However, I am happy to have them smaller and separate and I'll figure out how to stick them all together later!

7. If you have never made scrappy stars before this;
http://thesillyboodilly.blogspot.co.uk/2009/02/wonky-star-tutorial.html
Is a perfect tutorial for 12.5" stars

If you have any questions, please ask, I feel like I may have made this super complicated! I'm so excited to see these blocks and have a bright night sky quilt!


N.b. when I signed up for stash bee I was worried I might have moved by May so I entered my parents' address on the google doc. I didn't move so have amended it to be my address. it is correct on the google doc now, but just in case you have been super organised and pre printed the address list, please re check and send to the address in Kent :-)

Sunday, April 29, 2012

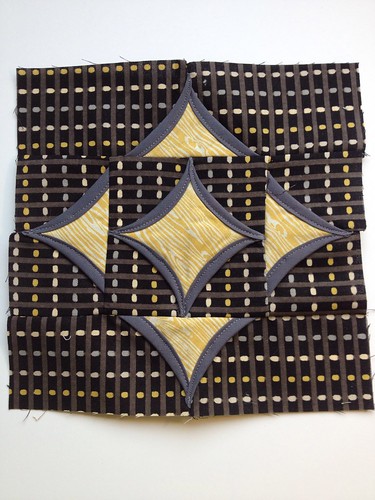
Gothic Windows for CeLynn

I had fun making these blocks.  I didn’t have any yellow/gray/black fabric in my stash, so I got straight away to ordering a few fat quarters on Etsy and laying them out near my sewing machine, and then procrastinating until the very last day to actually get around to sew them…
006
My first two blocks are 1/4 inch off on one end so they are slightly more rectagular, but if you are using sashing, it probably would be easy to include them.  The final outcome actually exceeded my expectations, mostly because I always do things like this, no matter how organized or careful I am.  Seems I am directionally challenged.
004
I had a good laugh about that one!  The yellow circles and daisies are Michael Miller Citron fabrics.  The yellow is kind of garish, so then I used Joel Dewberry Aviary which is a muted gold color.  My favorite blocks uses a fabric from my stash, charcoal washi tiles and a yellow 30’s repro fabric I’ve been stashing hording for years.
007
I hope you like them.  They will be in the mail first thing tomorrow morning.

Hive #4 - May Block

Hello Everyone, my name is Lynn Hurst and I live in Saco, Maine USA.  


Now on to my block:
 Finished Block 8 1/2" 
2 blocks each please 
black, off white, and red scraps
(Please No Solids)
Please use a variety of fabrics- I love scrappy!

Here's the finished block:


Here's how I make half square triangles:
Please feel free to make them using your favorite method.

Finished size is 2 1/2"
I'm starting with a 3 1/2" square which will give me a 2 1/2" finished size. 
First I cut my squares to 3 1/2 inches.

Then on the light squares I draw a diagonal line.


Then put your two pieces of fabric right sides together.
Then I sew a 1/4" on each side of the line.


Then cut on the diagonal line.


Iron the seam over to the dark side or you can iron the seam open.


Then I trim my block to 2 1/2" 


Block out layout

Then start at your top left 
and lay the black & off white square on top of the red & off white square.
 

Sew together


You should now have 4 rows of 4 blocks. 
Iron the rows 


Sew the rows together, be careful to match your seams.
Finished Size 8 1/2"  


Please do not trim down.


Finished block 


Well I hope you enjoy making this block - I can't wait to see them!  

Any questions please email me at ksdesigngirls@gmail.com

I'm so excited - thank you!
LYNN


Friday, April 27, 2012

A House Block for Stephanie


Wouldn't it be fun to live in a windmill in the middle of a field of flowers?  I hope this will find its place with the other wonderful house blocks you have recieved.  It will go in the mail this weekend.

April Hive 1 Block - Gothic Windows

Hello!! Here are my April Blocks for CeLynn. I hope you like them!! I know the tutorial said yellow and black or gray prints but I did not have any. After speaking with Sunnni she said that you didnt mind if they were all gray or blak background. I hope Its ok. I did go to a quilt shop and they did not have any prints in colors you requested.... they did however have a ton of green and black!!

Learning to make these was fun! Vickey

Thursday, April 26, 2012

Hive 1 April gothic windows

I had enough fabric to do one in each colourway, but not two of each.
So without further ado, CeLynn blocks! (pictures are a little wonky due to the blocks being pinned to the outside chair - wind was not cooperating)

April block 1 April block 2

They were a decent amount of fiddly to make, but I rather liked that nifty Flying Geese technique.

Wednesday, April 25, 2012

Hive 1 Block for CeLynn

Here they are!

I hope you like them.
I thought I would like this block.... I did not.
Especially pressing the seams.
Something I need to work on!
-Kristy Lou

April Blocks for Angie

These are the two blocks I have made for Angie - fingers crossed that they fit the bill!  They are now in the post winging their way across the Atlantic.  Pauline.


Tuesday, April 24, 2012

April block for Beth

I finished these a while ago and then they got lost amid my sewing mess.  I've got them ready to send out this week though.  Hope you like them Beth. 

I need some border advice!

Good Morning Hive Mates,

I've put together 12 of my 21 blocks into a Quilts of Valor quilt.  So far, this is what the FIRST quilt top looks like.


Currently this measures 42 x 56 and the minimum size for a QOV quilt is 55 x 65.  I could add two additional borders or just add one large 6.5" - 7" border all around.  WHAT ARE YOUR THOUGHTS?

What COLOR do you think the 2nd border should be?  Red solid, red with stars, white with blue and red, etc. 

If you don't see your block, please don't worry that I didn't use it.  Between my mom and I, we are making the additional 3 blocks so that I have a total of 24 blocks for the 2 quilt tops. 

I so appreciate everyone helping me out....thank you!  I think these quilts are going to look great. 

Thanks in advance for your thoughts on what I should do for a border!

Cindy

Monday, April 23, 2012

hive two---> two houses

This was a real challenge. I've never made my own paper piece design (and maybe the last time I paper pieced I was thirteen), but through much tutorial reading and deliberation, I made you two houses.

The first one is a chicken coop, with a lil embroidery for good measure. I made some fake perspective to enhance the realism ;)  . I need to find some chicken fabric, the lil guy in the door is supposed to be a chicken, but it's more of an pigtailed-owl-chicken.

This is my effort at making a dinosaur-themed bounce house. I think every town needs one.
Have fun with them! Let's do more paper piecing!
see ya,
Laurel

Hive #2 - April Block


Thanks to my mom who did my Bee Block for this month. I'm finally back by my machine and excited to get back to my blocks next month. She did an awesome job creating a house she thought was my style.

Sunday, April 22, 2012

Hive 2 April House Block

I finally finished my house block for Stephanie. It took me forever to decide what I was going to do and I hope Stephanie loves it.  


A close-up...


I used Free Spirit fabrics for the house.  I fussy cut the prints for the house, roof and door.  Overall, I think it turned out pretty good.  

Vicki  

Saturday, April 21, 2012

Hive 4 blocks for Angie

Here are my two blocks for Angie, hope they are ok, will pop them in the post this week.
Caroline

Friday, April 20, 2012

April Bee Blocks

Finished up all my April bee blocks. I'm in both #2 and #3 hives so I waited til both were done to post them.  First is for Stephanie for hive #2. I love all the houses that have been made so far and can't wait to see her finished quilt!  I chose to do a barn with a quilt block on it.   I would LOVE to own a huge red barn! I would put the same star quilt block on it if it was mine. :)  There is one here in my town (without a block on it) that I drive by every day on the way to take care of our horses.  That is what inspired me.


I sketched it out and made it into a paper pieced pattern.  The star turned out at 2 1/2".  I love how it turned out!  I hope you like it Stephanie!!

Second is for Beth for hive #3. These were very simple and a lot of fun to make.  And a first for me.  I have never made chevrons before!  Definitely on my to_do list!! The fabric I used in these are: Summer House by Lily Ashbury for Moda paired with a vintage print from my stash.


Fabrics used in these are: Rodeo by Debbie Mumm for South Sea Imports paired with some Sunkissed by Sweetwater for Moda.


I can't wait to see what is in store for May!


Thursday, April 19, 2012

blocks for Angie-hive 4


Here are my 2 blocks for Angie.  They were so much fun to make!    
I am planning to make a sample of each block in my hive with colors that I luv and that way I can have a Hive 4 sampler quilt!
 (we will see how long that lasts-LOL!)

House for Stephanie! Hive #2

I Finally decided what to do and I completed it today. I am satisfied. I will give it to you on Saturday and the baby shower!