Showing posts with label Hive9. Show all posts

Wednesday, November 1, 2017

Hive 9 Tutorial: November block for Karen

Hi! My name is Karen but I am also known as Tu-Na in blogland. I blog at Tu-Na Quilts, Travels, and Eats. My name, Tu-Na, was chosen by my grandson. Read here to find out why. If you are interested in learning more about me, you can read an introductory post I wrote here as part of the new quilt bloggers hop this year. I made my first quilt when I was 16 which resulted in my receiving necklaces, a bounty of nylon stockings and a marriage proposal. But I'll let you read more about that here if you want.

This is my first year participating in Stash Bee. In fact, it's my first year in any on-line quilting bee. I was so excited to join in on all the fun that I joined three on-line bees.

I've chosen a large circle block (16.5" unfinished) for my month. This quilt will make a lovely lap quilt for me to snuggle under this winter. I am not sure if I'll be calling it the Cheerio Quilt or the Lifesaver Quilt. It's a simple block to make. I found the cutting takes more time than the sewing.


The background color will be warm grays in light, medium, and dark solids and prints. For the circle portion, choose to work with either yellows OR oranges. Your stash may dictate which one you will make. The fabrics can be any shade of that color in solids and prints. I'm hoping for a very scrappy quilt so please use as many different background fabrics in the grays and either yellow or orange fabrics that you can from your stash.


CUTTING

8  4.5" squares of various shades of light, medium, or dark gray solids and prints (avoid the bluish grays if possible)

12  4.5" squares of various shades of either oranges OR yellows (not both) solids and prints


SEWING

Make 4 HSTs

For each HST: Draw a diagonal line from one corner to the other on the back of an orange or yellow square. I draw another line 1/2" away from that line. (There will be some waste here so you could opt to make the HSTs a different way or do as I did here by making an extra HST at the same time. I do this a lot and add them to my block stash to be made in a future quilt. If you don't want to use them and will be discarding them, you are welcome to include them in the mailing and I would appreciate receiving them. If you choose to make them another way, make sure they square to 4.5".)
Notice how I draw a diagonal line from one corner to the other and a second line 1/2" away. This will give me a bonus HST.

Take that drawn square and one gray square and put them right sides together.


Sew on each of the lines. Cut them apart.


Press the seams open. This is the only seams that will be pressed open. Square to 4.5".

To align the HST correctly, place the diagonal line of your ruler on the seam line as shown by the white arrows in the pic above. Trim block so it is 4.5" square.
Repeat three more times for a total of 4 HSTs.


Sewing the block

Lay out the squares as shown below. I have a lot of these colors so I was able to not repeat. If you are using several of the same fabrics, make sure to scatter them around the block to help give it a scrappy look.

Lay out the squares. Scatter any duplicate fabrics around so they are not next to each other.

Stitch each square together in each row using a scant 1/4" seam. I find that if I use a seam allowance just slightly less than 1/4" my blocks will end up being the correct size.

The black arrows show the direction to press the seams. Each row is pressed in an alternate direction allowing the seams to nest well making it easy to match those seams.

Press the first and third rows to one side and the second and fourth rows to the other side. This will allow the rows to nest helping the seams to match.


Sewing the rows together

Sew each of the rows together. Please do not press these rows so I can press them as needed. Please do not trim your block. I will do that.

Please don't press these last seams. I will press them as needed. Also please do not trim the block.

THANK YOU

Thank you very much. This has been a fun year and I have enjoyed making blocks for you. I hope you enjoy making this one for me. I am making a 1.5" postage stamp quilt and if you have any extra squares or scraps you'd like to include, I'd very much appreciate it. Thanks again.


What I Learned Today:
  1. The year sure seems to have gone by fast!
  2. There are so many cute blocks that I want to make.
  3. Joining the on-line bees was supposed to help me make new blocks and weed out the ones I don't want to make into a large quilt. However, I've found so many more that I want to make for myself than those I don't.

Question: What did you discover with Stash Bee this year? I found about a dozen more quilt blocks I want to make into larger quilts. I've also had a lot of fun making blocks for my bee mates and sending them to other places. It's been interesting taking them to the post office, too. I've discovered that there is no rhyme or reason to how the postage is determined. I've shipped blocks for as little as 49 cents and the same size as high as $2.38.

Karen,
Tu-Na Quilts, Travels, and Eats

Sunday, October 1, 2017

October Tutorial for Hive 9

Happy October.


First I would like to thank everyone for a wonderful year so far.  :)


For October, I would like to celebrate the Stash Bee. I made a duplicate block each month for my quilt. I would like to have this as a memory quilt of this year.


My request for the block....
Please make your favorite block in your favorite fabric.


Thank you so much, it has been a pleasure to get to know you


Chrystal


Friday, September 1, 2017

September Tutorial for Hive 9

Happy September everyone!
I’m very excited to have you all help me make a quilt for my niece and her wife! I had made them an Ohio Star quilt before I knew they planned to get married. When I make a wedding quilt, I try to make one with intertwining circles. I told them I would make another quilt with circles.
I’ve been following Sharon Holland and Maureen Cracknell’s Sewcial Bee Samplers sew-along and when I saw Sharon’s block #19, I thought it would be a great block for Anne and Kristen’s quilt. I have contacted Sharon Holland and she has graciously given me permission to use her block!
Here’s the link to the sew-along https://www.sharonhollanddesigns.com/sew-along/
If you scroll through and click on block 19, you’ll open the pdf for Circle of Friends.
I would like to make the block bigger-15x15 finished, so all HSTs and center square should be cut to 3” so they finish at 2 ½” in the block.
For my block, I would like the following colors – Fabric A-pale green, Fabric B-grey, and Fabric C-pale yellow. The colors were Anne and Kristen’s request, placement was my idea!
These are my two sample blocks:


For the one the top block, I decided to make HST the traditional way-cut 16 squares each of grey and green to 3 ¾”, marked diagonal from corner to corner, right sides together and sew ¼” on either side of line. Trim to 3” squares.
For the bottom block, I decided to use Sharon’s method—this was my first time doing HSTs this way. Cut 4 squares each of grey and green at 6 ¾” and follow her directions. I did trim these to 3” after cutting although they were very very close to 3”. There’s much less waste with Sharon’s method as you from this picture! You decide which method you want to use.

For this block, please don’t use a scant 1/4”-I did on the top block and it ended up at 16” rather than at 15½”. Also, please press the seams open. On the top, I pressed to the dark and some of the seams were very bulky—came out much better on the bottom! I’ll end up taking the right block apart and re-sewing. No need to trim your blocks-I’ll take care of that when I get them all.
Please contact me if you have any questions.

I look forward to putting all the blocks together and gifting it to Anne and Kristen! Thank you so much in advance!
Liz

Friday, August 18, 2017

Hive 9 August Block for Shelly

Your block is a quick one to make and I'm sure your grandson will have a lot of fun with his new quilt!!  I wish I had done better with the points but I may well come back to this pattern.
Mary Ann

(angel block)

Friday, August 11, 2017

Hi Shelly!
This was a fun block to do! Hardest part for me was picking fabrics!
This will be a great quilt for your grandson--Happy Birthday to him!

I'm ready to put them in the mail, but need to confirm your mailing address. Could you email it to me-eahorgan@gmail.com.

Liz

Tuesday, August 1, 2017

Hive 9 - August Tutorial


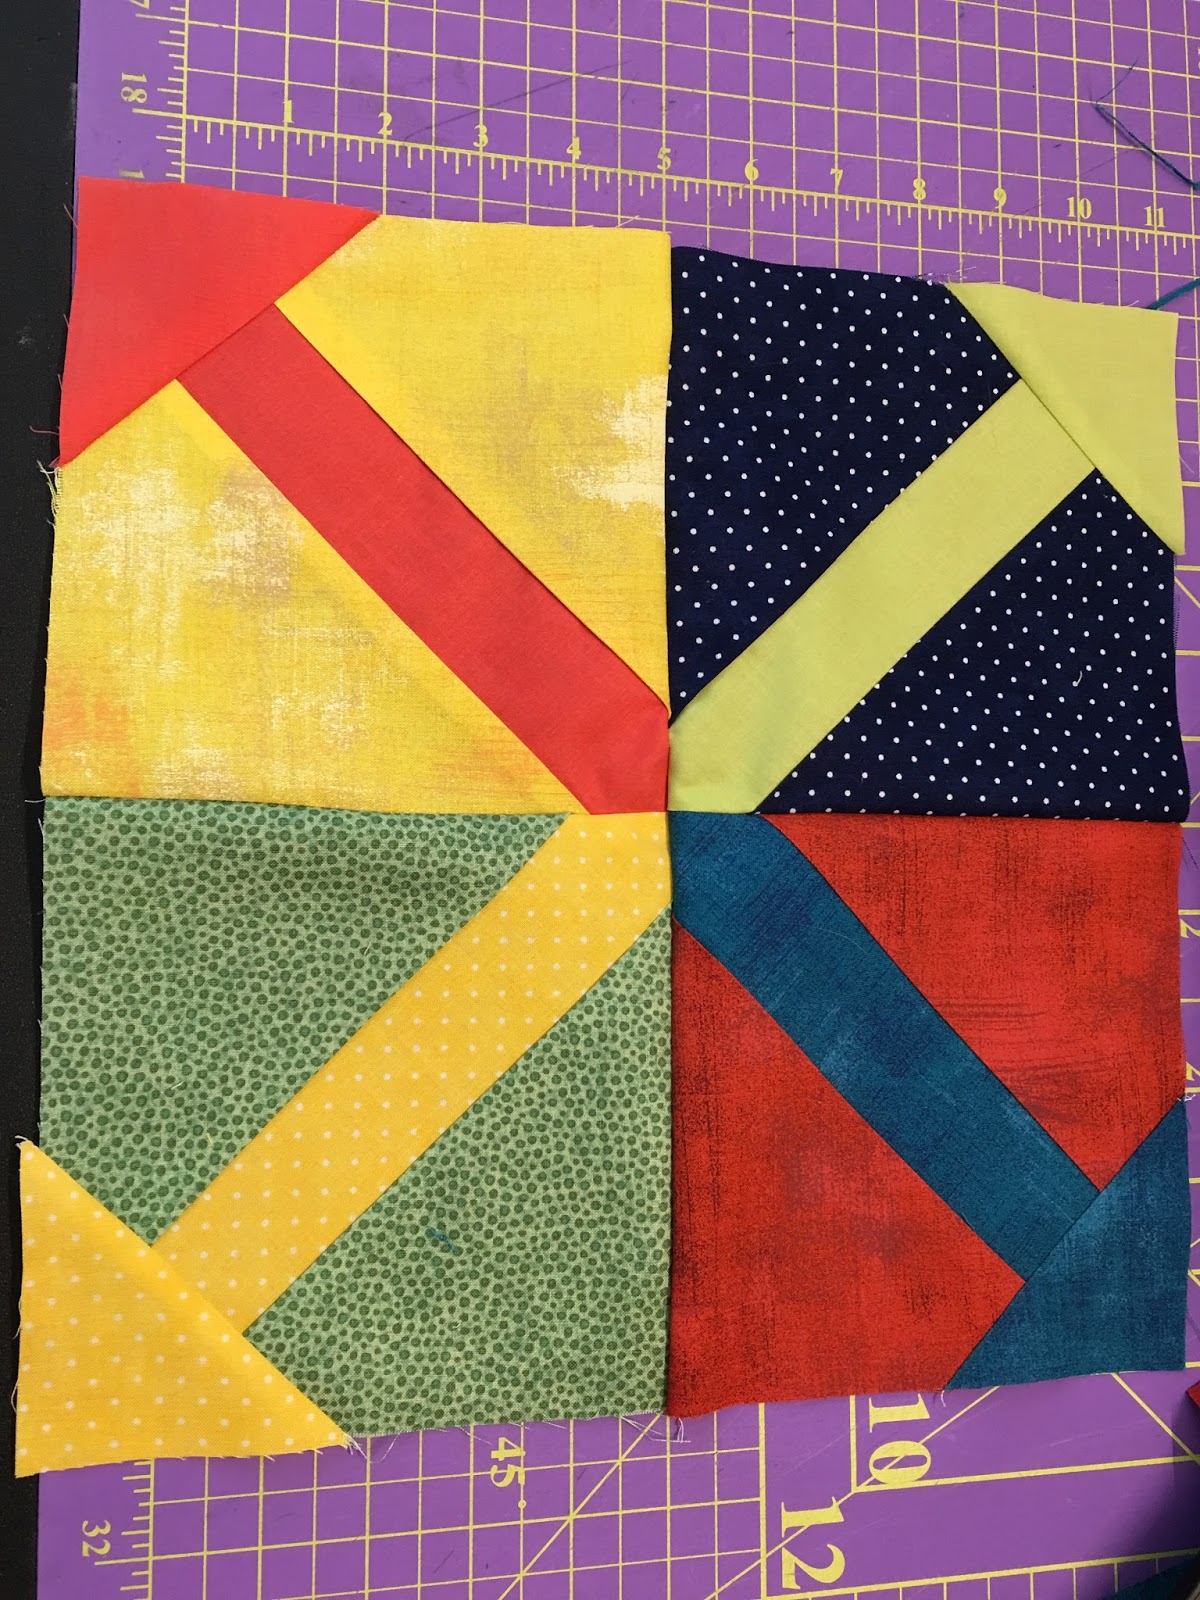
I am Shelly Recicar, and I live in South Florida with my husband, two dogs and cat.  We live on the intracoastal and boat often. I have been a member of the South Florida Modern Quilt Guild for six years.  I am using my blocks for my grandson.  His first birthday is in September.  My block is a significantly altered version of quills and arrows from Quilter's Cache.  This block is simple to make.  Don't fret if your arrow bases don't line up perfectly as you can see mine don't!  I don't think my grandson will ever know the difference.  But he will enjoy the bright colors.

My color palette is red orange, yellow/golden yellow, citron, aqua, and navy. Please use solids or modern fabrics. No reproductions, batiks or novelty fabric please.

Cutting

Background
4 - 6 1/2 inch squares (four different colors) Cut in half  diagonally.
Arrows (arrows can be the same fabrics used in backgrounds)
4- 2 x 10 inch strips (four different colors)
4- 3 inch squares (same fabric choices as the strips) Draw a horizontal line on the back of each

Sewing (four squares make one block)

  • Sew each  half of the background square to the arrow strip.


  • Iron seams to the side and trim block to 6 1/2 inches.
  • Sew arrow square to one corner on the marked horizontal line
  • Trim seam to 1/4 inch
  • Sew blocks together with points facing outward.
Thanks in advance for your special blocks.  I hope you enjoy making them.

Thursday, July 20, 2017

Blocks for Marie


Hi Marie!
My blocks went in the mail to you yesterday morning. I hope the fabric selections are what you were looking for. I made more HSTs than I needed for your blocks, so I sent along the extras. I thought it was better for you to mix them in with yours than to have blocks with the same fabrics in them. 
Stay cool!
Liz


Tuesday, July 18, 2017

Angel Blocks for Hive 9

Marie had some slightly more traditional fabric requests this month that posed some challenges for some of her hive mates. Luckily for her, my aunt had given me some fabrics a while back that fit the bill. I just had to dig deep into my scrap bins in the hopes that I didn't donate them at our guild's recent fabric auction! Thankfully, I found some of them so I made 2 blocks for her.


Marie, I'll get these off into the mail later this week. I hope you like them and that they work well with the others that you receive!


Saturday, July 1, 2017

Hive 9 Tutorial for July

Hello everyone
My block for July is pretty straight forward.  I'd like it done in 30's fabrics, often called "Aunt Grace" fabric, but any small floral will do.  (The picture below shows the fabrics I chose)

The background fabric should be a white solid or a white on white fabric.  You can choose one fabric or scrappy, either way is fine.  
From each of the four Aunt Grace fabrics and the background fabric (s), cut two 4 3/8" squares.  Pair a background square with an Aunt Grace square and draw a diagonal line.  Sew 1/4" on either side of the line and cut apart on the drawn line.


Press toward the Aunt Grace fabric and trim to 3 1/2".  (I oversized the squares so that there would be wiggle room to trim.  You should have 16 half square triangles (hst) in total.  Arrange the hst's as shown below and sew squares together, forming four rows.   Sew rows together making a 12 1/2" block.  Please don't trim, I'll do that on my end.  
Thanks so much for your help with my quilt!  Any questions or problems, please let me know.


Wednesday, June 28, 2017

Block for Hive 9

Hi Betsy,
What a fun block to do, especially so close to July 4th weekend!
I was trying to finish a wedding gift, which I did, and so I had to wait until the end of the month to do your blocks--there's a second one peeking out from underneath!
I'll get them in the mail to you tomorrow morning.
I hope you like them and can't wait to see your finished quilt!
Liz

PS - Happy early Birthday!

Sunday, June 25, 2017

June - Hive 9 - Block for Betsy

I am way late posting this. The block has been sent and received, but I keep forgetting to post it here. Betsy picked a string block in red, white and blue. Who doesn't love a patriotic quilt. I pulled fabrics and that was probably the most time consuming part of this block. It went together very quickly. I keep saying I want to do a string quilt for myself, but that is just one of countless quilts I want to do.


I stole the photo Betsy posted on Facebook, because I can't find the one I took of the block before I mailed it. All of the blocks I've seen so far look great, I can't wait to see her quilt when it is done. So far I've enjoyed making every black this year and I can't wait to see what comes next.

Saturday, June 24, 2017

Block for Hive 9

Hi Betsy, I'm a Stash Bee Angel from Hive 5, buzzing in to let you know that I will be putting this block in the mail for you on Monday. Since I live in Florida too, it shouldn't take long to get to you., Enjoy! (It actually is square, it's just the pic that's wonky.)

Thursday, June 1, 2017

Hive 9 June Block Tutorial

Hello! My name is Betsy and I live in sunny Florida. I learned how to quilt in 2007 and quilted for a few years and then put it down for a while but started back up in earnest in 2014 when I came across the modern quilting movement.

I thought about various blocks since this is my first time in a quilting bee and kept coming back to string pieced quilts. So, I'm asking you to make string pieced "X" block for me. Since my birthday is in July, I settled on a red/white/blue theme, with the red creating the "X".


 I'm looking for dark blues, saturated reds (more cool colored) and white whites (I prefer more gray to cream and it does not have to be solid). Scraps from our February and April blocks would be perfect.

There are a variety of string piecing tutorials so if you feel more comfortable using a different technique, go for it. I hope you have fun and don't overthink it too much.

Here is how I made my blocks:

For reference, I like to cut out a 8.5" square from regular paper so I can be sure that my pieced strings will be long enough since I don't use foundation piecing. There will be 4 squares total that will make up the "X" for a finished block of 16.5" square. I also recommend using strings that are a minimum of 1" wide and probably no more than 2.5" wide.

Here is the reference block and some strips I had on hand and others that I cut from various fat quarters.


Since this block is on point, the center needs to be a minimum of about 12.5" to make sure you have enough to cover the space.


Then grab another strip and sew it to the first using a 1/4 inch seam.


I just kept grabbing strips and sewing them together to do some random chain piecing:


I laid them out to make sure that they would cover the reference square:


Notice how this red strip isn't going to be long enough so I just grabbed another strip set and bumped the red further along so that it covered the reference block.

Just keep going until you have enough strips. I used a square up ruler to cut out my block but you can use your reference block to cut out the block.


One block:


Just repeat three more times to get your four parts of the "X":


Your finished "X" block should be 16.5 inches.

A few things to keep in mind: I found it easier to press my seams open as I went along to avoid additional bulk since there were quite a few seams in the block. When handling your blocks, be gentle since you will have bias edges.

Thank you and let me know if you have any questions.

Thursday, May 25, 2017

My first crash

Since I had the privilege of being Queen for Hive 3 this month, I had thought I would get experience by making other hive blocks.  So I did connecting corners for Kate in Hive 2 because I had not done that block before.  I may try it again 

I made cats for Jan in Hive 9.  This block was on a" blocket"  list (my new phrase rather than a bucket list).  I have cat lovers in my family and friends so this is a real possibility for me.  I had seen it on Missouri Star and was eager to make this.    

I made flying geese for Beth in Hive 5 because I need more experience with them.  Why do perfectly pressed blocks look totally unpressed in a picture???????

I made nine-patches for Kimberly in Hive 6 because she will need a lot of these for her projects and I had squares  already cut just the right size.  

My first thought that I would make all the blocks for other hives, I don't think that will happen this month, there was a time issue, Sorry to the other Queens, Maybe another year.  I'm loving stash bee.

Thursday, May 18, 2017

Hive 9 - May Block for Jan

Jan picked a fun block, that was simple to make. I had thought to have my cats go in opposite directions, but since I'm directionally challenged I think they are too. But the great thing is that Jan doesn't care which way they face...Yeah!!!


I think her daughter will love the quilt, because I've seen some pretty cute blocks being made. I was supposed to mail these earlier this week, but they didn't go out until today, but they are still on time.

Hive 9 May block for Jan

Hi Jan!
You may have already seen my blocks live and in person--I mailed them on Monday and just getting around to posting now.
This was a fun block! I'm sure your daughter will love this quilt!

Liz Horgan

Thursday, May 11, 2017

Crashing Hives 6 & 9

Since my block(s) was already done for May, I had time to crash 2 hives. Kim (Hive 6) asked for rainbow 9 patches and Jan (hive 9) requested cat blocks for her daughter's quilt.  Ladies, I will post them on Saturday.  Thanks for helping me feel less guilt about my stash.