

Sunday, March 31, 2019
March pinwheel block
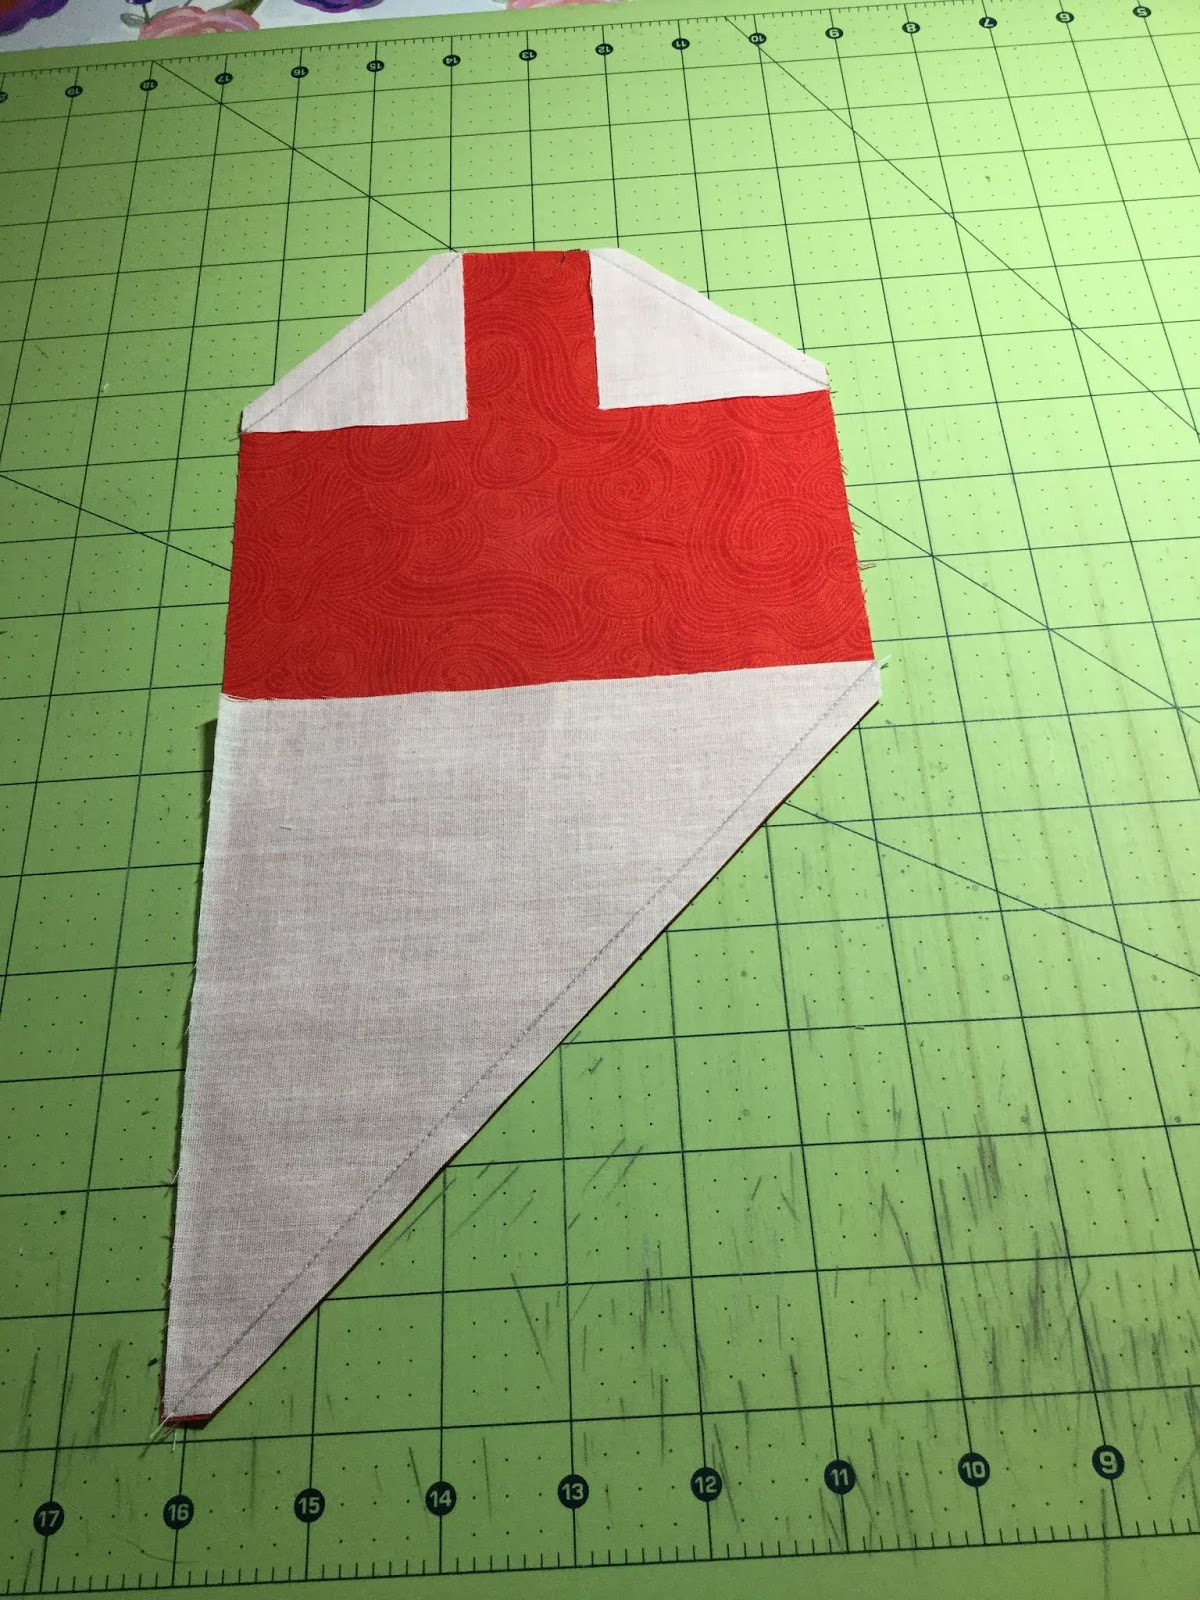
March has been a trying month in our house! My oldest had a stomach virus he just couldn't seem to shake, then my husband got a concussion playing soccer; between taking care of them, going in for a minor medical procedure myself, and a crazy busy month at work, sewing took a back seat. I finally had a chance to sit down and get my block done for the month yesterday. I hope this works well with the others! The light purple looks more pink in this picture than it is. In person it is definitely purple.

-Jennifer
-Jennifer
April Hive 4 Tutorial

The block you will be making will finish at 12.5”. Here are the fabric requirements:
1. 4 background squares cut at 2.5” and marked on the diagonal
2. 2 background squares cut at 6.5” and marked on the diagonal
3. 2 print squares cut at 6.5” x 12.5”
The background fabric should be light (I’m using white, but use what you have on hand)
The print fabric should be a red or pink (novelty fabrics are ok)

Place the large background squares on the bottom of the print fabric and the smaller squares at the top. Reverse for the other print.

Put both halves together, sew, press middle seam open and voila you are finished.

Hive 2 . March for Joan
Have to admit I’ve been putting this off, so snuck in under the wire to complete.
I’m not a lover of HSTs, but all done. Hope you like.

I’m not a lover of HSTs, but all done. Hope you like.

Wednesday, March 27, 2019
Hive 2 Purple Pinwheels for Joan
Hi Joan,
Here are 2 pinwheel blocks winging their way to you.

I hope you like how they came out & that they work well with all the other pinwheels you have been getting.
Happy Quilting,
Sherry V.
Monday, March 25, 2019
Hive 2- blocks for Joan
Two blocks for Joan. Hope you like them, I don’t have a lot of options for purple.

Tuesday, March 19, 2019
Hive 2 Block for Joan
I love purple so this was a great block for me! It came together easily and was fun to make.

Enjoy hour finished quilt! It’s on its way to you 😀

Enjoy hour finished quilt! It’s on its way to you 😀
Saturday, March 16, 2019
Stash Bee Hive 2 March Block

My March block for Joan. It is all about the purple! AND the snow is melting!!!
Valorie Webster
@facetfully on Instagram
Thursday, March 7, 2019
Pinwheel for Joan
Hi Hive 2, Rose here .
I really like how this came out. I hope you like it Joan.
Purple is not part of my stash. I have very few.
I am lucky I have my daughter to pick from when needed.
Looking forward to spring. This looks sort of springy to me.
I should have it in the mail this weekend.
Enjoy !!

Saturday, March 2, 2019
Hive 2 Purple Pinwheels for Joan

Hive 2 for Joan from Kathie
Joan, I think purple is the color I have least of in my stash, but one of my favorites is the light purple I used for your block. This was the very end of what I had, so I decided this would be a great project to use it all up. I did Jen's Color Challenge last year also, so I've made this block in purple before. I think you will have fun with all the shades of purple you get. Here is mine.
Kathie L from Allentown

Kathie L from Allentown

Friday, March 1, 2019
Hive 4 March Tutorial - X & +
Good Morning, all!
I'm ready for spring as I'm sure you are too, and my block this month reflects that I think. I'd love you to do an "X & +" block this month. I first heard of this block a couple of years ago and am finally hoping to get a quilt done, with your help. It's a very simple block and looks more difficult than it actually is. The quilt will be in green, gray and white and my fabric pull is the first photo. Think spring greens like you see when the trees first bud out.

You will need:
A. (8) 2 1/2" squares, please use white on white
B. (4) 4 1/2" squares for the cross pieces
C. (1) 2 1/2" x 6 1/2" rectangle for the plus
D. (2) 2 1/2" squares for the plus, same fabric as C
E. (4) 2 1/2" squares for the ends of the plus (should be a contrasting fabric so the "plus" stands out)
Take the 8 white on white squares and draw a diagonal on the back. Place this on two corners of your "B" pieces, as shown in the 2nd photo. Stitch on the drawn lines, then cut, leaving a 1/4" seam. Press out the triangle. (Photo 3)


Make 4. Take two of the "E" squares and sew them to both sides of the "C" rectangle. Take the remaining two "E" squares and sew them to the two "D" squares. Arrange the pieces as shown in photo 4 and sew together as you would a 9-patch. The block should measure 10 1/2". The two I made are in photo 5 as an example. And the inspiration for this quilt is photo 6. Please feel free to use the greens, grays and whites in any way you choose.
I was up at 3:30 AM and decided to put this tutorial together, so I won't be surprised if you have questions. Heres hoping it makes sense, but feel free to ask anything. Happy Spring!


Hive 2 March Tutorial - Purple Pinwheel
Hive 2 March Block Instructions
I love purple! I participated in the Color BOM last year as a new quilter and can’t resist this block by Jen at Patterns by Jen. Please make it in purples, using the 12” size. For the half square triangles one half should be dark and one light. Solids or patterns are fine. Use the same fabric as either side of the half square triangle for the 4 square sections. Follow the link below to Jen’s payhip site to download the FREE pattern. Thanks and enjoy. Joan

Above example of my block, below is Jen’s.

Hive 1 March Tutorial - Picnic Time Block
First things first, I am in the midst of moving from Michigan to South Carolina this month, so please do not mail my block until April 1, then I don't need to worry about things getting lost in the mail.
I am Jan and have been quilting for almost five years. This is my second year in a Stash Hive. Last year was very enjoyable and I learnt so many things. Also there were so many creative blocks, I am in envy.
With things very crazy here, I have opted for a very simple block. The Fat Quarter Shop had a quilt using the Picnic Time block. The quilt instructions are here. We will be making one block which finishes at 15 1/2 x 15 1/2.
This is the block

Please do not add the borders, per the FQS instructions, to the block. I will add all the borders.
I have their permission to use the block, here is the pdf file for the quilt and block, here.
I would like my block to be red, white and navy. The red should be mostly red. The blue should be mostly navy and the white can be solid, tone on tone or low volume reading white.
If you can use one red, one white and one blue fabric that would be great. If your stash doesn't work out, then go ahead and make it scrappy.
Here is my mini fabric pull, most of my fabric has been in storage since we sold our house last spring. You really can't see the white on whites.

Following are the cutting instructions from FQS. We will only be using the following pieces
Here are the instructions to put the block together.


Here is my sample block.

Don't forget to not mail the block until April 1. Thanks for sewing for me.
I look forward to another great quilt this year put together by so many blocks from all over the world.
I am Jan and have been quilting for almost five years. This is my second year in a Stash Hive. Last year was very enjoyable and I learnt so many things. Also there were so many creative blocks, I am in envy.
With things very crazy here, I have opted for a very simple block. The Fat Quarter Shop had a quilt using the Picnic Time block. The quilt instructions are here. We will be making one block which finishes at 15 1/2 x 15 1/2.
This is the block

Please do not add the borders, per the FQS instructions, to the block. I will add all the borders.
I have their permission to use the block, here is the pdf file for the quilt and block, here.
If you can use one red, one white and one blue fabric that would be great. If your stash doesn't work out, then go ahead and make it scrappy.
Here is my mini fabric pull, most of my fabric has been in storage since we sold our house last spring. You really can't see the white on whites.

Following are the cutting instructions from FQS. We will only be using the following pieces
Part Fabric Quantity Size
A White 4 3 ½” x 6 ½” rectangles
B White 5 3 ½” squares
E Navy 4 4 ½” square
F Red 2 3 ½” x 9 ½” rectangles
G Red 2 3 ½” x 6 ½” rectangles
H Red 2 3 ½” squares
Here are the instructions to put the block together.


Here is my sample block.

Don't forget to not mail the block until April 1. Thanks for sewing for me.
I look forward to another great quilt this year put together by so many blocks from all over the world.
Hive 3 March Tutorial - Modern Christmas Tree Block
Happy March, Hive 3 Mates!
Although it seems like it's way too early to be thinking about Christmas, I'm one of those people who tends to start a holiday project Thanksgiving week only to see it set aside in the rush of gift wrapping, baking, and visiting. So, this year, I thought I'd use my month as Queen to get a head start with these fast and fun Modern Christmas Tree Quilt Block by Amy Smart (Diary of a Quilter). Her tutorial can be accessed here: https://www.diaryofaquilter.com/2015/12/modern-christmas-tree-quilt-block.html I'm requesting the larger size (7 x 9), but her original tutorial for the mini blocks has some additional tips for sewing the pieces together.


Note: in this image I have one of the fabrics facing wrong sides up. This is INCORRECT. Your angles won't match if you do it this way. I was still able to make the tree blocks but it came out smaller than it was supposed to.
Once you have your cuts made, swap the prints and sew along the edges of the triangle. Due to the way I was cutting the angles, I needed to sew the left seam first and then the right hand side because that was the longer piece. If you have problems with this step, Amy Smart has a more detailed tutorial here: https://www.diaryofaquilter.com/2014/11/patchwork-tree-quilt-block-tutorial.html
Once the triangles are sewn together, cut your 2" x 8.5" rectangles in half, and sew a matching pair to either side of the brown fabric for the trunk. You'll trim the bottom of your tree so that it's straight, and then attach the trunk. The trunk piece is oversized to give you a cushion for trimming.
The tutorial says that the blocks should come out to be 7.5" x 9.5". Only one of mine came out to that size. Mine were closer to 7" x 9". Don't worry too much about that. I can trim them to a standard size after I receive them all and see what the average size is.

Here's the start of my modern forest. I can't wait to see what fabric choices you make!
Thanks,
Stephanie
Although it seems like it's way too early to be thinking about Christmas, I'm one of those people who tends to start a holiday project Thanksgiving week only to see it set aside in the rush of gift wrapping, baking, and visiting. So, this year, I thought I'd use my month as Queen to get a head start with these fast and fun Modern Christmas Tree Quilt Block by Amy Smart (Diary of a Quilter). Her tutorial can be accessed here: https://www.diaryofaquilter.com/2015/12/modern-christmas-tree-quilt-block.html I'm requesting the larger size (7 x 9), but her original tutorial for the mini blocks has some additional tips for sewing the pieces together.

Here's a picture of my fabric stash. The light in my kitchen was giving me trouble, but it's just a mix of holiday fabrics range in dark green shades, reds, and tone on tone whites. My color preferences are traditional reds and green, but they don't have to be holiday fabrics. Solids and tonal prints are fine. I used the white poinsettia print as the inspiration - so dark green for the leaves and reds for the flowers. I seem to have collected a number of fabrics with gold metallics. I can't remember really setting out to purchase those, but I think it will add a fun element to this project. And it reminds me of the foil that is often around the pots when you purchase a poinsettia. Feel free to toss them in there if you have some.
These blocks come together really quickly, and you'll make two at a time. You'll need two 8.5" squares of your contrasting fabrics (one of each fabric - I used green and white for my samples); two 2" x 8.5" rectangles (one of each fabric); and two 1.5" x 2" rectangles from a brown fabric. I have a lot of scraps of Essex linen left over from another project, so I've been using those. But any tan or brown fabric that matches your main prints are fine. Here's a shot of my brown fabric pull.

Here's an image of the cut pieces of fabric you'll need.

To make the block, you'll layer the two 8.5" squares on top each other, right sides facing up. You'll then make two diagonal cuts to create the improv triangle in the middle for the tree. Here's a photo of the cuts I made for one block.

Note: in this image I have one of the fabrics facing wrong sides up. This is INCORRECT. Your angles won't match if you do it this way. I was still able to make the tree blocks but it came out smaller than it was supposed to.
Once you have your cuts made, swap the prints and sew along the edges of the triangle. Due to the way I was cutting the angles, I needed to sew the left seam first and then the right hand side because that was the longer piece. If you have problems with this step, Amy Smart has a more detailed tutorial here: https://www.diaryofaquilter.com/2014/11/patchwork-tree-quilt-block-tutorial.html
Once the triangles are sewn together, cut your 2" x 8.5" rectangles in half, and sew a matching pair to either side of the brown fabric for the trunk. You'll trim the bottom of your tree so that it's straight, and then attach the trunk. The trunk piece is oversized to give you a cushion for trimming.
The tutorial says that the blocks should come out to be 7.5" x 9.5". Only one of mine came out to that size. Mine were closer to 7" x 9". Don't worry too much about that. I can trim them to a standard size after I receive them all and see what the average size is.

Here's the start of my modern forest. I can't wait to see what fabric choices you make!
Thanks,
Stephanie
Hive 5 March Tutorial - Double X
Hi everyone. This is my first year in the Bee and I've been busy testing out lots of possible blocks for my month! What fun that has been. Practicality won out in the end, though. Years ago I made a set of six inch Double X blocks for a mini quilt. A traditional block done in solids for a modern flair. I liked them a lot so decided I wanted to make more for an actual lap quilt. I did a few then got distracted by other projects.....a problem I have! LOL! Fast forward to now and my decision to have y'all help me get this project going again.

I'm not sure how much direction y'all need because its super easy. I hope the following is enough.
Fabrics:
I want only solids. Main color in sea/sea glass hues with white solid (not a white on white print). Please keep the blocks to one color, not scrappy.
You'll be making me a 9" finished block.
Cutting directions:
From sea/sea glass solid color:
From white solid:


This is the Double X block:

I'm not sure how much direction y'all need because its super easy. I hope the following is enough.
Fabrics:
I want only solids. Main color in sea/sea glass hues with white solid (not a white on white print). Please keep the blocks to one color, not scrappy.
You'll be making me a 9" finished block.
Cutting directions:
From sea/sea glass solid color:
- 3 - 3.5 inch squares
- 3 - 4 inch squares
From white solid:
- 3 - 4 inch squares

On the 3 white squares draw a diagonal line:

Pair with a color square and sew 1/4 inch on each side of the drawn line.

Cut apart on the diagonal drawn line. Press open. Square down to 3.5 inches.

If you prefer a different method for making the six half square triangles, please use it. I don't care how you do it. 😊
Arrange pieces like this...be careful of the orientation of the white:
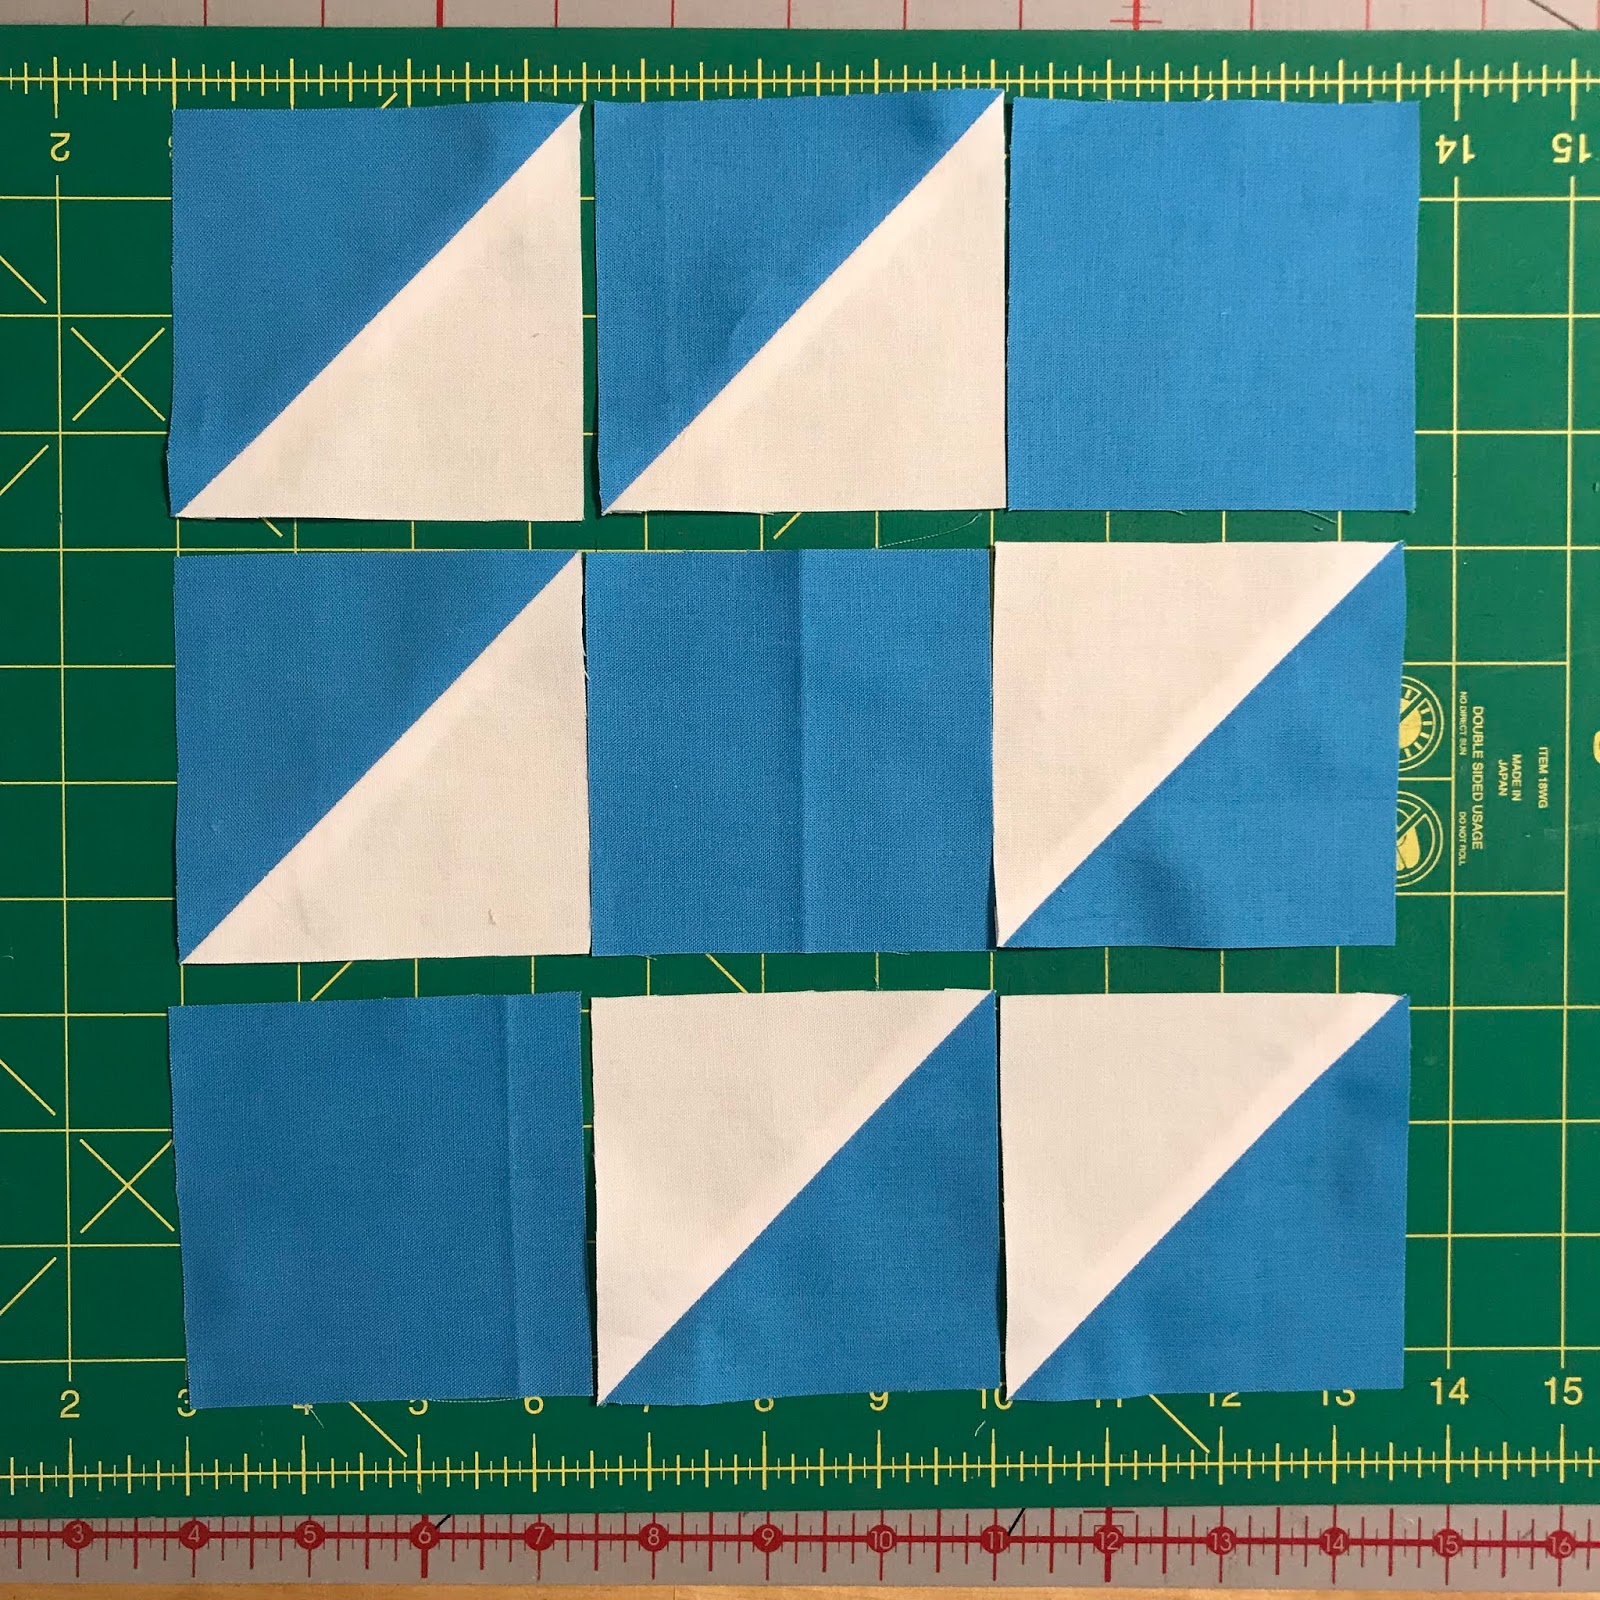
Sew just like you would a nine patch. I pressed most of my seams open. (The exceptions were that when I could press to a plain solid square I did)
Voila! You're done. Your block should measure 9.5 inches.

Thank you so much!
Cindy 😘
Subscribe to:
Posts (Atom)