Wednesday, April 30, 2014

Hive 6 May Tutorial - Scrappy Mountains

What is your name? Hi everyone!  I'm Shena, last minute replacement queen for Hive 6 in May.  I was supposed to be October queen, but I got bumped at the last second.  I blog at Apple Pie Patchwork.
Where do you live? I live in Lethbridge, Alberta, Canada.  I love it here, in the wide open prairie. 
Tell us about your family (Spouse, kids, grandkids, pets, etc.) I've been married to Darren for over 10 years now.  We have three kids, 9, 6, and 4.

Family 2013

Tell us about how you got interested in quilting.  I started quilting about 8 years ago.  I sewed garments in high school, but had mostly lost interest in that.  My sister started quilting, teaching herself with books and I was intrigued and started myself about a year later.  I've been loving it ever since.  
How do you organize your fabric stash? I'm sorry, I have no picture of this because my stash is still in a dark room in my basement, in the boxes I moved it into my house with 5 years ago.  I have it organized by colour, with a separate box for favourite designers. 
Who is/are your favorite fabric designers? I love love love Heather Ross.  So so much.  I was already quilting when her first lines came out but I wasn't aware of them because I live in a very conservative area, quilting wise.  The shops here think batiks are modern.  :)  So until I discovered blogs and online shops, I wasn't aware of her stuff and now I'm collecting things I could have bought when they first came out!  Oh well. I also love Tula Pink and Sarah Jane.  Novelty fabrics and low volume fabrics I am a big fan of.  
What is one thing you have learned that you wish you knew when you first started quilting?  As previously mentioned, awesome designers and their awesome fabrics.  :)
What is your favorite sewing/quilting tool and why should we all go out and buy it? I love my rotary cutter and rulers, which may be a cop out, but it's true.  And my design wall. I don't know what I'd do without that.  I have 3 in various rooms in my house. 
Who is your favorite fictional character and why? I think my favourite fictional character is probably a tie between Jane Eyre and Elizabeth Bennet.  They are both strong, independent female characters.  I wouldn't have to live in their times, and give up all my modern conveniences, but I love their fierceness.


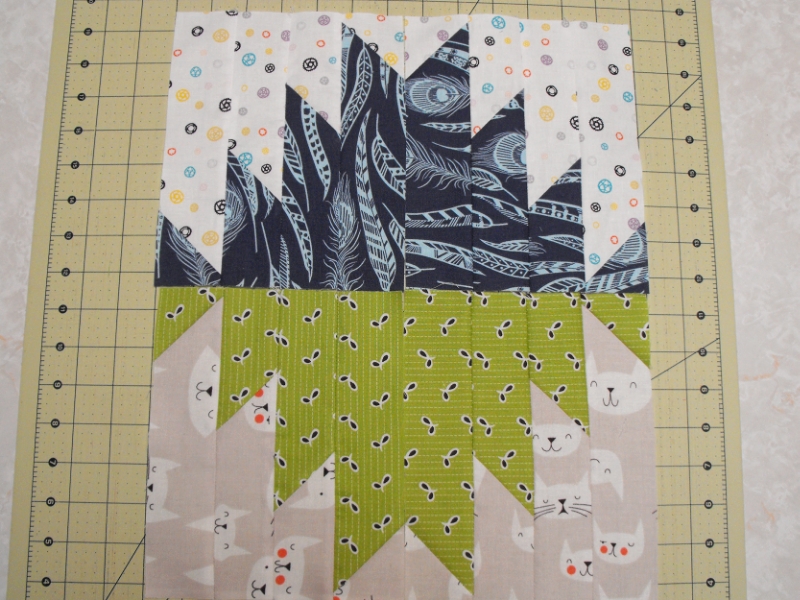
Anyway! On to the tutorial.  The block that I've chosen for this month is called Scrappy Mountains.  The tutorial was originally by Bonnie Hunter, of Scrappy Trip fame, among other things.  


Scrappy Mountains tutorial


To start with, you need to cut:
2 - 8.5" low volume squares
2 - 8.5" coloured fabrics

A note about fabric choice.  I love low volume and bright, modern fabrics.  However, I know not everyone has these in their stash.  If you don't have low volume, please use a light solid colour for the background, or anything light coloured and funky.  :)  Please don't use anything too dark for the coloured fabric, like black, and also please don't use brown since I don't like it very much.  Anything else is fair game.  Please also use 4 different fabrics.  The scrappier the better!

Scrappy Mountains tutorial

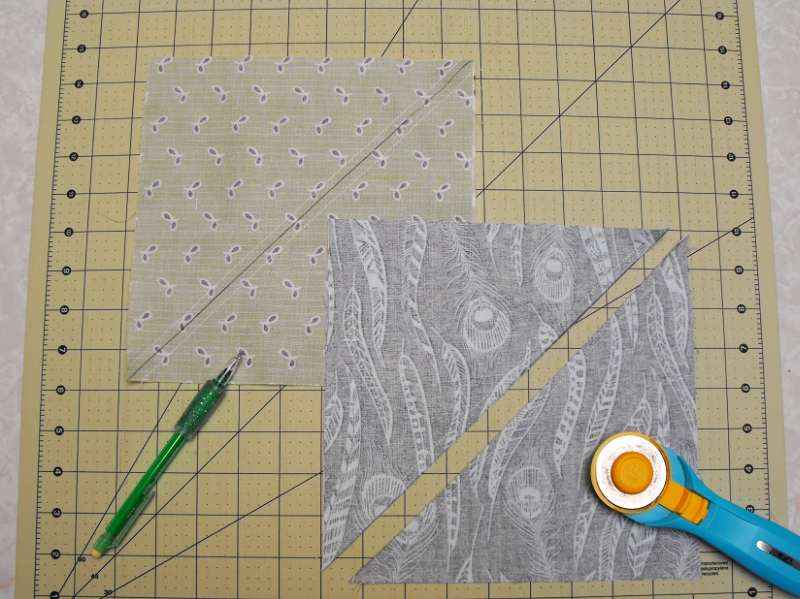
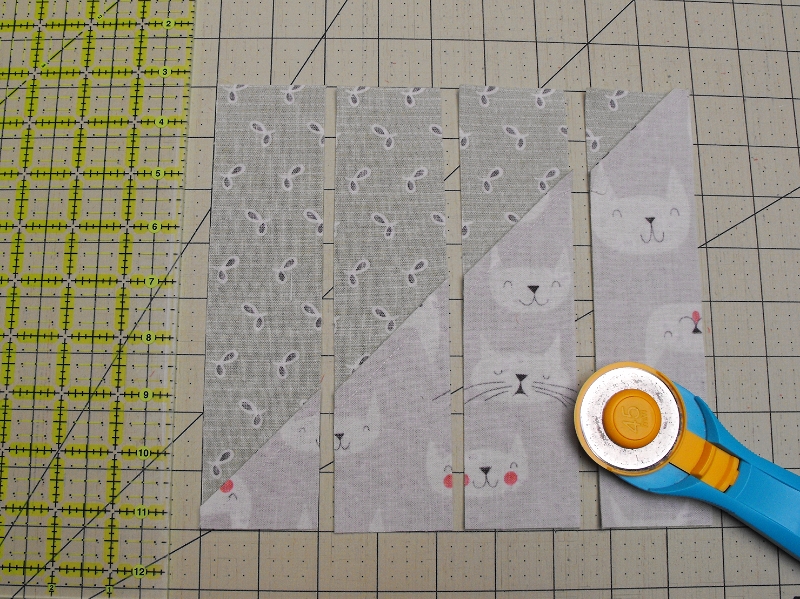
Draw a line down the centre diagonal of each coloured square.  Pair each of the coloured squares with one low volume square, right sides together, and stitch 1/4" away from either side of the marked line.  Cut the squares in half along the marked line. Press the seam toward the coloured fabric.

Scrappy Mountains tutorial

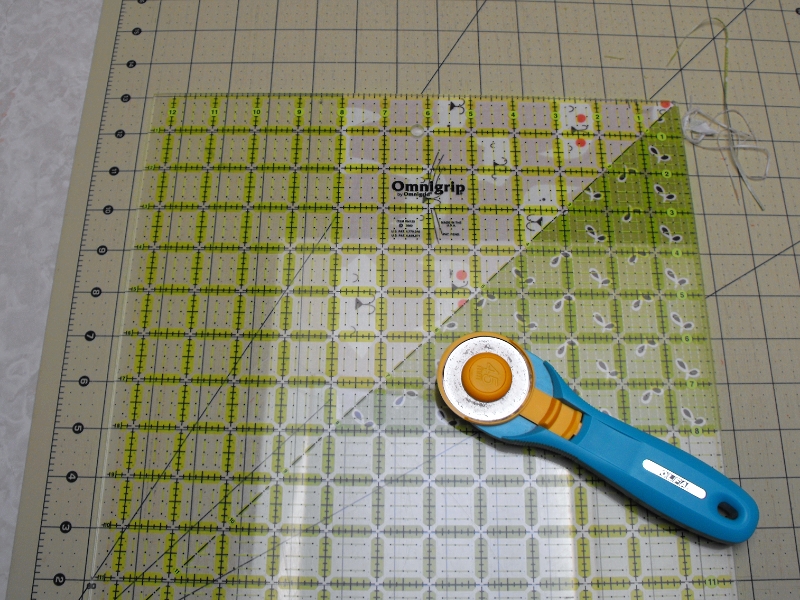
Trim all 4 HST to 8".

Scrappy Mountains tutorial

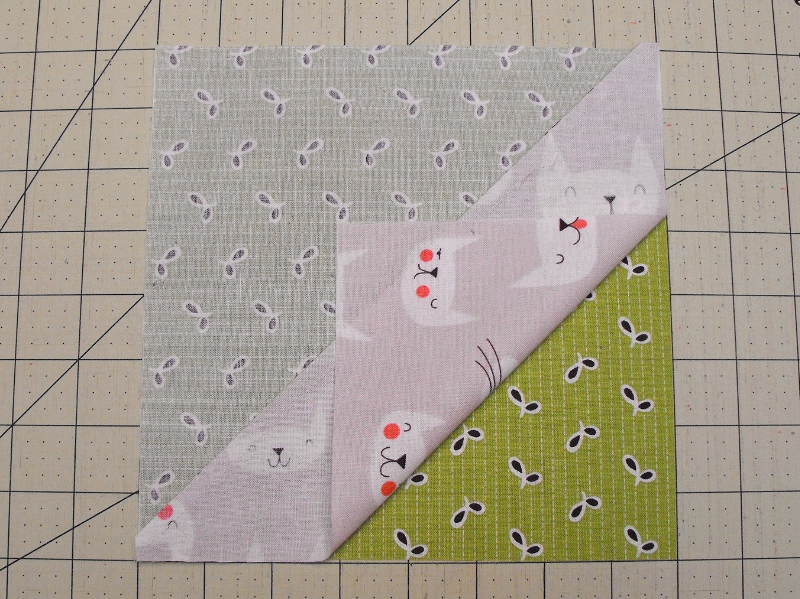
Take a matching set of HSTs, (in the picture I took both green ones) and layer them right sides together. Make sure that the dark triangle is sitting on top of the light triangle, as pictured.  This is very important later, so that you get two mirror image blocks at the end.  I found it helpful to quickly give these two stacked HSTs a quick press at the ironing board.  It made the next step much easier and prevented slipping.

Scrappy Mountains tutorial

Take your ruler and cut 2" segments across the block, as shown.  Cut through both layers.

Scrappy Mountains tutorial

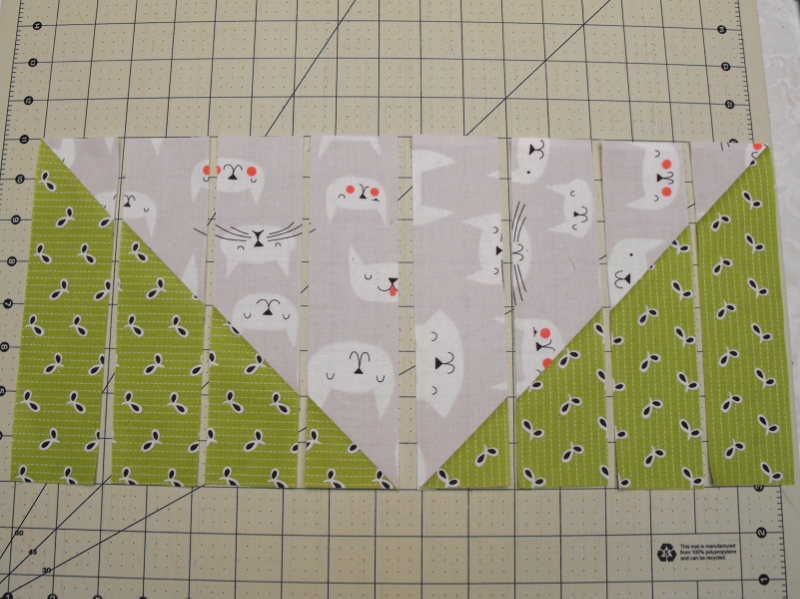
Carefully peel apart the layers.  You will now have a set each of downhill and uphill strips.

Scrappy Mountains tutorial

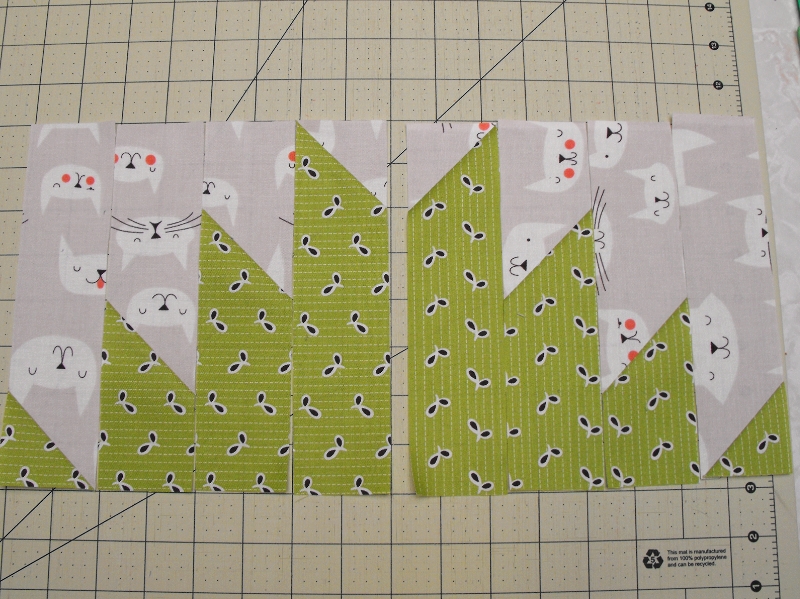
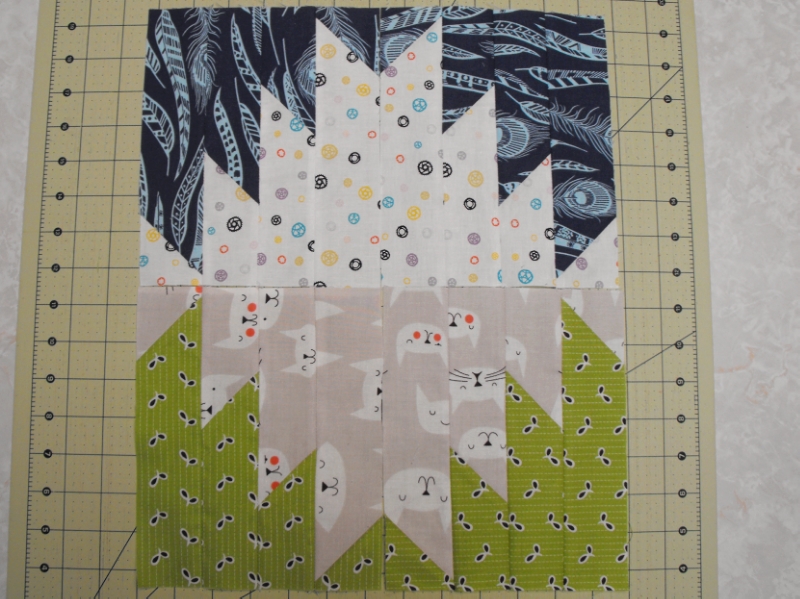
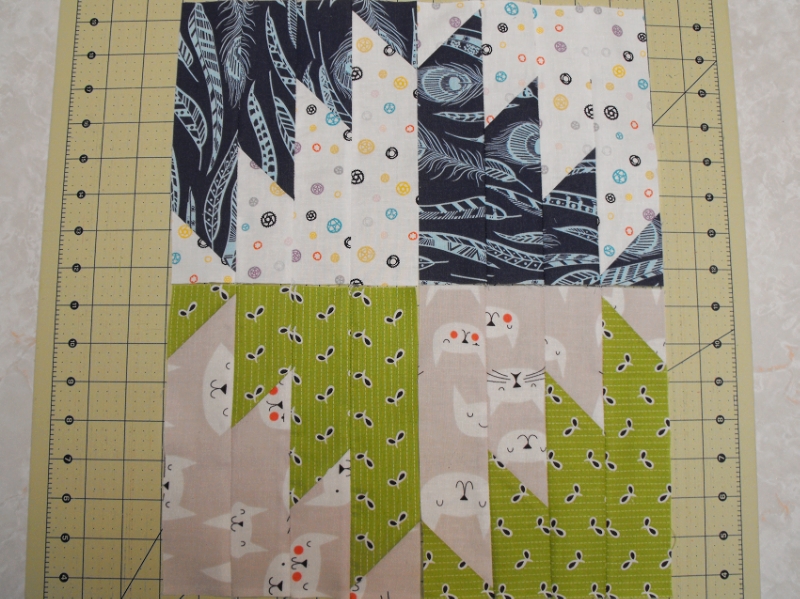
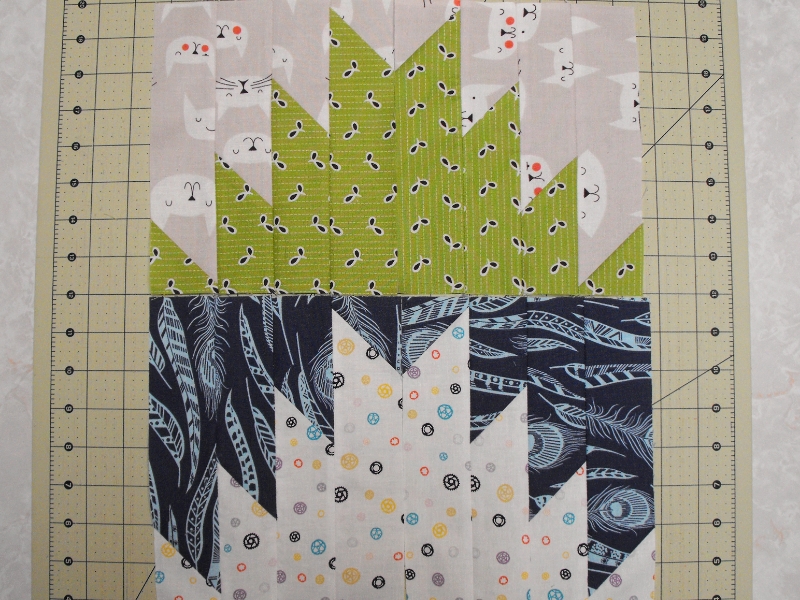
Flip each strip around 180° to rearrange the strips into the Scrappy Mountains block.  Stitch each half of the block together and press the seams open.  Repeat the same process of layering, cutting, and resewing with the other pair of HSTs for the second half of the block.  And that's it!  You're done!

These blocks can be arranged in so many different ways.  I haven't decided on my final layout yet, which is why I would like you to leave the four segments separate from each other.

Scrappy Mountains tutorial 

Scrappy Mountains tutorial 

Scrappy Mountains tutorial 

Scrappy Mountains tutorial

If you have any questions, please let me know.  I look forward to getting these blocks in the mail!  It's going to be such a fun quilt.  

Hive 8 May Block Tutorial

Hello fellow Bees. I am Tami. I blog over at Sea Me Sparkle. I live in South Carolina near the Charleston area.

Here is my family. My husband and I will have our 15 year anniversary this July. My daughter Chloe just turned 5 years old.


This is our cat named Cosmo. My daughter calls him Bootsy. It was easier for her to say back when she was learning to talk.

This is Koda our golden Retriever. He just turned one years old and he is a big boy. Not sure what we would do with out our fur babies. They are a big part of our lives.

How did I get interested in quilting?
I have been sewing as far back as I can remember. I remember modifying my clothing and making stuff for my dolls to wear. When I got older I would make clothing and also household décor. I always thought I would make a quilt one day. I even would buy quilt books and watch quilt shows on the PBS channel. Unfortunately I did not know one person that shared in my love of textiles and crafting. When I was mourning the loss of my beloved cat I decided to make a quilt in memory of him. So I went down to Jo-Ann fabrics and bought some fabric and some of the tools I was not familiar with and began to make my first quilt. I have not looked back since.

How Do You Organize your fabric?
I tend to organize by categorize, Like Christmas, Halloween, Whimsical, Favorites, Asian. There really is no rhyme or reason to most of my organization. Here are some photos.

I have my sewing and quilt books in this cabinet. It also holds all my batting and large yardage of fabrics. On top of this cabinet you can see a few large baskets, I keep random stash and scraps in these. Against the wall you can see a white drawer cheep storage I keep fabric in these drawers along with ribbons and sewing notions. That blue cart is from Ikea and I have specific projects that I am working on that are placed on it. In the corner stacked up you can see a few different bins and I keep individual projects in each of these.

This table is where I do my cutting and sewing. I just put my sewing machine on the end and roll my desk chair over to it. Under the table I have some plastic bin drawers these are all stuffed with fabric. In the white chest of drawers the bottom 3 drawers hold fabric. None of my fabric is folded fancy. One of these days I am going to sit down and fold it all in a more uniform way.

Who is your favorite fabric designer?
I don't have a favorite. I tend to just go with the reasoning if I love it I try to make sure to buy it before it is no longer available. Off the top of my head I would say Kate Spain, Mo Bedell, Bonnie & Camille, & Fig Tree Quilts.

What is the one thing you have learned that you wished you knew when you first started quilting?
I wish I knew back then the different quality of fabrics and batting.

What is your favorite sewing/quilting tool and why should we all go out and buy it?
This is a tough one, I think we all have the basic tools and they work the best. I would say buy pretty tools that way when they are laying all over the place at least they look nice.

Who is your favorite fictional character and why?
I love books, movies & TV so this is a tough question.
I am going to go with Aurora from the movie Terms of Endearment. I have seen this movie at least a dozen times and laughed and cried every time. I am picking her because she is a mom and she has faults but overall she loves her daughter and wants what is best for her. I could go on and on and pick more favorite characters and list several movies books and television shows but I better hold back and get to the quilting.

Ok Here we go


For my block this month I am requesting a simple 16 patch. That is right you can go ahead and let out that breath and relax it is not going to be hard. I am wanting to make a large quilt using these blocks for a beach/picnic quilt.

Pick 2 complimentary fabrics in either a floral print or a polka dot print. No solids and no blacks or dark fabrics. I am thinking pretty, girly, light and bright. Here are some fabric combos I pulled from my stash for examples.


Ok now go ahead and pick your 2 fabrics.
 
 
Then cut 2 strips 15 inches long by 3.5 inches wide.
 
Then alternate them going dark light dark light.
 
Sew the strips together then press seems towards the dark fabric
 
Once the strips are sewn together cut strips 3.5 inches wide. You will have a bit extra so go ahead and even out the side and then cut your strips.
 
Now alternate the strips by turning the 2nd and 4th one upside down so they look like this.
 
Now sew them together and press all seems to the same side. The block should be 12.5 inches. Don't worry about squaring them up I can do that. Also if you like making the block and have time feel free to make more than one. I plan to make the quilt large maybe 6 X 6 blocks so I will need 36 blocks.
 

Monday, April 28, 2014

Hive 6 March Finished Quilt

Melodee was quick this month and got a whole quilt completed before I even had a chance to get a mosaic posted.  Her quilt is amazing.  It looks magical in the picture below!

 Here is what Melodee had to say about her quilt:

"It has a picture of the hand quilting I did using #5 pearl cotton. I also machine stitched in the ditch along each of the large blocks. So around the blocks you gals sent me and not each of the smaller segments. And the bottom picture is the backing fabric. I picked this fabric for the back because I feel it has a sewing bee style that makes me feel great!! So awesome to know many hands went into the construction :)"


Wednesday, April 23, 2014

March Hive 7 Pretties

As usual, I go on vacation and come home sick. Sorry for my tardiness.


CitricSugar Amanda TiffBlakey
Aubry TiffBlakey jowori
Amanda MtClifford2012Andi 
MtClifford2012 Saylucky flutefishy

I am going to set them on point as time goes on and make a nice minty green one to even out the colors, but to tag those who made the block, it was easier in a 3 x 4. 

Thank you to all! - Andi


Monday, April 21, 2014

Hive 1 March Blocks

I am in love with these scrappy plus blocks! Can't wait to see this finished quilt!


These are just the images I could get into the Big Huge Labs mosaic maker. I'm not sure exactly how you choose to opt in or out, but the ones who have posted blocks to Flickr but have opted out of Flickr's APIs are not shown.

Danny

Monday, April 14, 2014

Hive 9 March Blocks

Hi all,

Just wanted to say thank you for all of my blocks. I know that some of you were a little concerned about sewing the circle, but these blocks are wonderful!

I'll post the completed quilt once it's finished. Hopefully, before the end of the year.

Thank you again,

Beky

Tuesday, April 8, 2014

Hive 7 - March Blocks


These are the blocks I hunted down from flickr. I'm sorry if I missed anyone! Andi, I think your quilt is going to look stellar when it's done! Thanks, ladies, for another amazing month!

Monday, April 7, 2014

March Hive 12 Blocks

Look at all the lovely blocks Jennifer received for March. I love her bright and cheery colors!

Saturday, April 5, 2014

Hive #2 March Round-up

This month we made many "Simply Woven" blocks from brights for our Queen Bee Dana.  Great job ladies!


1&2: Heather, 3: Abigail, 4-7: Dana, 8:Vickie, 9-11: Lisa, 12-13: Tiffany, 14-15: Megan, 16-17: Jansen, 18: Jessamie, 19: Andrea, 20: Mandy

I hope I got them all ... SO sorry if I missed any.  You were all busy little bees this month.

March Hive #4 Round Up So Far

Just so I don't forget.  

I've started putting together the blocks that I've gotten so far and the ones I  made together but my camera has gone AWOL so I can't take a picture till the hubs gets home. 
FOUND IT!  My son stole it!  So here is my top so far....:
So far I have gotten blocks from:

Sara
Sally
Carolyn
Heather 
Robin

Blocks Posted not recvd yet:

Celine

Heard From and know they are coming:

Rachel

Everyone else (If I missed a post on flickr or an email you can smack me with a raw mackerel.... if you can catch me!)

Chelsa
Kerrie
Alissa

I will update this post as the blocks come in and I'll add a picture of what I've got so far if I can figure out who absconded with my camera.  

Tuesday, April 1, 2014

Hive 1 - April Block Tutorial

ABOUT ME

What is your name?: My name is Natalie (also known as Threaded Mess on various forms of social media) 

Where do you live?: I live in Centreville, VA, USA which is about 30 miles west of Washington D.C.
 
Tell us about your family: I am a B2B Marketing major turned IT Business Analyst in Asset Logistics, married to a Computer Program Developer/System Architect who loves to play computer/video games, plays beer recreation league hockey, and occasionally gets his base guitar out for a jam session. Together we have two beautiful twin boys named Mason and Ronan who are 20 months and another baby due at the end of September (not sure what we're having yet). 
Corolla Beach July 2013

Tell us about how you got interested in quilting: I think I was given my first sewing machine when I was in 5th grade. I remember making a skirt with my mom that I was relentlessly made fun of for wearing. I apparently didn't pick a "cool" fabric from the Walmart selection I was allowed to pick from. Around the same time, my step grandmother tried to teach me how to make a quilt using squares of fabric. Without her tutelage (we usually visited to share meals together, not quilt), my interest waned and was ultimately forgotten. I continued to enjoy using quilts and appreciating them from afar. Flash forward 18 years, many craft interests that didn't stick, and enter my husband's mother, Ann. I was enamored with many of her creations, and honored with my first gifted quilt made just for me. She inspired me to create my first quilt a few months later for my sister Leslie. That was December 2008 and I've been making quilts ever since. 
My sister is obsessed with Hot Pink

How do you organize your fabric stash: My fabric room is always too messy for pictures (but I am showing some anyways). I am one of those people who can almost always tell you exactly where some scrap of fabric is until I put it away. 

For yardage, I have deep bins where I have rolled my fabric onto comic book boards and the fabrics sit in the bin so that the thin edge faces up. I keep larger scraps and fat quarters in open containers on my shelf. I also have some 'collections' grouped together in the shelf over my cutting table: Amy Butler, Anna Maria Horner, Heather Ross, and Lizzy House

Scraps are stored in old cheeze ball buckets (cleaned of course) on a shelf above my desk.

At any given time, I might have ziplocks with fabrics set aside for a certain project or just stacks laying around. It's not a perfect system but it works for me. 

My design wall is a piece of insulation board wrapped in a vinyl tablecloth backed with flannel. It sits on a curtain rod from ikea that I mounted upside down to cup the board so it can lean against the wall. That way it's technically movable.

Who is/are your favorite fabric designer(s)? I seem to gravitate to Lizzy House a lot. She plays a big part of my stash. More than looking for a particular designer though, I tend to look for fabrics that are timeless and geometric. Tone on tones, tone on whites, and solids are 90% of my stash. I do have a few grown-up prints, mostly from Amy Butler, Anna Maria Horner, and Joel Dewberry, but for the most part I stash fabrics that are geometric, vibrant, and that can blend into many collections.


What is one thing you have learned that you wish you knew when you first started quilting? You would think this one would be obvious, but I had no idea my first machine didn't have a quarter inch sewing foot. It was more like 3/8ths of an inch. None of my blocks were coming out the right size which was aggravating. I figured that out midway through the first quilt I made without help from my MIL, but had to commit lest I waste the blocks I already made. I ended up using the trimmed scraps to make covered buttons so it worked out. I also learned that I don't need to buy the whole collection. I can pick and choose fabrics and find other fabrics that go to get a unique, personalized look.

What is your favorite sewing/quilting tool and why should we all go out and buy it? I love my rotating cutting mat. It's perfect for trimming blocks because I can turn the mat without moving the block. I also really enjoy my slider mat for free motion quilting. Leaving my feed dogs up gives me better tension control than trying to manually adjust it. The slider covers the feed dogs and lets me glide without any tugging.

Who is your favorite fictional character and why? (Could be from a book, movie, TV show, etc.)  This is an impossible question for me to answer. Suffice to say that I'm a book nerd. I read every night and listen to audio books in the car so my average is between 1-2 book finishes a week. I am drawn towards the paranormal/supernatural/fantasy fiction and mostly from the young adult section. I am also a re-reader and tend to go back for my favorites like someone would pick up a favorite ice cream as a treat. TV and movies are fun for me too. The closest I can get to an answer is that I've read the Harry Potter books 7 times and if any of the movies are on TV, I'm watching them.


TUTORIAL

Improv Log Cabin Blocks: These blocks will start with a square between 1.5" square and 3.5" square, with strips of varying widths of 1" to 3" (anywhere in between), going from very light blue to darker blue, with the last 4 sides finishing in gray. Blocks can be any size between 12.5" and 13.5". Per Stash Bee rules, I am only asking for one, but if you get carried away and want to make more that's fine by me! If you need me to send you any fabric strips please let me know as soon as possible so I can get them in the mail to you.

Color Palate: 

White, (true) Light blue through (true) dark blue (gradient color scale), and light to medium gray


**DO NOT USE: prints with colorful accents. White, blue, and grey accents are all fine. Please try not to use blues that read on the green side or purple side.**

Color Explanation: I really love this quilt that I made in my charity bee earlier this year and decided to make one of my own. The color starts out with a white or very pale blue center. The blue gets gradually more saturated and darker as the block is built improv log cabin style outwards, and finally finishes with 4 sides of gray. I plan on sashing in white or blue and trimming them down to the same size to get a wonky look where all the blocks will 'float' on a background.


Anatomy of a Traditional Log Cabin block:
The numbers above show the starting block (1) and how to add to it. The difference you will see in an improv block is that all of the strips are not the same width, the color placement for my blocks will obviously be more ombre going from light in the center to dark on the outside, and you can have fun with the strips. You can bisect the strips with another fabric or use two different strips to make one longer one, etc.

Be careful as you build so that you aren't too small with your gradient blue core. If you are, it's ok to add some more gray on the outside if you'd already started on that color. That being said, I don't want the blocks to be too gray looking so plan on building with the blues and using the gray to finish the block off to the right size.

Here you can see a nice gradient of colors and the grays that I used


In the last two examples I bisected my blue strips with gray and I don't think it quite worked. I'm not tossing these but I would prefer if you bisect with a more similar color to your strip rather than another color (gray with gray, light blue with light blue, etc).

I’m going for a scrappy improv look here, so feel free to select whatever scraps that you have around that go with my color scheme. The more different fabrics the better. Mix it up and have fun! Maybe you’ll even be able to use a scrap or two. Maybe you’ll be able to cut from a fat quarter rather than needing to use yardage. I’d be happy to answer any specific questions about fabrics you want to audition. 

For more inspiration, check out this gallery!

Other basic guidelines: 
  • I would prefer if you pressed toward the darker fabric rather than pressing your seams open.
  • A 1/4" seam allowance is what I use. Since these are improv blocks, I'm not looking to match up points so if you are a little scant or a little over that's fine as long as the finished block is between 12.5" and 13.5" square(ish). If it's not perfect that's ok, as long as it's in the ballpark of that size. I will be adding sashing and squaring them up all to the same size once received.
  • Starting squares can be anywhere from 1.5" to 3.5" square or any rectangle in between
  • Strip widths can be anywhere from 1" wide to 3" wide and anywhere in between by any length you would like to cut. I scavenge through my scraps for small bits that would work and then add from my stash for the rest. 
  • Build your blocks just like a traditional log cabin. Because your strips are varying widths, you may find your block becoming more rectangular than square. To fix this you may have to add to the shorter side(s) which is fine but be mindful of color placement when you do.
  • I say Improv and not wonky on purpose! A tiny bit wonkiness is fine, but for the most part your shapes should be squares and rectangles, not irregular.  
  • Press as you add - this will help your blocks lay flat! Otherwise, they tend to puff up in the middle because of stretching on the bias.

Others have already written great tutorials so I am not going to write one out. Here's a link to one that I think is done well to show how to piece the block (courtesy of Ellison Lane), but ask that you use my specific guidelines for size of squares, strips, color, etc.


Happy Quilting!

Natalie