
This is such a lovely idea for your friend! I have always admired bookshelf quilts. I hope these books are a good fit - I had fun looking at all the bookshelves around my house for inspiration.
Enjoy!
- Julia H.

This is such a lovely idea for your friend! I have always admired bookshelf quilts. I hope these books are a good fit - I had fun looking at all the bookshelves around my house for inspiration.
Enjoy!
- Julia H.
-Starla
Hey again!
I made this stack and have not trimmed it to exact size as i think that should be up to the queen! I made a set of books that can be divided into 4-5 and if it's to chunky Adrienne can easily discard the rest!
This was so fun and simple - I think the finished quilt will be amazing!!!!


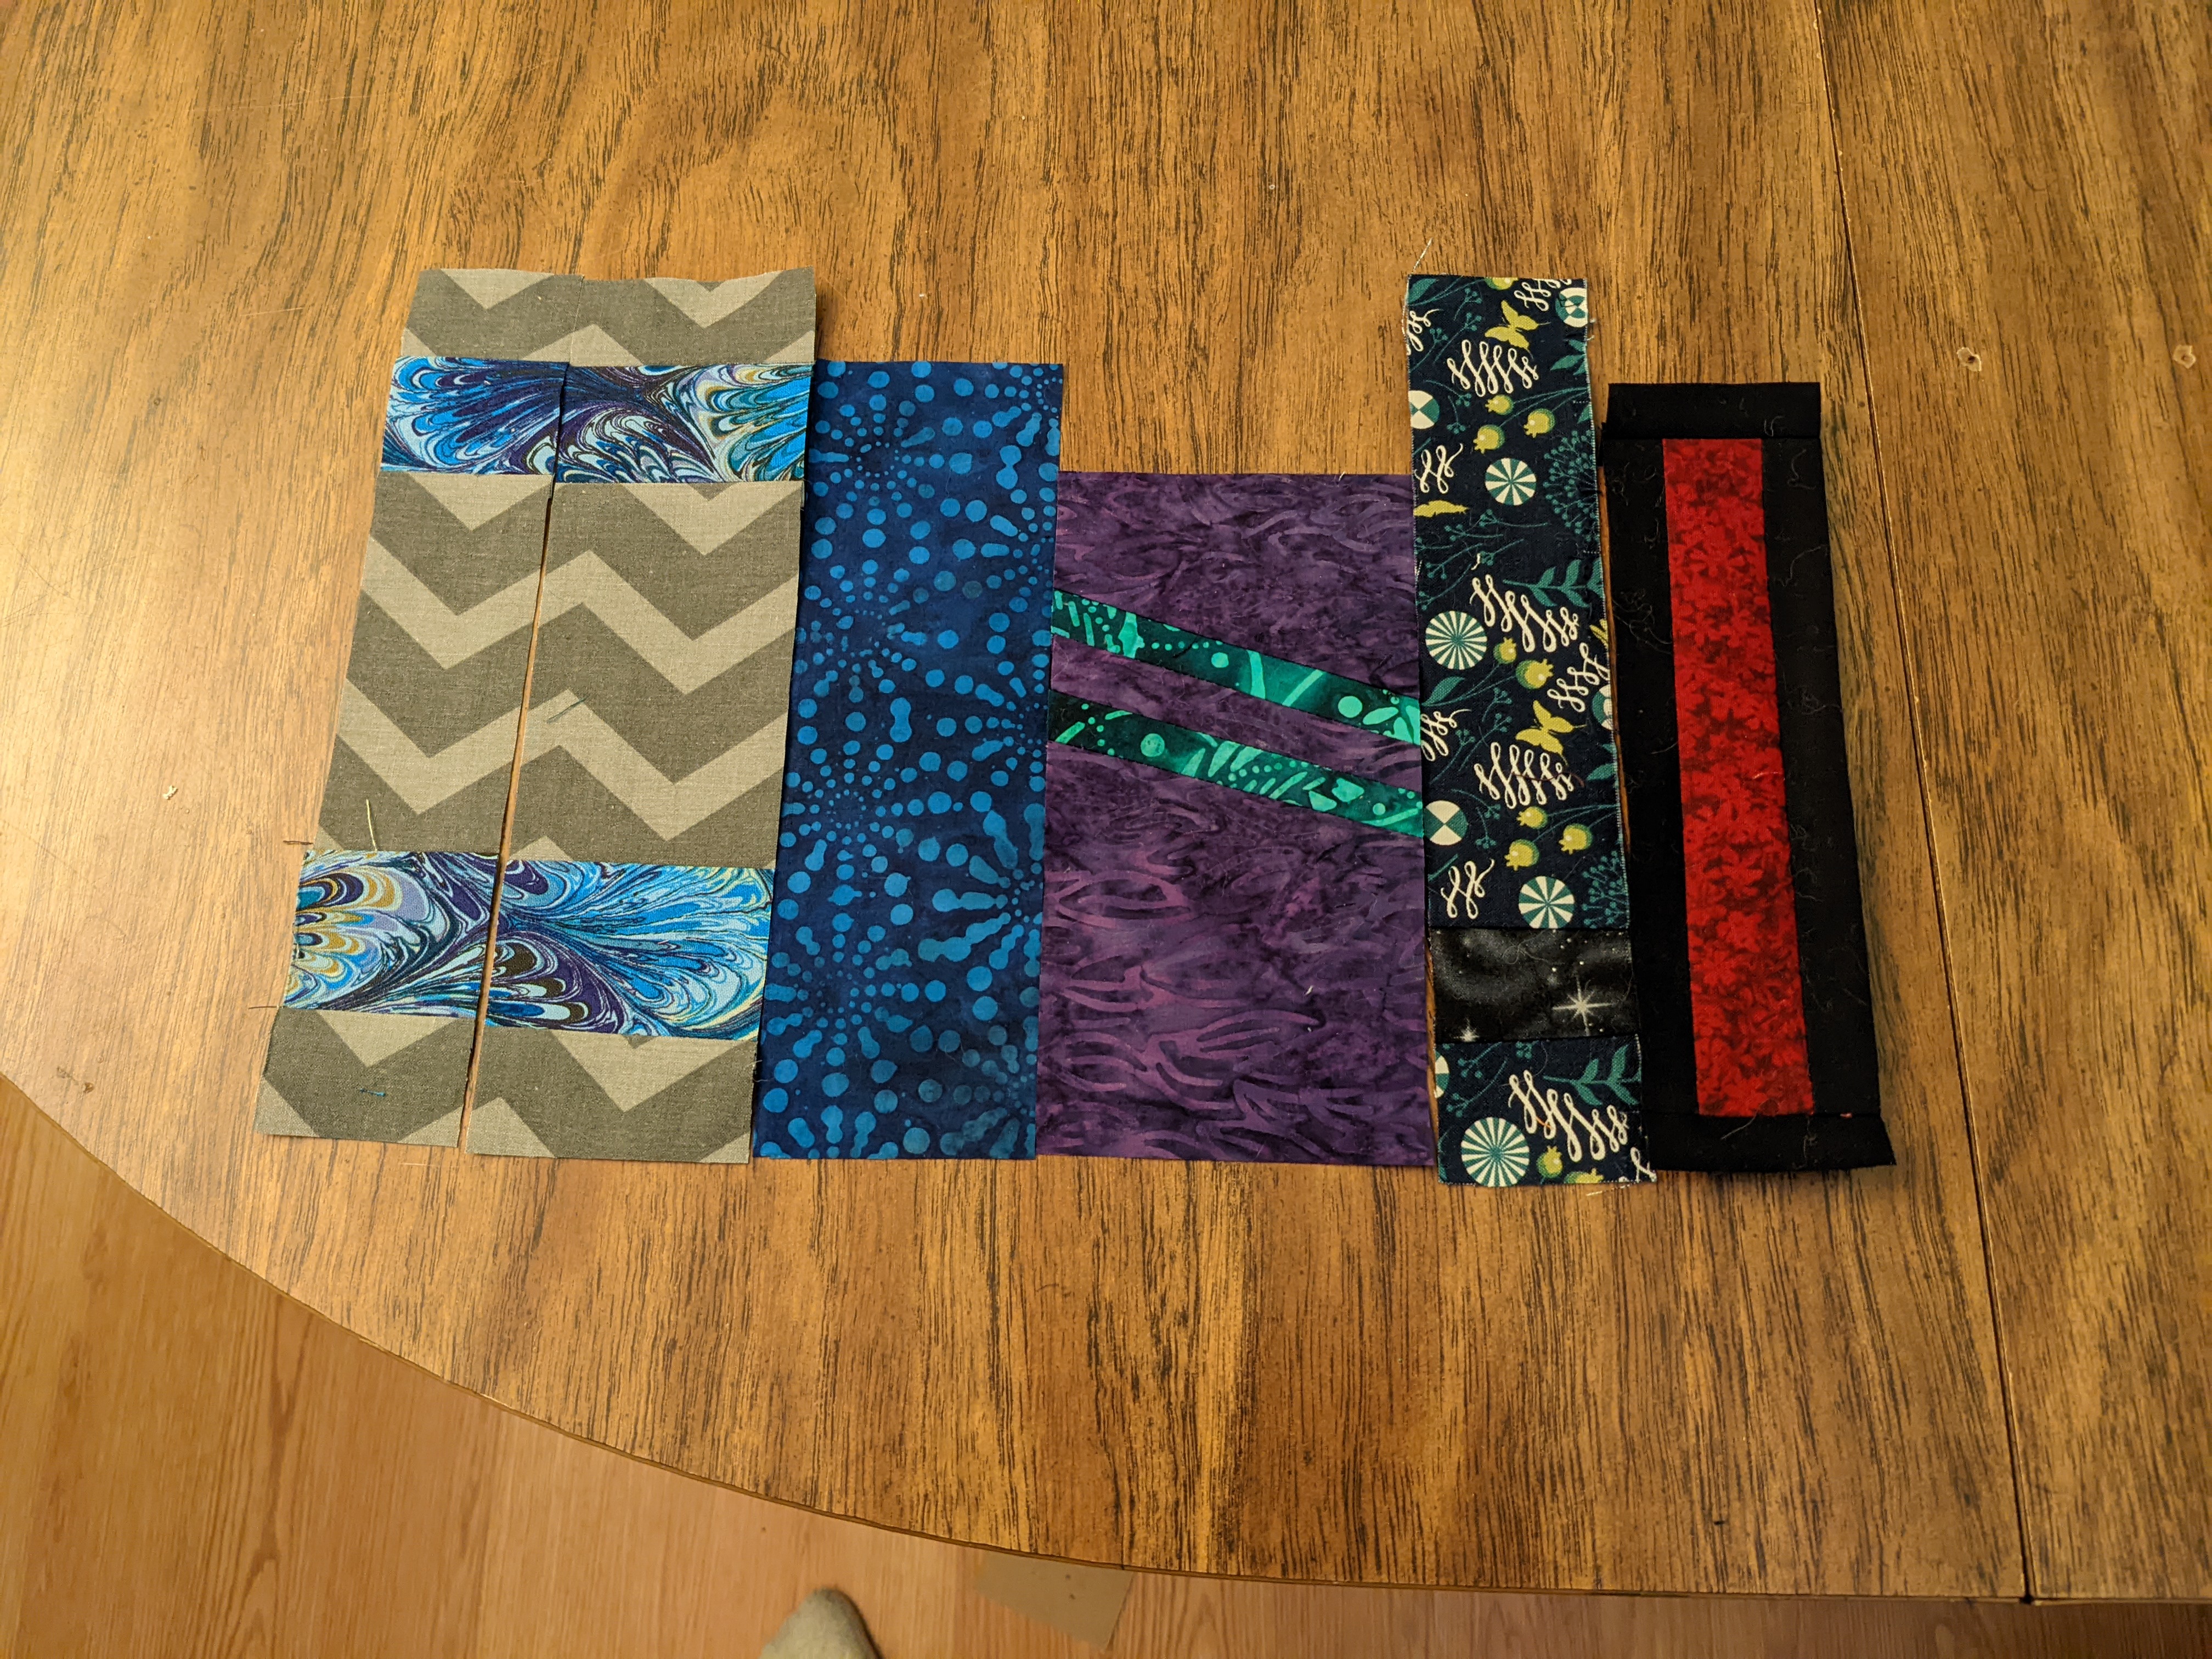
I enjoyed this block so much! I've thought about doing a bookshelf quilt, but I don't think I have the patience--making this one block was such fun though. I surprised myself with the backstory I came up with for each of them! In my head, the big red one reminds me of the dictionary we had in my house growing up--the purple on its side is some sort of local flora field guide--the small black ones are a mystery series--not sure what the next three are, but something fancy!--and then the last one looks like a few journals I had when I was young.
I love the variations that you can make when creating book blocks. The sky is the limit! Here are the blocks that I made. I originally intended 2 of the blocks to be laying on their side so that a trinket could be placed on top of it -- I do that often on my own bookshelves.


Hi there, this was fast and easy although I did struggle on which snowballed pink square to put where... Looks good in the end though!!!

Hi Adrienne,
So excited that you choose this type of block! I've wanted to make a book quilt for a long time but felt overwhelmed about how to start it. I hope you like these "books". Have fun piecing them all together. Can't wait to see the final product. I know your friend is going to love it!
-Nicole

Hi Kelsey,
I am so sorry this is getting to you late! This block was really cute and simple! Kudos to you for being so flexible with us. I went with a medium/light combo. I hope this goes along with what you envisioned for your final quilt. Can't wait to see the final version :)
-Nik
Hey Adrienne,
I'm actually slowly working on a bookshelf quilt for my sister. Your books gave me some fun new ideas for my own spines. I hope you like the colors I picked and that nothing's to bright.

- Kelsey
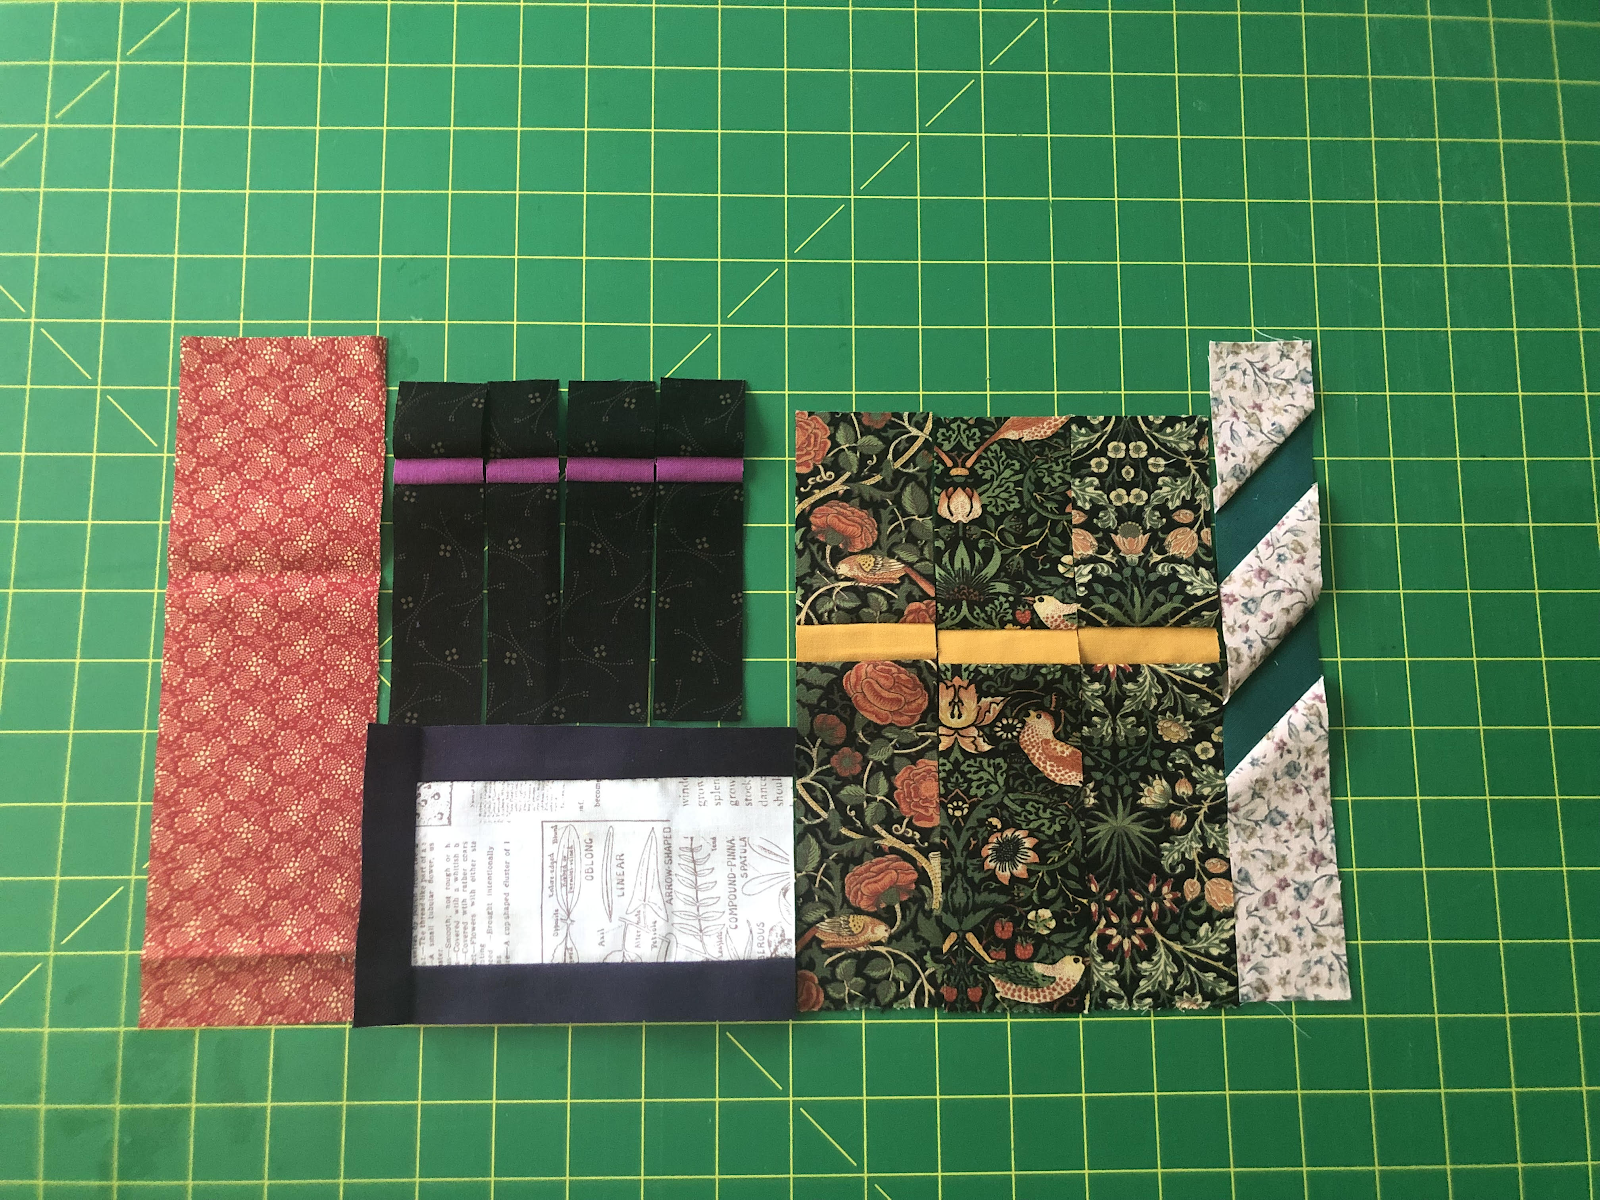
Hi Adrienne, I was so excited about your project that I included a tourist book about Paris:) If you like my selection of fabric, you'll have to thank Julia C! I used the fabric scraps she gifted me last month, and I chose rich colors, worthy of Sherlock Holmes' library. I will send you green/book/selvage from my own stash in a separate envelope. Happy sewing!


Fabric:
1 strip of majority black print (with maybe a teeny bit of red) 3" x 24 1/2 "
1 strip of majority white print (same comment as above) 3" x 24 1/2"

1. I've found the fastest way to sub-cut is to lay the strips right sides together and cut the two into 3" squares. You will need 8-3" squares of each fabric.

2. Mark a diagonal line on the back of the white fabric.
Sew the two together 1/4" away from the marked line on both sides.
Cut on the line and press toward the dark. You will have 16 half-square triangles. Trim each to 2 1/2" square.

This is a picture of the original 1923 quilt as seen in 101 Fabulous Rotary-Cut Quilts by Judy Hopkins and Nancy J. Martin.


Hi Adrienne,
Your block came just at the right time for some well needed sewing therapy!
I had lots of fun with those books. Hope they are, what you are looking for.
They'll go in the post on Saturday.
Happy sewing,
Rita
Hi everyone, this being my first Stash Bee, I had a really tough time deciding on what block I would choose for my month.
My best friend just graduated with a Master's in Library Sciences and is moving across the country for her dream job! I am asking everyone to help me create books for a bookshelf quilt, I have not decided on the background color so I just need help with the books.
I am hoping this will be an excellent strip scrap buster 👏 I am planning on making each person's books into a block for the bookshelf, so your books can coordinate or be unique, but they will be together on the shelf (if that makes any sense?)
The parameters for this month's project are:
- I would like the books to be disassembled and don't worry about squaring up
- Being mindful of the 1.5 hour time limit, don't make the book covers too complicated
- Choose less than 10 fabrics total, repeats are fine
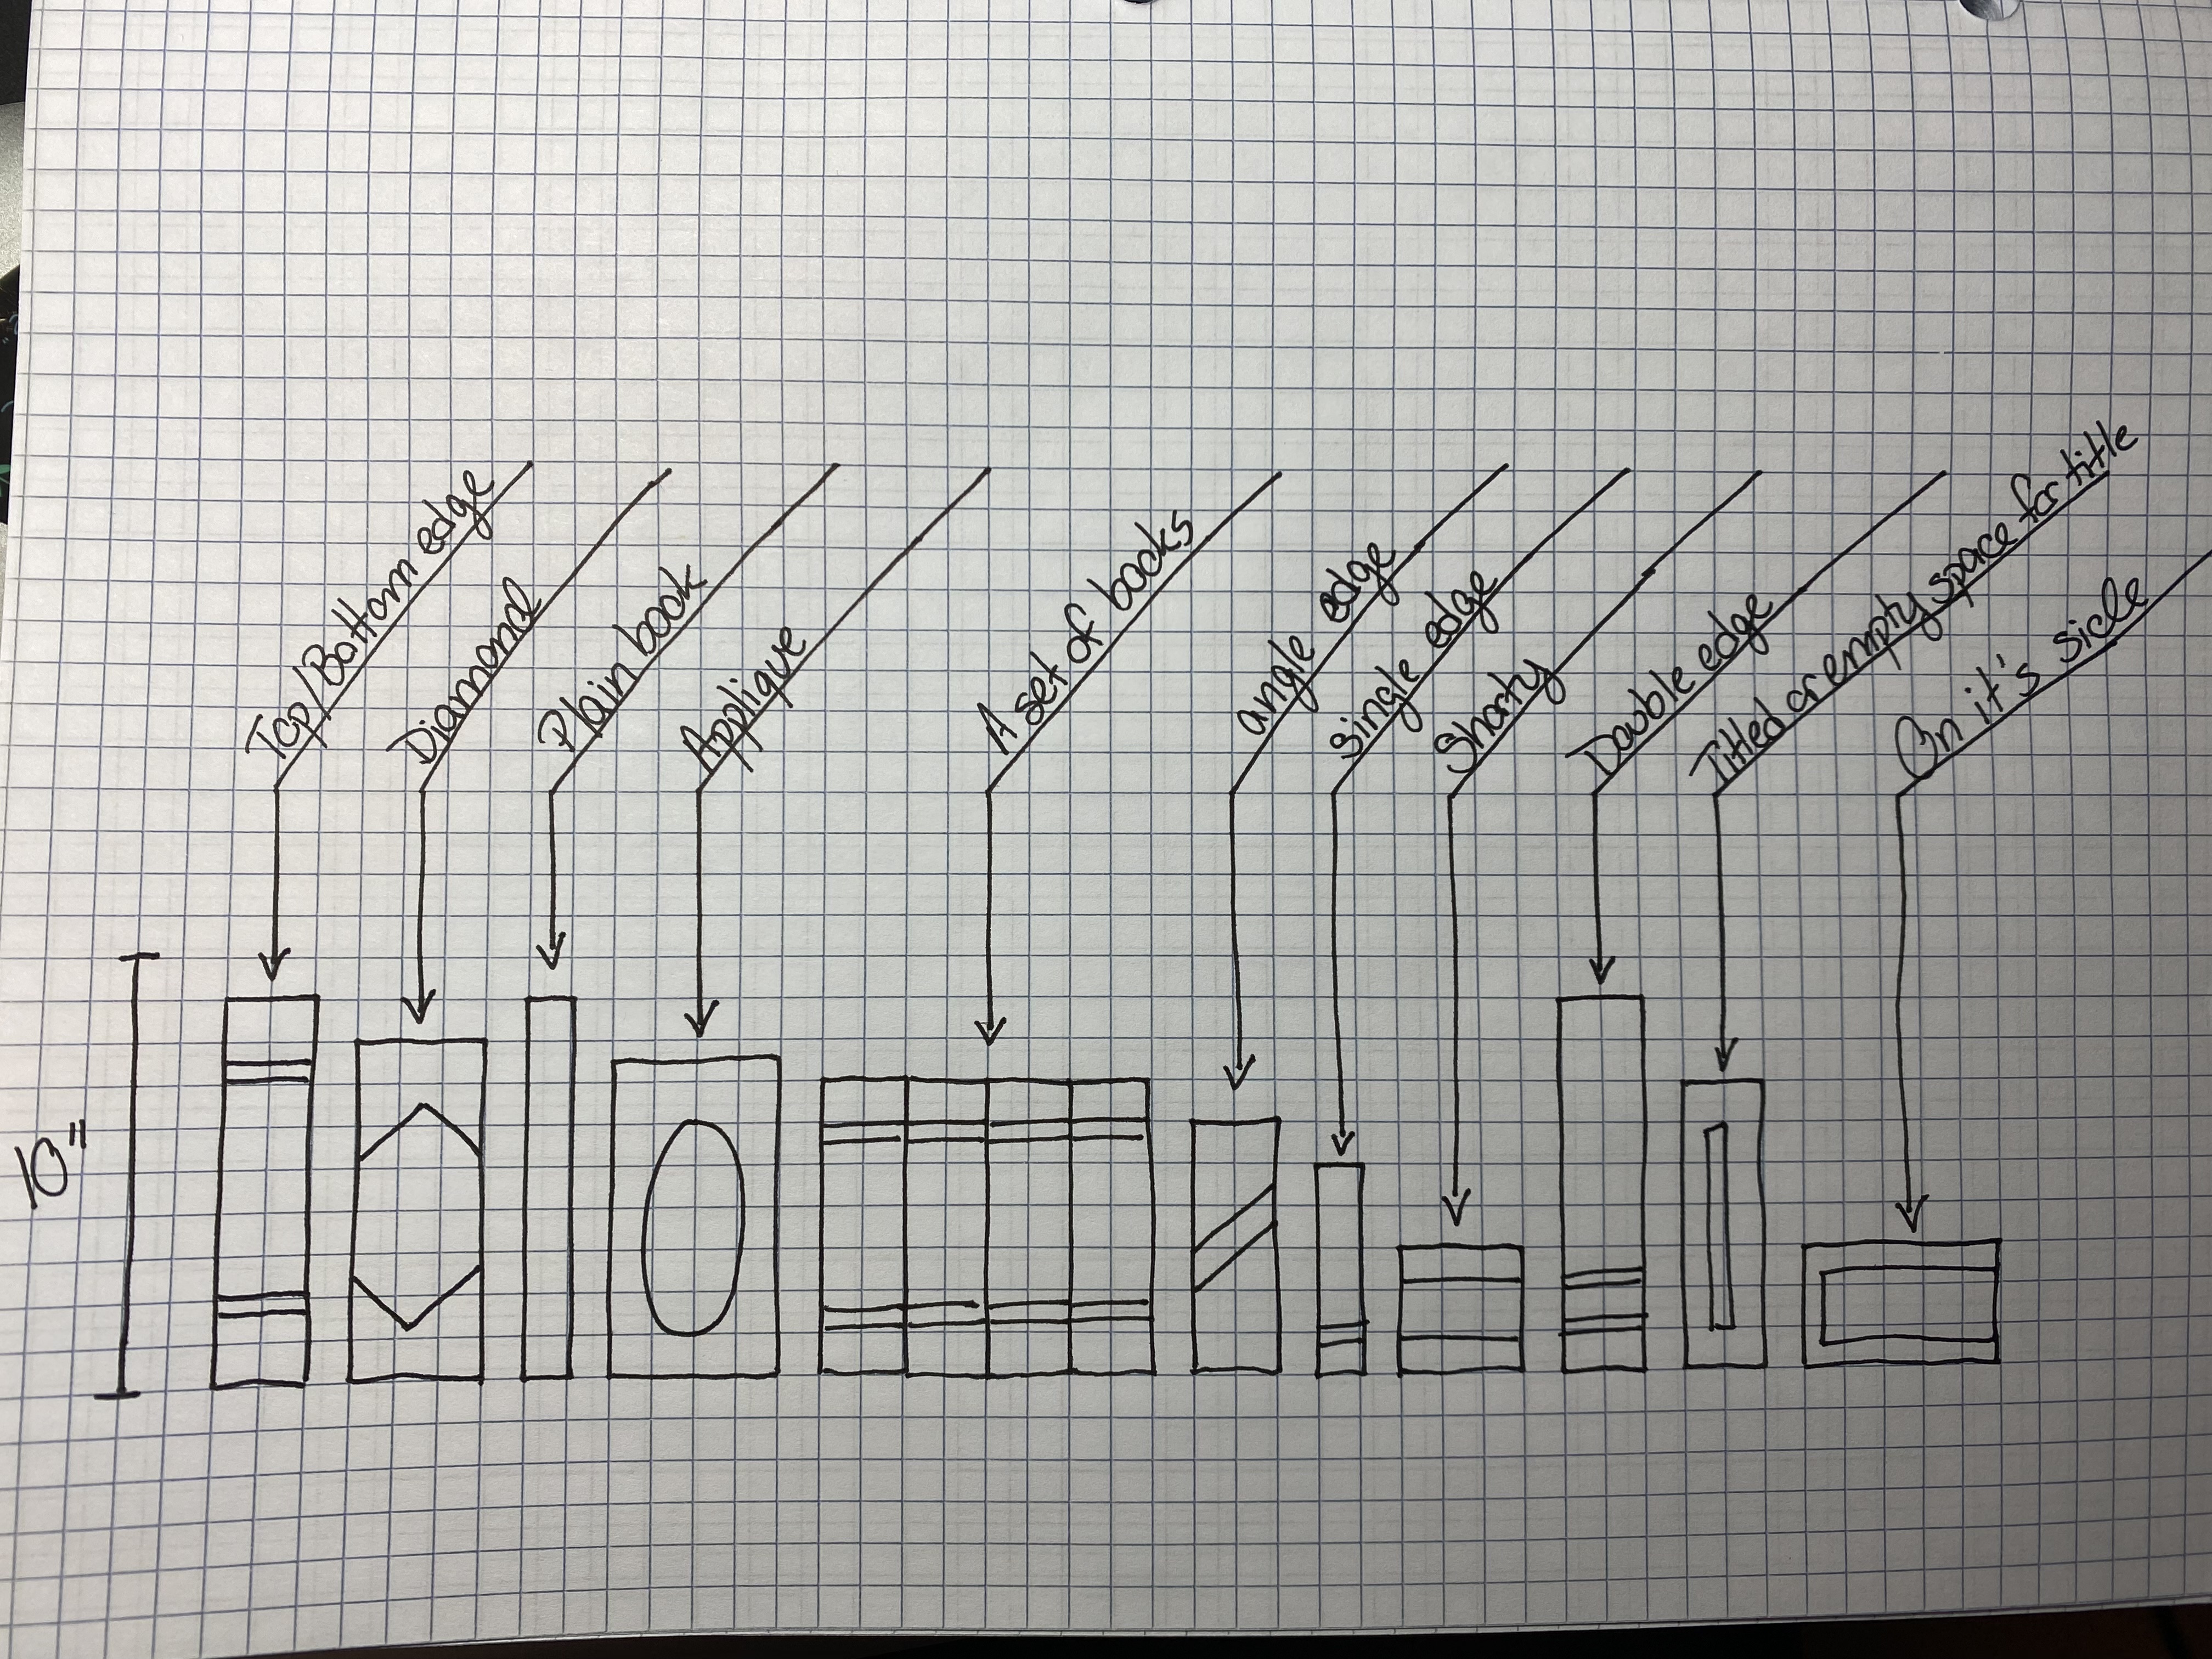
- The book height can be no higher than 9 3/4"
- The book width can be no thinner than 1" and no wider than 4 1/2"
- Make your book pile to be a total of 16" wide or less - make as few/many you like!
for example: make 8 - 2" books, or 16 - 1" books, or 4 - 2", 3 - 1.5", and 1 - 3.5" books
The main wall color will be mauve(y) with the bookshelf looking like an old/dark library. I am deciding on the background of the bookshelf, so for the books I am thinking rich, muted/greige tones; colors like olive, emerald, plum, eggplant, navy, dark gold, maroon, black, grey etc but anything will work except neon colors.
Any fabric styles would look great as a book, so use whatever you would like; bonus if it looks like a book! I found the below eyeshadow palette the other night and thought it was a perfect representation of some of her favorite colors for some inspiration!
**

I found a lot of color combo/fabric style/book cover shape inspiration on Fandom for Stitches, check out the Bookcase Quilts section! FYI it's a fantastic resource for some FREE paper piecing and embroidery patterns that are wonderfully curated for any of your future projects. 😊
**
A couple ideas for making book covers that I have started:
(I guess we can't click on the tiny picture but zooming in will work)
How to assemble the books:
For any of these with seams, press any way you like 😀
A Plain book:
Pick a strip and trim to the length and width you would like it and done! This one is my favorite 😁

A decorative binding strip: double binding, top and bottom, on an angle:
Pick a strip for the book cover and a scrap of contrasting color, decide where you want to place the contrasting color: at the top, bottom, top and bottom or on an angle. Cut the book cover strip where you would like to place the contrast edge, then sew the strips together. I trimmed off the excess for the photo but you don't have to do that.
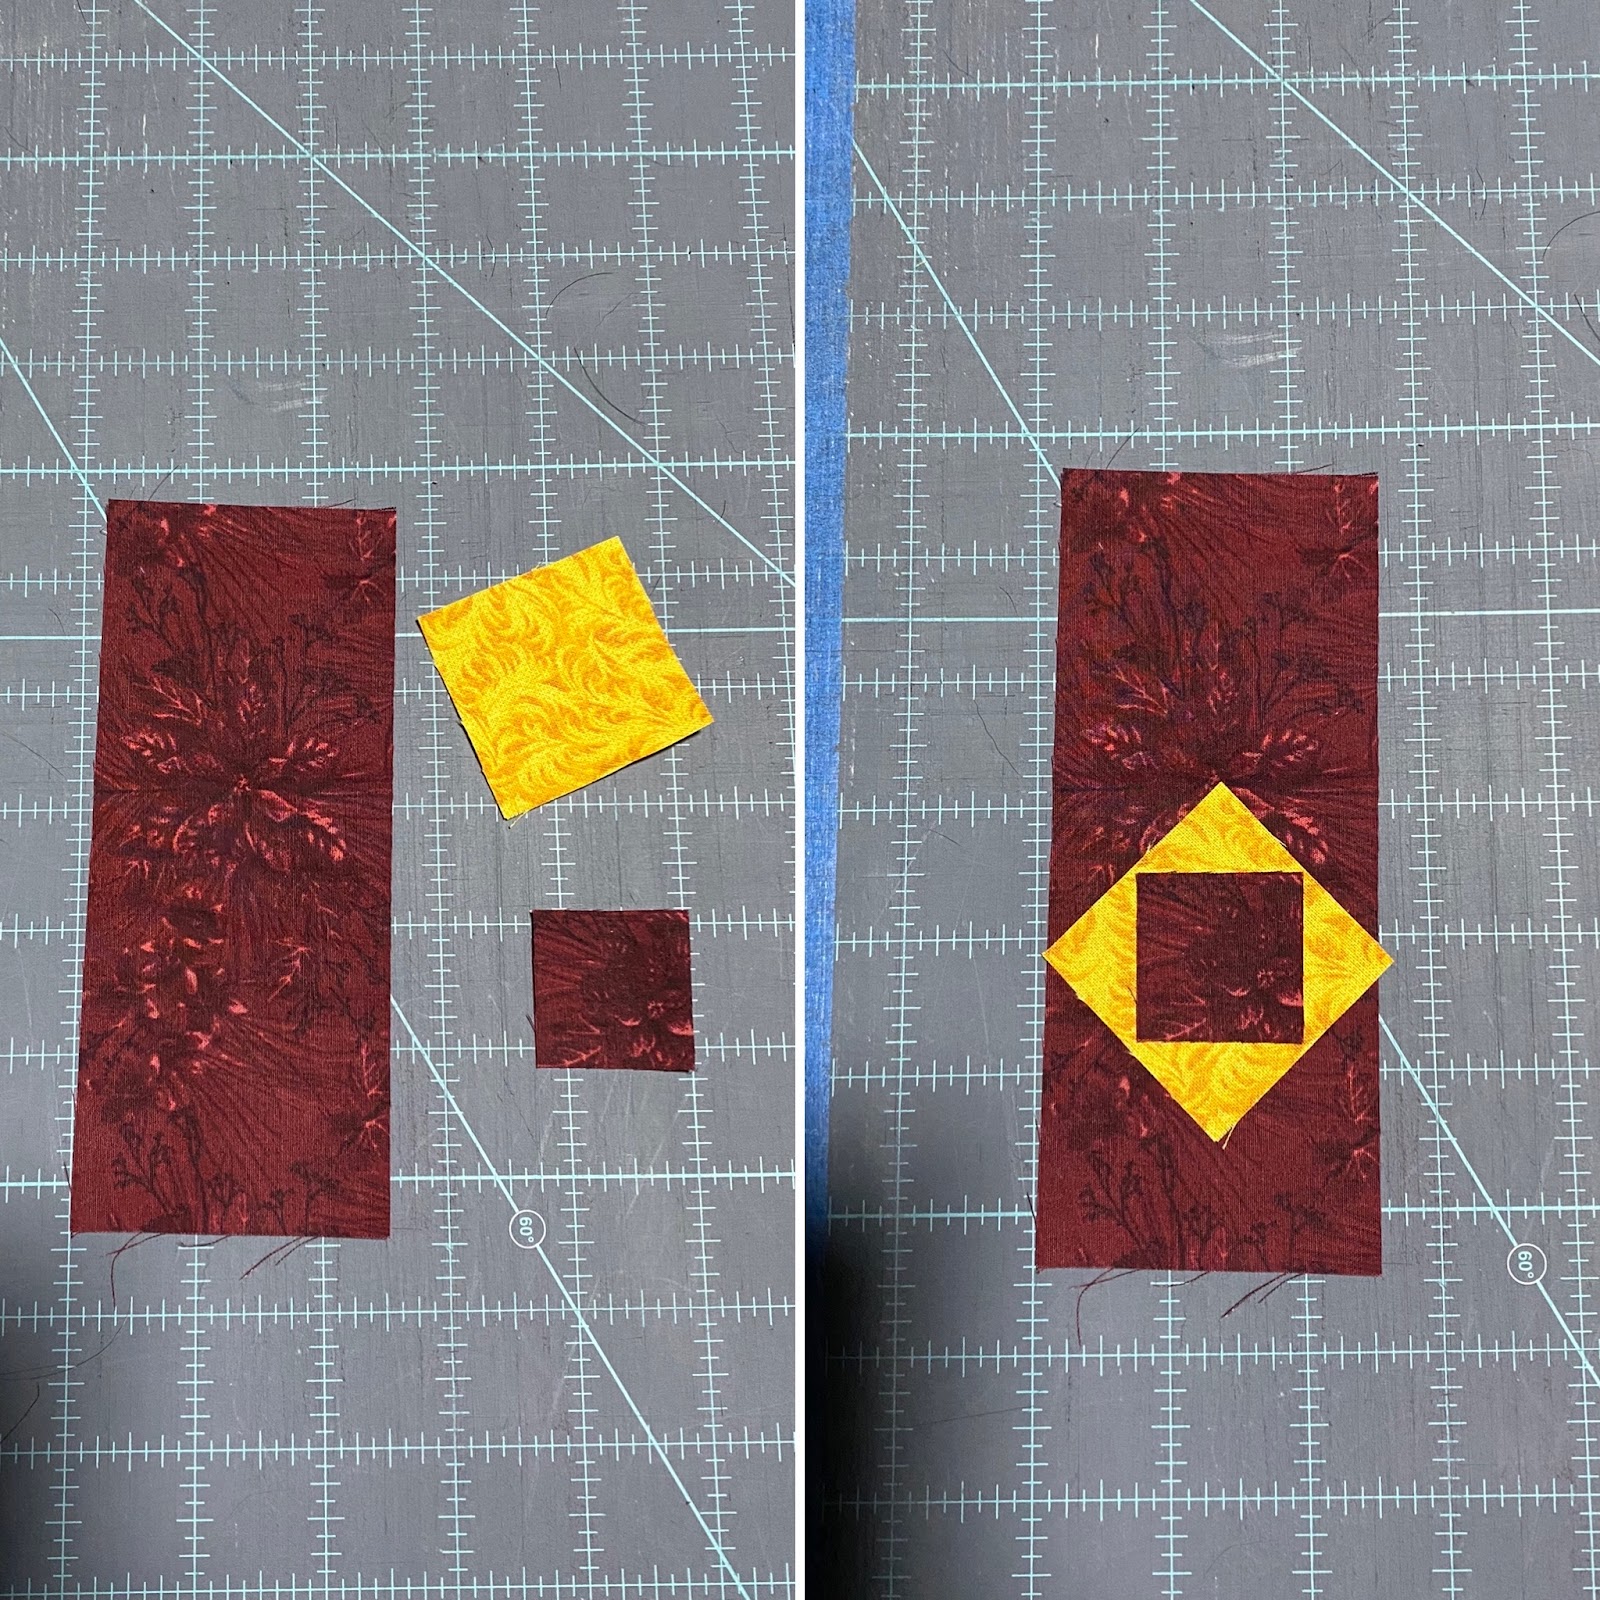
A diamond shape binding:
Pick 2 fabrics, I chose a gold scrap that was 3" wide and navy that I cut into 2" squares. If your squares are more than 1/2 the width of the bigger piece, there will be more overlap so your points don't get chopped off. Place the square in a corner of the rectangle and stitch from point to point across the square. Trim 1/4" from your seam and press open. Place another square on the other corner and repeat.

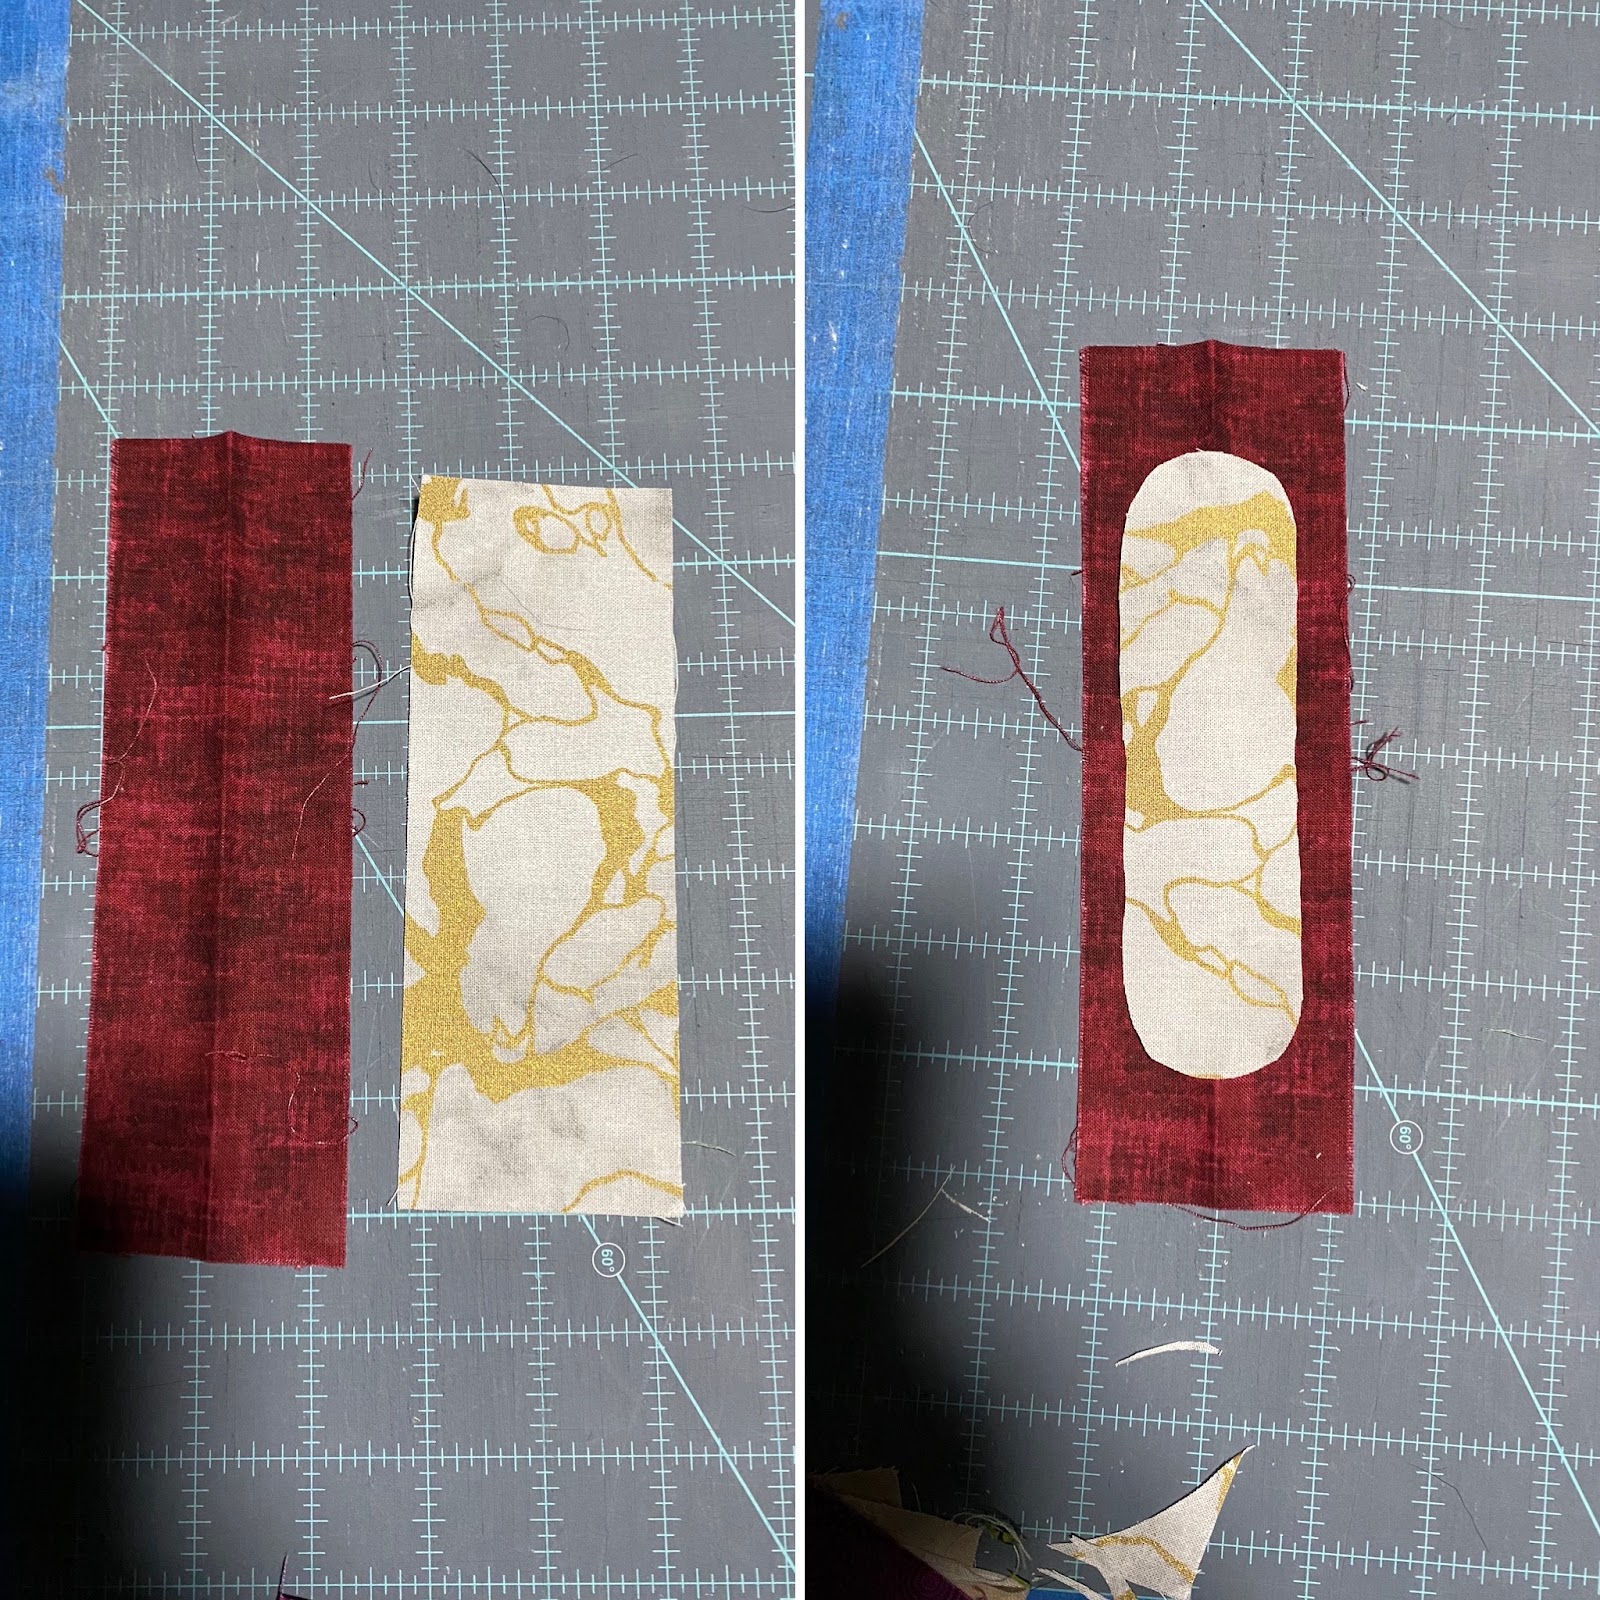
An applique binding: (If you are feeling like a challenge, use your preferred applique method)
Pick a strip for the book cover and a scrap of contrasting color, trim the contrasting piece to the shape you would like: oval, circle, square, rectangle. Place the applique piece 1/4" away from the edge of the book cover unless you want the edge in the seam allowance (I did both examples below) Applique shape to the strip.
The book on the left: I want the corners of the gold fabric to be in the seam allowance
The book on the right: I trimmed my oval so that the edges are more than 1/4" away from the edge and won't be in the seam allowance.
A set of books:
Pick a larger scrap for the book cover and contrasting strip for the decorative edge. I chose a large scrap that was 8”x8” and the contrast strip was 1.5”x 16”. I cut the large scrap into thirds; one section wider than the other two and then cut the contrast strip in half. I placed the contrast strip between the book cover sections. I sewed the strips together into one block and then, subcut into strips of different widths of 1.5", 1.75", 2", 2.5 to make a set of identical books.

A book on it's side (if you decide to make one of these, please make the pages light like white, white on white, light grey, even light yellow)
Pick a strip for the book cover and a rectangle of a light fabric for the pages. Trim the strip to 3/4"-1" width and the pages can be any width. My book example below was 1” book cover strips and 2”x6” rectangle for the pages. Subcut the book cover strip into 3; 2 sides of the book edge and 1 side for the binding edge, I didn’t measure the binding edge, I just approximated since I planned to trim it.
Sew the long strips for the book cover and pages together and then sew on the binding edge.


A book with a selvage title
Pick a strip for the book cover and a length of selvage. I trimmed the selvage about 1/4" ish from the text. Cut the strip into 3 across the short side: 2 shorter pieces and 1 wider piece. Cut the larger piece in half down the long side, perpendicular to where you cut. Sew the long pieces to the selvage and then sew the 2 short pieces onto the end.

Here are my sample books laid out in 16" wide "blocks"


Please let me know if you have any questions!
Thank you very much for helping me with this project, I am excited to see what everyone makes!!
p.s. if you have any selvage to spare, can you send a couple bits? I am going to use them as book titles!
p.p.s if you have any green 3"+ squares, can you send one? I am making a philodendron for one of the shelves 😁
~Adrienne
I saw this on a Pinterest board and it just said summer to me. (Photo from http://www.acraftyfox.net/quilt-tutorial/irish-chain-sewcial-quilt-read-along/) It will, hopefully, be an easy block to put together.

I’d like the greens to be of a medium value …

… and the low volume to be a white/off white background.

All squares are 2 1/2”. You will need 13 green and 36 low volume.

It can be pieced row by row or whatever way works best for you. Please don’t iron the finished block. (Which should measure 14 1/2”) It will be easier to put the blocks together if not pressed. Thank you for sewing for me this month.
Greetings Hive 4!
Have you noticed that curves are everywhere in modern quilting? My local quilting groups have been exploring improv and precise curves. I would really appreciate your help in finishing a project I started in a Brenda Gael Smith virtual workshop. You can check her website to see many design options using quarter circles. And if videos are more helpful, Cheryl Arkison has a great IG improv curves technique video.
Here's what your finished block(s) might look like.

You can send me one or both. Sending two exceeds the maximum measurement, but the simplicity of the block might allow you to feel generous. Once you have two base blocks cut, you'll make just one freehand cut and then sew two seams. Sound simple?!?! I hope so.
Here's my palette - a very muddy yellow, chartreuse, light and dark terracotta, four browns from light to very dark. Please choose two solids (one light and one dark) that would work well with this palette.

If you don't have anything in your stash that might work well with this palette, I hereby grant permission to do some upcycling. If you have some solid cotton or linen in old clothes and/or table linens, please use those (as long as there are no obvious stains). This will be a color experiment for me, so just do your best.
Cut 2 blocks approximately 10.5" square. You'll notice that my yellow block is slightly undersized. Slight variation to maximize fabric is allowed.


