Hey Marie,
I lost track of time this month but these two are on the way! I hope you enjoy them.


Hey Marie,
I lost track of time this month but these two are on the way! I hope you enjoy them.
Per usual, February kicks my butt bc it seems shorter than 28 days....
I had so much fun shopping my stash for your color choices! I knew I had ZERO solid brown so I had to go shopping (darn)
I pulled all of my fabric together the first week of the month and there the pile sat on my sewing table until the 23rd. Sewing wonky is def my jam but I had to keep an eye out for not being TOO wonky!
I hope you enjoy these blocks and I can't wait to see your final creation!! These will be in mail Monday morning 📫

Hello Marie!
Just finished these two blocks and really had a blast. I made two blocks since I had a lot of cuts left so hopefully one of them is to your liking!! The colours are a bit off (the blue leaves are really more blue than purple) but hopefully you get the jist of what it looks like...


Try as I might, wonky just doesn't seem to come out of my sewing machine! I don't measure, but it still works out to be fairly straight all the same. But I still like the look of it and I hope you do, too, Marie!

~ Diana @ Red Delicious Life

-Nicole

What a fun request, Marie, and I love your color choices! This took me a bit outside my comfort zone in the best way. Can't wait to see what you make with all our slightly wonky squares!
Enjoy!
- Julia H.


Here are the blocks I made for this month. I hope you like the colour choice and making these blocks was really good fun! Somehow they turned out about the same size, eventhough that was not planned.
Slightly wonky is definitely a sewing technique I identify with!
Kathrin

Hi Marie,
I enjoyed making those blocks, hope they are what you were looking for.
The blocks are in the post on the way to you.
Slightly wonky is just my jam :)
Happy sewing,
Rita
Dear Hive friends,
Here's (I hope) a fun and stress-free block for which you don't need to measure precisely, unless you feel more comfortable to do so, of course. This block should not be fully wonky, just slightly "wabi-sabi".
I was inspired by a tutorial from Hive 2 posted last November. The tutorial is very well done and I invite you to follow the directions here to complete the project.
Use solids, batik, and if you want to add prints, I prefer novelty with flowers and leaves.

-Layers: Prepare at least five layers of boxes. It does not matter if it is a square, a rectangle, or a mix of the two.

For those of you who were in the HIVE4 in 2020 you’ll remember this as Em’s block in February! Ever since I made it, I have been obsessed with this block! I reached out to Em and she is happy to allow me to use the same pattern! (I did do some research and found out this pattern on a website called www.gigisthimble.com. I used this website’s tutorial as a guide to writing my block.)
Here we go!
PS - Being Canadian, I spell “colour” with a U and “centre” a
little backwards.

Fabric
I want to see your pink scraps!
Pinks: You can use the lightest
of blush to the deepest of fuscia; bubblegum, coral, hot pink, pink lemonade, salmon,
ballet slipper, peony, strawberry, rose, watermelon, cherry blossom, flamingo, raspberry
and everything else in between. When
using prints, please keep the other colours in the prints muted so the pink
stands out. I really don’t love batiks so please stay away from them. If you have some fun, novelty fabrics that
you can fussy cut, like I did with my raspberry and strawberry fabrics, have
fun with it.

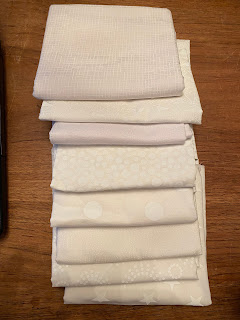
Background: I would l like white’ish. White on white would be preferred, but if you don’t have white on white, solid white works great. I would prefer that the background pieces are all same fabric.
Notes on Fabric:
- I know that the rules say that I can’t ask for
more than 10 fabrics, so if you need to stick to the max 10 fabrics, that is totally
fine. But if you have loads of pink scraps feel free to use as many as you have.
- For the pink 2” x 2” please try to use as many
different fabrics as you can. If you
don’t have that big of a variety in pink, when you are making your central grid
please try to keep the fabrics that are the same far apart.
- For the pink 4.25” X 4.25” blocks, you can use
four fabrics or eight. I chose to use eight, so my block had a lot of variety.
Cutting
(20) 2” x 2” pink squares
(4) 2” x 2” white squares
(4) 4.25” x 4.25” pink squares
(4) 4.25” x 4.25” white squares
(4) 2” X 3.5” white rectangles


Make center of the star
Step 1: Using sixteen of the pink 2” squares, create a 4x4 grid. If you aren’t using
20 different pink fabrics, please make sure that no two of the same fabrics are
side by side or one on top of the other.

Step 2: Using a ¼”seam allowance, sew the squares together in rows. Press the seams of each row to the same side, alternating the top row to the right, the second row to the left, the third row to the right, the fourth row to the left.

Step 3: Sew the rows together.
To save time, sew row 1 to row 2 and then row 3 to row 4. Then press the
rows and then sew together rows 1 & 2 to rows 3 & 4. To get nice straight lines, try butting up the
alternating seams together. Press the row seams in one direction.

Make the star points
**If you are
using four different pinks:
Step
1: Draw a diagonal line across the back of the pink 4.25” x 4.25” squares.

Step 2: Pair one pink square with a white square, with rights sides together (RST) use a quarter inch seam allowance and sew on each side of the line.

Step 3: Cut down the centre of the block along the line, which will make two half square triangles. Press the seams to the pink side. Repeat for the other three 4.25” x 4.25” squares, you will end up with eight half square triangles.
Step 4: Press to the pink side.

Step 5: Using a ruler trim the blocks to 3.5” squared.

**If you are using eight different pinks:
Step 1: Cut
the eight pink 4.25” x 4.25” squares on the diagonal and cut the four white
4.25” x 4.25” squares on the diagonal.
Step 2: Sew RST, one pink and one white triangle to each other along the long sides. Note – If you are going to use this method, you will be sewing on the bias, so you need to be gentle and make sure that you don’t pull the fabric out of shape.
Step 3: Press to the pink side.
Step 4: Using a
ruler trim the blocks to 3.5” squared. I used my long 4” x 14” ruler because it
has the 45-degree angle on it.

Make corners of the block
Step 1: Sew each of the four remaining 2” x 2” pink blocks, RST,
to one of the four 2” x 2” white blocks using a ¼” seam allowance. Press seams
to the side of the pink fabric. If you
are using fussy cut fabrics make sure you are a cognizant of the direction that
you want the image when you are sewing.

Step 2: Sew each of those pieces to one of the 2” X 3.5” white rectangles. You will need two segments with the rectangle on the right and two with the rectangle on the left.

Layout the block ***I forgot to take pictures at this stage!
Step 1: Place the four-by-four grid in the centre.
Step 2: Lay out the 3.5” x 3.5” squares around the grid; two on
each side of the grid. Long sides of the white half of the HST together. Reference the image below.
Step 3: Place the corner blocks. Make sure the pink blocks are on
the outer corners of the blocks, rectangles of the corner blocks should be
along the pink long sides of the HST. Reference the image below.

Sew rows together
Step 1: Top Row - Sew centre HST blocks together. Then sew the corner blocks either side of the pair of HST block.
Step 2: Middle Row - Sew the left side HST together, then sew the right side HST together. Then sew each pair to either side of the grid.
Step 3: Bottom Row - Sew centre HST blocks together. Then sew the corner blocks either side of the pair of HST block Step 2: Press the seams to either side.
Sew the rows of the block together
For this portion of the block, I used lots of pins as there are so many seams. I nested the seams where I could.

Step 2: Sew the top and middle rows to the bottom row
Voila! The block should measure approximately 12.5” x 12.5”. Please do not trim the block. I will trim them when they arrive!


Thank you so much in advance.

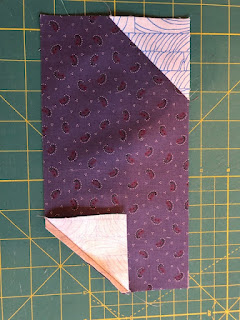
My pick for this year is a simple block. This block has been used in antique quilts and I found the free Lozenges block done by Bonnie Hunter and scaled it up in size.
You will need 4 different fabrics from my color choices of any shades of blues, purples, and grays. Below are examples of the fabrics in light and dark shades. I prefer prints. They can be textures, blenders, small prints, grunge and batiks are okay. I would like them to read mostly as one color, it is okay if there are just tiny bits of another color in them (for example, the purple in the darks, fourth from the left has little bits of red, yellow and green). Solids would be my last choice, but you can use if you need to. (If you have some fabrics that are closer to a middle value for the center fabric, just decide if it is closer to light or dark and make sure you have a good contrast for the corners.)


For one block:
1 - light 5 by 9 1/2 inch rectangle
1 - dark 5 by 9 1/2 inch rectangle
4 - 2 3/4 inch dark squares, all same
4 - 2 3/4 inch light squares, all same

Mark the diagonal on the 4 squares.
NOTE: Please read through all the directions and follow these next piecing and pressing instructions. This will allow the seams of the units to nest and get a perfect match at the diagonal seams on the edges when sewn together.
Place your rectangle right side up and place a square corner in the upper right hand corner and the lower left corner. Sew on the marked diagonal lines.

I find this hint makes the flipped corners more accurate. Do not sew exactly on the drawn line but just a hair to the outside of it, closer to the block corner.

Press these out to the corner, then flip back the edge triangle and trim the seam to 1/4 inch of the two layers below.
Now take the two remaining squares to the upper left and bottom right corners and sew the diagonal. This time, before pressing, trim the excess layers first and then press these seams towards the center.

So now you should have a unit that has opposite seams each going one direction and the other two the other way, matching the photo below.

Make the second unit exactly as above but with light center rectangle. Next you will sew them side by side, lining up the seams so they nest nicely. This will create a good match at the edges. Iron toward the block with the darker center.

The square now should measure at 9 1/2 inch square, (9 when finished).
Here is an assortment I have made so far.

Contact me if you have any questions. I can't wait to see all your scrappy variations!
Hello Hive-mates!
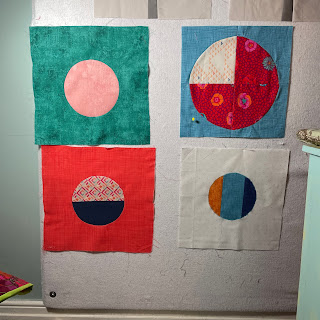
This month I'd like you to make me a circle block, simple or more complex, using pretty much any technique. I'll list three ways to do it below, with instructions. But first, an overview.
Overall Quilt Design

I've decided to explore basic shapes through my StashBee quilts. Last year was triangles with a flying geese-based design. This year I want to go ROUND, which is the title of this quilt. Actual colours and patterns will vary wildly, of course, but this is my overall plan.
BLOCK DESIGN
I'd like my Hive mates to make me a 12.5" square block, with one contrasting circle on it of any size from 3" to 10". The background of the block should be one fabric, but the circle can be pieced. The circle does not have to be centred on the background piece, but shouldn't be closer than 2 inches to any edge.


COLOURS


FABRIC PULL
Solids, blenders and modern prints that read largely as one colour from the swatches above are perfect for this. Pick at least two colours, with good contrast between them. Below is a selection of blenders I had on hand that fit this palette pretty well (the darker green is a bit off - should have subbed in something more olive)

BLOCK CONSTRUCTION
I know sewing curves is not everyone's favourite thing :) So I'm giving options for construction, from simplest to more complicated. The three methods are shown in the photo below: Appliqué (bottom right), Set in Circle (top and bottom left) and quarter circle/Drunkard's Path (top right).
If you have another method you want to use (turned edge appliqué for example) GO AHEAD! I'll love it :)
1. APPLIQUÉ
You can appliqué a simple circle (from 3" to 10" in diameter) to your background fabric using any method you like. Or you can piece together a square of fabric and cut your circle out of that, and then appliqué it to the background.
FUSIBLE WEB : I love fusible web so much! (Here's more info about fusible web.) You can draw your circle on the paper side of the f.w., then roughly cut it out and then iron the non-paper side onto the wrong side of the fabric you're going to make your circle from. Cut out the circle neatly, remove the paper backing and iron the circle onto your background fabric (it doesn't need to be centred). Then you stitch all around the perimeter of the circle with a tightish zig zag stitch (or, if your machine has a special stitch you like for appliqué, go for it!)


If you want to actually be less crazy, here's a nice simple fusible circles tutorial from A Bright Corner.
And if you don't have fusible web on hand, just dab a little washable glue stick or fabric glue on the wrong side of the circle and place it on your background fabric. Let it dry and then zig zag around the perimeter. Or use some fusible interfacing to give some body to the circle: here's a tutorial using fusible interfacing rather than fusible web from Bijou Lovely.
2. SET IN FULL CIRCLE
This is remarkably simple to do with a large enough circle, as long as you take it very, very slowly! If you've done garment sewing it will seem quite familiar - it's like setting in a sleeve.
Basically, you're going to cut a circle out of your 12.5 inch background fabric (I'd cut the background fabric to at least 13" x 13" and trim it afterwards) and then set in a circle of a different fabric (or a self-made pieced fabric) that's one inch larger in diameter than the background circle.
For example: cut a 7" diameter circle from your background piece and then cut out an 8" diameter circle to set into it.
You can download different diameter circle template pdfs here to print out:
9 inch (this is a semi circle template - place the diameter line (the straight one) on fold of fabric)
Tutorials: Colour Girl Quilts tutorial on setting-in a full circle. Ignore all steps before step 6, (She's using a special ruler -- if you have it, that's great! But just print out two adjacent sizes of the circle templates above, cut them out and cut the smaller out of the background and the larger out of the circle fabric. The rest of the tutorial is great.)
If you prefer a video, the same maker made a nice YouTube video showing her set-in circle technique. Go to timestamp 3:45 to skip the use of the special ruler and start at the other steps. She calls the background the concave piece, fyi, which is fair enough :)
Here are my own photos documenting this technique with a 7' pieced circle set into a 6" circle in the block background.
I made the simplest pieced fabric for my circle -- two 8" wide chunks, sewn together:


3. QUARTER CIRCLE TEMPLATES aka DRUNKARD'S PATH
I've left this one to the end because I personally have the most trouble with it because there's more matching of seams to be done to make a full circle block and I suck at piecing. But I know that some quilters are dab hands at this and it is very old traditional block pattern so what the hell.
If you want to try this technique, I can't write a better tutorial than you find on this very attractive free pdf pattern by Leanne Parsons for The Quilters Planner. The pattern includes a 6.5 inch quarter circle template -- four of them make a 12.5" block! I would take her advice and add an extra quarter inch to the outside of that template so you have some room for trimming and also for matching the damned seams :) Keep all the background fabrics the same, and you'll be golden.
Here's another very calming tutorial on the Drunkard's Path block at Lee A. Heinrich's site. Almost Zen.
I did make a block using this technique and hated it because I suck. I liked the idea of being able to do contrasting quarters within the circle, but found it easier to just piece the circle fabric first rather than set them in quarter by quarter. But you do you.
I hope this is okay. The way my brain works I over-explain some things while glossing over others almost entirely. That's why I linked to so many other tutorials. Circle blocks are one of the staples of modern quilting design and I love how they look. However you choose to make a block for me, I'll be so grateful!
Nina