Wednesday, December 31, 2014

Stash Bee 2014 - Hive 11 - finished quilt!

I am SO excited to have this quilt done, I wanted to thank the lovely ladies that helped me get this done!!


My sister & her husband loved it!

Saturday, December 20, 2014

Stash Bee FYI: Posting using Blogger

Since many Stash Bee participants do not blog, I hope this brief tutorial will be helpful for those of you unfamiliar with Blogger.

When you want to write a post, you will need to go to the Blogger homepage while logged into whatever Google-related account you used to accept your author permissions. You'll need to go to http://www.blogger.com and it should come up with a page that looks like this:


Most of you will only see "Stash Bee" listed, unless you use Blogger for your own blog.

To start a post, click on the orange box with the pencil. This page will now open:


The title of your post should go in the box circled in red.

The text body of your post goes in the large box circled in blue.

To add a picture, click on the picture icon noted with the green arrow. When you click the picture icon, this dialog box pops up:


There are a few different options to choose pictures, but the most basic option is to upload them from your device. When you click the "choose files" button, you'll have access to your device files and can chose to upload whatever pictures you desire. When finished, click the "add selected" button to add pictures to your post.

Once you are done with your post, you will need to label it so that it is easy to find -- with 99 each posting at least once a month, it will be helpful to have all posts categorized! If you click "Labels" on the right side of the posting screen, a dropdown menu will appear.


All of the labels that you will need to use are already listed below the box -- DO NOT create your own labels without prior permission. For a tutorial, you would click "Year", "Hive#", "Month", and "Tutorial". For a finished block or blocks, you would click "Year", "Month", and "Hive#". For a finished quilt, you would click "Year" (whatever year the blocks were made), "Hive#", and "Finished Quilt".

If you want to immediately publish your finished post, you can click the orange "Publish" button and you're done! If you want to schedule your post for a future time and date, click Schedule on the right hand side and the following menu will appear:


"Automatic" means that clicking the Publish button immediately publishes the post. Switching to the "Set Date and Time" setting pops up with this menu:


You can use the calendar to click the date you want your post to publish and change the time you want it to publish in the clock. Click "done" when you are finished. You can now click "Publish" and your post will automatically be posted at the date and time you selected and will be saved as a draft until then.

That's all for now on basic posting! Don't hesitate to ask your Hive Mama if you have any questions!

Sunday, November 23, 2014

Hive 11 - January FINISHED!!!

I couldn't get to the end of this round year and not have finished my quilt!

So a retreat last weekend seemed the perfect excuse to finish this off!


Weather is really grey and dull wet(!) here in the UK, so difficult to take a good photo!  In real life this is MUCH brighter and is truly lovely!  (It's also square, but I'm not all enough to get a photo straight!)

Thank you to my wonderful Hive 11ers!  You have contributed to a fantastic quilt!

Saturday, November 22, 2014

Hive 12 October Blocks

For October, Hive 12 was asked to make some simple nine patches for a quilt Francis make into a charity quilt for a local child. Here are some of the blocks she received:


Didn't people choose such cute fabrics?

And she almost has the top complete!


14 Stash Bee Hive # 12 October Top Almost Finished

Thursday, November 20, 2014

Hive 6 September and October Blocks

In September, Hive 6 made modern framed sampler blocks for Ashleigh.  She chose a rich jewel color palette that really sets off these blocks.


In October, we made Star Value Blocks for Kim.  I love quilt blocks that make a secondary pattern and this one sure is stunning!


We still have one month left in Hive 6 for 2014.  Happy sewing to all!

Tuesday, November 18, 2014

Hive 6 January Finished Quilt


This is my Hive 6 quilt from January.  I can't believe how long this one took me to finish, but I guess 2014 was a busy year for me!  I made some extra blocks, and some lovely hive mates contributed more than one block, to bring the total blocks up to 20.  Here's the original post with the block tutorial. I love scrappy quilts and I love lots of color.  I'm so happy this design worked out how I hoped.


I so appreciate the tiny bits of beautiful fabric everyone picked out for me as well as the variety in the low volume background squares.  This is such a joy to look at.  I can find something new to love every time I curl up with it.


I quilted free motion swirls all over and bound it with a basic from cotton + steel  in gray.  


Thank you so much to my hive mates in Hive 6, I will treasure this forever!


Sunday, November 2, 2014

Hive 11 November Block

Sorry there are no pictures yet in this posts but I will get them in as soon as possible.

What is your name and where do you live?

Hi my name is Linh Schilling and I live in Columbus Ohio.  I'm super excited about it being my month finally.  I love being the last to go because I always have a hard time picking a block because there's so many of them.  There's so many quilts I want to make and they all would be great if I had help making all the blocks. 

Tell us about you family?

I am currently living with my husband and two little girls.  My brother in law and his girlfriend is also with us for a little while they are in between houses.  I grew up an only child so I love having a house full of people every chance I get.  My husband is super supportive of all my hobbies and this one (quilting) I think is going to stick :)

Tell us how you got interested in quilting.

I love the library, so one day I decided to check out the crochet section and right under it was the quilting books.   I just happen to pick up one and found a quilt that called to me.  And that was it folks I was addicted.  From the quilt I realized all the math and method that goes into these squares we stitch together.  I also found out how expensive this hobby was going to get.  I couldn't get enough of it so I went online to do some more research and came across a little blog you might have heard of, Crazy Mom Quilts.  Here we go it was all I needed to decide that this was what I was going to do for a while. 

How do you organize your fabric?

Most of it is on a bookshelf.  I try to do it by color. I guess its kind of everywhere.

Who is/are your favorite fabric designer/s?

I love Aneela Hoey, Heather Ross and Sarah Jane.  I love how their designs remind me of my little ones.  I'm a big fan of every designer and love everybody's fabrics.

What is the one thing you wished you knew when you first started quilting?

Honesty I wish I came across quilting sooner than I did,  I would've done something completely different in college and overall I would've been a lot happier.

What is your favorite sewing/quilting tool and why should we all go out and buy it?

My OLFA rotary cutter, 3 x 18 ruler, OLFA cutting mat, iron, and ironing mat is all I need plus my sewing machine.  With these things I can make magic.

Who is your favorite fictional character?

I love Doctor Who and Sherlock Homes.  Do I need to say anything else?

Here's my block:

It was very hard to decide my block but I decided to go with a pineapple block using a tutorial from one my most favorite blogs Crazy Mom Quilts.  This way doesn't involve paper piecing and different width of fabrics (1.25-1.75). I would like for the block to be rainbow with low volume or white and finish at 16" untrimmed please. 

Sorry for my tardiness and I hope to get some pictures up soon because who doesn't love pictures.  Thanks again for being such a great group.


Saturday, November 1, 2014

Hive 6 November Block


What is your name?

I'm Sue Staum and I've had such fun getting to know you all a little bit and learning so many new things through this, my first Stash Bee experience. It's hard to believe it's finally my turn- how can it be November already?!? 

Seems that all the pictures I have of myself also have a grandkid or two in them!

Where do you live?

I live on a small lake in northern Minnesota, about 50 miles west of Duluth, the city where I was born and raised. Our home was originally my parents' cabin when I was a kid. Three additions throughout the years transformed it into our year round home on Sunset Bay. Living in the country is wonderful in so many ways- eagle's nest across the lake, baby loons, great blue herons, fish to be caught for dinner, an occasional black bear, wild turkeys, deer (that don't eat my hostas)- but it does mean that the closest quilt shops carrying modern fabric are 50 miles in one direction or 70 miles in the other!  We're used to doing lots of driving!

October Sunset on Cole Lake

Tell us about your family (Spouse, kids, grandkids, pets, etc.)

My husband, Kim, and I met in college and have been married for 36 years- yikes! We both are retired teachers having spent our entire careers teaching in McGregor, a small town 16 miles to the west of our home. Kim taught physical education and coached track and football and I enjoyed spending my days as a fifth grade teacher- it's a wonderful age! I loved my job and still do quite a bit of subbing. Quilting has helped me adjust to retirement. Last fall, a childhood friend and I, along with the local modern quilt shop owner, founded the Lake Superior Modern Quilt Guild which meets in Duluth. We are now one year old and have 62 members! I've gotten to know some amazing women!


That's our 2 year old lab, Berney, happily posing with his master who was helping me get some photos of my "slab" quilt last January. (In case your wondering about the bed in the snow, Kim decided he also needed a shot of the toddler bed he'd just finished for grandson, Max.)

We have two children who are happily married and have blessed us with grandchildren! Our oldest, son Mike and his wife, Anne, are both teachers, elementary and high school English, and are the proud parents of Max, 3, and Ella, our only granddaughter, who just turned one in September. They live in the Minneapolis area which is about a 2 1/2 hour trip. The absolute best part of retirement is the freedom to make that trip often!

Max and Ella on our last visit to their house.
Our daughter, Sarah and her husband, Mike, live in Duluth. Mike is also a high school English teacher and Sarah is an athletic trainer, working with the athletic teams at the same high school. They have Henry, 16 months and another little boy coming in March. How wonderful that they are close enough that I get to visit and help out on an almost weekly basis.

Henry listening to Mom saying he's going to have a baby brother.
(Actually I think the smile is more for the blue "reveal" cookie she gave him. )

I knew being a grandmother would be special but was not prepared for just how spectacular it is! These little ones have stolen my heart and it bursts with love, joy and laughter! 

Tell us about how you got interested in quilting.

I've been sewing and creating since I was young. My mom was an avid seamstress and taught me so much. I made my first quilts in the 70s and 80s- even made a QAYG queen size log cabin in country blue, tan and brown- oh, the 80s! These were all tied quilts. I never even knew that people quilted on their home machines. Over the years, I continued to craft- rug hooking with wool, embroidery, wool felt appliqué, needlepunch, sewing bags/totes and primitive dolls/snowmen and more.

When Max was on the way, I made my first quilts that were machine quilted using stitch-in-the-ditch, which I can't say I enjoyed too much. I kept wiggling out of the ditch. I went on to try various versions of disappearing 9-patch quilts and stacked coin quilts which I straight line quilted using my walking foot and found that I liked that much better. So no stitch-in-the-ditch on Henry and Ella's quilts. 

In June of 2013, Victoria Findlay Wolfe gave a trunk show in Duluth and I was blown away! Victoria is a Minnesota farm girl and she credits her grandmother for her love of quilting and sense of design. I loved how she "made" fabric. Later that summer I attended Camp StitchALot in Michigan with my friend. Our instructors include Jacquie Gering, (Tall Grass Prairie Studio and current president of the national MQG), Amanda Jean Nyberg, (Crazy Mom Quilts) and Rossie Hutchinson (Fresh Modern Quilts). We didn't realize just what a special experience this was going to be working with these talented ladies. Our guild was formed that fall and now I am hooked!  I especially enjoy improv piecing. I like not knowing for sure where it will lead.

How do you organize your fabric stash? 

I'll steal Diane's answer: "I'm supposed to organise it ....!!!" 
I have baskets and bins... many baskets and bins...

Who is/are your favorite fabric designers?

Heather Ross, Carolyn Friedlander, Lizzie House, Allison Glass, Denyse Schmidt, Charley Harper, Tula Pink, Art Gallery, Zen Chic, Amy Butler, Anna Maria Horner.
I especially love low volume and text prints, "blenders"- prints that read as basically one color- and geometric and novelty prints.

What is one thing you have learned that you wish you knew when you first started quilting?

 There are no quilt police! 

What is your favorite sewing/quilting tool and why should we all go out and buy it?

Since I retired I have been investing in some good equipment (with the help of some great coupon deals!):  Ginghar 10" shears and thread snippers (both are so sharp!), a seam ripper that comfortably fits my hand, red glass-head pins by Clover and Olfa Splash rotary cutter. All were recommended to me by various experience quilters and I am so glad I took their advice.


Who is your favorite fictional character and why? 

Do gnomes count? Seriously, I love to read and every day I find at least a little time to get lost in a good book. I do look forward to the new releases of Minnesota author John Sandford's books featuring Lucas Davenport (The Prey series) and Virgil Flowers. And every character that my most favorite author, Maeve Binchy, created has won my heart!  

On to the November block! Our last one!

I love wonky stars! Maybe it has something to do with all those correct answers I put stars by over the years! (I have a thing for smiley faces too!😉) Anyway, what I would love for you guys to make is improv wonky star blocks. These blocks can include one, two, three or more stars- any size- it's all up to you! I'd like you to shoot for making blocks that are about 12.5 inches unfinished. (It's not a problem if the blocks don't end up as squares or if they are a bigger or even a little smaller.) To flesh out your star(s) to about 12.5 ", you should add various size strips/rectangles/squares of low volume prints (I really love LV text prints.) and/or an off-white solid like Kona Snow. Actually combos of LV and solids would be the best!

As far as prints for the stars go, I want it to look scrappy so the more prints you use the better! Feel free to fussy cut some centers. As I said above, I like geometric prints and blenders- no busy multi-colored floral prints, please- unless you just know it would be perfect for your star(s)! It's your creation- I trust your judgement! I also love novelty prints.

As to colors, I love blues/teals/aquas and greens the most, with reds, oranges, yellow/golds, grays and blacks thrown in the mix. Please no (or limited) pinks or purples- thanks. 

I had a blast sewing up some "example" blocks. Improv is rather addicting, isn't it! This is what I am envisioning. I'll make all the blocks fit together later by adding additional strips of off-white solid and low volume, where needed.


If you have not made wonky stars before or want a refresher, there are many great tutorials online. Here are a few I've used:
http://thesillyboodilly.blogspot.com/2009/02/wonky-star-tutorial.html
http://quarterinchmark.blogspot.com/2012/11/tutorial-wonky-star.html
http://owensolivia.blogspot.com/2012/10/wonky-star-block-tutorial.html

Your wonky stars can be whatever size/shape you'd like, in combinations of your choosing. (Or just one star is good too.)

The smallest I have made started with nine 1.5" squares, finishing as a 3" square block. These are really fun! Maybe fussy cut the center and use up some of those tiny scraps?

If you want to have 3 or even 4 stars in one block, I have found that various stars made with 1.5" squares, 2.5" squares and 3.5"squares will "fit together" quite well to create 12.5 blocks. Just fill in the spaces between the stars with low volume and/or off-white solids. Here are a few examples I made:


A star within a star is pretty cool. A tiny star made from 1.5" squares makes a perfect center of a star made with 3.5" squares. With some added strips on 2 sides, it measures 12.5".


Stars can "overlap" by sharing a corner:


Your wonky stars don't have to be made only from squares. I love these skinny, pointy stars! The center and the three other small squares are 2.5", the rectangles measure 2.5'" x 6" and the large square is 6". (I haven't added strips yet to get this block to measure 12.5")


And this example has a 4" center block with side blocks measuring 2.5" by 4" and 2.5" squares on the corners.


Pieced centers is another nice touch. Here are a couple of tutorials on that:


I'm just so excited to see what you come up with! I hope that with the busy holiday season coming upon us that these blocks will be quick and easy and you'll enjoy making them as much as I do. I have really enjoyed creating with all of you this year! And a special thanks to Courtney for keeping us going! 

If something isn't clear, or you have any questions/comments, please let me know.

Thanks! 
Sue

PS- I'm excited to be going to Quiltcon 2015 in February. Anyone else attending? It'd be great to get together !

Hive 8 - November Block Tutorial

What is your name?


Hola! I'm Jamie. On IG and flickr I am frampuna. I only started a blog so I could do this bee, so I don't really have anything posted over there:)

Where do you live?


I live just north of Denver and south of Boulder in Colorado. We get a decent amount of snow, but we also have a ton of sunshine, so it doesn't stick around for very long.

Tell us about your family (Spouse, kids, grandkids, pets, etc.)


I have three kids, Evalyn (5), Denison (3), and Elodie (8 months)


My husband is Daniel. We met in college in Chicago, got married 6 + years ago, and moved to Denver when we started having kids. Daniel is in graduate school here.


Denison is a ham. 


This is Elodie. She bears a striking resemblance to her sister at this age, so just imagine this face but crying and you'll know what she was like as a baby.


This is all three of them loaded up in a wagon for Easter because I thought that is what you are supposed to do with your offspring on Easter, apparently.

Tell us about how you got interested in quilting.


To be honest, it was because I quit my job as an editor to stay at home with our kids.


They are cute, I think.


But moments like these can make a person a little cuckoo. I got a sudden and extreme urge to buy a sewing machine in February of 2013 and started learning the basics of sewing and quilting.


When I'm not chasing these sillies around (you know, like at 3 in the morning), I am in my studio sewing something.

How do you organize your fabric stash? (Picture appreciated)


I keep all my batting, interfacing, and random fabrics like flannel and canvas in a shelf unit by my closet of shame (which is where I store my unfinished projects).


My fabric stash is stored in an Ikea shelf. Most of it is 1/2 yards or fat quarters. Half yards are folded on comic-book boards and FQ are in the vintage locker baskets and Target bins. 


I store any scraps that are smaller than a FQ in the bins under my cutting table. Tiny scraps go in a vintage knitting basket next to the cutting table and I grab that first when starting a project to see if I can use any up. I do love scraps!


My sewing machine(s) are out on a desk under a nice window where I can get some great light to sew by. I've been trying to sell my Pfaff (the one on the left) because I use it so rarely and love my straight-stitch Juki, but for the time being, the Pfaff only comes out when I need to zig zag, which is like 1 time per year.

Who is/are your favorite fabric designers?

I love so many designers. I started out a huge Bonnie and Camille fan. I still like their stuff because all the colors work so well in our vintage-inspired home, but I've branched out so much from my first fabric purchases. I love Japanese and novelty prints, Yuwa, Suzuko Koseki, Melody Miller, Heather Ross, Teagan White, Kokka, I could make that list even bigger, but you get the idea.

What is one thing you have learned that you wish you knew when you first started quilting?

Most of the "rules" can be broken and there is more than one way to do most things. I spent a good deal of time worried I wasn't cutting, pressing, and sewing correctly. I certainly feel precision and technique/skill building are important, but I've realized that there are so many great ways to achieve the same result, it is best to find what works for you and stop worrying about the "right" way.

What is your favorite sewing/quilting tool and why should we all go out and buy it?


I recently won a bottle of Flatter at my Modern Quilt Guild meeting and I'm surprised to find how much I love it. I typically press with steam, but this stuff doesn't seem to cause any warping on tricky fabrics and it smells great. I also love my Little House pins. They are worthy of the hype. They are super sharp and glide through fabric like butter...also, I may or may not sew over them because they are so fine:) The other two tools I can't live without are my thread snips (nothing fancy, just a cute polka dot pair from Hobby Lobby) and my add a quarter ruler for paper piecing. I absolutely love paper piecing and I can't imagine doing it without this ruler. 

Who is your favorite fictional character and why? (Could be from a book, movie, TV show, etc.)


Hard to pick a favorite, but I've always been rather fond of Calvin. His intelligence and perspective on life are astoundingly accurate. I must admit, however, that I found him much more amusing before I had a Calvin of my own. Denison would give Calvin quite a run for his money. 

November Tutorial


For this month's block, I'd love a low-volume churn dash block. These blocks will measure 12.5" and should go together fairly quickly. I tried to pick a block that would require minimal effort since I know the holidays are coming up and I think we're all probably desiring to get as much checked off our to-do lists as quickly as possible!

I took the basic instructions for measurements from Katy Jones' scrappy churn dash tutorial found here. For additional inspiration, check out this quilt I found over on Pink Stitches blog. I love the look of her quilt and would be pretty happy with something similar.


For the background, I'd love low-volume prints similar to those above. They don't have to be all black and white by any means, just light enough to read low-volume and allow the churn dash to stand out. For each block you will need two 5" dark squares, two 5" light/low-volume squares, four 2.5" x 4.5" rectangles of light/low-volume prints, and one 4.5" low-volume and/or novelty print for the center. For the low-volume rectangles, please feel free to use different prints for each rectangle, or two or three, or all the same... whatever your stash will allow. I chose to use a handful for my blocks.


For the block centers, I would love some novelty prints or fussy cut squares of fun things like animals, sewing notions, macaroons, strawberries, etc... You will need one 4.5" square for each block. They don't all have to be low volume; please just be sure that what you choose for your center contrasts enough with your darker fabric for the churn dash so that the center shows up. For example, if you chose navy blue for the churn dash, a navy center will not show up as distinct from the churn dash.


For the darker, churn-dash portion of the block, you will need two 5" squares and four 2.5" x 4.5" rectangles. I love reds, aquas, green, navy, pink. They can be a solid or they can be a print or text. As long as they read dark against the low-volume background. I would prefer a vintage-like color palate as opposed to primary colors. Not sure if that description makes sense, but I'd lean away from dark purple, hunter green, maroon... maybe the colors you might expect to see in a more traditional quilt. I posted some palate photos below for a better idea. Though don't feel like you have to stick to them strictly if you get my aesthetic:)


Ok, so let's get to cutting!


I made two blocks at the same time. 

Dark (churn dash)
Two 5" squares
Four 2.5" x 4.5" rectangles

Low-Volume/Novelty Print (middle)
One 4.5" square

Light (background)
Four 2.5" x 4.5" rectangles
Two 5" squares
(Remember you can make the block super scrappy and use a different print for each low-volume background piece, or use all the same print. I used a mixture for mine.)


Now cut all of your 5" squares in half on the diagonal so that you have 4 triangles of your dark print and 4 triangles of your low-volume/light prints for each block you are making.


Next, you will match up your dark-print triangles with your low-volume triangles and sew them together. I use a scant 1/4" seam to give me room to trim these down a tad and get a nice, even square.


Press to the darker fabric for your half-square triangles (HST). 


Trim off the dog ears and trim up your HST to 4.5" if you need to.


Next sew your rectangles together. There will be 4 dark prints and 4 low-volume/light rectangles for each block. Match up one dark print and one low-volume and sew together down the long side using your 1/4" seam. Press to the darker fabric. These units should now measure 4.5"


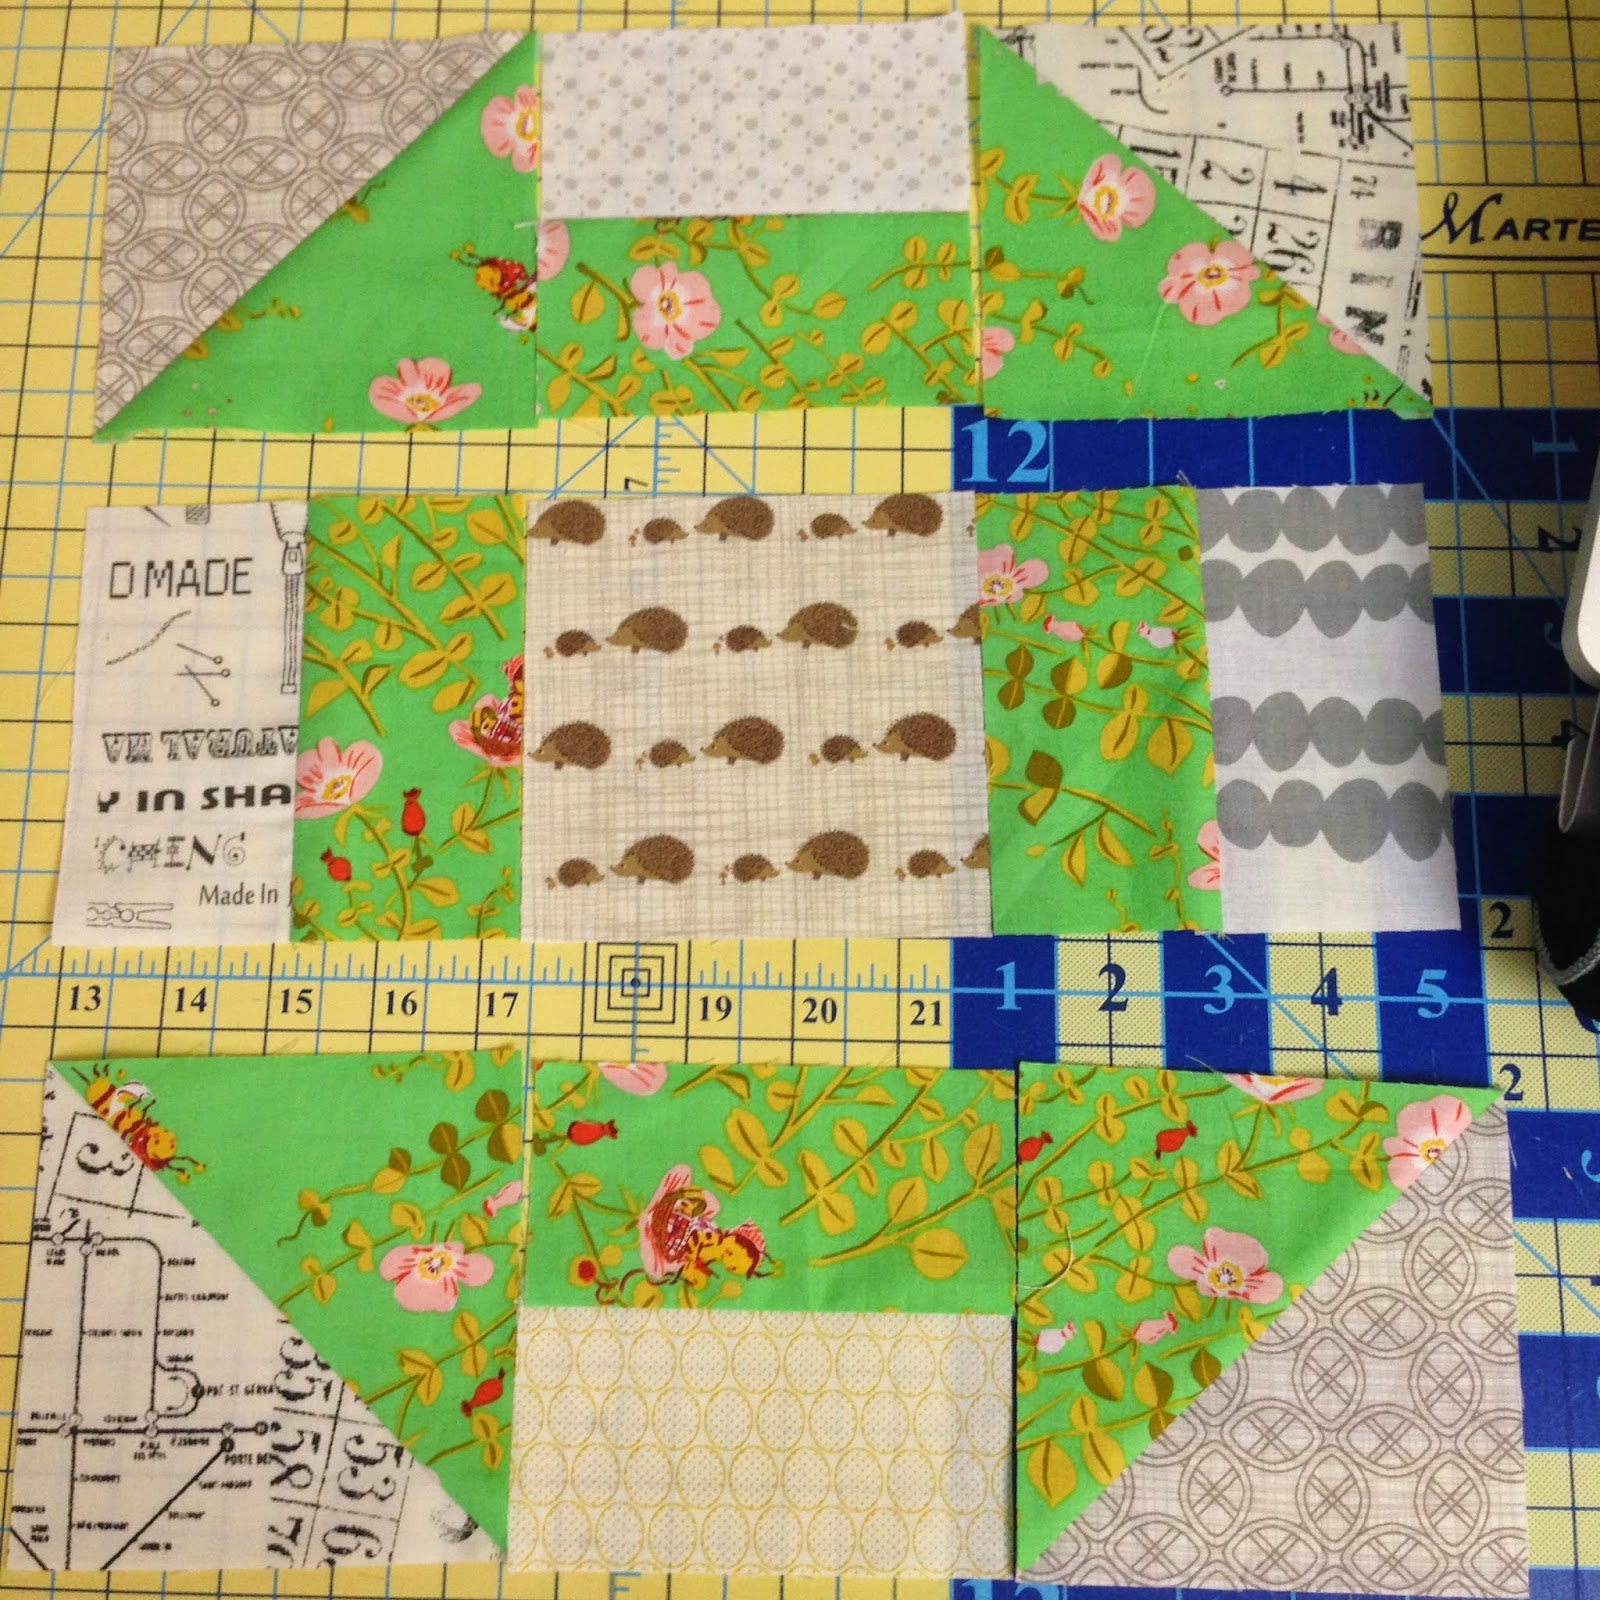
Now lay out your block as pictured above. There will be 4 HST for each block, and you will alternate as follows: Top row- HST with dark triangle down, rectangle unit with dark print down, HST unit with dark triangle down; Middle row- rectangle unit with dark print to the right, 4.5" low-volume/novelty print center, rectangle unit with dark print to the left; Bottom row-HST with dark triangle up, rectangle unit with dark print up, HST with dark triangle up.


Now sew your rows together and then press each row in an alternating direction. These rows should measure 4.5" x 12.5"


Now nest your seams...


And sew the top row to the middle, and then top/middle to the bottom.


Press all seams in one direction.


Here is what your block should look like!


I intentionally left the selvedge on the square on the bottom left because I like that look, so feel free to do the same if you have scraps and want to use those selvedges in them!


I haven't decided exactly how big I want this quilt, but I will likely make it lap-sized. So if you're in the mood to do more than one at a time as I did, I'd love it! And feel free to ask any questions you might have. 

It has been a great year sewing with you all and getting to know you a bit better. Thanks for making my first sewing bee so fun and for pushing me outside my box a bit. Hope to stay connected with you on IG!

Jamie