
Showing posts with label July. Show all posts
Showing posts with label July. Show all posts
Saturday, July 18, 2026


Tuesday, July 14, 2026
Hive 1 July: Begger's Block for Cindy


Hi Cindy!
On the second attempt I made it - yay! Hope these colours are what you are looking for. The blocks are already on the way to you.
Happy quilting,
Rita
Thursday, August 7, 2025
Crashing Hive 3 - Halloween Bear Paw block for Maree

Halloween fabrics are my obsession and I loved making this bear paw block for Maree. Sorry it's a bit late.
Thursday, July 10, 2025
Christmas in July for Beth, Hive 1


Hi Beth,
Hope you like those gnomes. I've had only bits and pieces left from previous Christmas themed fabric bundles, but tried to make it work.
These guys are going into the post today to make their way over the big pond.
Happy quilting,
Rita
Wednesday, July 2, 2025
Christmas in July for Beth
Hi Beth,
Two gnomes wearing their Christmas morning PJs are hanging on the closest thing to a Christmas tree South Florida can offer!😂
Coming your way after the 4th of July weekend,🎇🎆🎇
Marie

Tuesday, July 1, 2025
Hive 5 Tutorial for July- Sampler
July 6" Sampler Squares
This year, I am grateful to ask your help in making a sampler quilt for my nephew, Danny.
I thought I would start with a little bit of information about the recipient. Danny is a 10-year-old boy who loves his family and his pets. He has two dogs, one cat, and three siblings, and loves being a big brother. His favorite subject is math, and his favorite colors are green and blue. He likes baseball and playing video games, but he is the kind of kid who does not answer his ringing iPad when friends call if he is spending time with his family. For Danny, nothing tastes better than his grandma's home cooking--he especially loves his grandma's turkey burgers or cheese tacos.
I hope this provides you with some inspiration!
The Quilt
I struggled to come up with an idea for what to make Danny, and I finally decided on a sampler quilt. I already have a good number of 12" squares, and I would like your help to make 6" squares to mix in. The plan is to mix up blocks of different sizes. You can make ANY 6" (finished size) block you'd like. They should be 6.5" unfinished. Generations Quilt Patterns has a lot of options for inspiration.
 |
| These are some of the 12" blocks that I have received from another swap for this project. |
Fabric Parameters:
I am using Danny's favorite colors in this quilt: Blue and Green. If you need an additional background color, please use light to medium grey.
Please avoid:
- Florals
- Girly themes (shoes, lipstick, etc)
- Overly childish themes (I want the quilt to grow with him)
- Greens that lean toward olive or mint. I am looking for brightly saturated green
 |
| Here is my fabric pull for the project. You can see batiks, light denim, solids, patterns, and blenders. |
Tutorial
As I mentioned above, any 6" block is perfect! You can use traditional piecing, FPP, appliqué, improve, you name it. Just make sure the unfinished size is 6.5". For the sake of this tutorial, I am going to lead you through making a Double Pin Wheel from Generations Quilt Patterns.
Step 1: Cut Fabric
- Background - Cut (1) 4.5" square, then subcut it twice diagonally, corner to corner. You now have 4 triangles.
- Accent Color - Cut (1) 4.5" square, then subcut it twice diagonally, corner to corner. You now have 4 triangles.
- Main Color - Cut (2) 4" squares, then cut each once diagonally. You now have four larger triangles

Here are my cuts. The grey is the background; the green is the accent, and the blue is the main color.
Step 2: QST
With right sides together, align the edges of one background triangle with one accent fabric triangle. Stitch them together along a straight edge (not the bias) to form a quarter square triangle. Press to the darker fabric. Repeat with three other sets.
 |
| Here is what my QSTs look like. |
Step 2: Quarter Units
Sew each QST to a larger, main fabric triangle. Be careful and make sure all of your smaller units look the same. Trim to 3.5" inches.
 |
| If you've sewn everything correctly, you can easily make a pinwheel by rotating each block 90 degrees |
 |
| This is what it looks like when you mess up. Try not to do this! |
Step 3: Assemble Block
Sew units together so that they create the double pinwheel block. Press the rows in alternating directions so the seams nest. Press however is most comfortable for you, and trim to 6.5".

Here is my finished double pinwheel! Thanks for sewing, and I am looking forward to seeing what you come up with.
 |
| Note that I my centers do not line up perfectly. I don't mind if yours are a little off either :) |
Monday, June 30, 2025
Hive 4 - Scrappy Stripes Block July Tutorial by Pam


This is my 8th year taking part in Stash Bee, and for the first time, I’m repeating myself on a tutorial. Last year I created my tutorial for Scrappy Stripes blocks, and received a dozen or so beautiful blocks, some of which are pictured above. I made three blocks myself for the tutorial, so I have a nice pile of blocks already. I'm re-sharing the tutorial for my July 2025 turn as Queen Bee of Hive 4, so I'll end up with an even bigger and more beautiful quilt, thanks to all my talented Hivemates.
HOW TO MAKE THE
SCRAPPY STRIPES BLOCK:
The block will end up a bit more than 12-1/2 inches square,
but because it’s improvisationally pieced, it won’t be exact, and the edges won’t
be straight. That’s fine! When you’re finished with the sewing, don’t
bother trimming the ragged edges or squaring up the sides. These blocks are going to be all slightly
different sizes, so I’ll take a look at them all before deciding what size to
trim them down before sewing them into the quilt top.
FABRIC SELECTION:
- · For the background square, one 13” or slightly larger square of any very light solid or low volume print will work.
- · For the scrappy stripes, two strips of any bright solid or print fabric, about 1-1/2" to 2-1/2" wide and at least an inch longer than the height of the background square. Note that the strips do not have to be an even width, they can be wider at one end and narrower at the other.
- · Small scraps of various prints or solids to make the pieced stripe.
Background of the block:
To get the approximately 13” size of background I wanted, I
laid my 12-1/2" square ruler over a piece of fabric, then roughly cut
around about 1/2' from the sides of the ruler. Don't worry if the edges
aren't straight!

Inserting the stripes:
Cut across the background square, either vertical or
slightly diagonal--just eyeball it.

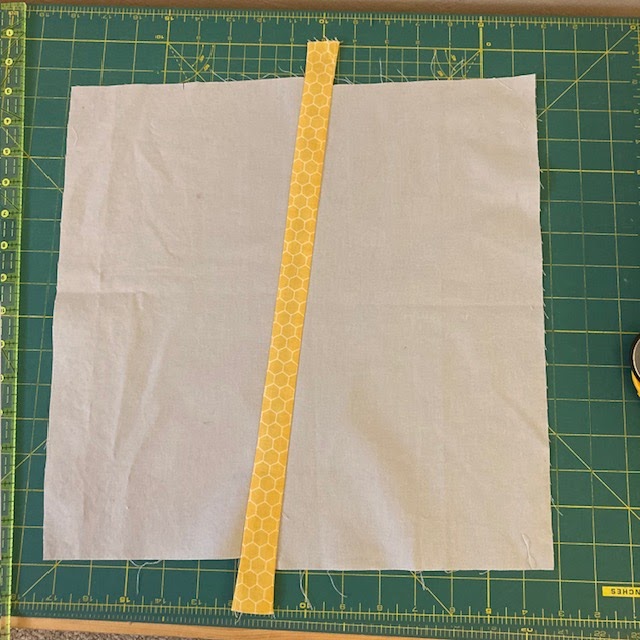

I pressed the seams toward the stripe, but how you press
isn't important for this kind of block
Next repeat to add another stripe to the block.

Adding the scrappy stripe:
To make the scrappy stripe, take the small fabric scraps
that you like and sew them together into a piece long enough to go across the
background square, then cut a strip from that long piece.


Sew the scrappy stripe into the block same as before. For the pieced stripe, it was easier to press the seams toward the background, because of all the seams on the stripe.
Hive 3 - July Tutorial - Bear's Paw Block for Maree
Hi Everyone.
Hard to believe it is July already. Here in New Zealand it is winter and recently we have had a lot of foggy, wet days in the Waikato area where I live. Hopefully most of you will be experiencing much nicer weather. I have been really busy at work, but would have loved to be able to make the most of this weather to stay home by the fire and sew.
For my blocks this month I have chosen a Halloween themed Bear's Paw Block. This is my (partially revised) tutorial from 2024 and I have decided to ask for more blocks so that I can get my quilt top completed. Along with Halloween fabrics I am happy for you to use fabrics that include bugs, moths, cats, black and whites, trees, etc and colours that give a bit of a Halloween vibe. I have included some of these in my blocks. If you are concerned about not having enough Halloween type fabric, I am happy for you to make the 4 individual paw blocks and send them to me without your sashing attached. That way I will be able to add in some of my fabrics and mix up the blocks. So please feel free to repeat fabrics if necessary.
The tutorial I used is a Free Tutorial by Generations Quilt Patterns. Here is the link Bears Paw Quilt Block Pattern: Instructions in 3 Sizes (generations-quilt-patterns.com)
They have 3 different size options and the one we will use is the 14" Finished Block with some variations. They have a great tutorial, although there are a lot of ads which make it a bit harder to read. They also have great instructions for making 8-at-a-time half square triangles which is a big time saver. You do need to refer back to the size chart as they use measurements for a smaller block when teaching this method.
I also decided to use a thinner sashing, and wanted a mix of little squares and large squares for the paw blocks, so please refer to the cutting instructions below. Our unfinished block size will be 13.25" square. My blocks both ended up about 1/8" smaller so don't worry if your block varies a little bit also.
Here are my blocks I have made and also blocks I received from everyone last year. Unfortunately I never received a block from one lady, but Helen kindly made me an extra block. So I have two which I made and received 10 more.


And here are some of my fabrics. I joined a Coffin Hexie swap a number of years ago and had forgotten that I had purchased a number of different prints for that. Some I also received from an Instagram friend who lives in Washington State, USA.


Fabrics and Cutting Instructions

| Piece | Fabric | Qty | |||
|---|---|---|---|---|---|
| 1 | A | 1 | 1¼" x 1¼" | ||
| 2 | B | 4 8 | 4½" x 4½" 2½" x 2½" | ||
| 3** | C | 2 | 6¼" x 6¼" | ||
| 4** | Background | 2 | 6¼" x 6¼" | ||
| 5 | Background | 4 | 1¼" x 6½" | ||
| 6 | Background | 4 | 2½" x 2½" | ||
| Unfinished Block Size | 13¼" | ||||
**These are the oversized patches that will be trimmed to perfection AFTER stitching.
To make cutting out easier I have adjusted the chart to show only what you will need to cut for my version of this block.
Fabrics
- Fabric A is a small square which can be coloured or black n white
- Fabric B - Halloween Fabric (or other fabrics as suggested)
- Fabric C - Black n White, Black, or Black n Grey
- Background - White or Off White Low volume fabric - with interesting black or grey details if you have it.
I am not too worried about how you press your blocks, however in saying that the tutorial does give good instructions for pressing. I found that I did not need to press any of the seams open. I much prefer to press to the side unless there is way too much bulk.
Half Square Triangles (HSTs)
The HSTs that make up the claws (position 3 in diagram) are made using the 6.25" squares. You make 8 at a time and they come together quite quickly. I used directional fabric for one of my backgrounds and this method works perfectly in making sure the fabrics all end up the correct way.
Here are a few photos showing the stitching lines and cutting lines.
You need to join a background square and a Fabric C square with right sides together. Mark the 2 diagonal lines so that you have an X. Sew 1/4 inch either side of both of these lines. You will then cut down the centre top to the bottom, and centre left to right (like a +). You also need to cut along the diagonal lines which you drew initially. Repeat for the other set of squares and you will end up with 16 HSTs. These need to be trimmed down to 2.5" squares.
One of my favourite rulers is my Bloc Loc square which makes trimming these HSTs to size so much easier. I am also lucky enough to have a little rotating cutting mat which is also a favourite tool.


For the paw I have used 2 x 4.5" squares and in the other 2 squares I have used 4 x 2.5" squares. I like the scrappiness of this to add extra fussy cuts or even just to add a touch of colour. So if you don't have any prints to cut, I am happy if you just use plain or textured colours here.

I feel like I could just continue to have fun making these blocks and exploring other fabric placement options.
Here are all of my blocks to date, and another photo showing a Tim Holtz grungey check fabric which I intend to use as my sashing. I normally go for much calmer fabrics so this sashing is pretty bold for me. Surprisingly I really love it though!


Hopefully you can all have fun making these blocks. I have not had the chance to just play with fabrics like this in a very long time and actually really enjoyed making these as they are not my usual fabric of choice.
Please note that Helen's version of these in January had wider sashing than mine and her blocks were a bit larger.
Thank you.
Maree
Instagram - @maree3ma
Friday, July 26, 2024
Hive 1: Crumbs on the Drunkard's Path for Leah!
Hello!!
This was a fun time! I'm glad Rita softened us up. I hope the wonkiness and...festive colors are okay!! 🎄 I can't wait to see all of the blocks together!
They'll be on their way ASAP.

Wednesday, July 24, 2024
Hive One - Crumbs on A Drunkard's Path - Grace’s version
Hope you enjoy! It is being posted in the mail tomorrow.

Saturday, July 20, 2024
Hive 1 July Block Crumbs on a Drunkard’s Path for Leah
First time doing a crumb block, hope you like it! Will mail out next week.
Chris

Friday, July 19, 2024
Hive 1 July Block
This month’s blocks were fun! I enjoy seeing curves and I appreciated getting some orphan blocks out of my stash!


~ Megan
Monday, July 8, 2024
Hive 1 July Crumbs on the Drunkard's Path for Leah

Drunkard's Path and crumbs for Leah
Hi Leah,
Here is my contribution to your quilt. I aimed for complementary purple and yellow. Crumbs are crumbs so other colors were added, but I still hope in the end that everything will fit well in you plan!
Happy quilting!
Marie

Tuesday, July 2, 2024
Hive1, July, Crumbs on the Drunkard's Path Block for Leah


Hi Leah,
Great Block for using up scraps!
Easy-peasy Block, they came together quickly and will go on their merry way to you today.
Happy quilting,
Rita
Monday, July 1, 2024
Hive 6 - July tutorial - Old Missouri block
For my July block, I wanted to remake an antique block called Old Missouri. I originally found this pattern in my box of saved patterns from the Kansas City Star. I grew up in Missouri, and I still live here. I have a great love for my state. I want to make a red white and blue quilt.
The Fabrics: You can use solids, patterns, or blenders for any of these fabrics as long as they read red, white, or blue. Kitschy or patriotic fabrics are welcomed.
.heic) |
Finished practice block This is the 1932 newspaper template that inspired this block |
- 3 blues: Line them up from darkest to lightest. The darkest for the corner triangles, second darkest for the bars, and lightest for the center piece.
- Red: Any red for the two quarter circles.
- Background: white, white-on-white, or off-white
Here is a picture of the fabrics I am considering. I love a scrappy quilt, so you will notice that my sample block uses cats and flowers. If it's red, white, and blue, it works!

Cutting:
- Print out the templates I've created and cut them out. I have modified the original pattern to include seam allowances. Once it is printed, check to make sure the templates match the measurements. I realized that I had to download the pdf document to get the right sizes instead of printing from the web. (Note: the measurements I've written of the template reflect the original pattern, without seam allowances)
- Use template piece 1 to cut a 4 1/2 x 4 3/4 a rectangle in the lightest blue for the center piece. You could also just cut this without the template.
- Use template piece 2 to cut a 2 3/4 x 4/14 TWO medium blue bars. You could also just cut this without the template.
- Use template 3 to cut two tringles in the darkest blue, or cut a 4 1/4 x 4 1/4 inch square and cut it on the diagonal.
- Fold your background fabric in half and use template # 4 twice to cut four background arches, two facing each direction.
- Use template piece 5 to cut two red quarter circles.
Sewing:
- Sew two opposite facing background arches together on the short straight seam, right sides together. Then, sew the other two opposite pieces together, right sides together. You will end up with two of these.
.heic)
- Fold the quarter circles in half and finger press them to find the center. Line up the center of the quarter circle with the center seam of the arch. Using a quarter-inch seam, carefully stitch the arch to the quarter circle. Here is a video you can watch about how to sew this drunkard's path. Repeat for the second drunkard's path. This was my first time sewing curves on a quilt block. Mine practice block is not perfect, so I am not expecting perfect blocks from you guys either.
- Next sew the two medium blues (pieces # 2) on to both sides of the center piece (piece #1). Press toward the darker blues. Press toward the red.
- Find the center of both dark blue triangles by folding them in half. Align this crease with the center of the medium blue bar stitch a triangle onto both medium blue bars. Your path now has light center (piece 1), bookended by two medium blue bars (pieces 2). These are bookended by two dark blue triangles (pieces three) that form the corners of the block. Press toward the darker blues.
- Sew one drunkards path on to both sides of the path. I pressed to the white to reduce bulk. You can press toward the blues.
.heic)


Subscribe to:
Posts (Atom)