Sunday, July 6, 2025

Christmas Gnomes for Beth


This nose-less gnome is heading your way! 
I don't have much in the line of holiday or winter fabrics but I think this 
mid-year dressed gnome with grey haired-swirled beard should fit the vibe check. 
I'll get him dropped in the mail this week. -Tasha

Wednesday, July 2, 2025

Christmas in July for Beth

Hi Beth,
Two gnomes wearing their Christmas morning PJs are hanging on the closest thing to a Christmas tree South Florida can offer!😂
Coming your way after the 4th of July weekend,🎇🎆🎇
Marie


Tuesday, July 1, 2025

Meghan's July Block for Hive 6- Instagram

 Hi Quilty Friends! 

I hope your summer is going slow with time to sit at the sewing machine. Summer is one of my favorite times to sew. I have been working slowly on this 4th of July quilt for several years and need your help to get this UFO completed! 

The pattern I will be using for block is a free pattern from Cluck, Cluck Sew. 

https://cluckclucksew.com/2017/12/no-point-stars-a-free-printable-pattern-in-5-sizes.html

You will need three different fabrics- please use any red, white and blue fabrics you have in your stash. They can be white on white, white, low pattern white, anything that reads white. Reds can be deep to cherry reds, nothing too pink. Blues can be navy to light blues. Please stay away from teals. 

Please cut out 9- 4" squares- these will be 8 of one color and 1 for your middle block, which will be a different color. 

Please cut out 8- 3" squares, these will become the points on your no point stars 


Step 1: You can draw lines down all eight of your 3" squares or use whatever method you like to use to make corners within your squares. I use the cluck cluck sew tape on my machine. 


Step 2: Sew one 3" square to a 4" square from corner to corner. Make 4 of these units


Step 3: Cut the corner off the block and leave a 1/4 inch from the seam. Press to the dark side. 


Step 4: Add the next 3" square onto the other side of the 4" square. Sew on the diagonal line. Cut off the corner of the block and leave a 1/4 inch from the seam. Repeat four times. 


Now you have your corners for the stars! It should measure 11 inches by 11 inches. 

Step 5: layout your block like a nine patch, sew together and press to the solid blocks. 


You just made a no point star! 


=


Hive 1 Christmas in July Tutorial for Beth


🎄Christmas in July for Beth🎄

This quilt will be for my niece.  She loved gnomes when she was younger, and I figured that Christmas gnomes would be a good quilt.  Even if she isn't into gnomes like she was, I thought it would still fit.  

I found a gnome quilt square that I really liked from the 'Sew Can She' blog at the following link: Sew a Gnome Mini Quilt - Free Gnome Quilt Block Pattern.  I changed up the sizes of the pieces so please use the following cuts but the directions on the blog should still work.  I made a few squares at the adjusted sizes with this tutorial, and I was pleased with it (see below).  It will result in a square about 9.5" tall by 9.25" wide.  I plan on making a quilt with a number of different colored gnomes and possibly adding in a few trees.  I was thinking that it will be a throw quilt size.


Colors:

The tutorial has a blue hat and a red body (or shirt?), but I think that you can get creative here.  I would be careful if you go with red and blue that it doesn't come across as too summery or patriotic instead of Christmasy.  I think my first example above does kind of start to look too patriotic with the gingham fabric so we will see if he makes it into the finished quilt.

Please avoid any childish or religious Christmas fabrics, florals, or licensed fabrics.  But I am fine with other Christmas prints.  I like a good metallic so feel free to use metallic fabrics or fabrics with metallic flourishes.  

I think the blue fabrics could be a range from dark blue to light blue with even some light green-blue colors as well.  That one fabric in my blue picture is not gray but light blue.  I know it appears like that in the picture.

For the background, please keep it to white fabrics.  I am fine with white-on-white designs, but I want it to go together as much as possible so please try to avoid the creams.  For the beard, I used a different white than the background, more a white-on-white design.

There might be other color combinations that work really well together so please be creative.  Like a green hat?  What would a non-traditional Christmas color look like?  Like if you had a pink Christmas pattern?  Let me know if you have questions around color combinations.

Below are some examples from my stash.  

Green:                                                                                     Blue:


Red:                                                                                 White:


For the nose, I sized down the template that comes with the tutorial.  I basically sized the pattern down 25% but I just winged the nose.  If you are concerned about sizing the nose down on the fly, I am happy to add the noses to final squares myself.  I have enough Heat n Bond to do that and lots of different skin type fabric.  So, feel free to send them without the noses!  See below for the difference between the two sizes - the grey oval is the nose that I sized down:


Cuts:

  • Background (white fabrics)
    • 2 squares, 5" x 5"
    • 2 squares, 2" x 2"
  • Body or Shirt fabric (red in the tutorial)
    • 2 rectangles, 2" x 3.5"
    • 2 squares, 3.5" x 3.5"
    • 1 rectangle, 2" x 9.5"
  • Hat fabric (blue in the tutorial)
    • 1 rectangle, 5" x 9.5"
  • Beard fabric (white fabrics)
    • 1 rectangle, 3.5" x 6.5"
Thank you in advance for helping me to put this together.  I am excited to see the varied fabrics and color combinations that you all come up with.  Again, if you have questions, please let me know.  
Thanks, and happy quilting!
Beth

Stashbee Hive 2- June- Improv Curves for Emily!!


Improv Curves!

Promise- not scary!

This idea was inspired by this video https://youtu.be/5Trgij2tync?si=2SxMDw54YPosrmbf

She gives good instructions too (and visual ones since it’s a video)- but she only uses 3 fabrics and 2 cuts and I would like 4 fabrics and 3 cuts. Also- she doesn’t have a "straight edge" side like I need- as explained in the sewing instructions below. 

Please read all instructions first. It's not hard, but it's good to know what you are doing and understand the why before you start. 


We will wind up with 4 pieces that I am considering 1 total square- but that’s a GRAND TOTAL of 3 cuts and 12 seams. And I expect it to be wonky as all get out- so no pressure! I had never done this before either but I wanted to try something new and gentle- non-patterned- mistake-friendly curves won.

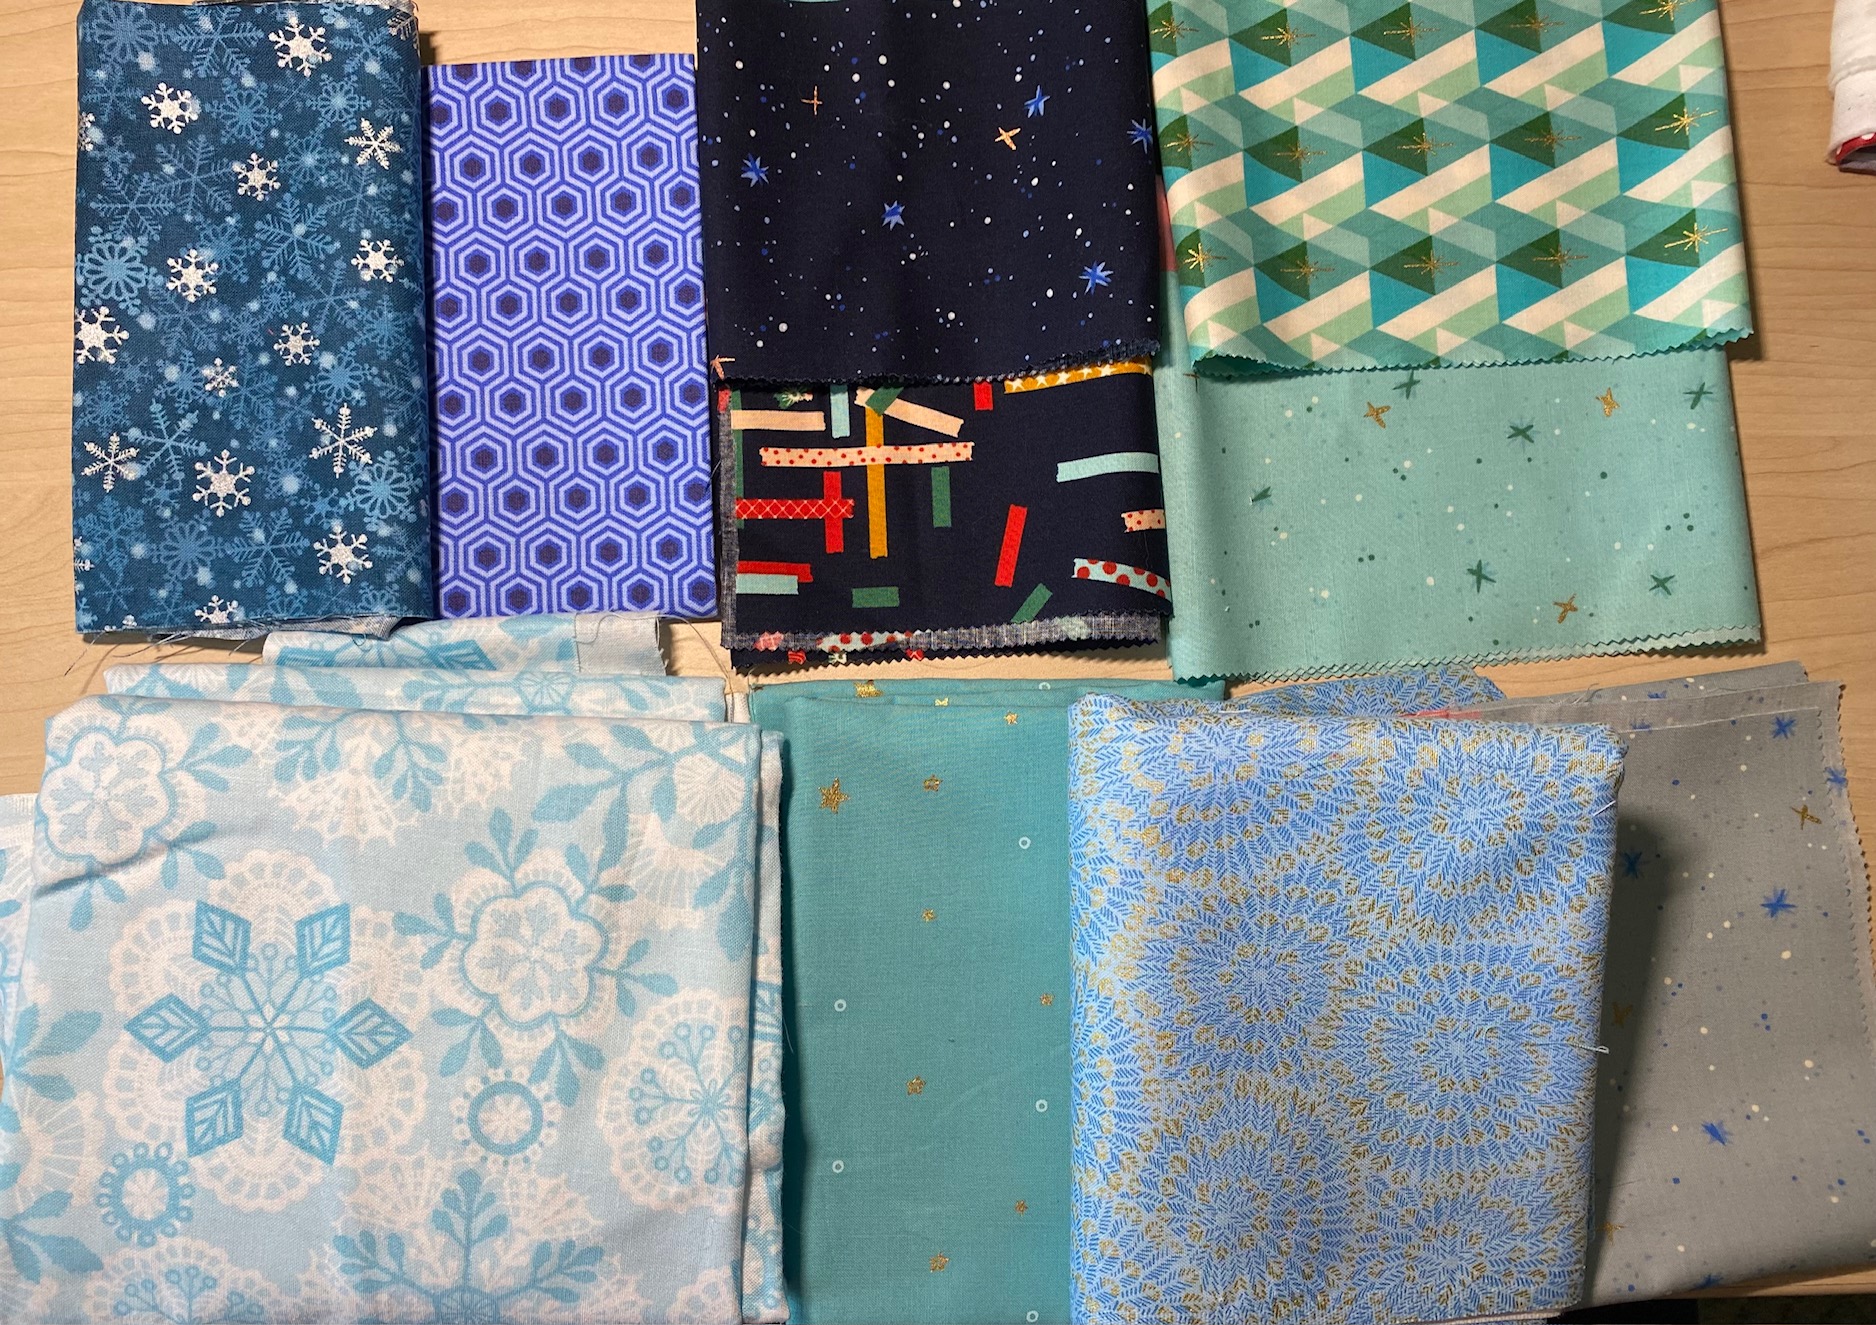
Fabric Pull:  we need 4 x 12” squares- 1 square from each fabric:

With all fabric- while in general patterns are ok, please stay away from actual images- no ducks or santas or whatever. Think mostly blenders- so think abstract or at least really not-obvious. note: for "white" cream is also ok- as long as it's a lighter cream, don't go too far towards tan. I am trying to stay on the black/white/grey spectrum for those shades. 

1st fabric- Reads REALLY dark- like black- dark grey is fine, patterns are fine try not to have much of any color besides white, grey, & black (though a little sprinkle is fine- you can see I have some gold bits on one of mine)

2nd fabric- Reads close to white- can have a little bit of black and/or grey to break it up- patterns are fine try not to have much of any color besides white, grey, & black (though a little sprinkle is fine)

3rd fabric- Reads white & black, but is in the middle of the above 2- patterns are fine try not to have much of any color besides white, grey, & black (though a little sprinkle is fine)

(soo...1 dark, 1 light, 1 medium)

4th fabric- something that reads as a solid color- doesn’t need to BE a solid color- just needs to read as one. Batiks are fine. I like bright, bold colors- not neutrals. We are looking for high contrast pop between this and the 3 other black/white/grey fabrics


Fabric Examples:


Cutting:

Stack all 4 of the 12” squares on top of each other, nice and tidy & all lined up. Doesn’t matter what order as we are going to rearrange all the stacks once cut anyway.

Figure out if you are more comfortable swinging your cutter left to right or right to left- I did this by swinging my hand and cutter both ways until I knew which felt better.

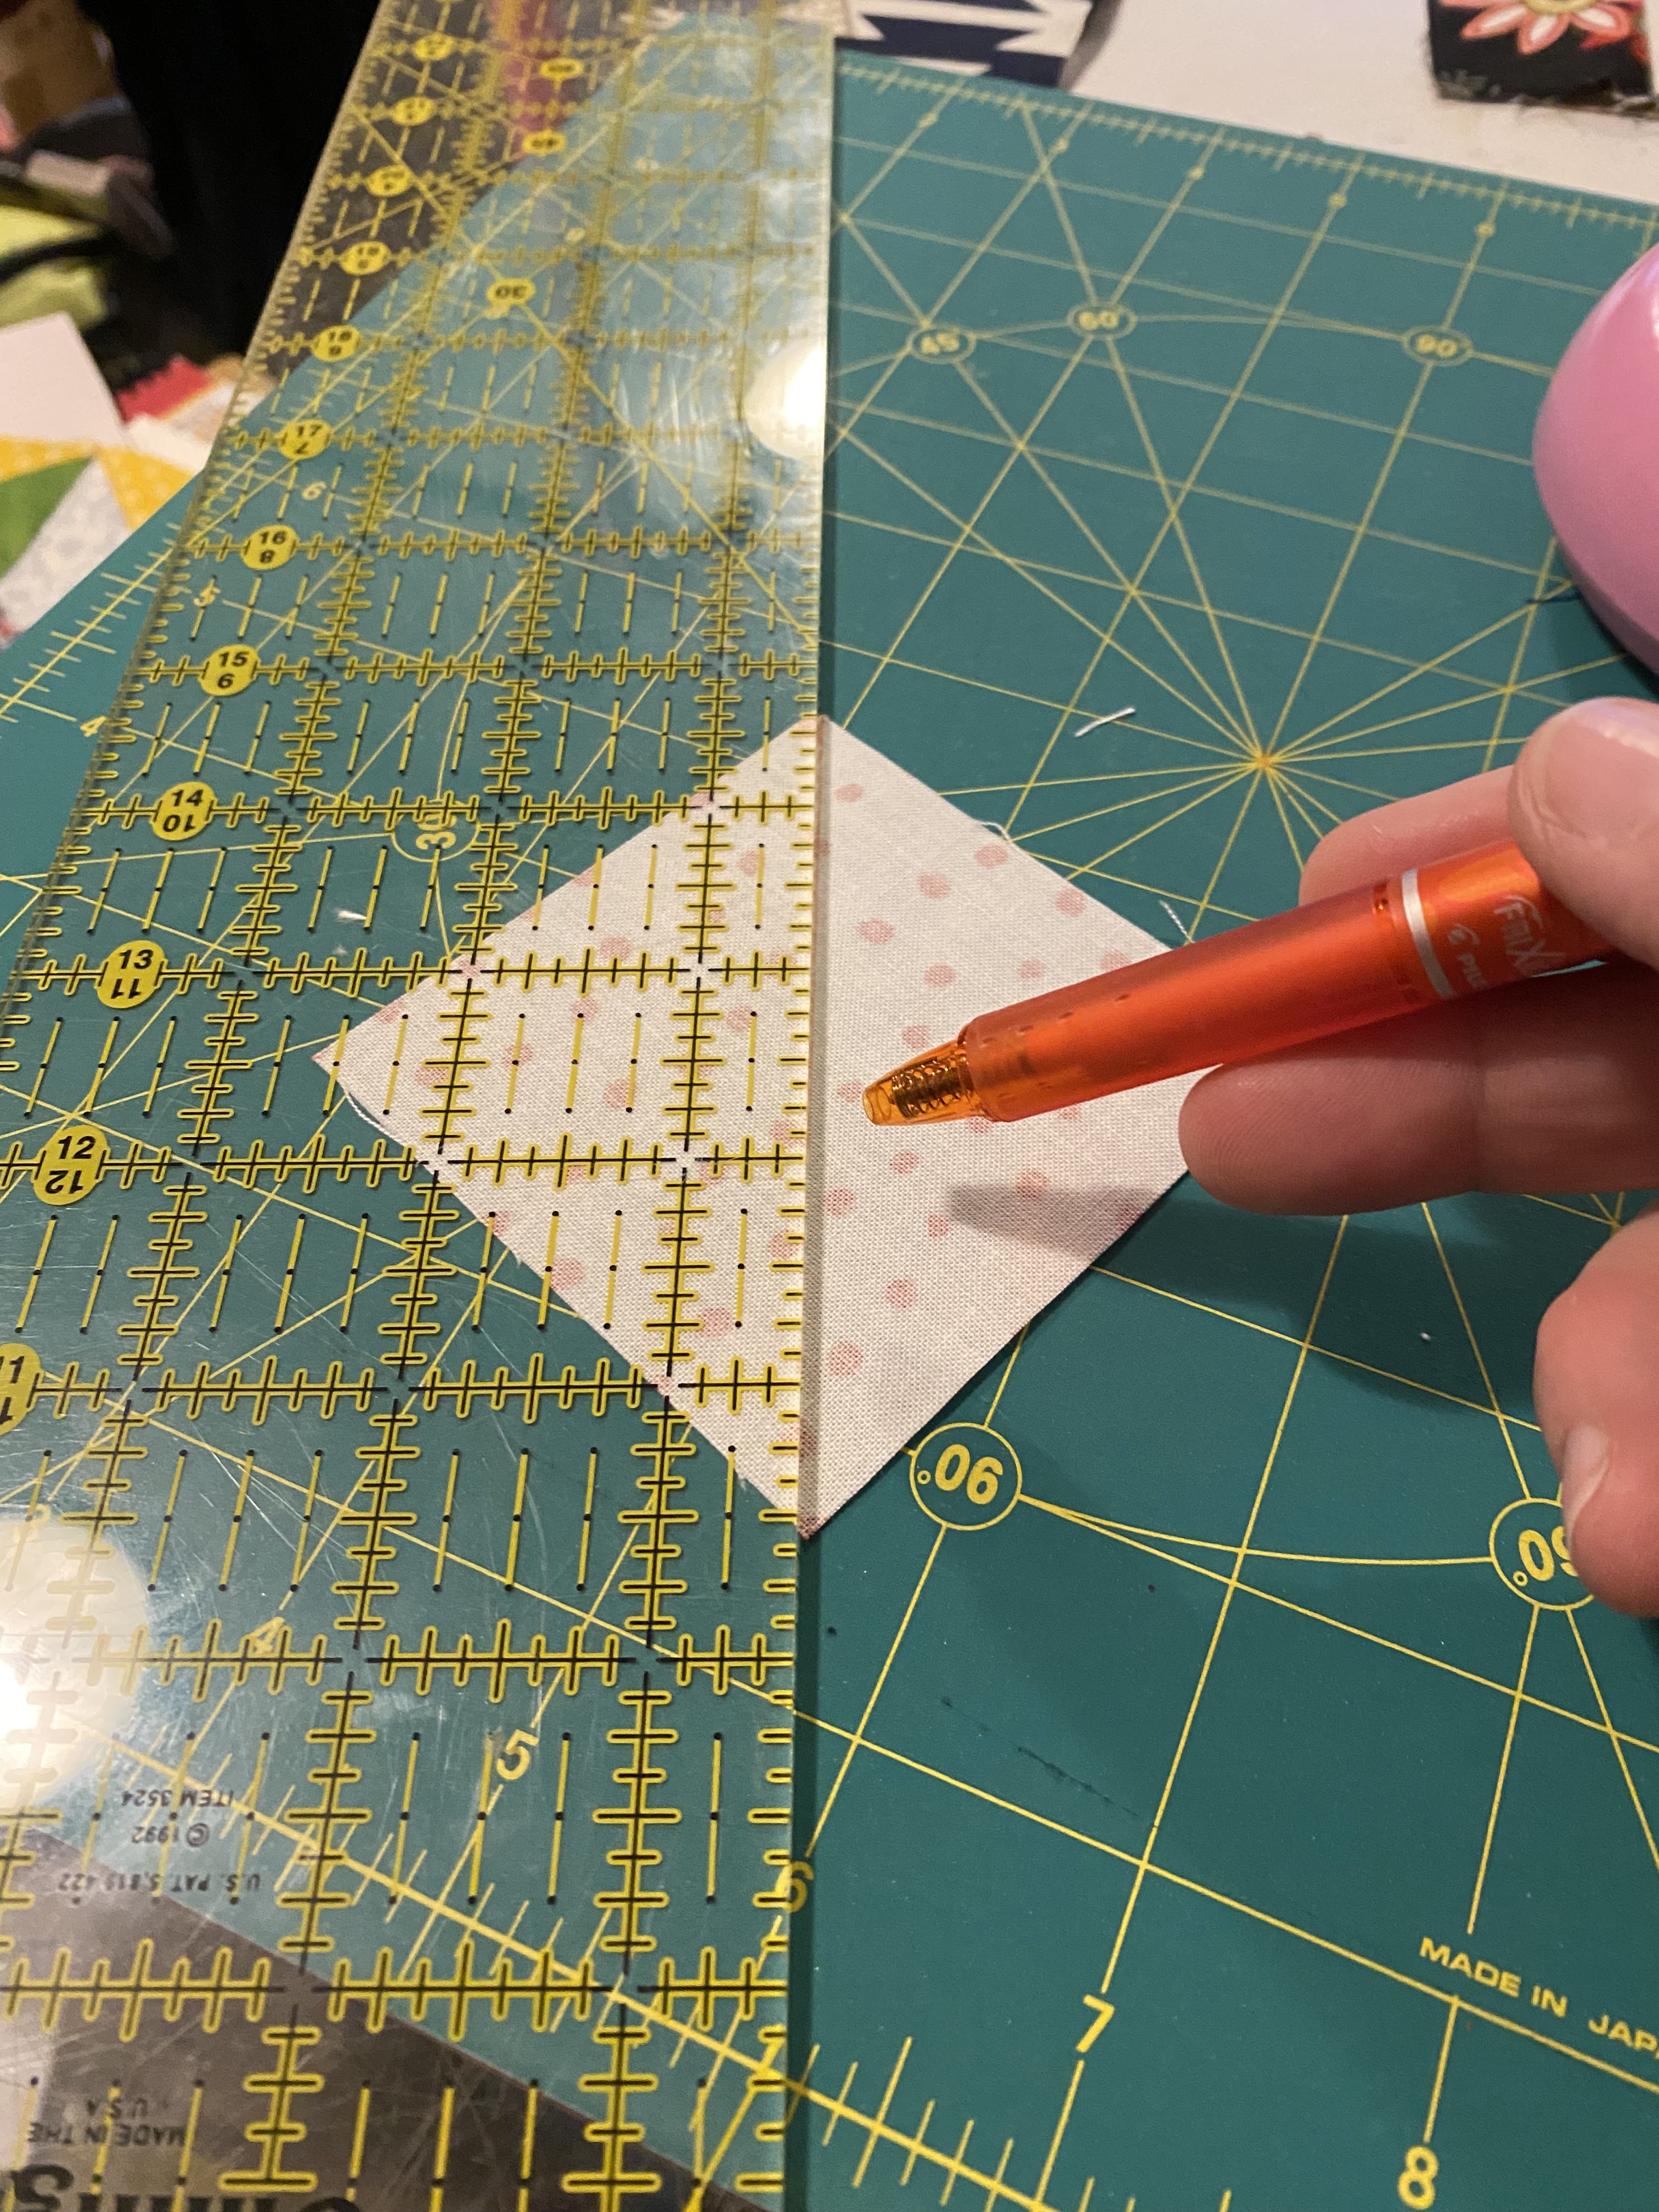
Take a deep breath- You will only be making 3 cuts, all starting on the bottom edge and going either to the right side or to the left side- whichever you thought was most comfortable.

It is SUPER important that the 4 layers of fabric stay lined up together while you cut- the cuts need to match for sewing.

You want to keep the 3 cuts at least 1.5” in width for easier sewing. Also- we want them to be different widths- not all close to the same width (Which is what I did in the photo below because it was my first time- no one will die if they are pretty close so don’t panic too much about that).

I would recommend that that the first cut and third cuts be at least 2" from the edge for easier sewing- but these look better if they aren't exactly the same spacing for all cuts- some fat, and some thin is awesome. 

Now…CUT a rough arc. Not looking for perfection- just a fairly round-ish arc.

(I didn’t take a photo of this stage before I did the next thing- so this photo will serve for both steps)


OK breathe again.


Next step is basically the same as if you have ever done a stack’n’whack- we need to switch fabrics around so that the 4 squares each have 1 of the 4 fabrics

With 3 cuts you will have 4 sections- starting on either the small inside corner or the large outside edge- think of them as stacks A, B, C and D.

Stack A take the top 1 piece off and move it to the bottom

Stack B take the top 2 pieces off and move them to the bottom

Stack C take the top 3 pieces off and move them to the bottom

Stack D leave as is.

You will then have 4 stacks where each of the same layer is 4 different fabrics (see above photo). Perfect!


 Sewing:

Pick either the side where cuts start/stop- I used the 
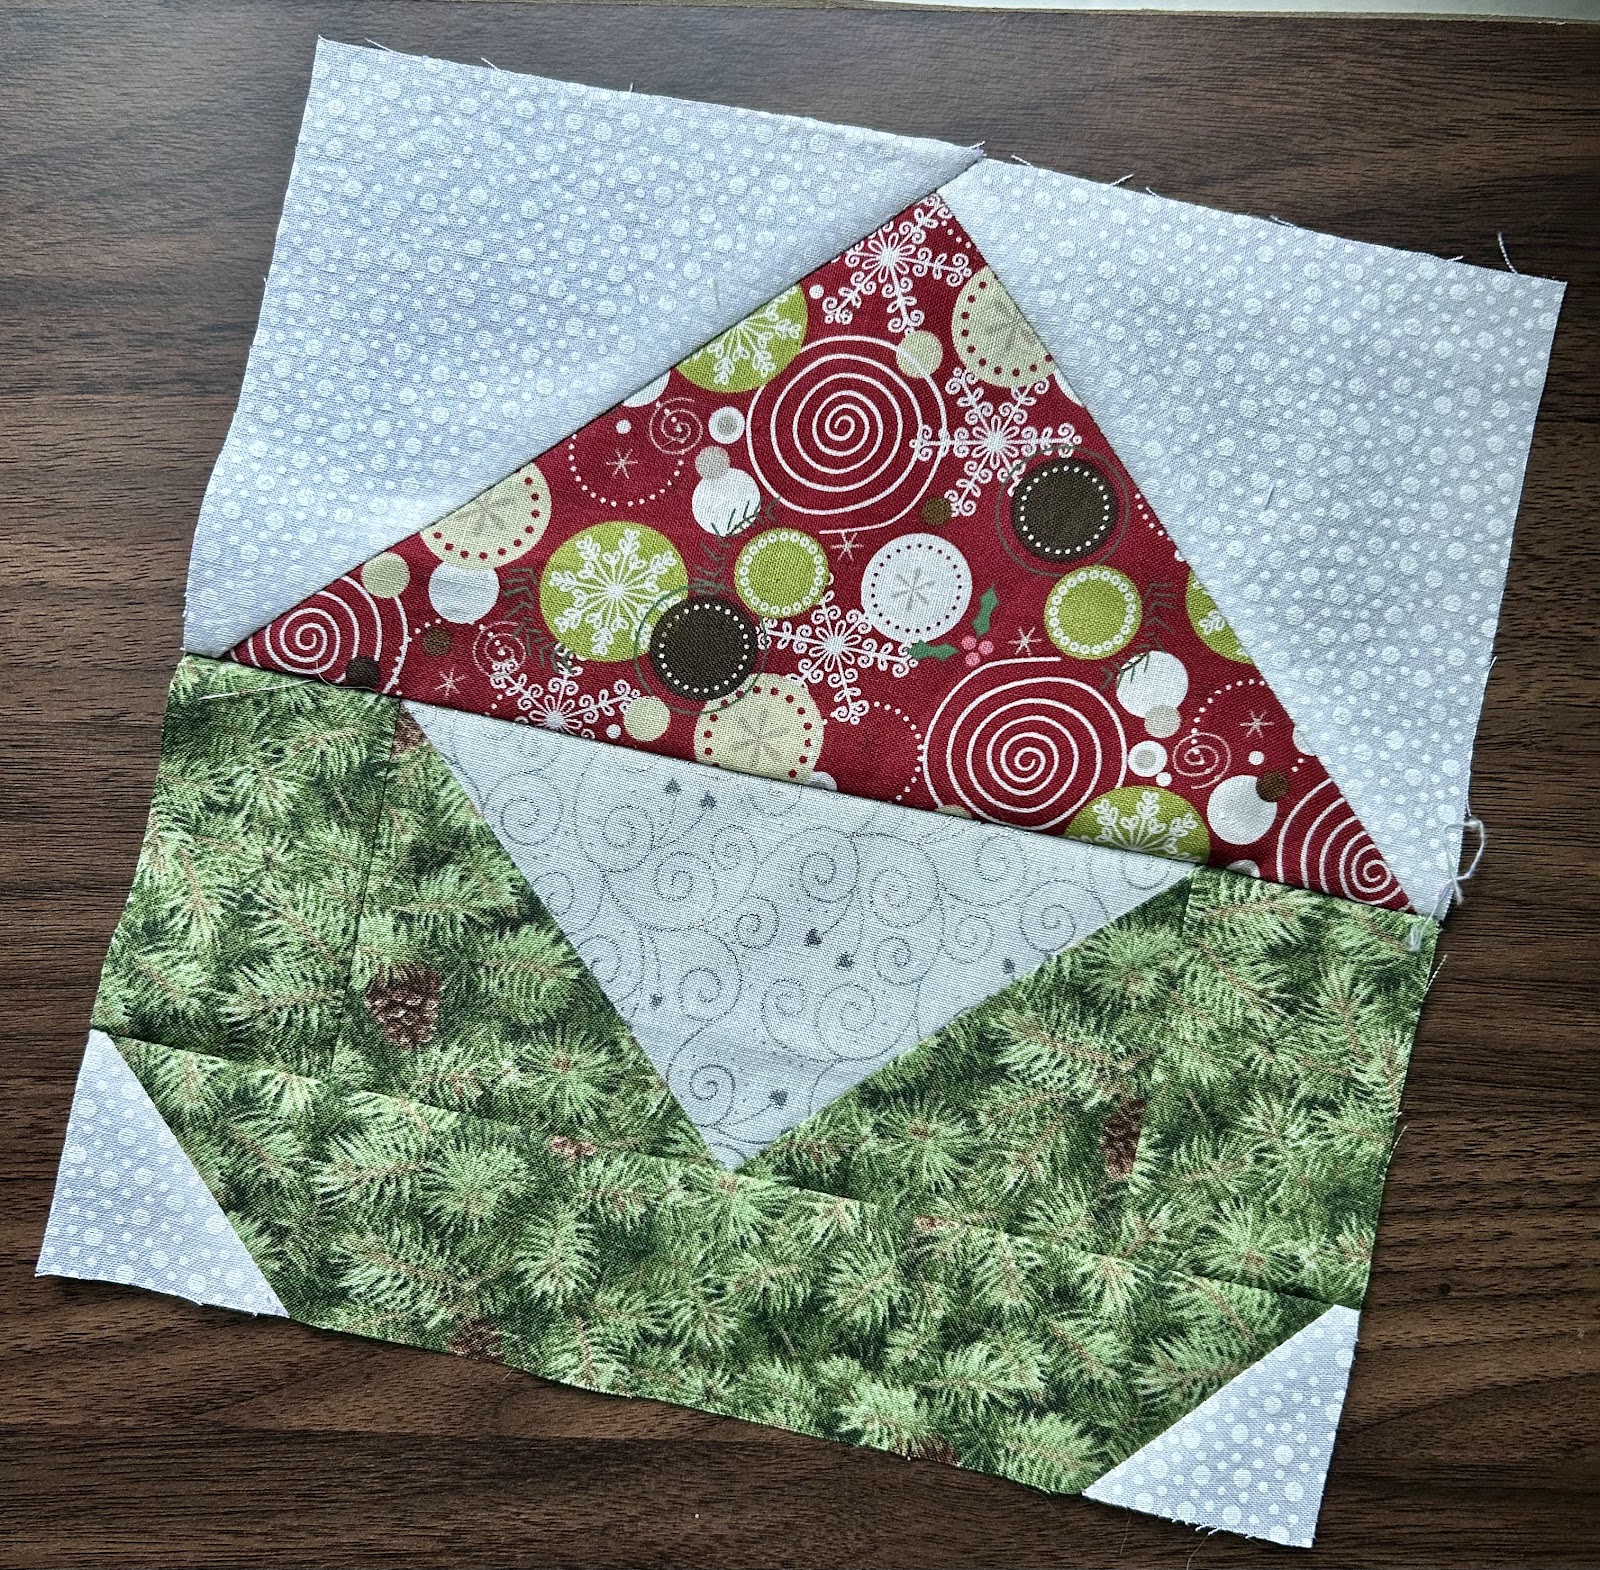
bottom- but if the side is more comfortable to sew from then that's fine. Just do it the same for all 4 blocks. We will start all sewing on along the same edge to keep that 1 edge as "straight" as possible. Look at my photos- you can see 1 edge is "straight" (I do not mean perfectly straight- just...in coparion to eht other sewn side) and the other is severely stair-stepped.  The edge you chose is going to stay your “straight edge” This is the edge that you will start sewing on every time- so all edges of all pieces will line up along this edge- therefore keeping it “straight” (pretty close to straight, not perfect) 

I did not pin anything, but I did use my ¼” measurements like I usually do for a ¼” seam. It wasn’t perfect, and if your seams get a little fatter than ¼” that’s ok, but you don’t want them to be thinner.

Grab the top fabric from Stack  A and the top fabric from Stack B. Line up the cut edges on your chosen “straight” side, right sides together, and sew the curve.

Go slow, adjust fabric often.

The fabrics will NOT line up at final finishing edge/side- this is fine. You will in the end wind up with a “stair-step” on that side. Totally good.

(In the below image you can see I’ve chosen the bottom as my “straight” which made the left edge  a “stair step”)

 Once those 2 are together, take the top fabric from Stack C, right sides together with the 2-pieces unit you already have, lined up along the “straight” edge. And repeat sewing this one on.

And finally take the top fabric from Stack D and do it again.


TA-DAH! 1 block done!

Do that 3 more times with the remaining pieces. Fabrics should not duplicate within the same square.

Breathe again


Once all 4 blocks are together- press them

I pressed on the backside starting from the small cut corner and moving outwards- I did GENTLY pull my block as I went to help eliminate puckering and get those curved seams to lie flat.


Once pressed- ALL DONE!!!

Do not trim- just send them to me as is- stair steps and all.


End results as I want you to send them to me (again you can see 1 "straight-ish" edge which is the side where I started all  my sewing, and 1 "stair-step" edge which is the side I finished all my seams on). Also note how the different widths of cuts create more drama than similar widths.  (I have rotated the blocks here so to see the "circle" easier, but if they were all lined up the same, the "straight" side would all be on the same side)

Yes- please send the pressed BUT UNTRIMMED blocks. I will figure out a size I like once I have them all and trim them to that size. 


Hive 5 Tutorial for July- Sampler

 July 6" Sampler Squares

This year, I am grateful to ask your help in making a sampler quilt for my nephew, Danny. 

I thought I would start with a little bit of information about the recipient. Danny is a 10-year-old boy who loves his family and his pets. He has two dogs, one cat, and three siblings, and loves being a big brother. His favorite subject is math, and his favorite colors are green and blue. He likes baseball and playing video games, but he is the kind of kid who does not answer his ringing iPad when friends call if he is spending time with his family. For Danny, nothing tastes better than his grandma's home cooking--he especially loves his grandma's turkey burgers or cheese tacos. 

I hope this provides you with some inspiration!

The Quilt

I struggled to come up with an idea for what to make Danny, and I finally decided on a sampler quilt. I already have a good number of 12" squares, and I would like your help to make 6" squares to mix in. The plan is to mix up blocks of different sizes. You can make ANY 6" (finished size) block you'd like. They should be 6.5" unfinished. Generations Quilt Patterns has a lot of options for inspiration.

These are some of the 12" blocks that I have received from another swap for this project.

Fabric Parameters: 

I am using Danny's favorite colors in this quilt: Blue and Green. If you need an additional background color, please use light to medium grey

Please avoid: 
  • Florals 
  • Girly themes (shoes, lipstick, etc)
  • Overly childish themes (I want the quilt to grow with him)
  • Greens that lean toward olive or mint. I am looking for brightly saturated green

Here is my fabric pull for the project. You can see batiks, light denim, solids, patterns, and blenders.

Tutorial

As I mentioned above, any 6" block is perfect! You can use traditional piecing, FPP, appliqué, improve, you name it. Just make sure the unfinished size is 6.5". For the sake of this tutorial, I am going to lead you through making a Double Pin Wheel from Generations Quilt Patterns.

Step 1: Cut Fabric

  • Background - Cut (1) 4.5" square, then subcut it twice diagonally, corner to corner. You now have 4 triangles.
  • Accent Color - Cut (1) 4.5" square, then subcut it twice diagonally, corner to corner. You now have 4 triangles.
  • Main Color - Cut (2) 4" squares, then cut each once diagonally. You now have four larger triangles
Here are my cuts. The grey is the background; the green is the accent, and the blue is the main color.


Step 2: QST

With right sides together, align the edges of one background triangle with one accent fabric triangle. Stitch them together along a straight edge (not the bias) to form a quarter square triangle. Press to the darker fabric. Repeat with three other sets.

Here is what my QSTs look like.

Step 2: Quarter Units

Sew each QST to a larger, main fabric triangle. Be careful and make sure all of your smaller units look the same. Trim to 3.5" inches. 

If you've sewn everything correctly, you can easily make a pinwheel by rotating each block 90 degrees 

 
This is what it looks like when you mess up. Try not to do this!

Step 3: Assemble Block

Sew units together so that they create the double pinwheel block. Press the rows in alternating directions so the seams nest. Press however is most comfortable for you, and trim to 6.5". 


Here is my finished double pinwheel! Thanks for sewing, and I am looking forward to seeing what you come up with. 

Note that I my centers do not line up perfectly. I don't mind if yours are a little off either :)


Monday, June 30, 2025

Hive 4 - Scrappy Stripes Block July Tutorial by Pam


This is my 8th year taking part in Stash Bee, and for the first time, I’m repeating myself on a tutorial.  Last year I created my tutorial for Scrappy Stripes blocks, and received a dozen or so beautiful blocks, some of which are pictured above.  I made three blocks myself for the tutorial, so I have a nice pile of blocks already.  I'm re-sharing the tutorial for my July 2025 turn as Queen Bee of Hive 4, so I'll end up with an even bigger and more beautiful quilt, thanks to all my talented Hivemates.

HOW TO MAKE THE SCRAPPY STRIPES BLOCK:

The block will end up a bit more than 12-1/2 inches square, but because it’s improvisationally pieced, it won’t be exact, and the edges won’t be straight.  That’s fine!  When you’re finished with the sewing, don’t bother trimming the ragged edges or squaring up the sides.  These blocks are going to be all slightly different sizes, so I’ll take a look at them all before deciding what size to trim them down before sewing them into the quilt top. 

FABRIC SELECTION: 

  • ·         For the background square, one 13” or slightly larger square of any very light solid or low volume print will work.   
  • ·         For the scrappy stripes, two strips of any bright solid or print fabric, about 1-1/2" to 2-1/2" wide and at least an inch longer than the height of the background square.  Note that the strips do not have to be an even width, they can be wider at one end and narrower at the other.
  • ·         Small scraps of various prints or solids to make the pieced stripe.

Background of the block:

To get the approximately 13” size of background I wanted, I laid my 12-1/2" square ruler over a piece of fabric, then roughly cut around about 1/2' from the sides of the ruler.  Don't worry if the edges aren't straight!


Inserting the stripes:

Cut across the background square, either vertical or slightly diagonal--just eyeball it.


 Take one of the bright strips and insert it into the sliced background as shown below:


I pressed the seams toward the stripe, but how you press isn't important for this kind of block

Next repeat to add another stripe to the block.


Adding the scrappy stripe:

To make the scrappy stripe, take the small fabric scraps that you like and sew them together into a piece long enough to go across the background square, then cut a strip from that long piece.


Sew the scrappy stripe into the block same as before.  For the pieced stripe, it was easier to press the seams toward the background, because of all the seams on the stripe.  

 YAY, YOU'RE DONE!  

Hive 3 - July Tutorial - Bear's Paw Block for Maree

Hi Everyone.

Hard to believe it is July already. Here in New Zealand it is winter and recently we have had a lot of foggy, wet days in the Waikato area where I live. Hopefully most of you will be experiencing much nicer weather. I have been really busy at work, but would have loved to be able to make the most of this weather to stay home by the fire and sew. 

For my blocks this month I have chosen a Halloween themed Bear's Paw Block. This is my (partially revised) tutorial from 2024 and I have decided to ask for more blocks so that I can get my quilt top completed.  Along with Halloween fabrics I am happy for you to use fabrics that include bugs, moths, cats, black and whites, trees, etc and colours that give a bit of a Halloween vibe. I have included some of these in my blocks. If you are concerned about not having enough Halloween type fabric, I am happy for you to make the 4 individual paw blocks and send them to me without your sashing attached. That way I will be able to add in some of my fabrics and mix up the blocks. So please feel free to repeat fabrics if necessary. 

The tutorial I used is a Free Tutorial by Generations Quilt Patterns. Here is the link Bears Paw Quilt Block Pattern: Instructions in 3 Sizes (generations-quilt-patterns.com) 

They have 3 different size options and the one we will use is the 14" Finished Block with some variations. They have a great tutorial, although there are a lot of ads which make it a bit harder to read. They also have great instructions for making 8-at-a-time half square triangles which is a big time saver. You do need to refer back to the size chart as they use measurements for a smaller block when teaching this method.  

I also decided to use a thinner sashing, and wanted a mix of little squares and large squares for the paw blocks, so please refer to the cutting instructions below. Our unfinished block size will be 13.25" square. My blocks both ended up about 1/8" smaller so don't worry if your block varies a little bit also.

Here are my blocks I have made and also blocks I received from everyone last year. Unfortunately I never received a block from one lady, but Helen kindly made me an extra block. So I have two which I made and received 10 more.


And here are some of my fabrics. I joined a Coffin Hexie swap a number of years ago and had forgotten that I had purchased a number of different prints for that. Some I also received from an Instagram friend who lives in Washington State, USA.


Fabrics and Cutting Instructions


PieceFabricQty


1A1

1¼" x 1¼"
2B4
8


4½" x 4½"
2½" x 2½"
3**C2

6¼" x 6¼"
4**Background2

6¼" x 6¼"
5Background4

" x 6½"
6Background4

2½" x 2½"
Unfinished Block Size

13¼"


**These are the oversized patches that will be trimmed to perfection AFTER stitching.

To make cutting out easier I have adjusted the chart to show only what you will need to cut for my version of this block.

Fabrics 
  1. Fabric A is a small square which can be coloured or black n white
  2. Fabric B - Halloween Fabric (or other fabrics as suggested)
  3. Fabric C - Black n White, Black, or Black n Grey
  4. Background - White or Off White Low volume fabric - with interesting black or grey details if you have it.
Pressing Instructions
I am not too worried about how you press your blocks, however in saying that the tutorial does give good instructions for pressing. I found that I did not need to press any of the seams open. I much prefer to press to the side unless there is way too much bulk.

Half Square Triangles (HSTs)
The HSTs that make up the claws (position 3 in diagram) are made using the 6.25" squares. You make 8 at a time and they come together quite quickly. I used directional fabric for one of my backgrounds and this method works perfectly in making sure the fabrics all end up the correct way.
Here are a few photos showing the stitching lines and cutting lines.
You need to join a background square and a Fabric C square with right sides together. Mark the 2 diagonal lines so that you have an X. Sew 1/4 inch either side of both of these lines. You will then cut down the centre top to the bottom, and centre left to right (like a +). You also need to cut along the diagonal lines which you drew initially. Repeat for the other set of squares and you will end up with 16 HSTs. These need to be trimmed down to 2.5" squares.
One of my favourite rulers is my Bloc Loc square which makes trimming these HSTs to size so much easier. I am also lucky enough to have a little rotating cutting mat which is also a favourite tool.


For the paw I have used 2 x 4.5" squares and in the other 2 squares I have used 4 x 2.5" squares. I like the scrappiness of this to add extra fussy cuts or even just to add a touch of colour. So if you don't have any prints to cut, I am happy if you just use plain or textured colours here.


I feel like I could just continue to have fun making these blocks and exploring other fabric placement options.

Here are all of my blocks to date, and another photo showing a Tim Holtz grungey check fabric which I intend to use as my sashing. I normally go for much calmer fabrics so this sashing is pretty bold for me. Surprisingly I really love it though!


 Hopefully you can all have fun making these blocks. I have not had the chance to just play with fabrics like this in a very long time and actually really enjoyed making these as they are not my usual fabric of choice.

Please note that Helen's version of these in January had wider sashing than mine and her blocks were a bit larger. 


Thank you.
Maree

Instagram - @maree3ma