In diesem Monat bin ich diejenige die entscheidet welchen Block wir nähen, und ich darf dann alle Blöcke behalten. Ich bevorzuge "nähen-auf-Papier" und mein erster Gedanke mich für so einen Block zu entscheiden, aber dann hat meine Freundin (Nancy E.) diesen Block vorgestellt:
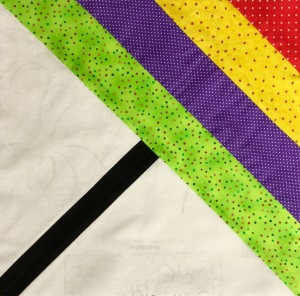
Nancy E. is in charge of our guild's block-of-the-month program, and this was the April block. And guess who won those blocks? I did!
Nancy E. ist für den Block des Monats in unserer Guide zuständig, und dieser Block war der Block des Monats im April - und ich habe sie alle gewonnen!
So now, I am asking my fellow bee members to make this block for me.
So jetzt, werde ich die Teilnehmer in meiner "Stash-Bee" bitten mir diesen block zu machen.
Here are my preferences:
- For the background, please use pure (bright) white. I used tone on tone white for my block, which is my preferred kind of white!
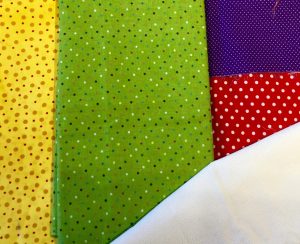
- Colored strips: Polka Dots, any color; please do NOT use pastels or batiks. I prefer primary colors but please do not use black, brown or yellow for the background color (of the polka dot fabrics).
- Für den Hintergrund, bitte pures weiss verwenden; weiss mit Muster wird vomier bevorzugt, solange das Muster auch weiss ist.
- Für die farbigen Streifen: Stoffe mit Tupfen aber bitte keine Batik Stoffe und keine Pastel Farben. Ich hätte gerne Grundfarben aber kein schwarz, braun oder gelb als Hintergrund (für die Tupfen Stoffe)
Unten sind die Stoffe die ich verwendet habe (bitte das gelb ignorieren)
And now for the tutorial (I have also created a .pdf of the tutorial)...
Und jetzt zum Block (den gibt es auch als .pdf)
CUT: Black: one strip ( 1 1/2” x 9”) White (background): one square, 13” 4 strips, each a different color: 2 1/2” x 18”, 2 1/2” x 16”, 2 1/2” x 14”, 2 1/2” x 12”
Zuschneiden: Schwarz: ein Stück ( 1 1/2” x 9”) Weiss (Hintergrund): ein Quadrat. 13" 4 farbige Streifen, jeder Streifen eine andere Farbe: 2 1/2” x 18”, 2 1/2” x 16”, 2 1/2” x 14”, 2 1/2” x 12”
INSTRUCTIONS:
Anleitung:
- Cut your white square once on the diagonal, then cut one of the halves in half again.
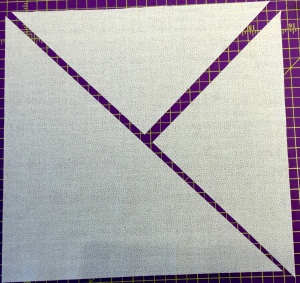
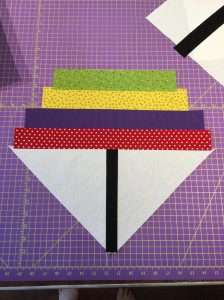
2. Attach a white triangle to one side of the black strip, then attach the other triangle to the other side of the black strip. Your piece should now look like this:
Eines der weissen Dreiecke auf die eine Seite von dem schwarzen Streifen nähen, dann das andere auf die andere Seite. Und dann sieht das so aus:
3. Center your 21/2” strips on each other and sew together.
Die vier 2 1/2" Streifen aufeinander zentrieren und dann zusammen nähen.
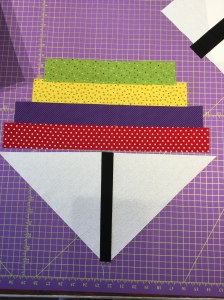
4. Attach the pieced strip onto your first piece (centering your colored strips on the black).
Jetzt die zwei Teile zusammen nähen.
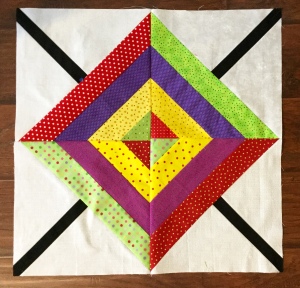
5. DO NOT TRIM - because some of the other squares I have received are a bit "odd-sized", I'd like to trim the blocks when I get them so I can make most of the seams match. Following, is a photo of the block I made for this tutorial, and some of the blocks I had; all combined into a large square. In this example I was able to match all the seams except for the centers...I might be able to fix this when quilting.
Ich bitte die Damen den Block NICHT zurecht zu schneiden! Manche von den Blöcken, die ich erhalten habe, sind ein wenig ungerade...wenn ich sie bekomme, schneide ich sie dann so zurecht dass die Nähte zusammen passen. Das Photo unten, sind vier von diesen Blöcken zusammen genäht. Man kann da sehen, dass fast alle Nähte zusammen passen (ausser die in der Mitte, aber das kann ich beim Steppen vielleicht korrigieren).
I cannot wait to see what all my Bee-mates come up with!


3 comments:
lovely block, the polka dots will be so fun! a couple of questions ... can the white be a kona solid? or do you prefer white on white pattern? also, solid black only for the narrow strip or can we use brown or dark gray....
thanks!
Sorry for the delay in replying; somehow, I missed the question.....
The white can be either, although I personally prefer white on white (but whichever you have available is fine). The narrow strip should be black (solid or black on black) but please no other color.....
Cute block. I've never seen it arranged with the striped triangles meeting in the center. I've only seen the umbrella tilted the same direction across the quilt. Will be sending mine soon.
Post a Comment