
Hello Hive 2! My name is Deana and I keep a very active blog called "Daughters of Dorinda" aka DreamWorthy Quilts.
In February, we are going to be making a bright little block I designed. I am calling this quilt "Sweet Cherry Orange".

Colors: White, Orange, Coral Pink, and Red. I fell in love with these colors after seeing them in my Stashbee last year and knew that whatever block I picked for this year would be in those same colors. Here is one of those blocks Carla in my hive made. The colors make me smile!

I prefer modern or Batik fabrics for this project. I also LOVE polka dots. Please, don't add any other colors but the three listed with white unless they are very small and not dominant. Also, I don't care for solids; I prefer the texture in prints.
White: Please use a white on white or solid white without any other color in it. You can mix whites in the same block; I did.
Coral Pink: Please try to use a pink that is slightly on the orange side. Here are some coral pink samples on Pinterest.
Orange: Bright orange, NOT burnt orange
Red: Just try to match the pictures as much as possible.
You may also use fabrics that have a combination of the colors in it such as the corner pieces in the photo above (it has all three colors)
Below is a photo of my fabric pull already made up into blocks:
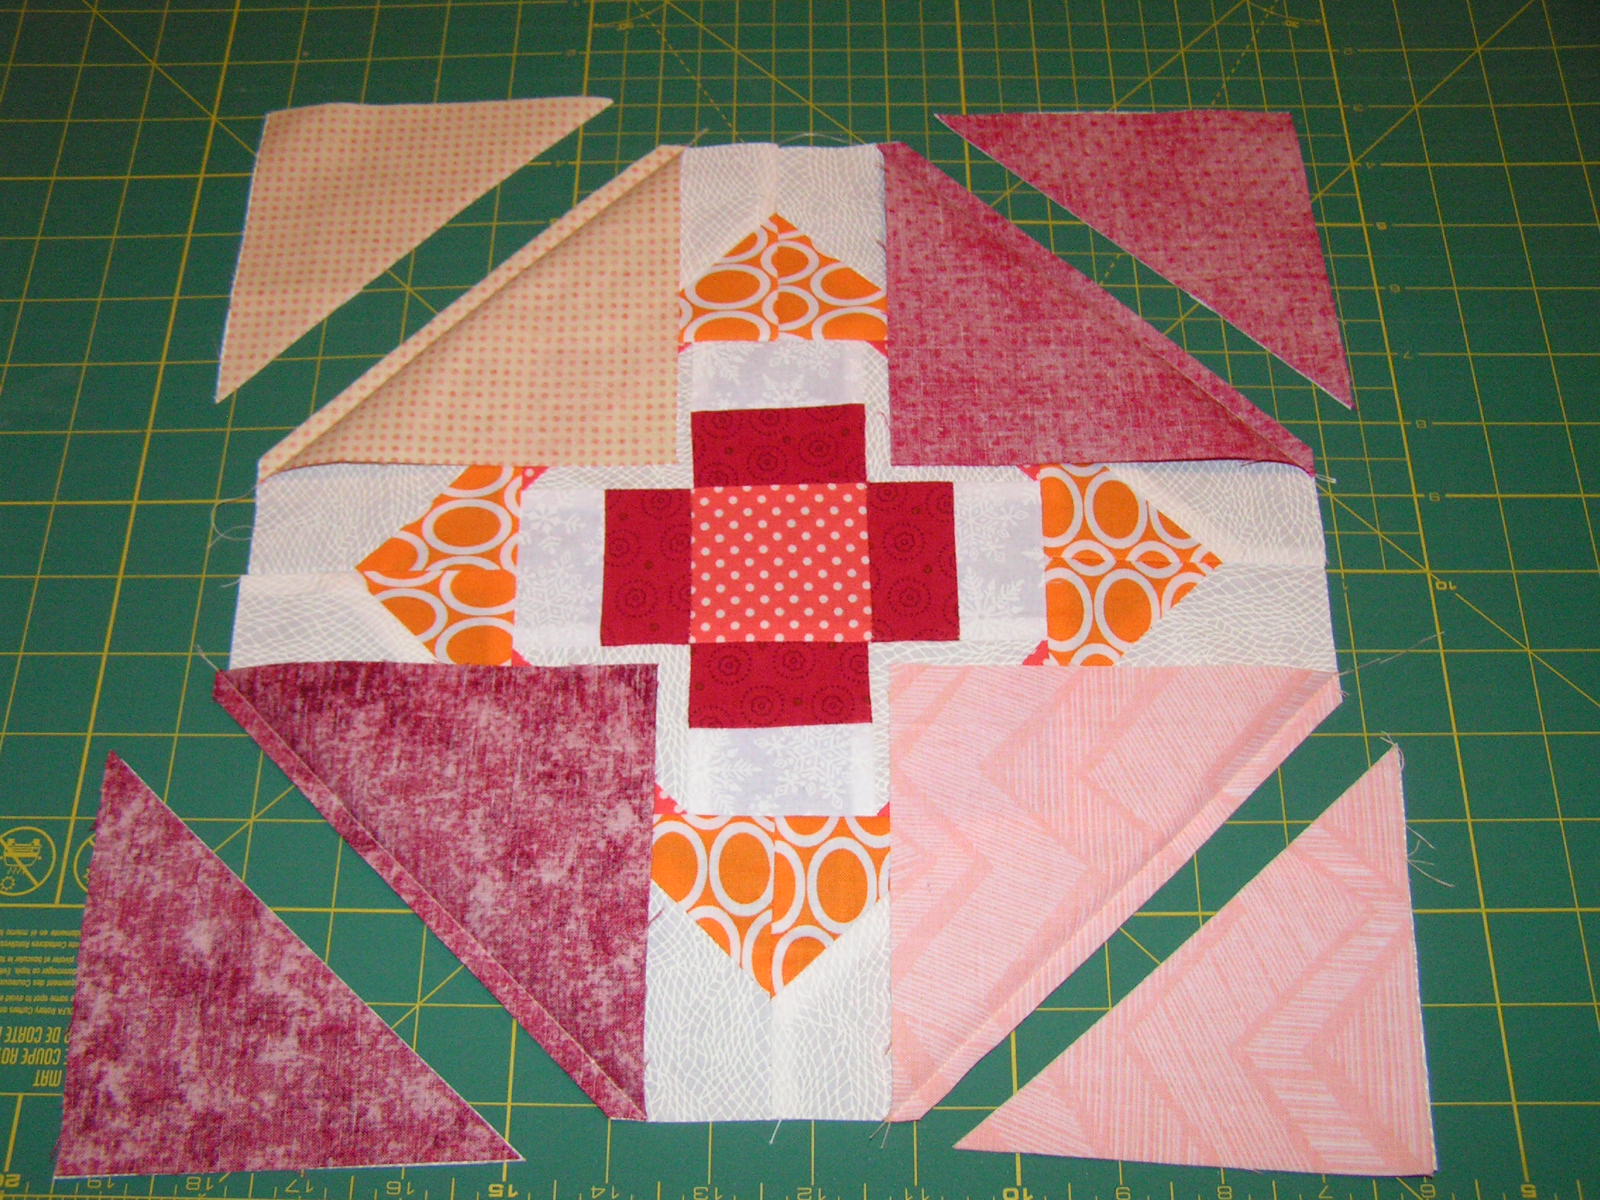
The half square triangles in the upper left corner are "bonus triangles" cut from the four corner triangles. I would LOVE it if you would send me those bonuses for a border. It would give me a variety of fabrics.

White
(1) 1 1/2" x 11"
(2) 2 7/8" squares (or 3" squares if you like to true HST's down to size)
(4) 3 1/2" x 6 1/2"
(4) 3 1/2" squares
Orange
(8) 2 1/2" squares
Red
(1) 2 1/2" square
(2) 2 7/8" squares (or 3" squares if you like to true HST's down to size"
Coral Pink
(1) 1 1/2" x 11"
ALSO
(4) 5" squares from a variety of reds, oranges, and pinks. Please make each square a different fabric but it can be the same fabric that is in the center of the block if needed.
1. Begin by sewing the 1 1/2" x 11" strips of pink and white together as shown below. The 11" can be longer; it just needs to be at least that long. Press toward the pink fabric.
2. Cut the 2 7/8" squares of white and red (yours might be 3") through the diagonal to form a total of 4 triangles in each color.
3. Sew a red triangle to a white triangle and press toward the red.
4. If you cut your squares 3", true the blocks to 2 1/2" square. Squares cut 2 7/8" should already be 2 1/2" if your seam allowance was an accurate 1/4".
5. On the back of the fabric, draw a diagonal line through all orange 2 1/2" squares and various colored 5" squares.


8. Press toward the orange. Check to see that the pieces finish off the squares/rectangles straight and not crooked BEFORE trimming the excess 1/4" from the seam. Please don't leave the excess fabric in the block because it makes quilting difficult.
 9. Cut the white/pink strip unit into (4) 2 1/2" segments as shown below.
10. Sew the orange/white units together as shown below. It works best if you repress half of the orange fabrics toward the white instead of the orange. Opposite pressed seams can butt up next to each other for a perfect point match.

11. Create the center of the block as shown below joining HST's to both sides of two of the pink units. Press toward the white triangles. Also, join pink units to both sides of the red square. Press toward the red square.

12. The block goes together as shown below. The white squares join and go on the sides while the white rectangles join and are added last to the top/bottom.

13. The final step is to add the 5" square corners. Place a square in each corner and sew on the diagonal line. Because these pieces are so large, it is critical that they are placed perfectly in the corners. If they are not, the block will be very crooked.
Press toward the colored corner fabrics.
 14. After pressing and checking to see that the corners are square and not crooked, trim 1/4" from the seam using a ruler and rotary cutter. I would love it if you sent me the cut off corners with the block so I can use them in the final border. If you choose, you can just keep the outside four corners on and I will cut them off when they arrive.


I will be setting these blocks together with white sashing. I am using cornerstones in orange, red, and pink. If you desire to throw in a 2 1/2" square of one of these three colors, I would love the variety in my quilt. Certainly, it is not required. You can see the basic layout below. I hope to add enough of my own blocks to make a queen sized quilt.

I look SO FORWARD to getting to know you all better in 2016!
In February, we are going to be making a bright little block I designed. I am calling this quilt "Sweet Cherry Orange".

Colors: White, Orange, Coral Pink, and Red. I fell in love with these colors after seeing them in my Stashbee last year and knew that whatever block I picked for this year would be in those same colors. Here is one of those blocks Carla in my hive made. The colors make me smile!

I prefer modern or Batik fabrics for this project. I also LOVE polka dots. Please, don't add any other colors but the three listed with white unless they are very small and not dominant. Also, I don't care for solids; I prefer the texture in prints.
White: Please use a white on white or solid white without any other color in it. You can mix whites in the same block; I did.
Coral Pink: Please try to use a pink that is slightly on the orange side. Here are some coral pink samples on Pinterest.
Orange: Bright orange, NOT burnt orange
Red: Just try to match the pictures as much as possible.
You may also use fabrics that have a combination of the colors in it such as the corner pieces in the photo above (it has all three colors)
Below is a photo of my fabric pull already made up into blocks:
The half square triangles in the upper left corner are "bonus triangles" cut from the four corner triangles. I would LOVE it if you would send me those bonuses for a border. It would give me a variety of fabrics.

CUTTING:
White
(1) 1 1/2" x 11"
(2) 2 7/8" squares (or 3" squares if you like to true HST's down to size)
(4) 3 1/2" x 6 1/2"
(4) 3 1/2" squares
Orange
(8) 2 1/2" squares
Red
(1) 2 1/2" square
(2) 2 7/8" squares (or 3" squares if you like to true HST's down to size"
Coral Pink
(1) 1 1/2" x 11"
ALSO
(4) 5" squares from a variety of reds, oranges, and pinks. Please make each square a different fabric but it can be the same fabric that is in the center of the block if needed.
Sewing Instructions
1. Begin by sewing the 1 1/2" x 11" strips of pink and white together as shown below. The 11" can be longer; it just needs to be at least that long. Press toward the pink fabric.
2. Cut the 2 7/8" squares of white and red (yours might be 3") through the diagonal to form a total of 4 triangles in each color.
3. Sew a red triangle to a white triangle and press toward the red.
4. If you cut your squares 3", true the blocks to 2 1/2" square. Squares cut 2 7/8" should already be 2 1/2" if your seam allowance was an accurate 1/4".
5. On the back of the fabric, draw a diagonal line through all orange 2 1/2" squares and various colored 5" squares.

6. Place an orange square in the corner of the 4 white squares as shown. Also place an orange square in two right corners and two left corners of the white rectangles. See below.
7. Sew exactly on the diagonal lines. It is important to pin and hold the squares perfectly in the corners or the pieces will become skewed.

8. Press toward the orange. Check to see that the pieces finish off the squares/rectangles straight and not crooked BEFORE trimming the excess 1/4" from the seam. Please don't leave the excess fabric in the block because it makes quilting difficult.

10. Sew the orange/white units together as shown below. It works best if you repress half of the orange fabrics toward the white instead of the orange. Opposite pressed seams can butt up next to each other for a perfect point match.

11. Create the center of the block as shown below joining HST's to both sides of two of the pink units. Press toward the white triangles. Also, join pink units to both sides of the red square. Press toward the red square.


13. The final step is to add the 5" square corners. Place a square in each corner and sew on the diagonal line. Because these pieces are so large, it is critical that they are placed perfectly in the corners. If they are not, the block will be very crooked.
Press toward the colored corner fabrics.
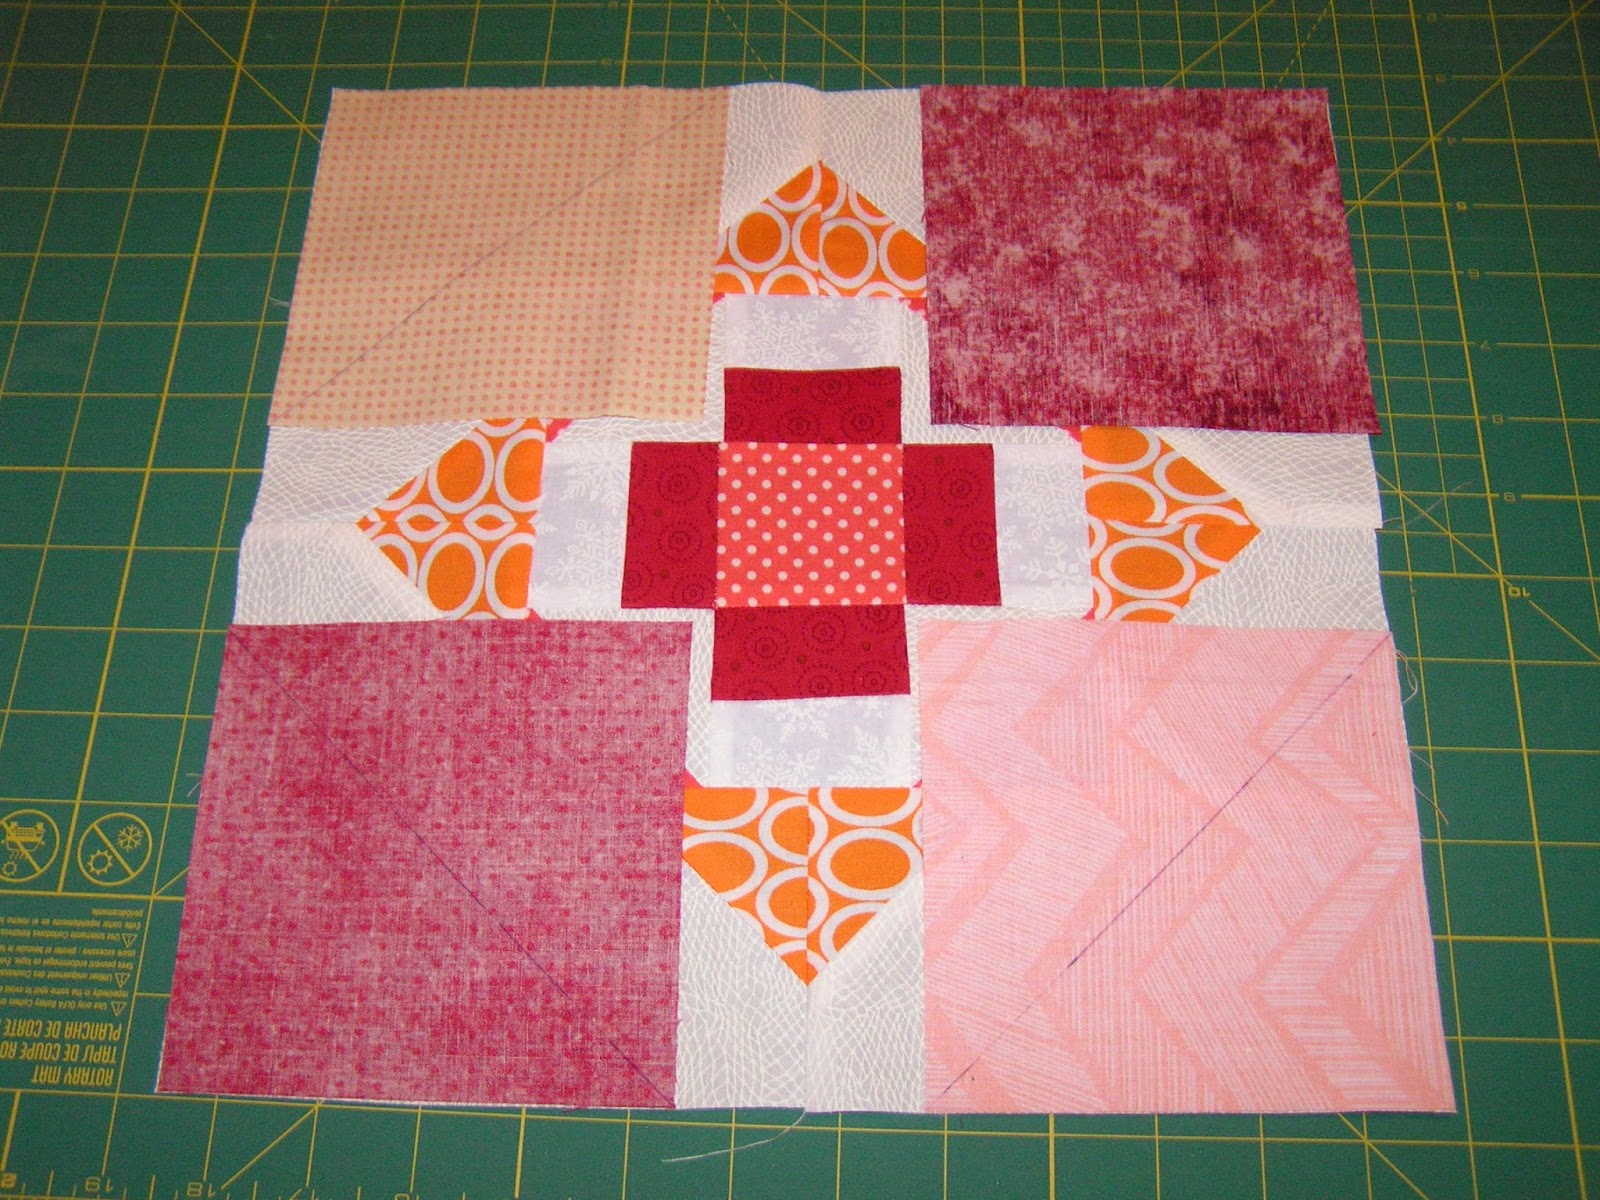
The block should measure 12 1/2" when you are finished.
Below are my finished blocks.


I will be setting these blocks together with white sashing. I am using cornerstones in orange, red, and pink. If you desire to throw in a 2 1/2" square of one of these three colors, I would love the variety in my quilt. Certainly, it is not required. You can see the basic layout below. I hope to add enough of my own blocks to make a queen sized quilt.

I look SO FORWARD to getting to know you all better in 2016!
2 comments:
Deana... The more I look at your block the more I like it. It was so much fun to make for you.
Deanna, I'm on my third round of making this block and it's coming out consistently small. I'm going to try sizing all the measurements up a bit and see if that helps at all.
Post a Comment