This is Tisha Cavanaugh. I blog occasionally over at Quilticing.com and this is my second year in the Bee. I love my Bee quilt from last year and I am very excited to see how my blocks turn out this year.
For the last 2 months I feel like everywhere I look I have been seeing yellow quilts. Every time I see one it makes me want one. It's like they are calling to me.
So this is the block I have selected this year:
It is a variation of the Carpenter's Star Block. I was inspired by a few pictures I found on Pinterest including this one from Sisters and Quilters.
So this should be the easiest fabric pull ever! I am only asking for 2 fabrics. You will need one bright white solid and one bright yellow (print or solid is fine). For the yellow think sunshine, lemons, yellow daisies, daffodils, and bumblebees. Please steer clear of mustards or anything that leans orangey. Here is my fabric pull.
Warning: Please be advised that the song "Mellow Yellow" may or may not get stuck in your head during the making of this block. They call me mellow yellow. Quite rightly....
Cutting Instructions:
Helpful Hint: Some of the cuts are really similar, so I found it helpful to label each of my piles with their size (I learned this the hard way :))
White:
- 1- 6 1/4 inch square
- 1- 5 1/2 inch square
- 4- 3 inch squares
- 4- 3 1/2 inch squares (these are for HSTs so if you need more trimming room cut 3 3/4 inch)
- 4- 3 3/8 inch squares
- 1- 6 1/4 inch square
- 4- 3 inch squares
- 4- 3 1/2 inch squares (these are for HSTs so if you need more trimming room cut 3 3/4 inch)
- 4- 3 3/8 inch squares
Piecing Instructions:
A few notes:
Please press all seams (excluding the flying geese) open.
Please piece with white or very light color thread.
Step 1: Half Square Triangles
Using the 3 1/2 inch white and yellow squares make 8 yellow and white HSTs using the drawn line method. After last month I know we are all experts with this :).
Step 2: Flying Geese (No Waste Method)
The no waste method is perfect for the sawtooth star and similar blocks because you end up with 4 flying geese units. There are tons of tutorials for this online (just search no waste flying geese), but this is how I did it.
Start with the 6 1/4 inch yellow square and the 3 3/8 inch white squares. On the 3 3/8 inch squares draw 2 diagonal lines a 1/4 inch away from the corners (as shown below). Place 2 white squares at opposite corners of the yellow square (right sides together) being careful to align the drawn lines (see below). The tips of the white squares will overlap a little.
Sew along each of the drawn lines. Helpful hint: You will get a more accurate block if you sew 1 or 2 thread widths into the seam allowance instead of directly on the drawn line.
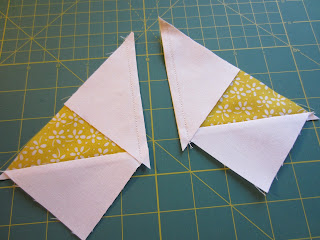
Cut the unit apart diagonally and press to the small triangles.
Place the remaining 3 3/8 inch squares on the yellow corner of each unit (right sides together). See below. Sew along the drawn lines. See helpful hint above.
Cut the units apart and press to the smaller triangle.
Repeat these steps with the 6 1/4 inch white square and 3 3/8 inch yellow squares. You will end up with 8 flying geese units. Trim to 3 X 5 1/2 inches if necessary.
Step 3: Assemble the Block.
Lay the block out as below:
I sewed all the rows together first and then the columns. The block should be 15 1/2 inches unfinished, but don't worry about squaring it up. I will take care of that.
Here are some other blocks I made in the last few weeks.
Please feel free to send me an email if you have any questions.
Thanks!
Tisha


No comments:
Post a Comment