Hi
There! I’m Liz, from Hive 8. This year’s Stash Bee is my first bee ever,
and I’m super pumped to be this month’s Queen!
My
block request is a Log Cabin Plus block.
Log Cabins are a long-time favourite of mine, and this interpretation has
a graphic, modern spin…I can’t wait to see how the quilt comes together, I’m
already so excited!
Fabric Selection
Background: Solid White/Off-White. I'm not fussy on the exact white that you use, just please use a solid and please use the same white for the entire block.
Plus: Black and White print. Try to avoid any other colours besides black and white/off-white in the pattern. If you don't have any black and white prints in your stash, solid black is cool too.
Cutting
Cut the following pieces of white (Background) fabric:
(Qty 4) 3" x 3"
(Qty 4) 3" x 5 1/2"
(Qty 4) 3" x 8"
Cut the following pieces of black (Plus) fabric:
(Qty 4) 3" x 3"
(Qty 4) 3" x 5 1/2"
Piecing
Use a quarter inch
seam allowance for all piecing, and press all seams open.
Steps 1 through 4
describe the piecing directions for one quadrant. You will need to
create 4 quadrants for each block. As a time-saving tip, I recommend
chain piecing all 4 quadrants at the same time, in which case you can skip step
5.
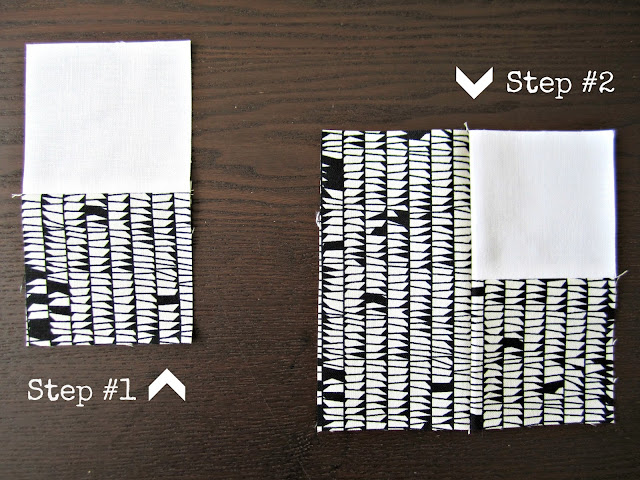
Step 1
Join a black 3" x 3" square to a white one. press
the seam open. (pictured
below)
Step 2
Sew a black 3" x 5 1/2" piece to a long edge of the unit
created in Step 1. (pictured
above)
Step 3
Working clockwise, sew a white 3" x 5 1/2" piece to
the edge of your work from Step 2. This piece should be touching the end
of the black strip that was added in Step 2, as well as the white square from
Step 1. (pictured below)
Step 4
Add a white 3" x 8" strip, perpendicular to the piece
that was added in Step 3. The result should be a square Log Cabin that is
8" x 8". (pictured above)
Step 5
Repeat Steps 1-4 three times to create a total of 4 Log Cabin
quadrants.
Step 6
Arrange your quadrants as pictured, so that the black pieces
create a plus sign. Sew the top two quadrants together, and the bottom
two quadrants. This will create 2 rows that are 8" x 15 1/2".
Take care to match your seams so that the edges of the "pluses"
are aligned.
Step 7
Join the top and bottom rows, to create your finished block!
Thanks for Sewing with me this month, Hive 8!!
--Liz


9 comments:
Oh this is a good one! Funny story, yesterday I went to my LQS just to look around and bought one thing for my stash... A yard of cotton & steel basics- black with white dots. Meant to be!
Oh man, I have no excuse to buy more fabric this month. ;) I've been collecting black and white fabrics for a few months now for a quilt in my head, and am therefore very spoiled for choice with this one!
This is a great block Liz. I'm next and I can't make up my mind.
Great choice - simple to make but all the blocks together will be striking. Thanks for the clear directions!
Awesome - a quilting miracle!!
I was hoping the black and white combo would be an easy one for the group. You'll just have to come up with another excuse to buy some fabric (I don't know about you, but I never have too much trouble coming up with those excuses!!)
It's so tough to chose, eh? I struggled with it too. There are so many possibilities!
Thanks June! I'm glad you find the instructions easy to follow.
I finally mailed mine on Friday. Hope it doesn't take too long to get there.
Post a Comment