Thursday, October 1, 2026

Hive 3 - Tutorial for October - Haphazard block for Laurie

I’m so excited for another year with Stash Bee and I'm asking to add to my blocks from last year as I fell in love with each and every one!  

BUT this year You can choose any color you want for the strips.

The Haphazard block is bright, it's scrappy, it's creative, it's versatile!!

I'm using My Poppy Makes for inspiration. You can find the quilt  here:  MY POPPET MAKES

I changed up the dimensions so we will end up with a 15” block.


Fabric:  

Let’s keep this Bright!  


Center Square: Black and white, typeset, tone on tone, white on white

Strips: Pick one favorite color from your stash, then select four different fabrics to use.  If you like Pink, feel free to use that again! 


Instructions: 

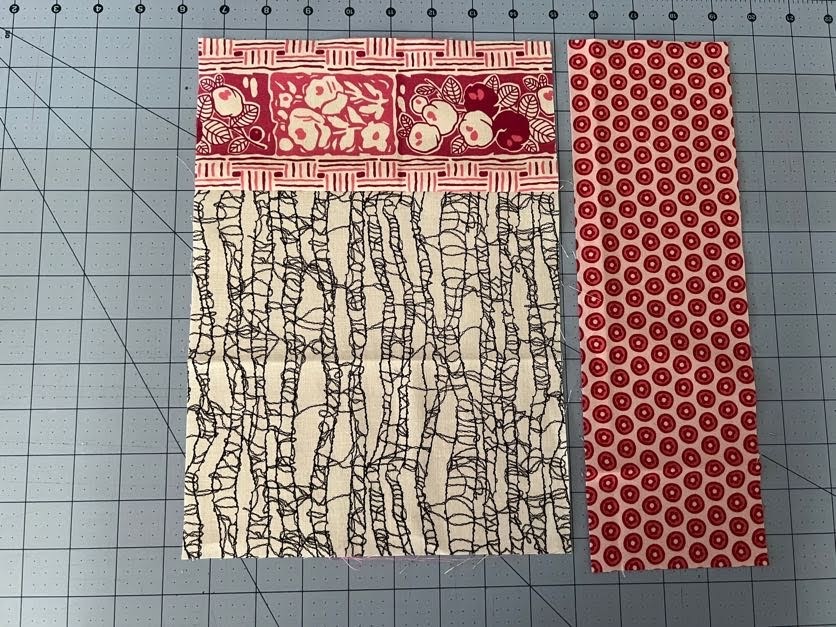
Cut (1) 8.5” square from your center fabric.

Pick out your 4 different fabrics in your color line and cut strips.  

(1) 4" by 8.5"

(2) 4" by 12.5"

(1) 4" by 16.5"

Sew the strips around the center square using a 1/4” seam and trim each strip after you sew it.  The measurements I gave for the strips are oversized so you will need to trim down a bit after sewing. This is expected.


Your block should now measure around 15.5” but don't worry if it doesn't. This block isn't one that has to be exact and a little wonkiness is fine with me.  Press seams as you like.


 Now comes the fun part!  Cut the block in half twice 

(7 3/4” for those who want measurements)


Then turn each piece so that the center square is in each corner. It makes a plus sign pattern in the middle of the block.  (it's ok for one strip fabric to end up in a row/column but if you want to move blocks around go right ahead and play around with the layout)


Sew the 4 pieces together.  Your block should be around 15"

Press the seams as you like.  Don't worry about trimming as I can do that later when assembling the quilt.


Hope you have fun with this quick and easy block!

Thanks, Laurie


Hive 1 Tutorial for October - Plus Sign Blocks for Trishia

 I couldn’t decide which version I liked best, so it’s Choose Your Own Adventure time!


The blocks will go together to make our new living room throw for autumn. All of my living room throws coordinate with a painting my daughter made for me. It’s a copy of Modigliani’s Girl in a Red Party Dress, my favorite painting. So this one will be blues, browns, creams, and low volumes with splashes of warm colors to complement that fiery hair.


Blues: navy, turquoise, teal, dusty blue, cornflower. Please no neon, color crayon blue, or brights. 


Browns: pretty much any shade of brown, even going into dark mustard range. But no creams if they aren’t at least medium value compared to the next group.


Off white, light cream, and/or low volume: these should be mostly low volume and background fabrics. You’ll notice in my sample blocks and fabric pull below that I’m pretty liberal with this. I love florals and unique prints in pinks, bronze, yellow, blues, grays, browns so long as the print reads as background and doesn’t compete with your blue or browns. As much as I love black and white prints, please avoid those for this project. Gray designs are good here, just not black.


For all of these, Solids work. Prints are great! Think nature, autumn, geometric. Please no Christmas/winter, summer (I.e. beach balls or popsicles) or childish prints. I love butterflies, birds, and flowers so any of those you can squeeze in are greatly appreciated. 


Plus Squares Option 1

The base of each block is two nine patch sections. One will have a blue family plus sign. The other brown family plus sign. You can make both or just one.


For each plus sign 9 patch, you will need five (3*3in) squares of the main color family (blues or browns) and four (3*3in) squares of background fabrics plus fabric for the low volume square (more on that later).


For cutting, I like to stack about 5 fabrics aligned on an edge. I cut a clean line then cut another 3 inches away. Both are about 4 inches in length, parallel to one another. Then I fold back the excess fabric carefully leaving the 3in strip so I can cut the other direction to detach it from the main stack of fabric, then cut again 3 inches from that cut to finish the square. 


Basically, I cut 3in squares from 3-5 fabrics at once rather than cutting individual squares as that would take forever. Below, you can see the initial two cuts (3in apart from one another, I made these cuts longer to make it easier for you to see) and the excess fabric carefully folded back so I can make the other two cuts to remove my squares from the fat quarters/fabric scraps. I had one long strip, so I placed that on top of the pile to ensure I’m not cutting that one short. 


Once you have your squares, arrange in a plus sign pattern:


Sew together rows, press top and bottom row in towards the middle square. Press middle row out. Nest seams together and sew rows together. 


Press again. If you like, you can spin the seams where four corners meet. I just learned this technique and love it! 


Partner Squares, if you want


For the other square, you choose! It can be one cut of fabric, a four patch, a nine patch, or even a higher number of squares if you have a bunch of strips of light and low volume fabrics that you want to use up. These squares should end up being 8 inches. If you made both the brown and blue 9 patch, you’ll need two 8in partner squares. OR not, I can add those later. This is really open to what you want to make.


For partner squares, you choose one:

  • Single fabric: 8 inches square OR

  • Four patch: Four squares (4 ¼ inch each) OR

  • Nine patch: nine squares (3 inch each) tip, use the cutting method from the plus squares to make this go faster OR

  • More squares, strips even! If you have smaller squares in background fabrics or even if you want to do 3 strips of 3 inches x 8 inch, I’m okay with that! This throw is meant to be scrappy and a bit uneven so the partner squares don’t have to be 9 patches. 


If you made both the blue and brown 9 patch with partner squares, the final layout has the plus blocks in opposite corners. Sew a plus block to a partner low-volume block. Repeat with the other set. Press. Sew together with the plus blocks on opposite sides so they are kitty corner from one another. Please don’t trim!


(Finished Block Option 1: Both 9 Patch Plus Sign Block version)

Plus Squares Option Two


If you want to do something more modern and improv or if 9 patch blocks just aren’t your thing, you could make a variation of Pam’s Wonky Hashtag block, but you’d only need 2 colored strips and would cut down the middle(ish), sew in the first strip, press, then cut down the middle the other way for the second strip. The big difference besides the number of strips is that they should be straight instead of angled, they just don’t have to be right in the middle of the block if you don’t want. 


I made a version of that with process pics on my Instagram if anyone is interested in going that route. Just email the group and I'll send my link.


I started with 10 inch squares but you could do any size. For the gold my strips were 1.5in and for the blue they were 2in. I’m ok with any square 19 inches or smaller- I plan to use improv log cabin around smaller blocks to get everything to fit together. If one of you has more patience than me, you could even do a bunch of small 4 inch squares with 1 or 3/4 inch strips. Whatever makes you enjoy this month’s block works for me! The variety will make the finished quilt all that much better!


This is a lot of info, hopefully not too much. Please email if you have questions.