
Stash Bee November Block
This month’s block comes by inspiration from Maja Svane @msmajabird when she participated in a quilting bee earlier this year!


(photo credit: @msmajabird)

(photo credit: @msmajabird)
I am looking for ONE 16 1/2” x 16 1/2” strip block from each person. I want to include all the colors in the rainbow, so please choose your favorite
color(s)—the one you have the most of in your stash— and build from there. (I
will make extra blocks in case some colors aren’t represented, so feel free to
choose your favorite, even if it’s already been used!) I would like you to
create an ombré or gradation effect in your block, starting from a deep, rich
color and ending in something light. You may choose to use one, two, or three
colors. I started one of my blocks with a red and ended with yellow. I’d prefer
not to have a lot of solids, but a couple mixed in throughout is fine.
For
my blocks, I just started grabbing colored strips out of my stash bins. They should be about 1" - 2 1/2" wide and at least 17 " long. Are your strips not 17 inches long? No problem! Grab a few colored strips and sew them together until they are at least 17” long!
Each block should contain somewhere between 11 and 14 rows of strips to create a 16 1/2” block.

Each block should contain somewhere between 11 and 14 rows of strips to create a 16 1/2” block.

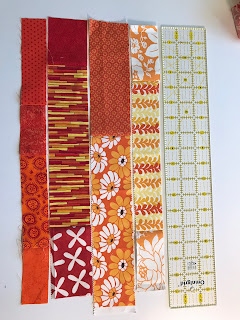
I laid my fabric out in rows and played with color combinations from there. When I found the right gradation I was looking for, I starched and pressed and cut each piece of fabric. I laid them out in strips again to make sure I still liked my layout. (Just to give you an idea, my strips measured about 26” tall and 18" long before sewing them together.)

(unpressed)

I started sewing two strips together from the top and from bottom. I starched and pressed after each seam until I got to the center. I prefer seams to be pressed to the side, but if you are having a hard time keeping them straight (and not wavy), feel free to press them open. Then I was left with sewing the last two pieces together.

I used Flatter to starch each seam as I went, and it made my block lay MUCH flatter and eliminated a wonky, curvy seam, which sometimes occurs when sewing skinny strips together. You can also use Best Press or regular starch if you have it.
This is what my block looked like after all strips were sewn together and I starched and pressed one last time. It’s nice and flat! (Did I say starch enough times in this tutorial???)

I have a huge acrylic ruler that I used to trim my block. If you don’t have one or would prefer not to trim it, just send it to me, and I’d be happy to trim to 16 1/2” square!

Here are four blocks I made as examples of what I am looking for. If you have any questions, please let me know. And make sure you visit @msmajabird and give her some love for her inspiring block!

I've had a wonderful time participating in this bee this year with all of you! Happy sewing in the future and may your bobbin always be full!!!
Becky
1 comment:
very fun block! I will send my block uncut as I don´t have a huge ruler :-)
Post a Comment