
I'm excited to get to know you guys this year. You had a quick overview of me in my intro here a couple of months ago. You can also read my About Me page on my blog if you still want to know more. I've spent the last couple of months preparing for and taking my teacher licensure tests--in fact, my last three are tomorrow (Jan 2.)
This year each queen bee gets to ask a question that you all will answer in your block posts. So hurry up and finish your blocks so we can see everyone's responses =) This month, I think I'd like to know what your favorite home-cooked meal is ... Ready ... GO!!
It's a little difficult for me to narrow this down. My mom cooked dinner just about every night when I was growing up and I enjoy doing the same for my family. My problem is that I have two people with major health issues and one 17yo who has been a vegetarian for about a year now. Ten years ago I would have said lasagna with a big green salad and homemade garlic bread was the best meal ever =) I love anything pasta ... but right now all that comes to mind is a thick, medium-rare steak piled high with grilled onions and mushrooms. I'd round out the meal with a nice scoop of wild rice, asparagus and homemade rolls. Now, in reality, I'd never be able to eat all this in one sitting, but a girl can dream =) On to the fun stuff ...
Tutorial
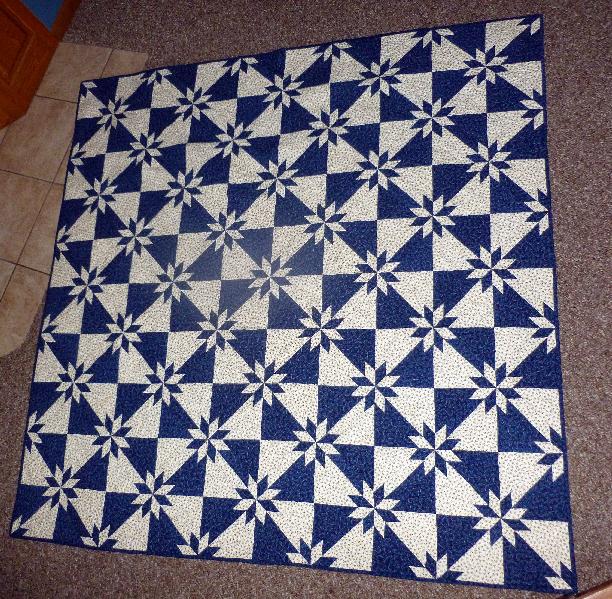
This time, I 've decided to go with a traditional Hunter's Star with a twist. Here are some of my inspiration photos:
 |
| http://media-cache-ak0.pinimg.com/736x/05/e3/5d/05e35dff3c4d593994f30324c8152a58.jpg |
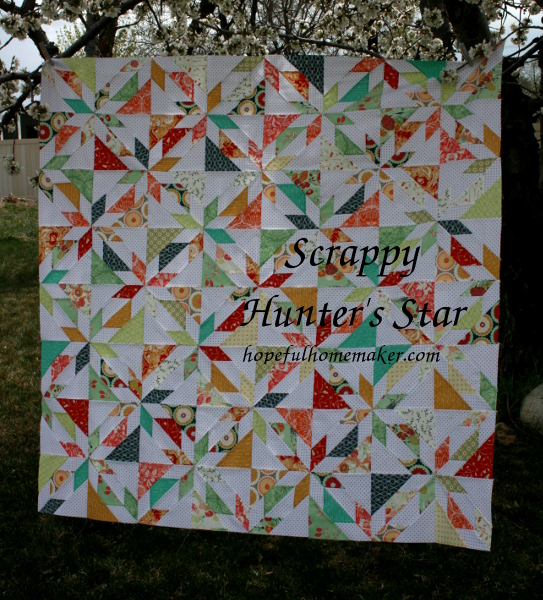 |
| http://hopefulhomemaker.com/2014/04/16/scrappy-hunters-star-tutorial-layer-cake-pattern/ |
 |
| http://patchworksampler.com/?p=1115 |
 |
| http://www.quiltingboard.com/pictures-f5/traditional-hunter-star-quilt-t200360.html |
 |
| http://thefabriccupboard.blogspot.ca/2012/01/hunters-star-quilt-class.html |

The original tutorial is *here* with just a few adjustments. She is using her AcuQuilt machine, but we won't. We will also be making 4 of her blocks as units. Each unit is 8-1/2", so the finished block is 16-1/2". Seams are 1/4".
Since we will be making 4 units of two colors each ... you will need 8 fabrics/colors ... 4 light and 4 dark. From each of the 8 fabrics, you will need to cut:
1 - 4-1/2" square
4- 3-1/2" squares (unless you don't trim your HSTs; then you could probably get away with 3")
Here are the pairs that I chose from my scraps (I made 2 full-size blocks.)

Draw a line diagonally down the center of the light 3-1/2" squares and pair with a coordinating dark square.

Chain piece stitching 1/4" from each side of your drawn line.

Cut each HST apart, cutting directly on your diagonal.

Press open with seams to the darker fabric. Trim each HST to a 2-1/2" square. (I know this is a little wasteful, but I found that my accuracy greatly improved when I started making my HST's a little larger than needed and trimming them down.)

Referring to the images in the "Putting the Blocks Together" section here, assemble the 4 units. I assembled the HST 4-patch corners first, pinning like crazy at each intersection. I pressed the seams open here. (The intersections got bulky when I tried pressing to the dark fabrics.) Then each unit came together as a 4-patch, again pinning at the ends and intersections. Press the seams to the large squares and the final middle seam open again.


Finally, sew together your 4 units, alternating the lights and darks to create the star in the middle. Once again, I used lots of pins and sewed slowly to make sure that the intersections were as clean as possible on the first try.


**Updated 1/5/15: Please have the center star pattern match the picture on the left**
Voila ... all done. I can't wait to see what you come up with. As always, feel free to contact me with any questions. Enjoy!
9 comments:
Fun! I have long wanted to make a hunter's star quilt, so this will give me a taste.
okay!! And we are off and running!! Thanks for a clear tutorial!
I love this block and made a whole row of them last year. It will be fun!
This my time with the Stash Bee. I'm so excited to get started.
Are we making one or two 16" blocks?
You only need to make one, Jan. I always make multiples when I'm doing a tutorial to make sure they're clear.
ALSO LADIES, Carla noticed that I flipped my sample block. ACK! I'm off to testing this AM, but I'll have to unstitch and fix that. SORRY! Thank you Carla for checking up on me =)
I hope I can get the hang of this by my month! What a fun star, I don't think I've ever done that one.
I had mine done and ready to mail, and realized I have them going the wrong direction. Duh!
My favorite home cooked meal is Mac and Cheese. My favorite recipe is the Martha Stewart mac and cheese but I love any mac and cheese.
Post a Comment