


My family and I live in Fort Madison, Iowa - Home of the Fort Madison Bloodhounds - GO HOUNDS! *howl*

I am married to Jim, the one guy in the world who can keep me grounded and calm when I'm flying off the deep end. ;) While I have always said I hated the saying, he truly is my "better half". We were married in August of 2012, second marriages for both of us....and the last for both I might add. ;)

I have a stepdaughter, Laura, age 23, who is expecting a baby girl, Andra Marie Faith, in July - I'm gonna be a 37 year old grandma and I can't wait!

I also have four children from my previous marriage - Austin, 15 who is a very smart and active teenage boy, is looking forward to taking drivers education next month, and just got his braces off and is smiling like never before! :) Emma, my daughter, just turned 14 and recently got her learners driving permit...now everyday when I pick them up from school she's chomping at the bit to drive! :) Nathan is my 12 year old red head who is so flipping smart and I swear has a photographic memory - I keep telling him he needs to be a pharmacist when he grows up but he is adamant about being a video game programmer...and I'm ok with that too, as long as he's happy. :) Marin is my youngest, and is 8, and is the coolest second grader I know. ;) He always has some interesting (and usually funny) tidbit about his day...he's great at making everyone laugh.

We also have two cats - Scooter, who has been with us
forever and a day, who is our protector and growls like a dog at noises and people coming in the door, and who is a spoiled, bratty princess who only likes things on her terms.

Then we have Figaro, who was a shelter kitten that we adopted. He is so funny! He thinks he's so brave but is really a big chicken.
As far as how I got interested in quilting, this is a hard question for me to answer because I'm not really sure. We are huge Iowa Hawkeye fans, and I remember being at a craft store when I was dating my husband and finding some really cool Hawkeye fabric. On a whim, I decided to make a quilt for my oldest son, thinking "I can do this". And so I did.
Oh.


Well, let me start off by saying, my crafty room is in our basement. The beauty of living with a big family is you get to share EVERYTHING. Even in our four bedroom house, there is still no room for me to have a dedicated craft room, so I share my space with my beloved. Many a time one can venture downstairs and hear the saw or sander going on his side, and the sewing machine on my side. I also share my space with the washer and dryer, so often my ironing board becomes a laundry folding table, and the chair becomes a t-shirt holder.
So, as for organization, I have a bookshelf that I covered with fabric that holds a lot of extras, notions, clothing patterns, etc...otherwise, it's kind of a bag here, a bag there, a to-do pile over here and a "what the heck am I gonna do with all of that stuff" pile over there. Then there are the forgotten boxes and bags of fabric that get sorted through occasionally (that my husband just ever-so-lovingly reminded me of). I don't know that I will ever change this "organized mess", because it kind of just works for me....and if it ain't broke...well, you know the saying. :)

I really don't pay much attention to fabric designers. I'm more of a "oh! That's cute!" type of fabric buying gal. If it's a design or a material I love, I buy it, and as a new quilter, I'm still learning, so I don't really have an answer for the question of what I wished I knew when I first started.


.jpg)
AND NOW......YOUR APRIL BLOCK TUTORIAL...
I had a pretty hard time deciding on what I wanted to do for my block. There's so many different styles and techniques out there that I want to try, but something kept me coming back to this one. I like it because it's a little funky, there's so many different ways it can turn out, and there's really no way to mess it up. I tried to capture the steps as clearly as possible, but if you have any questions, please let me know.
This is a block I discovered from a tutorial at reannalilydesigns.com called "Fracture". Considering how I get a little wordy, I am linking her tutorial here for reference as well. Since I'm a nurse, I thought "yeah....I think this is the one"! She does a really great job of explaining how to achieve this block and I'm gonna try to do it justice. Here we go!
First off, there are no stipulations as to what colors to use....whatever makes you happy! I think it'll look fantastic totally scrappy! Usual quarter inch seam allowance and please press your seams open. The finished measurements for this block are pretty much...none. Some blocks will end up squares, some rectangles. I will give you an approximation on sizing I used to create my block, but I will eventually trim everything up to the size and shape that I want the blocks, for they are all going to end up different and I will fit them accordingly when it comes time to piece together. For example, my finished block, when I ended up trimming it all up, ended up being 9.5 x 10.5 rectangle. This will most likely make more sense to you as the tutorial goes on.

Pick out several different scraps with colors/designs you want to use. Again, I have no preference, so they can be solids/designs/light/dark/bright/bold - your choice! I used five different designs/color combinations for my block - you may choose to use more or less. The strips themselves I made to around 18" long so I would have plenty to work with. The width of the strips is your choosing as well. Mine were anywhere from 1 - 2.5 inches in width. Not all were straight cut either, and that's okay too...it just adds to the funkiness!

Lay your strips out in a design you think you will like. And then......

Start sewing the strips together. Right sides together please.

Press seams open. When you are finished sewing your strips together, you'll have something that looks like this. I had some overhang with some of my strips, so I went ahead and just trimmed it up even before starting the next step.

Grab the top of your strip set and start to fold it over, right sides together.

You're gonna wanna make the fold approximately four inches, but to be honest, I just eyeballed it. Remember, there's nothing precise about this, so if it's not four inches, no big deal. :)

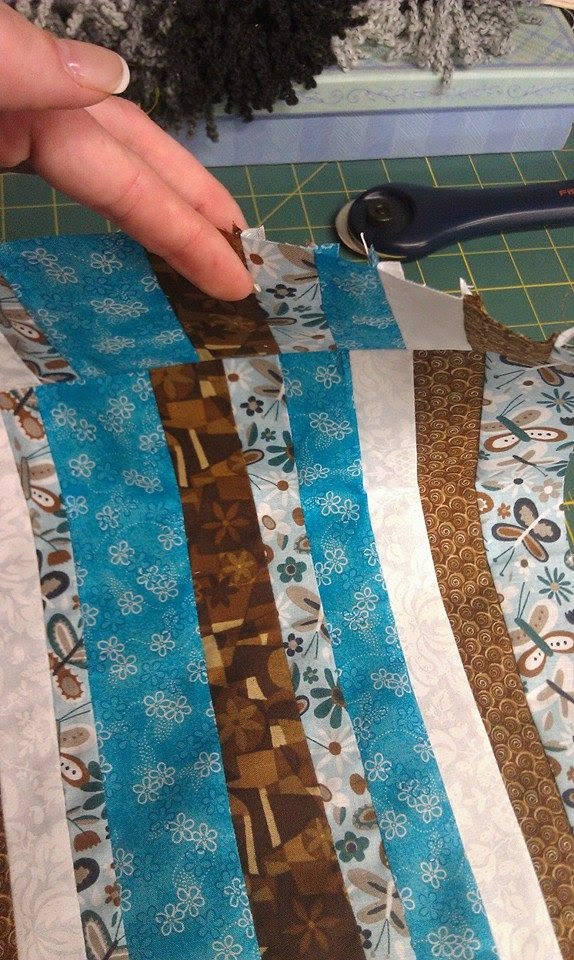
Now, the trick to this fold is to make it an UNEVEN fold. See how it's crooked at the top? That's how we want it to be.

You're gonna take your straight edge and lay it just a smidge below the fold...again, no specific measurement. See where there's just a scant bit showing? That's the part we're going to cut off.

Go ahead and cut that fold off.

Take the piece that you just cut, and while holding BOTH pieces, move the cut piece either slightly to the right, or slightly to the left...your choice. In this pic, I chose to move it to the right.

Then sew the two pieces back together again. You will have some overhang on the end, and that's totally ok. It's going to look like a huge mess when it's almost complete, and that's what we want it to look like.

See? Overhang. No big deal.
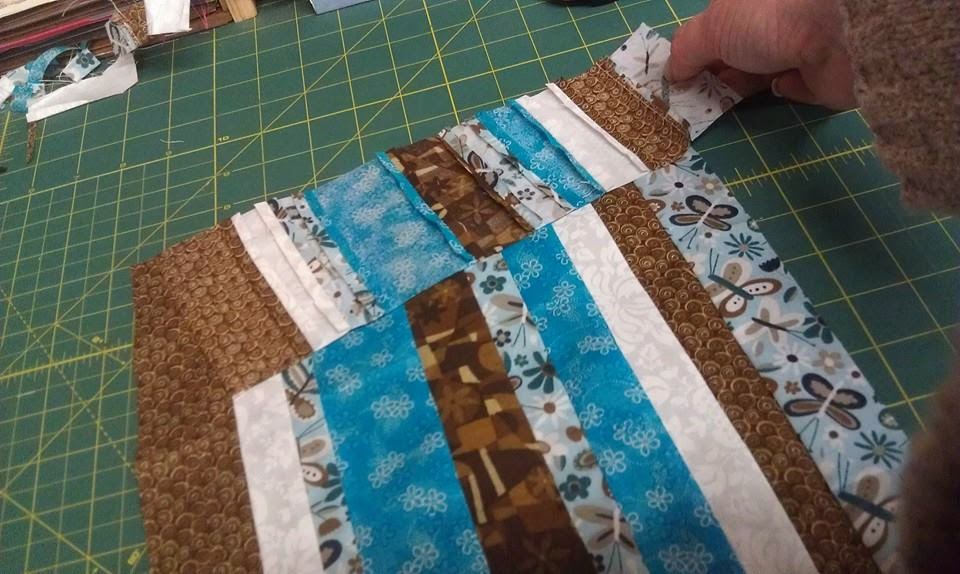
Press your seam open, then lay piece flat again. See how that first piece you sewed back on is off -kilter, or "fractured"? Now, you're gonna do like you did before, make yourself a fold, right sides together, but this time, try to fold the opposite way, like so...


Place your straight edge across the second fold and again cut. Once cut, hold your two pieces, then move the cut piece slightly to the opposite direction of what you did for the first one. (i.e. I pulled mine to the right first, so for this second cut, I pulled to the left). Sew your two pieces together again.

This is what it's going to start looking like on the front as you alternate folding, cutting, and pulling to the left or right. Continue for as many folds as you want.

This is what you should end up with. See how the strips are fractured or broken up? They're also one big uneven mess on the edges and this is PERFECTLY OK! PLEASE NOTE **** THIS IS THE POINT THAT I WANT YOU TO STOP AND SEND THEM TO ME*** I will trim them up accordingly when I receive them. Because there are no true measurements, all of your blocks are going to end up being different sizes, which is what I'm going for. Some may end up being trimmed to 9.5 or 12.5 square and others multiple sizes of rectangles. It will end up a very crazy, broken, "fractured" quilt!

This was my finished block, once I trimmed everything up.
It really is a fairly quick block to do....mine was under an hour. I can't wait to see what you all come up with, and again, if any questions or if I didn't explain myself well, please let me know and I will try to explain better or answer to my best ability!
3 comments:
I'm looking forward to doing this block! I love the way it looks and can't wait to try it. (PS I love your colors on your sample too!)
Ooooh!! I L-O-V-E love this block and I cannot wait to see what this quilt is going to look like! I love the crazy and unusual and thus fits that to al tee!
Lisa
Thanks! Have fun with it!
Post a Comment