
Hive Five - April Block Tutorial

Hi Everyone! Let’s start out with the basic info! I’m
Bonnie and live in Arizona. After
growing up in Pennsylvania, we moved first to Ohio in
’96 then continued further west to AZ in ’99.
Now, after 15 years here, we’re empty nesters! - “yay” – but also “boo” L.
Our daughter, 26, left for college in
New York City and never came back. Our
son, 21, is currently in his third year at ASU only 20 minutes from home but we
treat each other like we are 2000 miles apart!
We know he’ll be leaving Arizona, too.
They both have a love for adventure and hope to save the world.
Obviously, it’s so hard to get those
family pictures because we’re only together only about 3-4 times a year! Here’s a good one. I’m extremely grateful that they still look
forward to hanging out with us for vacations – we are all
skier/snowboarders. But they hang out
with each other as well.


These are things that I love to
do: obviously make everything…. from
bronze sculptures and pottery to copper enameling, baking, welding, painting,
reupholstering, electrical fixes in the house, making shelves from hockey
sticks and mountain biking, skiing, going to the gym, and camping out and
staring at the stars. (yes, I have taken
my sewing machine to a campground with electricity and quilted under the
trees!) I have a problem sitting
still. In fact, I’m typing this in a
camper at night while my husband is sleeping.
Rarely do I go anywhere without bringing some sort of craft like hexies
or knitting.


Ok, I love these pics so I had to
share! When I asked for a sewing machine at 10 years old, no one could teach me.
No one in my family sewed, except a dead great, great, great uncle. I don’t
recall there being any classes back then either. It was a $69 Singer from Sears -- I still have it.
So, I taught myself until I was 12
and had HomeEc in school. After
that, I still teaching myself. The picture on the right was in high school –
1979. I was sewing a lot then because
holes in jeans were not a designer element nor a fashion statement! The patches and inserted bandana fabric I
used became quite popular! Guys in school were dropping their “dungarees” off
at my locker!
Like most sewists, I made a ton of
stuff but I never tried quilting until three years ago. Again, I read and tried
things on my own. Now there are classes
to take, groups to join, people to meet AND AN INTERNET!!
After taking a few courses at my LQS,
I met a wonderful woman who has become my respected mentor. She said, “Don’t forget to break the rules!”
And that’s what I love best – playing
with the quilts and changing it all up. (She also said, “Never put the ironing
board next to the sewing machine – make sure you get up off that chair and move
your “rear”!)

My Stash
My studio started out as a guest
room. I limited myself to half the
closet and half the shelves. That space
was to include all my craft stuff. Well,
that didn’t work out too well. So, obviously,
my guests were becoming limited in the amount of things they could bring as
well as how long they could stay!! Just joking J
As each child left, we gained one
more guest room and I had my “studio” to myself.
Most of my fabric is in the
closet. There is some orphan fabric in
the garage and some extra pieces left from home dec projects stored away. In the last years, I’ve transitioned from
homedec to cottons.
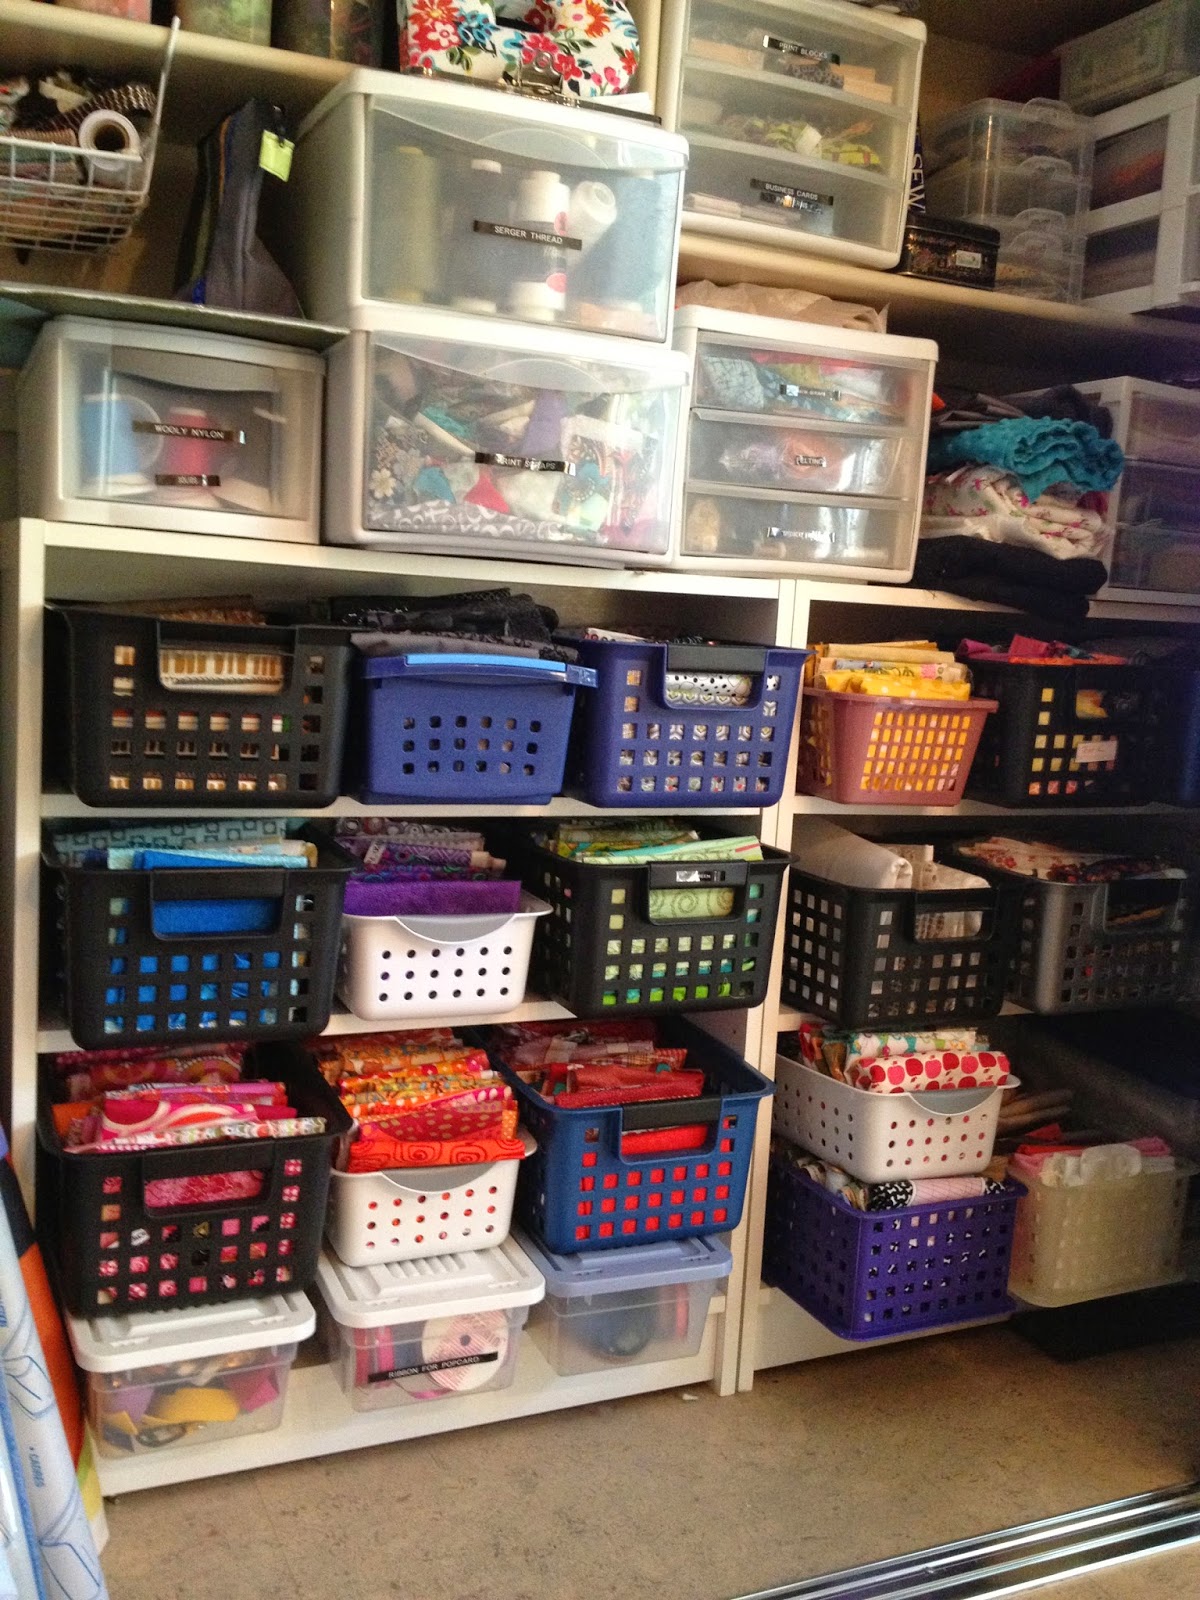

Small scraps are organized by color in old Tupperware. First shelf behind
the “B”.
Medium pieces are in baskets for easy choosing. I love the baskets because I can bring them
out to the table by color and play from there.
Larger pieces are folded on shelves in no order. Except by type. Cottons together.
Misc other fabrics are in the plastic drawers with labels. Bolts of home dec are to the left in the
corner
The other side of the closet has WIPs
and interfacing etc.
Fabric Designers
I don’t have favorite designer. I like contemporary fabrics - not a lover of
vintage or florals unless they are fun and modern. Michael Miller, Kaffe, if I need to
name. Carrie Bloomston is great fun and
local for me in AZ. Generally, I like
fabrics that I can play with. To quote a
very respected quilter: “I like the
fabrics that let ME tell the story”.
What is one thing you have learned that you wish you knew when
you first started quilting? I still would like to find the perfect marking pen/pencil that
will wash out unconditionally. Maybe it hasn’t been invented yet.
Favorite sewing/quilting tool and why should we all go out and
buy it?
One little tool: For hexes and hand
sewing: Clover brand Needle Threader – INDISPOSIBLE!

And my favorite splurge:

Eye Vac
electric dustpan – because I am a thread and fabric “cut & thrower”. Two years ago I replaced the carpeting with
cork because vacuums and threads don't go well together ! (check it out on the internet – my
hairstylist has one in her salon)
Who is your favorite fictional character and why? (Could be from
a book, movie, TV show, etc.)

Eloise – She was a
bit iconic from when I grew up and I have passed it on to my daughter. Eloise, an active child, lived in a NYC hotel
and found herself in quite interesting predicaments all while being totally
innocent, curious, intelligent, adventuresome and comfortable in her
surroundings. She was an independent
dependent. Coincidentally, they did an
updated illustration of Eloise living in Brooklyn now. So does my daughter.
A recent proud moment: Seeing an Instagram of my daughter at an Art
Fair visiting a Bernina booth and making an eyeglass case. She has never sat at my machines and
sewed. There is hope.
-------------------------
and now the tutorial…..

Finally, I picked one!
I can’t tell you how many hours I spent mulling through books and websites
finding the block I wanted! Now that I
have it, I hope you like it. It might
seem boring at first, but when it’s all finished, it will be awesome!
Just to give you an idea, the finished quilt top may end up
here:

Or here:


No, my other rooms are not black and white, too! (ok, one is
mostly beige, lol)
The Block
I was inspired by “Unraveled” by Kati “from the blue
chair”. Here are her two versions:


The tutorial I wrote should be pretty easy to follow. Throughout the tutorial, I’ll pop in with a
few suggestions and comments (I have been told I can get chatty!)
Please read the tutorial before gathering your stuff and
cutting.
The Fabrics

Blacks and whites.
That’s it. (The color of the whites is a really “white-white”.)
Blacks should be shades of blacks and greys without
additional colors. Black on black, black
on grey, grey on black, grey on gray.
Pulling out your long and narrow scraps will be perfect here!
Whites should be white. Not yellowish, not creamy. Again, white on white is good but should you
only have a solid, go with it! If your
stash doesn’t have enough of these, please don’t hesitate to let me know! Don’t go and buy them! That’s not the idea of the “stash” bee, right? I can send a variety of fabrics to you!
As for patterns, I’m more of a modern/contemporary girl
myself. For this block, I prefer to
avoid novelties, calico and word patterns.
The color choice probably limits these kinds of patterns anyway. I guess we are talkin’ blenders for this one.
Maybe blenders with punch!
The Cutting
So, lets talk base fabric.
I started with a fat quarter and cut it to 22” x 13”. The Stash Bee
maximum block size is 16” x 16” but let’s leave this point here for just a
minute until you read through the tutorial…

The Strips
The strips can be cut anywhere from 1” to 1 ½”. Nothing
less than 1” because the ¼” seam allowances will not fold properly on the back
as you will be pressing them toward the strip.
The length of the strips should be about 16” so that they can be set on a
diagonal and then trimmed. If you have
longer strips, you may want to wait to cut them as you make the block – see
ahead. Shorter strips, >13”, can
be used …. but as the angles of the cut increases, you may be a little “too
close for comfort”.

In the picture, note the shorter
one. I didn’t use this one – it was too short for the diagonal.
Putting it all Together
Now is the fun part.
No rules – almost.
First strip
Start at least 2” from the left edge. This will give me a little “play” when
putting your blocks all together.
Pick a spot and using your 24”x 6 ½” ruler (or similar) and
rotary cutter, slice a diagonal line.
Any pleasing angle, just as long as it has an angle and is not completely
vertical and nor parallel to the sides.

Right sides together, pin the edge of one strip to the edge
of the fresh cut white/background piece.
Making sure the ends extend beyond the top and bottom edge of the white base
fabric.
Here is where I started glue basting, or you may pin.
Glue Basting: Thanks to Alyson’s block and its bias cuts, I
have begun to love glue basting! – See the link to Cristy Fincher’s video - http://www.youtube.com/watch?v=P_sGpTZBBc4


(that’s the wrong side up on the bike
fabric!)
If you’re glue basting, glue on very edge then lay your
first strip along the edge as above and press.
Or conventionally pin.
For either method, stitch using ¼” seams and grey/neutral thread.


Press seam allowances toward the strip then trim top and
bottom of strip using straight edge ruler.
Now we need to attach the right side of the new strip to the
remainder of the white base fabric. Remember to allow for the ¼” and off-set
the edges as such: This picture below illustrates
the adjustment when attaching the white base fabric to the right side of the
inserted strip. See the little blue dog ears J


Press second seam allowance toward the strip so that BOTH
seam allowances are facing the strip – (just like we did in the stem of the
Feather block in February!)
Ready for strip number two??

Find your next spot.
The only rule here is that you keep your next cut at least
½” from the right seam of the first strip.
This allows for seam allowance area and a little extra space.
Here we go again:
Repeat the same steps as for the first strip. Cut White, add
strip ….


and press second strip:

Now lets move on…
After we put on a third strip (darker black #3 below), I
decided, “Hey, let’s mix it up a bit!
Let’s overlap!”
This is OPTIONAL! But
I’ll show you how to do it. I laid down
the next strip to see how I liked it
(YOU CAN DO THIS WITH ALL THE STRIPS IF YOU PREFER – checking the
placement, that is.)
So, lay the strip down.
When the strip is in a position you like, place the ruler’s edge at
approximate center of strip. Gently pull
the strip out leaving the ruler in place, then slice!


Following the same piecing/pressing instructions as above -
being careful with the intersections. The
back will look like this, depending on the width of your strips! Cool, eh?

If you decide to cross strips, please only do it once in the
block.
Block Size
The Stash Bee rules call for the block to be no more than 16
½” x 16 ½”. You can stop at that point,
leaving 2” on the right edge and trim (or leave the remainder attached).
If you are having a blast and enjoying this “strip
business”, you can add a few more strips working your way to the end.to the end
– remember to leave that same 2”. I
think 6-7 strips is a comfortable number.
Please leave your block with raw edges. I can trim it to the size once I have them
placed!

 Above: 16” block (with extra
white fabric on the right side) Right: My
finished block
Above: 16” block (with extra
white fabric on the right side) Right: My
finished block
Please get in touch if you have any concerns. This IS my first quilting tutorial, so I expect at least a few!
Thank you so much!
Bonnie
**and a special thank you to my son who rescued me (via phone) from tearing my hair out after I lost all these pictures while posting!!!
**and a special thank you to my son who rescued me (via phone) from tearing my hair out after I lost all these pictures while posting!!!
4 comments:
What a lovely family you have! <3
I really love the block you've chosen, I've wanted to make something like that for a long time and I'm thrilled to try it out! =D
Maria,
Thank you!! So glad you like the block!! I know it's a little less complicated and challenging as some others, but I thought it would be something different. I'm all about the "different"! Enjoy!
That quilter friend of yours sounds pretty smart! :)
Love this block and so glad you chose it for our bee. It's a great modern design (and improv, my fave!!) Can't wait to see what your hive sends you!
Post a Comment